Bright pictures with mushrooms, a story about each mushroom and coloring pages with mushrooms. When exploring the wonderful world of the surrounding nature, do not forget to tell children about mushrooms in more detail -
unique inhabitants of the natural world, occupying a middle position between the animal and plant kingdoms.
Lesson on the topic "Mushrooms" - we think, we reason, we learn
If you ask the kids which group fungi belong to, they will no doubt answer - to plants.
The following arguments can be given as evidence:
- immobile lifestyle;
- passive nutrition (substances dissolved in water).
This is where you can surprise them by telling them that the fungus cell in its structure is more like an animal cell - for example, a beetle or a scorpion, as it is covered with a chitinous (shell) shell. In addition, mushrooms cannot produce their own nutrients under the influence of sunlight, as plants do, which means that this is also a hallmark.
Ask the children: where most often in the forest can you find a mushroom? Of course, under a tree. It is not for nothing that many mushrooms got their names from the names of their best friends - the trees under which they grow (under-aspen, under-birch). And what explains such a neighborhood? Just because fungi cannot provide themselves with all the necessary substances, as plants do. Therefore, many of them try to be friends with trees in order to receive through their roots those products that they lack.
We are thinking about what large groups all mushrooms are divided into? Of course, mushrooms are edible and mushrooms are not edible.

Let the children remember the most famous representatives of each group, and you help them by arming yourself with photographic cards depicting mushrooms in advance.
For better assimilation and greater clarity, on a board or table, fasten cards with the name of the group: “Edible mushrooms” and “Not edible mushrooms”. Send each picture after discussion to the appropriate group. At the same time, twin mushrooms are best studied in parallel, this will teach kids to be careful in the process of collecting them.
In the study of edible mushrooms, the video presentation "Edible mushrooms" will help you:
Mushroom cards
As a rule, children know the following types:
Champignon. This mushroom is specially grown in greenhouses, since, unlike many of its counterparts, it does not need to be near trees. What two distinguishing features of champignon should be remembered? The first is the pink or dark brown color of the plates under the cap. The second is a reddish or yellow hue of the pulp of the mushroom. And, of course, you need to remember the unique aroma of this mushroom, which cannot be confused with anything if you inhale at least once.

Immediately remember what is the name of the twin of this noble mushroom? Of course, a pale toadstool. We examine its image, looking for distinctive features. The most observant will be able to note:
- white color of the plates under the cap;
- the presence of a specific sac at the base of the stem of the fungus.
We add that the flesh of the pale grebe on the cut always remains pale, for which this mushroom got its name.

Russula. This mushroom is distinguished by the brightness and variety of colors of its cap. It differs from grebes in its thick stalk, fleshy cap, and fragile flesh. And it owes its name to the fact that it does not require long-term cooking, as it does not contain harmful substances.

Boletus. One of the brightest representatives of the union of mushrooms with trees. It is distinguished by the unusual (mottled) color of its legs and the tubular structure of the cap.

Boletus. From its name it can be seen that this mushroom is especially friendly with aspen. And his cap is bright red, the same as aspen leaves in autumn.

Ryzhik differs from other mushrooms not only in its color, but also in the fact that its cut acquires a blue tint over time.

Honey mushrooms. Friendly mushrooms that grow on the stumps of felled or dead trees. One of the latest mushrooms, appear only at the beginning of autumn.

Oily. Unusual mushrooms growing in coniferous forests. Their cap is covered with a layer of oily liquid, for which they got their name.

Breast. Everyone's favorite, the king of salted mushrooms. It has an unusual shape and a short leg. It occurs in two forms - wet (its surface is fringed and slightly moist) and dry - with a smooth hat.

White mushroom, boletus. A noble representative of his kind. The owner of a very thick, fleshy light leg and cap with a tubular bottom structure.

Chanterelles. Unusual red mushrooms, in which the leg smoothly turns into a hat with a wavy edge.

Speaking of chanterelles, you immediately need to remember their dangerous counterpart - false chanterelles, and pay attention to their differences from real ones: an unpleasant smell, bright color (with a reddish tint), smooth edges of the cap.
We immediately recall the most famous non-edible mushroom -. We are discussing where this name could come from. The children remember the fact that the fly agaric is very dangerous for various insects, and our ancestors laid out its mushrooms on the windows so that flies would not fly into the house.

Every kid knows what this mushroom looks like, its color is so unique. Children will also be interested to know that the fly agaric hat can be not only red, but also brown or yellow.
And finally, let's remember another unusual representative of the mushroom kingdom - truffle. This delicacy mushroom grows in deciduous forests, and under a layer of earth. Therefore, various methods are used to extract it. Pigs and specially trained dogs find truffles especially well.

For greater clarity, we use a poster depicting all common edible and non-edible mushrooms, among which we find friends, and we also study previously unseen mushrooms.

Through the poster, on which the images of mushrooms are drawn, we smoothly move on to the next, reinforcing part of the lesson - pictures with mushrooms. Some of them display the main features of each mushroom, making it recognizable. On others, we see the general contours of mushrooms. You can offer kids riddles or poems about mushrooms that fit the pictures.
A picture for children mushroom (poems about mushrooms, riddles about mushrooms) are used to consolidate knowledge of the names of the main parts of the mushroom; with the help of them, we are trying to remember how and in what parts, as well as the characteristic place of their habitat, those mushrooms that we studied today differ from each other.
Riddles about mushrooms
For example, you can offer such rhymes and riddles:
My hat -
Where the needles are.
Shines in the sun
Slides in the hands. (oiler)
With a thick leg, small,
He hid in the moss ... (boletus).
If I get into the basket -
You will have a supply for the winter.
I taste very good!
Guessed? This is ... (breast).
Lead a friendly round dance
Red sisters.
Everyone will immediately understand:
In front of him ... (chanterelles).
He sits bravely on a stump
Bunch of brave guys.
Everyone can easily recognize them:
Who doesn't know about .... (again)?
All shades and colors
Those mushroom caps.
Collect them without haste
Very fragile ... (russula).
Look at the video riddles about mushrooms:
As the end of the lesson, in order to include motor memory in the work, in the final part we offer the kids to work with coloring. Coloring mushroom sets the kids in a calm way.
Coloring pages with mushrooms


At the end of the work, you need to consider all the results and even make an impromptu exhibition of mushrooms painted in bright colors.
Presentation "mushrooms for children" on video:
Pictures with mushrooms


Someone may find pictures with funny house mushrooms useful.

All mushrooms are divided into two categories: edible and inedible. How to draw a mushroom? The form largely depends on its variety. A mushroom is not always a familiar leg with a hat attached on top, because they come in the form of a fan, hoof, star, ball, bowl, and even coral. Among the edible most often found: milk mushrooms, chanterelles, russula, boletus and white. And a fly agaric and a pale grebe are considered a bright representative of poisonous ones.
 Porcini |
 inedible |
 Children's example |
 fly agaric |
 Chanterelles |
 Realistic |
Porcini
Let's try to consider the technology of how to draw mushrooms in stages. Let's take a pencil and with a slight movement of the hand make the boundaries of the earth, using curves and lines for this. In the middle of the sheet, we begin to draw a leg. It consists of two parts: the lower one is wide, which expands slightly towards the root, and the upper one with a skirt narrows upwards. The leg should take up one third of the sheet. Let's move on to the hat: the upper part resembles the outlines of an umbrella, but with jagged edges, and closer to the foreground you need to make two notches.

Now you need to take a pencil with a harder lead and draw all the lines, adding individual strokes. So, you will have to draw a few grains of sand on the ground, and draw three small and two large circles on the hat. We make notches in the form of a cracked part of the mushroom, shading it in the middle.

To give volume to the image, it is necessary to add chiaroscuro in the right places. So, in front of the mushroom, to the left and a little behind, we make out a small shadow zone, since the main part will be located to the right of the mushroom. We darken the leg with horizontal strokes (they are parallel, but slightly beveled at an angle) to the left and in front of the border of the skirt and hat. In the upper part, chiaroscuro is needed on the left and along the edges of the hat skirt.
inedible mushrooms
Having practiced on a simple and familiar image of a mushroom, you can move on to group composition and consider how to draw a mushroom with a pencil in a complex and step-by-step technology. We conditionally divide the worksheet into three parts, and start drawing from the middle one. We draw two vertical lines, which are located slightly at an angle so that the straight lines diverge upward. Under these skeletons of future mushrooms we draw small horizontal lines. All movements should be smooth so that the pattern is barely visible.

We set the borders of the caps: for the larger line we make a wide surface, and for the smaller one - a rounded one.

We draw up all the elements in more detail. For this, the movements must be smooth and zigzag.

Let's move on to the design of the surface of the earth. Near the legs we finish the blades of grass, and in front of the large mushroom we lower the leaf.

Now we change the pencil to a harder one and draw boundaries, increasing the number of blades of grass.

Let's move on to the hats: on each you need to make a lot of circles (regular and irregular shapes) so that they cover the entire surface.

After that, you need to draw the legs of the mushrooms: add two or three vertical strokes to the left and right of the border, not forgetting to draw a few in the center. Draw the veins of the leaf.

We work with grass. It is necessary to make it voluminous and increase the number of small elements.

The next step is the volume of the hat. To do this, it is necessary to circle each circle along the contour again, adding chiaroscuro in different places.

The last step is coloring. Using the fine hatching technique, go through all the elements of the composition and shade. It should be remembered that the hat should be the darkest zone, the grass a little lighter and the lightest - the lower part and leaf.
Children's version of the mushroom
Not everyone will immediately be able to repeat the complex technology, so parents need to be told how to draw a mushroom for a child. We start with the hat. It should be wide and high.

From the middle part of the bottom of the cap we draw two borders of a thick leg.

In the background, add the border of the hat skirt.

To the left of the mushroom, draw the bottom of a small mushroom, directing the curves to the left.

We do the same on the other side of the mushroom, drawing the lines a little longer.

We put on the left the same hat as that of a large mushroom.

For the right element, we draw only half of the surface, since it is hidden behind a large mushroom.

In the foreground, we draw the border of the tooth-like grass.

It remains to decorate the drawing. The grass is green, the legs are pale yellow, the hats are red, but with white circles. A family of fly agaric came out.

Trio of poisonous fly agarics
Now you can carefully study how to draw a fly agaric. We start the work with two mushrooms of different sizes, tilting them in opposite directions so that there is an empty space between them. Thin legs with skirts and hats in the shape of triangles.

In the background between them we draw a long leg, bringing it high above them. Almost near the hat itself, we finish drawing the skirt. The top of the mushroom looks like a flat plate.

For a large fly agaric, you need to make a high hat, pulling it up in the form of a triangle.

Coloring the composition. It is better to do this with colored pencils: we make the edges of the mushroom brown, the middle of the legs and the bottom of the skirt of a large hat are light brown, the hats are red with white circles. Draw long and narrow grass at the bottom.
yellow fox
It's time to consider the technology of creating a completely different mushroom, the cap of which has a different shape. So, how to draw a fox? With a slight movement of the pencil, draw the outlines of the future mushroom. First, a horizontal line, in the middle of which the leg skeleton passes in the form of a curve. Now it needs to be limited on both sides by two more oblique lines, which will show the size of the bottom element. Further, from the last element we take aside two curves that create the shape of a bowl. We finish the upper rim of the hat in the form of a compressed circle.

Near the root we draw a piece of grass with sharp teeth. From the end of the leg, we draw several curves along the bottom of the cap to its border.

We circle the mushroom with a dark brown pencil, painting it with a brown tint, leaving areas for a light shade in some places. We paint over the grass with green, framing it with a dark tint, and let separate highlights of light green color over the blades of grass.
White mushroom (difficult option)
The next master class will tell you how to draw a white mushroom with a pencil in the most realistic way. We start with the skeleton: the horizontal line is the surface of the earth, the vertical line is the middle of the leg, half the circle is the hat.

We draw a leg, keeping the vertical strictly in the center. It should be wider at the bottom, tapering at the top. We make the top of the hat with humps, lengthening the lower part.

On the hat we draw circles of different sizes. We make out the lower part of the skirt in the form of notches, duplicating one more layer a little lower. We make a few strokes on the stem, and near the root we draw the borders of blades of grass.

We draw lines, leaving small strokes intact.

All over the mushroom we add groups of strokes, on the stem we draw only vertical single ones. We draw blades of grass in more detail.

To create a realistic hat, draw horizontal semicircles over its entire surface, interrupting them in the central part.

We do the same with the leg, but the lines should not be directed horizontally, but vertically.

Using the technology of small hatching at different angles, we draw the area of grass and leaves.

Now we need to add small dots all over the surface.

The last step is hatching in the opposite direction. On the hat we draw it vertically, and on the leg horizontally.
The article describes in detail the process of drawing mushrooms with a pencil. It will interest those people who are fond of drawing or just dream of learning how to draw. Also, this master class will be useful to parents who want to captivate their children with drawing, teach them how to draw.
Many inexperienced artists think about how to draw mushrooms. To correctly draw mushrooms with a pencil and then color them, you can look at the beautiful and clear photographs that can be found in encyclopedias and educational magazines. And you can draw mushrooms in the forest from nature, if possible. In nature, it is most convenient to make sketches with a simple pencil or pen, and you can color them at home.
Before you draw a mushroom, you need to prepare:
1. Liner;
2. Pencil;
3. Pencils of various shades;
4. Eraser;
5. Album sheet.

It is better to draw mushrooms in stages:
1. Draw the legs of three mushrooms and a line indicating the ground.

2. Sketch mushroom caps. So far, mushrooms look like hammers, but this is only a sketch, later the drawing will become more realistic.
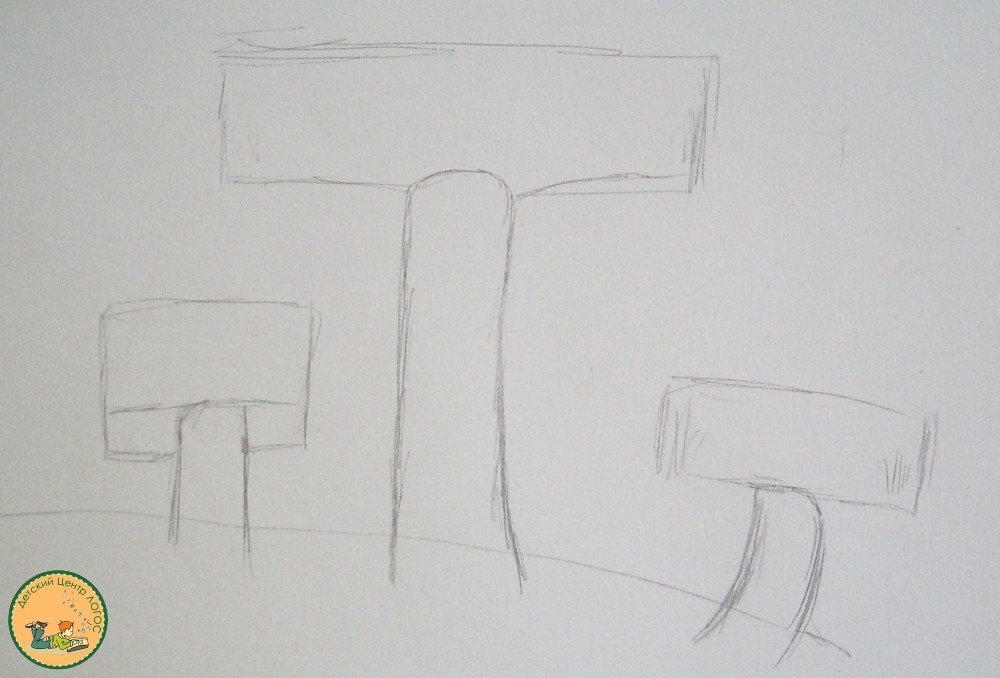
3. Draw the hat of the extreme fungus.
4. Draw the bottom of the large mushroom cap.

5. Draw the top of the mushroom cap.

6. Draw the hat of the last fungus.

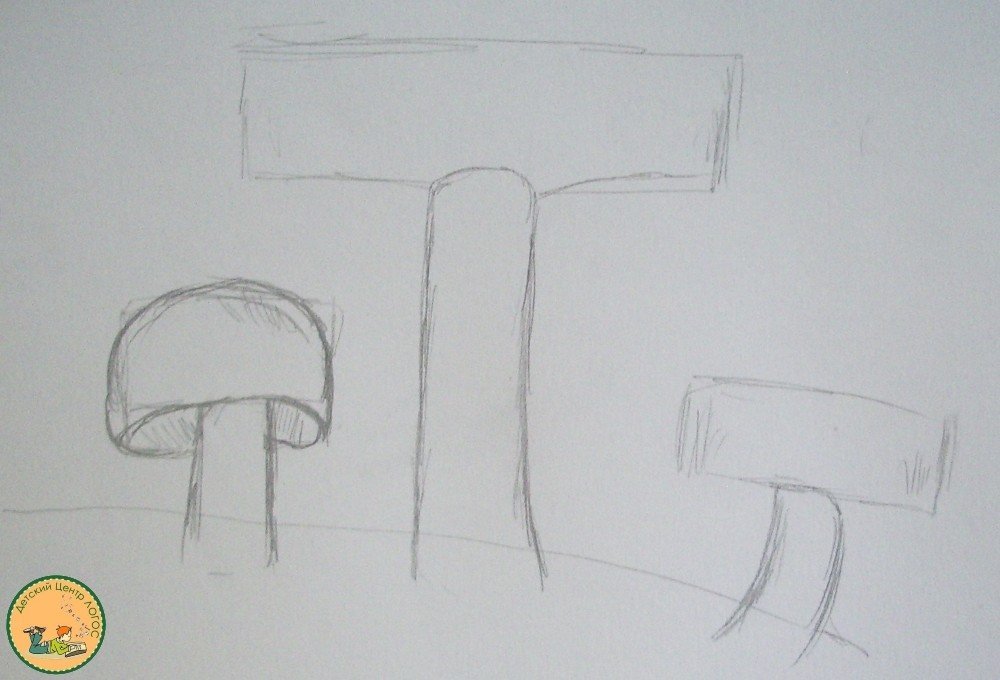
7. Draw blades of grass and a leaf lying on the hat of one of the mushrooms.

8. Outline the image with a liner.

9. Use an eraser to remove the pencil sketch.

10. Color the cap and fungus of the little mushroom. When coloring and drawing mushrooms, consider the features of their structure. For example, in this case, russula are depicted, the hats of which come in different shades. Caps of porcini mushrooms can be painted brown, and not yellow or red. And fly agarics, for example, have a characteristic “skirt” on the leg.

11. Color the cap of a large mushroom using yellow, brown and red tones of pencils.

12. Stroke the bottom of the mushroom cap and its leg with gray and brown pencils.

13. Color the third mushroom with the same colors as the big one.

14. Grass, as well as a leaf, paint over with a green pencil.

The drawing of wild mushrooms is ready. It will also not be difficult for children to draw mushrooms, especially if their parents help them. Kids will surely like to paint mushrooms not only with pencils, but also with felt-tip pens or paints.

We invite you and your children to to our School of Painting "Art People Project"!
Speech therapy classes with children are much more productive if you use special visual material. This is especially necessary to do when the baby's personal experience (on the topic under discussion) is not too great. For example, preschoolers rarely see mushrooms, they have vague ideas about their different types, therefore, high-quality images of these “forest gifts” allow not only to develop children's speech, but also significantly enrich knowledge about the world around them, nature.
If you want to use pictures of mushrooms for activities with children, then you should consider a few rules for their use:
- Give the child the opportunity to take a good look, study new images in each drawing, and only then use them for developmental exercises or games.
- Pay attention to the quality of the pictures. It is best to use special speech therapy illustration sets produced for kindergarten, but you can also take realistic images from the Internet or use photographs.
- Be sure to select a variety of handouts - both subject pictures and plot pictures. The first ones are small cards with single images of mushrooms, and the second ones are illustrations of a real (hedgehog with mushrooms) or fabulous (a series of pictures Under the mushroom) situation on the topic. For the development of the speech of preschoolers, both types of visual material are necessary.
- Any illustration for classes should be made in a realistic manner, exactly repeating all the elements of the external structure of an object.
- It is most convenient to use cards with names that older preschoolers can read for themselves.
- Images of mushrooms on a transparent background greatly expand the possibilities of using them when compiling stories.
Cards by Glen Doman on the topic “Mushrooms”:


Tasks
There are so many representatives of this natural kingdom that each species allows you to offer the child special tasks. To do this, of course, you need to choose suitable pictures with mushrooms for children, as close as possible to natural ones.
Russula
- What color are the caps of these mushrooms?
- Explain what their name says?
- Count: one honey agaric - two honey agarics - three ...
- Think and tell why honey mushrooms are often called "friendly"?

- Compare fox and fox. How does a chanterelle mushroom look like a red beast?
- What fox can be seen in the kitchen? (fried, boiled, pickled, dried, salted, fresh)
- Where does the boletus like to grow the most? What tree "gave" him his name?
- How can you call a grove in which only aspen mushrooms grow? (aspen, aspen)

boletus
- What happens if you uproot mushrooms, and not cut with a knife? Why can't this be done?
- In what forest can you most often find a boletus (in a birch grove, in a birch forest).
Borovik (white mushroom)
- Describe the appearance of a boletus.
- Explain why it is also called "white"?
- Can someone hide under a mushroom if it has grown very large?

- Why can't you pick fly agarics?
- What other inedible mushrooms do you know?
Death cap
- Tell us about what poisonous mushrooms are and why pale grebes are considered so dangerous to people?
- Why is no one picking up harmful mushrooms?

Games
Different pictures of mushrooms for children allow you to conduct many kinds of speech therapy games. Here are some examples:
- We collect mushrooms
Each player chooses one picture with a mushroom and tries to describe its external features. If the other player guessed correctly, then the card goes to him. The one with the most pictures wins.
- How are we similar?
An adult chooses two cards (boletus-boletus, white-butter, russula-fly agaric) and invites children to see as many differences between them as possible. The one who gives the answer last wins.
- Cheerful chefs
Invite the children to “cook” a meal of various edible mushrooms they know. Everyone must choose one picture and name a dish that can be cooked with certain mushrooms (for example: porcini mushroom soup, pickled butter, boletus in sour cream, salted milk mushrooms, etc.
- Oh, what a honey agaric we have!
The image of any mushroom is transferred from one player to another. Everyone names one of its signs, distinctive features of the external structure. The winner is the participant who can see and name some detail last.
- Tales from storytellers
Ask each player to choose one specially selected mushroom picture for children. Then everyone has to come up with a short story about their character. Tell about his character, habits, occupations. For example, Borovik is the king of all mushrooms in the forest, he is strict and important, busy with state affairs from morning to evening, loves to play football and play the balalaika. Older preschoolers can be invited to come up with (in a circle) a whole story about the mushroom kingdom, you can also draw illustrations for the fairy tale together.
- Mosaic: find a piece
Make cut-out pictures from the cards and invite the child to collect them. You can use drawings of poisonous and edible mushrooms for this game.
- full basket
Invite the child to select a few cards (he will need a small basket for this), memorize them well and repeat all the names by heart without looking into the basket again. Each player can try to become a mushroom picker by collecting their own set of cards.


Puzzles
With children it is very useful to learn riddles on a chosen topic. This helps not only to train the memory, attention of a preschooler, but also significantly increases his vocabulary, and also allows you to automate difficult sounds. Here is a selection of suitable riddles called Basket of Mushrooms for Toddlers:


coloring pages
Coloring drawings is very important for the development of fine motor skills of the baby, for his speech development. Younger preschoolers need to be offered larger, simple outline images of the most famous mushrooms (white, fly agaric), and for older children it would be more correct to select drawings with miniature mushrooms, chanterelles, and russula. Make sure that children do the work only with pencils, it is this condition that provides the value of coloring.
Hello! We present you a new drawing lesson in which we will tell you how to draw mushrooms. This lesson is very simple, and therefore we will rather talk about how to draw mushrooms for children. We specifically make such a reservation in some lessons, which consist of a small number of steps and are drawn much easier than the bulk of drawing lessons with .
By the way, we also have a more advanced one - it is very realistic, with texture rendering and complex shadows. Well, today we draw a very simple one for children and very beginner artists, let's start!
Step 1
First, outline the caps of each mushroom. The top one is the largest, it looks like a roof, under which the other two hats are located. We follow the shape of the hats, we try to copy from our sample.

Step 2
First, let's deal with the largest hat. We will draw the inner part with it, marking a curving line inside the already finished contour. Then we will draw a leg to the central mushroom and two small ones. In the last two cases, the legs are more rounded.

Step 3
We turn over all the previously drawn external contours, draw the border of the hat of the central mushroom.

Step 4
The final step is to draw spots on the hats (ordinary ovals), and also outline smooth lines on the inside of the hat.
It was a drawing lesson on how to draw mushrooms with a pencil for. Good luck!


