Experiences like growing your own crystal will make you feel like a jack-of-all-trades—you'll learn how to make beautiful home decorations, sweet candies, and help your kids learn the basics of chemistry.
Use of crystals
Such an idea how to grow a crystal- this is a great opportunity to study the chemical properties of different substances. If you have children at home, be sure to challenge them to grow a crystal at home - not without your help, of course. It will be interesting for the children to observe the progress of work, comprehending chemical science in such an exciting way.
Some experiments will also help you get decorative details to decorate individual compositions - for example, salt crystals can be excellent decorating materials.
However, it must be remembered that many of the materials used are extremely poisonous - they should not be touched by hands or inhaled vapors. Such substances are unsuitable for use in everyday life - they can only be used for experiments.
Growing crystals can be chosen as a hobby, an exciting activity, because in fact the creator never knows what kind of crystal will turn out in the end.
Types of chemicals
At home, you can grow a crystal from a variety of substances. Some of them require special processing: you can work with them only under certain conditions - at a special temperature, lighting, etc. These include the following materials:
- Mohr's salt;
- blood salt;
- various alums;
- nickel sulfate;
- ammonium nitrate.

If you are just starting out with how to grow a crystal at home, it is better to postpone using them.
However, many work mixes, such as table salt, can be found in any home. With them, it is recommended to start work for beginners.
Salt
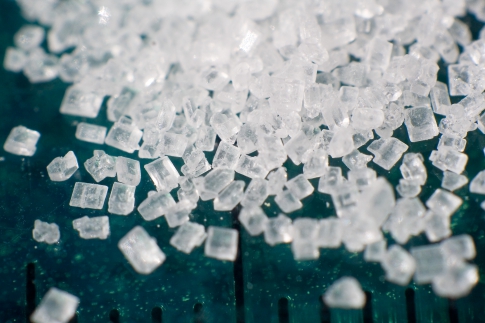
There is nothing easier than growing salt crystals at home!

You do not need to use any special accessories or set up a supernatural workplace to work with this product.
blue vitriol
Another easy option. Before growing a crystal from copper sulfate, the substance can be bought at an amateur gardener's store - it is sold as a fertilizer.

From the master classes below, you will understand that working with vitriol is as easy as growing a crystal from salt. The only difference is that the mixture is an active saturated salt substance, so it is undesirable to conduct experiments using running or any other water - only distilled water, which you can find in a pharmacy, is suitable.
Sugar
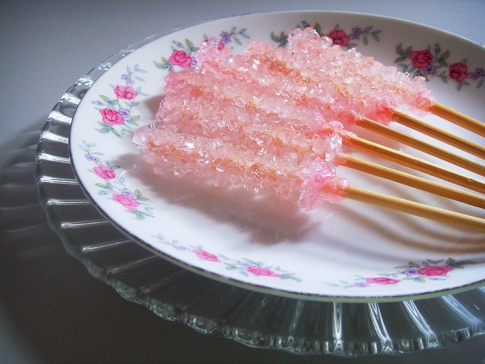
The only substance that can be eaten after the experience! Experiments with sugar are completely harmless, so you can safely teach your children how to grow a crystal, using his example.
The result should be delicious sugar candies in the form of frosty crystals - an original replacement for cockerels on a stick.
Safety regulations
Despite the fact that novice chemists use mostly familiar solutions, such as salt or sugar, everyone must follow certain precautions - the instructions are presented below.
- Allocate special dishes for experiments, from which you will not eat in the future. Neglect of this point can lead to serious food poisoning.
- Each substance must be stored in a separate, hermetically sealed package with a mandatory signature of the contents on the bottle. Keep substances out of the reach of children and pets, in a cool and dark place.
- Use protective clothing and gloves.
- Work with chemicals that emit vapors into the air should be carried out only near powerful hoods.
- If acid gets on the skin, it is imperative to sprinkle the place with a weak alkali (water diluted with baking soda) and vice versa - alkaline solutions are easy to neutralize with an acid like citric acid.

Such skills are very useful when working with dangerous chemicals. Over time, you will bring the implementation of this instruction to automaticity and will not worry when you want to use dangerous mixtures instead of ordinary salt or soda to grow a crystal.
salt crystals at home
After the theoretical advice, you can move on to the part where you will learn how to grow a crystal from salt. Prepare water in unlimited quantities - it is better to use distilled water (purified from any additives) so that the substance does not react with any impurities. However, ordinary running water will do.
In addition, you will need a small saucepan, a glass container (jar, glass), silk thread, a pack of salt.
- Place a saucepan of water over medium heat. Heat the water, but do not bring to a boil.
- In small portions, start pouring salt into the water, stirring constantly. Each time pour a new handful after the previous one is completely dissolved.
- The preparation of the solution ends when the salt has completely ceased to dissolve in water - this means that you have prepared a concentrated mixture.
- Pour the concentrated composition into a transparent glass container and leave to settle for about a day.

- Free time is necessary for all the smallest, undissolved particles to settle to the bottom. In the photo you can see how the salt precipitate is obtained.

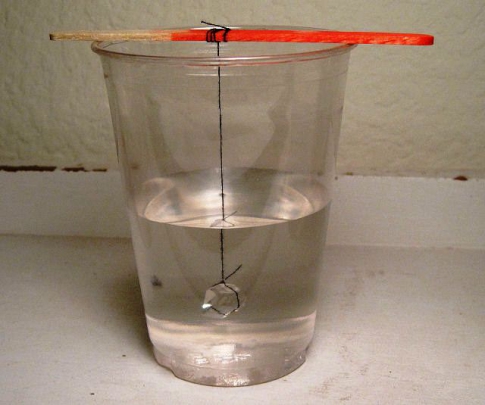
- Take a thread or string, tie it around a long thin stick that you can put on the neck of a glass container.

- The length of the lace should be less than the height of the vessel, so cut off the excess.

- Lower the string into the water in a suspended state so that it does not touch the walls of the jar and the sediment at the bottom.

- Leave the experiment in this state for 1-3 weeks.

- After a couple of days, you will notice an increase in small crystals on the thread. Experience in this case is interesting just by observing how much the crystal grows over a certain period of time.

- Instead of an ordinary thread, you can lower a large piece of salt suspended on a thread into a glass. In this case, the substance will grow around it.
You can either grow a crystal of a certain shape, or an arbitrary one. To control the appearance of the substance, apply a thin layer of grease or petroleum jelly to one side of the crystal - you will see that there will be no growth here.
If desired, salt can be replaced with other substances - for example, it is easy to prepare crystals from soda or copper sulphate using the same technology.
How to grow a crystal from sugar?
If you set a goal to learn how to grow a crystal from sugar, you will be pleasantly surprised by the result - beautiful sweet candies that will delight children and pleasantly surprise adults during tea drinking. An interesting use for them is to stir tea with them. So you get both a stir stick and a sugar sweetener.
- Prepare a concentrated sugar solution in the same way as in the experiment with salt - the sugar should completely stop dissolving in warm water. After that, pour the hot syrup into a transparent bowl.
- When the solution is ready, start preparing the base sticks. Tie one stick to the other crosswise so that the first is lowered into the bowl, and the other is held by its neck.

- Dip the stick in the syrup - it should not touch the bottom.
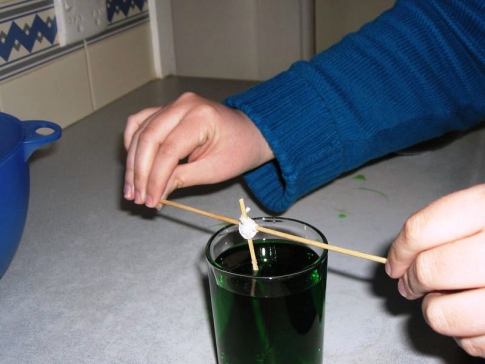
- Leave the structure in a dry and warm place - in a day you will notice how crystals begin to appear in the liquid.

- In about a week, you will have finished sugar skewers. Enjoy your meal!

If you want your lollipop to be colorful, add a little food coloring to each jar as you pour the hot syrup.
Such sweets can be a nice gift for your loved ones for the holidays - you can add such sweet sticks to a present for the New Year or Birthday.
To find out how to grow a crystal from blue vitriol, watch the following video.
Take it, tell your friends!
Read also on our website:
show more
Crystals are a beautiful and unique natural phenomenon that has fascinated mankind for many centuries. However, thanks to science and the research of scientists, today they can be made independently.
Growing crystals is an interesting and exciting activity not only for children, but also for adults.
If you tell your child about the wonderful world of crystals, then he will undoubtedly ask you: “How to make a crystal at home?”
To get such a miracle of nature will be interesting not only for kids, but also for those who have never conducted such experiments at school. Therefore, you can not only catch up, but also instill in your child a love of science.
It is worth noting that any age of the child is suitable for this experiment. The only task for the parent will be the correct and accessible explanation of the formation of crystals. For this fascinating procedure, you can buy a ready-made kit or grow a crystal from improvised materials.
What is needed to grow crystals?
Before making a crystal at home, prepare the following:

It is also worth being patient, as growing crystals requires a lot of time and effort.
Growing crystals from table salt
Many people ask the question: “How to make a crystal out of salt?” Indeed, it can be found in the kitchen of everyone. So why spend money on a more "refined" material when you can use just salt!
As a rule, beginners begin to grow crystals from this material. To do this, you need to prepare a saline solution. Pour a little warm water into a glass dish (you can take a jar or a glass). Add salt until it no longer dissolves, while always stirring the solution. To completely dissolve the salt, it is necessary to maintain a high temperature of the water in the glass as long as possible. Therefore, it can be put in a warm place or placed in a pot of warm water. By the way, if you are interested in how to make a crystal from sugar, then follow the same technique, replacing salt with granulated sugar.
So, the concentrated solution is ready. Now it is necessary to hang a thread on a jumper (for example, a pencil) with a crystal of the same salt attached to its end. It is he who will become the foundation for the birth of our future crystals, which are formed in 5-7 days.

So we figured out how to make a crystal at home from salt.
Growing crystals from vitriol
We have already said that such a natural miracle can be obtained not only from salt. Let's look at how to make a crystal from vitriol.
We want to warn you right away that vitriol is a harmful chemical. Therefore, you need to work with it very carefully. As a rule, this is done with gloves. Never let this product get into your eyes!
The methods for growing crystals from this raw material are very similar to the previous ones. Since vitriol is sulfur-copper salt, instead of table (edible) salt, we add this particular chemical to warm water. Everything else is done in the same way as described above.
The only difference is the color. Crystals from copper sulphate will be dark blue, and from table salt - white.
Crystal figurines
Were you curious to learn how to make a crystal at home? Do you want us to tell you how to make crystal figurines?
There are two such ways. The first involves the preliminary cultivation of crystals of different colors (for example, from vitriol and salt) and their further bonding with glue to obtain one or another figure. It can be a snowman, a cat, and so on. That is, it all depends on your imagination.

And the second method involves making a blank before making a crystal from salt (or from another similar substance). The workpiece is made of wire. The shapes can be different: these are stars, hearts, circles, squares, treble clefs, that is, what you have enough imagination for. After you have made the frame, you need to wrap it with ordinary threads and dip it in saline, then dry it. After drying, small crystals form on the threads. They will be the basis for growing the main crystals. After 5-7 days you will have a beautiful crystallized figure.
Man strives to be on a par with nature in everything. Today he can do a lot. Surrogate motherhood, nano technologies, what can we say about the artificial reconstruction of the structure of minerals. And not in some heavy-duty laboratory, but at home, one might say, on the kitchen table. Yes, yes, today anyone can find out how to grow a crystal, and even easily deal with it.


Crystal at home

Crystal at home
Each of us with this word imagines transparent, large, colorless or bright polyhedrons with brilliant ideal edges. They owe their exceptional qualities to their structure: crystals and amorphous bodies are distinguished by the existence in the internal structure of the first strict crystalline lattice. If we imagine that a person has decreased by a million times and found himself inside a glass cube, then around him he would see a chaotic heap of various molecules. But if you look inside even the smallest crystal, you can see a completely different picture: on different sides, rigidly ordered ranks of molecules, ions or atoms stretch endlessly, which obey the laws of strict symmetry that rule in the world of regular crystals.
To realize how common substances with a crystalline structure are in the surrounding nature, you just need to remember that most rocks are made up of crystals. But the entire crust of the Earth is built precisely from rocks.

Growing crystals is a very exciting thing, and if you do it with children, it is also educational.
And although in creating crystals at home we can equalize with nature, but first, perhaps, it would be worthwhile to familiarize yourself with the rules for growing a crystal from a solution.
Before studying that how to grow a crystal at home, it is important to remember the basic safety rules when experimenting with toxic salts:
- it is impossible to use food utensils during the experiment, since its subsequent use during meals can provoke poisoning of the body;
- you can not eat food at the same time as conducting experiments, which can also cause poisoning;
- it is impossible to use unknown reagents for experiments;
- All chemicals should be stored in sealed containers in a dry, safe place that is out of the reach of small children and animals. On it you need to make an inscription that will inform about the content;
- gloves and protective clothing should be used during the experiments;
- experiments, accompanied by even the smallest release of harmful compounds, must be carried out in laboratory fume hoods;
- If the solution comes into contact with the skin, immediately rinse the area with clean running water. If acid gets on the skin, then you need to treat the body with a weak solution of alkali. And vice versa: when alkali gets on the skin, the affected area is treated with a slightly acidic solution. If the solution gets on the mucous membranes or in the eyes, then you should immediately go to the hospital, and before that, rinse them with water.
After such a briefing, you can begin to work on growing crystalline substances using even the most aggressive components. But it's best to start with absolutely affordable, safe and even pleasant ingredients. The most popular experience how to grow a crystal from sugar.

Children love sugar skewers.
Such crystals are often attached to expensive varieties of tea and look very tasty and beautiful. Yes, so much so that you don’t even want to stir tea with them - it’s a pity! In addition, this wand alone costs about 160 rubles: you must admit, it’s very expensive. But they can be grown much cheaper yourself. So, for one sugar crystal on a stick you will need:
- water - two glasses;
- sugar - five glasses;
- wooden skewers or sticks for mini-skewers;
- thin paper;
- pot;
- transparent cups;
- food coloring if you want to grow a multi-colored crystal.

When you prepare a sweet solution, start preparing "skewers". Tie two twigs together. The first will serve as a “fishing rod”, and the second will serve as a mount.

Place the twigs (or toothpicks) in the syrup and wait.

For,. a week is enough for a sugar crystal to grow.

After the seven-day period, enjoy the sweet.
It all starts with taking a quarter cup of drinking water and a couple of tablespoons of granulated sugar. On fire, sugar is brought to dissolution and syrup is obtained. Then a little sugar crumbles on a piece of paper, the stick is dipped in syrup and crumbles in sugar. You need to make sure that its cubes stick evenly on all sides of the stick, which will make the crystal even. Then several similar sticks are prepared, which are left until they are completely dry so that the saccharins do not crumble when they get into the hot syrup. After all, if this happens, then subsequently the crystal will not have anything to cling to and it will not be able to grow. Therefore, it is better to prepare the sticks ahead of time, for example, in the evening, and leave them to dry overnight. Then a saucepan is taken, water is poured into it - two glasses, and sugar is poured out - two and a half glasses.

As fasteners, you can use clothespins.
The syrup is put on a small fire and, with constant stirring, all the sugar dissolves. The remaining sugar is poured into the resulting syrup - two and a half glasses, and boiled until it is completely dissolved. After turning off the fire, the syrup is left on the stove for another 20 minutes. While it is cooling, sticks are being prepared. Papers are taken and pierced with a skewer. You don’t need to make a hole very wide, because the point is that this piece of paper sits tightly on a skewer.


Then the hot syrup is poured into glasses. It is necessary that it is the hot syrup that is poured, because otherwise the crystals will not grow. If you want to know the way how to grow a crystal at home, and even colored, then everything is simple: a little food coloring is added to the syrup. The workpiece is lowered into the glass, but so that the sugar does not touch its walls and bottom. And the piece of paper in this case is both a holder for a stick and a lid for a cup, which protects the syrup from dust. The same procedure is done with all the remaining blanks: they are placed in glasses and left to grow for about 7 days.

sugar crystals

sugar crystals

sugar crystals


DIY sugar crystals

DIY sugar crystals

DIY sugar crystals

DIY sugar crystals
Children will watch this process with interest, as every day the crystal will increase. But we must be prepared for the fact that they will all grow in different ways: some quickly, while others will need a much longer period of time. But when after a week there are no changes, you will have to repeat everything from the beginning. Most often, beautiful crystals grow in just a week. A few unfinished ones can be left to ripen for the same time. Well, have a delicious tea party! True, such a sugar crystal can simply be absorbed like a lollipop.

sugar crystals

sugar crystals

sugar crystals
One of the easiest ways how to grow salt crystal at home, will require from its performers not only to be smart with the solution, but also to stock up on remarkable patience. So:
For work you will need:
- drinking water
- small saucepan
- transparent glass container (the best option is a jar)
- a pack of table salt
- silk thread.
Water is poured into the pan and put on fire, but it is not brought to a boil: the solution should turn out hot, but not boiling water. After heating the pot with water, salt is poured into it in small portions, while the solution must be constantly stirred. A new portion of salt is added when the previous one has already completely dissolved. The concentration of the solution should be such that grains of salt cease to dissolve in it. For the role of breakfast, the largest of the crystals is selected from the already fully settled brine.
Now the concentrate can be considered ready. It should be poured into a glass jar and let it stand for about a day. This must be done so that small, undissolved particles of salt fall to the bottom. On the second day, you can see many small crystals in the jar. You need to choose the largest of them and get it, and then tie the crystal to a thread or attach it to a wire. This will turn out the seed, the presence of which is important before how to grow salt crystal. Then the solution must be poured into an empty container, but so that small crystals do not fall. When this is not done, the particles of salt crystals will begin to take the substance from the solution on their growth.
Then the seed is lowered into the solution poured separately, and you should be patient. But while the crystal is forming, there are some important tips for growing it. With the rapid cooling of the salt solution, the crystal grows in a minimum time, but its shape will be geometrically irregular, but the crystals grown with a gradual decrease in temperature will take more time, but they will amaze with their perfect beauty. You should also not shake the jar with a growing crystal, just as you should not take it out until the process, in your opinion, is finally completed.

Boil water and immediately pour into a jar.

Add 2-3 tablespoons of salt to the mixture and stir with a spoon until even small particles dissolve.

Add the rest of the salt and mix thoroughly.

Now you have a saturated solution ready.

Shake the jar well.

Tie a string around a pencil or stick.

Trim the excess length so that the string does not touch the bottom of the jar.

Dip the end of the rope into the jar.

Leave the jar in a warm sunny place for 1-3 weeks. Check the lace regularly, it will gradually become covered with white crystals.

Instead of a rope, you can use an iron ring, then the crystals will grow in a circle.

These figures clearly show how the crystals grow.

This is how the thread with crystals will change over time. On average, it takes 2-3 weeks to grow a crystal.
Very beautiful crystals do not grow from ordinary salt, but from alum. Alum is a double salt and can be bought at any pharmacy, as it is a drug that is used as a hemostatic and cauterizing agent. They are cheap - about 12 rubles. Now we will demonstrate a master class on growing crystals from alum. They turn out to be very regular and beautiful in shape and grow faster than salt crystals.

As you can see, this crystal is the correct shape compared to a regular salt crystal.

Aluminum sulfate costs from 8 rubles and is sold at a pharmacy. It is often used as a hemostatic agent, for example when you cut yourself while shaving.

For the experiment, it is better to use two cups so that there is a choice of good crystals. Bring half a liter of water to a boil and dissolve six tablespoons of alum in it. Leave the cups for a week.

This is how alum crystals grow within a week.

There are too many small alums in the second glass, which is why we immediately decided to grow the crystals in two glasses, and not in one.

Choose crystals of the correct shape and large sizes and place them on a paper towel.

This is how we grew one large crystal of irregular shape. If you do not want to grow such an awkward crystal, saw off a large part from it.

Separated part of the crystal. We will continue to grow it.

Tie the crystal to the thread.

It is very convenient to use an ice cream stick, it will not slip or fall, unlike a wooden pencil.

Place the crystal in the alum solution, it is prepared in the same way, only the ingredients can be halved (a glass of water, 3 tablespoons of alum)
A week later, our crystal has grown significantly.

The crystal has the shape of an octahedron. Remember, the crystal doesn't change shape as it grows, whatever shape you choose for the seed crystal, that's how it will continue to grow.

The structure of salt crystals is cubic, so all crystals are in the form of cubes, unlike alum crystals, which can have a variety of shapes.

The photo shows how the salt crystals gradually grow.

Depending on the saturation of the solution, the crystals may grow faster or slower.

This crystal is about 2 weeks old.

And this crystal grew for at least 3 weeks.
If you want to conduct an interesting experiment with a child, choose bright materials and a saturated solution, so the crystal will be more visible and interesting to the baby.

Here such a crystal can be grown on a string or fluffy Christmas tree tinsel.

Make a solution and place a rope in it.

In a week, natural processes will do their job and transparent “icicles” will appear on the string.

Salt grows in regular cubes or parallelepipeds.

salt crystals at home

salt crystals at home

salt crystals at home
salt crystals at home

salt crystals at home
salt crystals at home
salt crystals at home

salt crystals at home

salt crystals at home
salt crystals at home

salt crystals at home
Salt and sugar alone are not enough for the most inveterate alchemists. In addition, they are interested, for example, how to grow copper sulfate crystal. But the technique below is suitable for growing absolutely all types of crystals.
To grow a sufficiently large crystal from an aqueous solution of copper sulfate, you will need:
- a glass or plastic container of any size, but preferably transparent and colorless, so that you can easily spy on the growth of crystals in it. The plastic version is convenient in that crystals do not adhere to it. If the jar is larger, then this will allow you to grow a much larger crystal. But it is also important to take into account the fact that the larger the jar, the more solution will have to be prepared and the larger portion of the reagent will be required;
- copper sulfate or copper sulfate, which can be bought not only in a chemical store, but also in a gardening store. Although it will not be clean enough, it is not so important. Before you buy salt, you need to consider the substance. To do this, the package contains a small strip of transparent polyethylene, through which a bright blue powder should be visible. In the presence of large lumps, especially green ones, it is better to refuse to buy, because such vitriol was probably stored at high humidity and is oversaturated with a huge amount of impurities. You will have to suffer with it when growing crystals, and therefore it is better to contact another similar store.
Growing crystals from copper sulfate is perhaps the most popular. They are beautiful in shape and grow quite quickly.

Copper sulfate is used in horticulture and agriculture as a fungus and mold control agent. Copper sulphate is quite toxic, so in experiments it is recommended to use disposable or non-food utensils and wash your hands thoroughly.
For the experiment, we need 100 gr. copper sulfate per 100 ml of water. Stock up on 300 ml of water and 300 gr. vitriol, respectively.

Put the jar in a water bath and pour hot water into it, dissolve 100 g in water. vitriol.

Transfer after 10 min. vitriol from the first jar to the second. After a while, check the bottom of the jar, seed crystals should form there.
Try to choose crystals of the correct form 1-2 mm long. Dry them on a paper towel, try not to touch them with your hands, use tweezers.

Prepare 200-300 ml of the solution and, after tying the seed crystal with a thread, place it in the solution.
Prepared thus, there is nothing left, how to grow a crystal from vitriol. So, a container is taken and copper sulfate is poured into it. You don’t need to pour a lot, 100 grams will do for a start. Salt is poured with hot water (better, of course, distilled, but not necessary). Then you can use two ways. First, a seed is taken, that is, a small crystal. The more there are, the more crystals will come out. A little water pours, and the solution is constantly stirred. It should become so saturated that the grains of salt at the bottom cannot dissolve. The solution is filtered while still hot and placed in a cold place, but not covered with a lid. On the second day, the bottom of the container is covered with a bunch of small crystals. It is necessary to select from them a couple of pieces of the most even and largest. You can also choose according to your taste - those that you liked the most. A solution for crystals can be prepared in the same way, but add a little more water, cool, and then filter thoroughly.

Copper sulphate is a poisonous compound, but you can buy it at any garden store.
There are two ways to obtain crystals from vitriol: cooling and evaporation, but most experimenters still prefer evaporation.
It takes 4-6 hours to grow a copper crystal.
It should be noted that after a few hours the crystal will lose its luster as the water evaporates from it. To prevent this, varnish the crystal. So it will not only remain shiny for a long time, but also become non-toxic and you can safely pick it up.

These wonderful crystals are the mineral chalcanthite. It is formed from copper sulfate naturally in nature.
When the solution and the seed are ready, you need to rinse the seed under running water, but you don’t need to touch it with your hands, since blue vitriol is still a chemical substance, and fingerprints may remain on the seed, causing the crystal to begin to take on an irregular shape. Then the seed is carefully placed in a container with a filtered and cooled solution. It can be placed at the bottom, as a result of which the crystal will grow only in width and length. The best option would be to hang the seed on the fishing line: when using a thread, many small crystals can grow on it, but this will not happen on the fishing line. The second end of the fishing line is tied to a pencil or other similar long object, and then the crystal is placed in the solution. the length of the fishing line must be adjusted so that the seed hangs on it in the middle of the solution itself. So the crystal should grow evenly in all directions. The container is placed in a place with a constant temperature and covered with a sheet of paper. And not cardboard, under which even small crystals will grow for several months, but under thin paper only a few weeks. Once a week, the solution should be filtered from the precipitated crystals. This will grow beautiful bluish-blue crystals with parallelogram-shaped edges. When their size is right for you, they need to be pulled out, rinsed in running cold water, wiped with a napkin and opened with several layers of colorless varnish, and nail polish will do. Such a crystal is freely taken in hand, wetted with water, which will not harm it in any way, because the varnish will completely protect the fragile substance. But you should not treat them less carefully, so as not to accidentally destroy the beauty. Do you also want to become a magician and try to grow such a wonderful crystal with your own hands? Then do not waste time, because you will need it to create an ordinary miracle!
It looks like the growth of a crystal of copper sulphate. The first day.
And so the crystal grew in a week. Eighth day.
The longer the crystal grows, the larger it becomes.
In eight days, the crystal has time to grow by 2 cm.

A deep blue color is a sign of a good crystal.
This is how the crystal looks on the 11th day of growth.
Change the solution often, do not forget to filter it.
12th day of growth.
In copper sulfate, crystals grow in various shapes, but most often they are treclinic.
If you chose the evaporation process, then get ready that the crystal will grow for a long time - at least 14 days, during the cooling process it grows faster - only 24 hours, but it can be irregular and even unpredictable in shape.
During the experiment, do not use iron objects, as vitriol reacts with iron.
This crystal is already 22 days old.
You can even grow crystals for a whole month.
Growing a crystal is painstaking work, but the result is worth it.
Experiment with children, but be careful with blue vitriol, it is toxic.
This crystal is 42 days old.
One and a half months is not a period, you can continue to grow until you get bored.
This crystal is 52 days old.
This video shows how to grow a crystal from ordinary salt.
This video shows how to grow a crystal from blue vitriol.
Manufacturers of modern toys designed to organize educational children's leisure today often offer ready-made kits for growing crystals at home. But it would be a mistake to think that this occupation is the development of our time and the achievement of the modern chemical industry.
The book, on the basis of which our retro blog is preparing a publication today, was released in 1875 and its main goal was to convey to young readers as much useful practical information as possible, contributing to the development of children's thinking and expanding their horizons.
One of the extensive chapters of this edition was devoted to how to grow a crystal at home, using any (or even all at once) of the ingredients suggested in the book. By learning how to grow crystals, you can use them to create beautiful decorative items that can become an original Christmas tree decoration or part of a festive interior decor.
General rules for growing crystals
- Before proceeding to the practical part, I would like to warn you: growing crystals does not tolerate fuss: the beauty of their shape directly depends on the conditions in which the solution is located. The vessel where the crystals grow must be removed to a place where no one will disturb it and cannot accidentally touch, push, or overturn it. Any careless movement can lead to the fact that the crystal is not as large, even and beautiful as we would like.
- To obtain large crystals, the amount of water must be increased: the larger the crystal should be, the more water must be taken to dissolve the original ingredient. Most components are sensitive to water quality and can react with impurities that make up its composition, so it is advisable to take filtered or distilled water.
- The less the solution is heated, the better for the crystals, because. in heated and settled water, larger and more even formations are obtained. As soon as crystals appear at the bottom of the vessel, the smallest ones should be selected and removed, leaving only the large ones. The remaining crystals are turned very carefully every morning with a thin stick to the other side - so the growth of the layers is uniform.

Alum crystals
To grow crystals, you need alum: to obtain large and transparent polyhedra, aluminum-ammonium or aluminum-potassium (burnt) alum is suitable; Potassium chromium alum is usually added to burnt alum to create a beautiful purple color.
If only potassium chromium alum is used in the work, then the crystal may turn out to be dark purple or almost black. Pale pink or with a lilac hue, polyhedral crystals are obtained using iron ammonium alum.
Also, multi-colored crystals can be obtained with the help of some dyes: for example, yellow gives a saturated solution of turmeric; red color - decoction of sandalwood; blue - copper sulfate. You can also use modern food coloring.
Solution preparation
Alum is ground to a powder and dissolved in hot water. The amount of initial ingredients is determined by eye: alum is poured into water so much that a supersaturated solution is obtained, i.e. they no longer dissolve. If the resulting solution seems cloudy, then it is filtered through filter paper (you can use a modern coffee filter).
The solution is cooled and left at rest for a day: during this time, most of the alum will settle to the bottom of the vessel in the form of crystals. These crystals can also be used to decorate various items: if you make a crown out of wire, wrap all its elements with woolen thread and immerse it in a solution of alum, in a day it will be covered with crystals like precious stones.

Growing crystals from salt
One of the most popular ingredients for growing crystals is the most common table salt. To prepare a solution, warm water is poured into a non-metallic vessel and salt is dissolved in it according to the same principle as in the case of alum crystals: the solution must be so saturated that the salt ceases to dissolve.(Crystals are also grown from sugar in the same way. )
Important point: to prepare a solution in modern conditions, you should pay attention to the fact that table salt does not have an anti-caking component that prevents the formation of beautiful crystals.
For several hours, the vessel is placed in a warm place until about a third of the prepared solution has evaporated, after which the vessel is moved to a cooler place. Armed with patience, transparent salt cubes will soon be found at the bottom of the vessel. If this solution is placed outside the window in winter at a temperature of about -10 degrees, then the crystals will form in the form of hexagonal plates.
With the help of such a solution, you can prepare figured Christmas tree decorations by making the frame of a future toy out of wire and wrapping it with woolen thread. A saturated saline solution is poured into several vessels, different dyes are added to each of them, and wire blanks suspended on a stick are immersed.
Also, original toys can be made by cutting blanks from felt - due to its texture, felt absorbs saline well and the figure is completely covered with small crystals.

soda crystals
Baking soda crystals are grown in the same way as salt crystals. But to create a saturated solution, it is very important that the water is as soft and pure as possible, ideally distilled, or at least well filtered.Soda is dissolved in hot water until a saturated solution is obtained (soda stops dissolving), after which the solution is filtered and the container is removed to a warm place. After some time, crystals begin to appear on the bottom and walls of the vessel. This moment is the most successful for placing an object in a container, the contours of which will gradually become overgrown with crystals.
It should be remembered that, unlike crystals obtained from salt and alum, soda is highly susceptible to moisture in the air, so these crystals can easily break down. To protect them from deformation, soda crystals are stored in a tightly closed vessel.
Saltpeter Crystals
The shape of the crystals will depend on the type of saltpeter taken: these can be elongated cylinders or "sticks", plates fused together, pointed needles.
About 100 g of any kind of saltpeter is poured into a small container and 50 ml of water is poured into it. This mixture is placed on fire and heated for some time, bringing to a boil. The finished solution is filtered through gauze or filter paper and cooled.
As the solution cools, small bright white crystals will precipitate. If you want to get larger crystals, you need to take about 450 ml of water for the same amount of saltpeter - after cooling, oblong hexagonal crystals will be obtained.
If you mix saltpeter powdered into powder with table salt, dissolve these substances in water, boil and cool, then in the end you can get two types of crystals at once.
Growing crystals from vitriol
Crystals grown in this way are very beautiful: saturated solutions of copper and iron sulfate are prepared in two different vessels. Water for the preparation of solutions should also be as pure as possible - filtered or, ideally, distilled.Both vessels are placed in a water bath and heated, stirring, until the vitriol is completely dissolved. In the process of cooling, green crystals are obtained from iron sulphate, and blue crystals from copper. A green crystal is tied with a thread and carefully immersed in a solution of copper sulfate. After some time, this crystal will be covered with a blue layer; after that, it is taken out of the vessel and immersed in a solution of iron sulfate, which will give the crystal a layer of green color.
Thus, the procedure of immersion in different vessels is repeated until a large crystal is formed, consisting of beautiful green and blue layers.

Growing crystals at home is a very exciting process, but quite lengthy. In this article, we will tell you how to grow a large and beautiful crystal from ordinary table salt.
How to grow a crystal from salt
You can grow a crystal from different salts (from a chemical point of view), but the easiest way to grow a crystal at home is from ordinary table salt (its chemical name is sodium chloride NaCl).
Important note! You should not paint the solution from which your crystal grows with any paints. This will only spoil everything, and the crystal will still not be colored.
The process of growing a crystal from salt at home does not require any special knowledge and chemical reagents and preparations. Each family has food (cooking) salt, which we eat. If we look at the salt under magnification, we will see that it consists of transparent cubes. These are salt crystals. Our task is only to give a beautiful shape to these crystals.
We grow a crystal from salt at home
 Let's proceed directly to growing a crystal from salt. First, let's make a salt solution. To do this, pour water (preferably distilled) into any small container and put it in a larger container, which also contains water, but warm, 50-60 degrees. This temperature is easy to set on some models of electric kettles. For those who do not have such a miracle kettle, we can recommend mixing one part of the required volume of freshly boiled water and two parts of water at room temperature. This will be about 50-60 degrees. Then pour salt into a small container and, after stirring, leave for 5 minutes. During this time, the container with water will heat up, and the salt will completely dissolve. Then add more salt, mix again and leave until completely dissolved. This procedure must be continued until the salt ceases to dissolve in water. What we got is called saturated salt solution. Carefully pour the saturated solution into a container of the same volume. Make sure that undissolved salt does not fall into a new container.
Now, in a bag of salt, select a larger crystal and carefully place it on the bottom of a container with a saturated saline solution. The main work is finished - now just wait! After a couple of days, you will notice the growth of the crystal, and our crystal will grow more and more every day!
Advice! To speed up the process, remove the enlarged crystal from the solution after a few days. Prepare a saturated salt solution again and lower our crystal there. So it will grow much faster!
This is how easy it is to grow a crystal from salt at home. Send photos of your crystals to us, and we will be happy to publish them on the pages of our website.
Categories


