Perhaps absolutely everyone knows what a mushroom looks like, because it consists only of a stem and a hat. However, not every novice artist knows how to draw a mushroom, whether it be a boletus or a pale grebe. To understand and remember how to draw a mushroom correctly, you should at least look at photographs of various types of mushrooms. Of course, it is best to draw mushrooms from life while walking through the forest or the park, but this is not always possible.
Before you draw a mushroom, you should take care of the following stationery:
one). Liner;
2). Pencil;
3). Eraser;
4). multi-colored pencils;
five). A piece of paper.
Next, you can start learning how to draw a mushroom in stages:
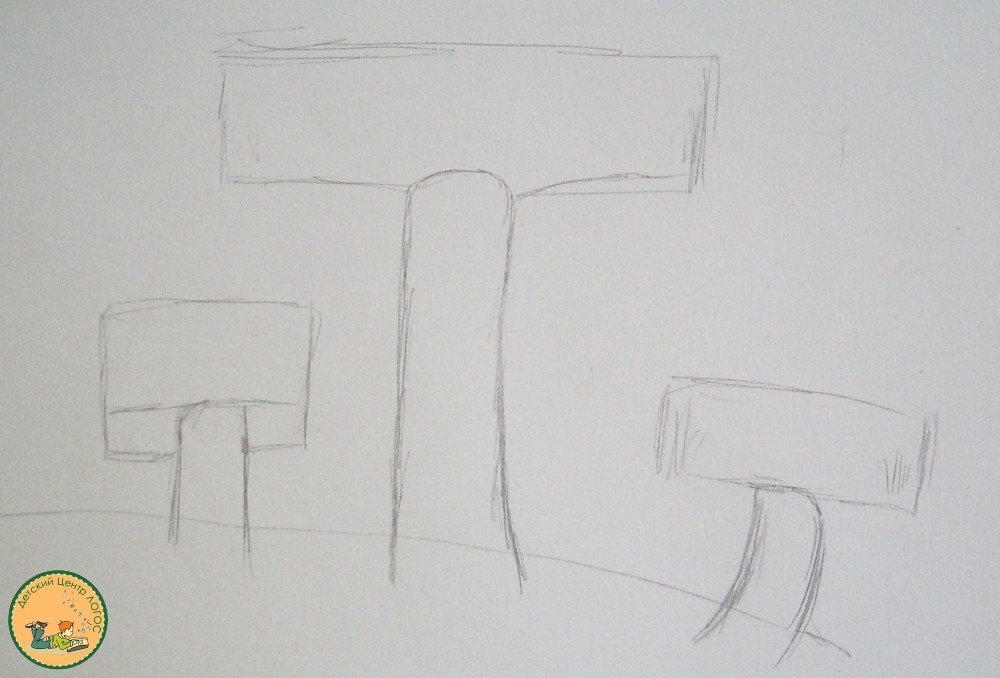
1. Schematically depict the outlines of mushrooms;

2. Draw the legs of porcini mushrooms. Compared to the legs of other mushrooms, they are slightly thicker;

3. Now work on the caps of porcini mushrooms;

4. Draw the leg of the fly agaric. Do not forget that there is a characteristic skirt on his leg. Draw folds on the bottom of the hat;

5. Draw small spots on the fly agaric hat;

6. Draw a boletus. In fact, it is very similar to a white mushroom, but its cap is slightly flatter, and the stem is noticeably thinner;

7. So, drawing mushrooms with a pencil is quite simple. But in order for the mushrooms to look realistic, and one of their varieties is still more strikingly different from the other, the drawing should definitely be painted. Therefore, first circle the sketch of all three mushrooms with a liner;

8. After that, use an eraser to remove excess pencil strokes;

9. Paint over the cap of the porcini mushroom with brown pencils;

10. Shade the space under the cap of the porcini mushroom with light brown and brown shades. Work the mushroom leg in light brown and gray tones;

11. Stroke the leg of the fly agaric with a gray pencil, and its hat with red;

12. Paint over the boletus hat with a burgundy pencil, and then slightly darken it with brown. Shade the leg of this mushroom with gray and brown pencils;

13. Color the grass with a rich green pencil.

Mushroom drawing is ready! Many other types of mushrooms, both poisonous and completely edible, can be depicted in a similar way. In fact, there is absolutely nothing complicated in how to draw mushrooms in stages with a pencil, which means that a child can also be quickly taught this skill.

The article describes in detail the process of drawing mushrooms with a pencil. It will interest those people who are fond of drawing or just dream of learning how to draw. Also, this master class will be useful to parents who want to captivate their children with drawing, teach them how to draw.
Many inexperienced artists think about how to draw mushrooms. To correctly draw mushrooms with a pencil and then color them, you can look at the beautiful and clear photographs that can be found in encyclopedias and educational magazines. And you can draw mushrooms in the forest from nature, if possible. In nature, it is most convenient to make sketches with a simple pencil or pen, and you can color them at home.
Before you draw a mushroom, you need to prepare:
1. Liner;
2. Pencil;
3. Pencils of various shades;
4. Eraser;
5. Album sheet.

It is better to draw mushrooms in stages:
1. Draw the legs of three mushrooms and a line indicating the ground.

2. Sketch mushroom caps. So far, mushrooms look like hammers, but this is only a sketch, later the drawing will become more realistic.
3. Draw the hat of the extreme fungus.

4. Draw the bottom of the large mushroom cap.
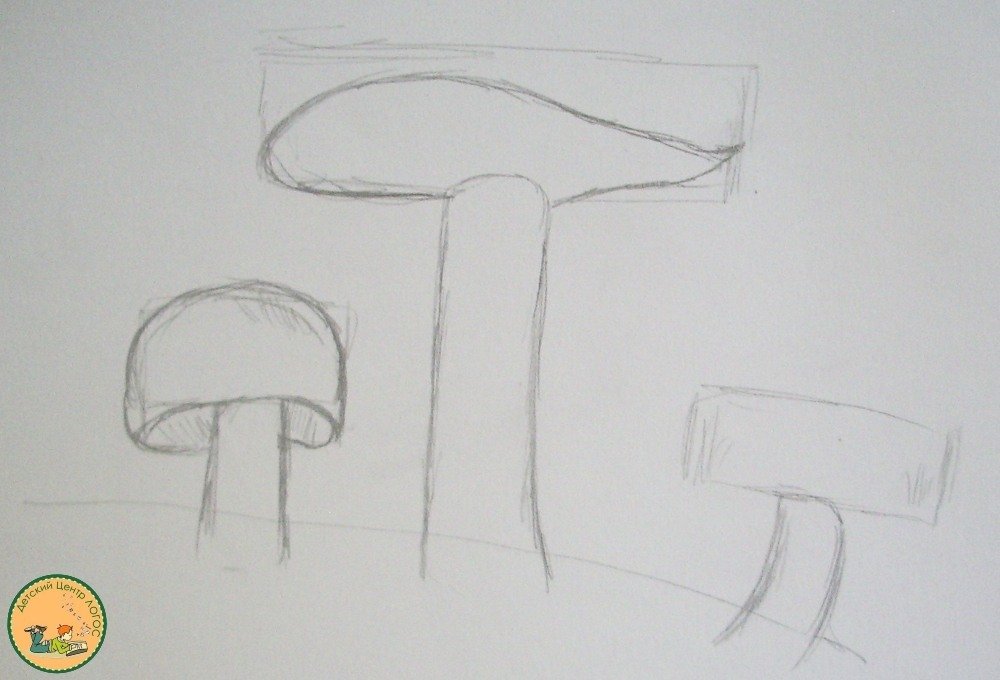
5. Draw the top of the mushroom cap.

6. Draw the hat of the last fungus.
7. Draw blades of grass and a leaf lying on the hat of one of the mushrooms.

8. Outline the image with a liner.

9. Use an eraser to remove the pencil sketch.

10. Color the cap and fungus of the little mushroom. When coloring and drawing mushrooms, consider the features of their structure. For example, in this case, russula are depicted, the hats of which come in different shades. Caps of porcini mushrooms can be painted brown, and not yellow or red. And fly agarics, for example, have a characteristic “skirt” on the leg.
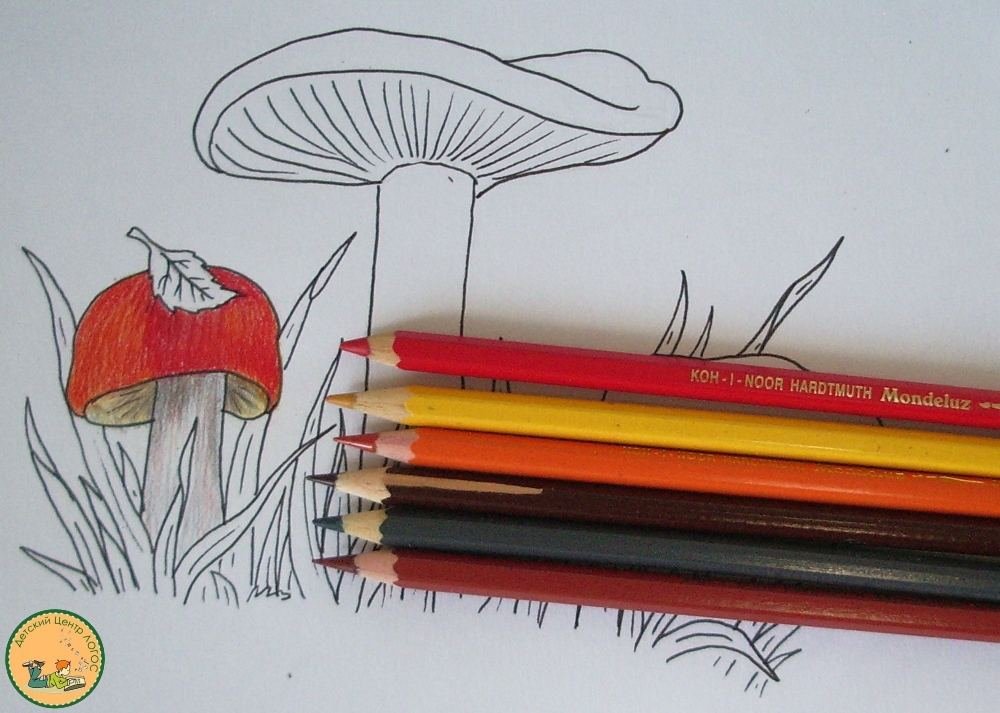
11. Color the cap of a large mushroom using yellow, brown and red tones of pencils.

12. Stroke the bottom of the mushroom cap and its leg with gray and brown pencils.

13. Color the third mushroom with the same colors as the big one.

14. Grass, as well as a leaf, paint over with a green pencil.

The drawing of wild mushrooms is ready. It will also not be difficult for children to draw mushrooms, especially if their parents help them. Kids will surely like to paint mushrooms not only with pencils, but also with felt-tip pens or paints.

We invite you and your children to to our School of Painting "Art People Project"!
This is an average lesson. It can be difficult for adults to repeat this lesson, so I don’t recommend drawing a mushroom for this lesson for young children, but if you have a great desire, then you can try. I also want to note the lesson "" - be sure to try to repeat it if you have time and desire to draw today.
What you need
In order to draw a mushroom, we may need:
- Paper. It is better to take medium-grained special paper: it will be much more pleasant for novice artists to draw on this particular paper.
- Sharpened pencils. I advise you to take several degrees of hardness, each must be used for different purposes.
- Eraser.
- Stick for rubbing hatching. You can use plain paper rolled into a cone. She will rub the shading, turning it into a monotonous color.
- A little patience.
- Good mood.
Step by step lesson
Food or still life will be much easier to draw if you see it live. No photograph can convey the chiaroscuro that real objects give. It will be much easier to draw a mushroom if you can see and penetrate into the very essence ... If it is not possible to draw from life, try to search by images in Google or Yandex.
By the way, in addition to this lesson, I advise you to turn your attention to the lesson "". It will help improve your mastery or just give you a little pleasure.
Please note that every object, every living being, every phenomenon on paper can be depicted using simple geometric objects: circles, squares and triangles. It is they who create the form, it is them that the artist needs to see in the surrounding objects. There is no house, there are several large rectangles and a triangle. This makes building complex objects much easier.
Tip: sketch with as light strokes as possible. The thicker the strokes of the sketch, the more difficult it will be to erase them later.
The first step, or rather zero, is always to mark a sheet of paper. This will give you an idea of where exactly the drawing will be. If you place the drawing on half of the sheet, you can use the other half for another drawing. Here is an example of a sheet layout in the center:
If you not only like to collect mushrooms, but also like to draw, let's try to draw mushrooms together, it will be more accurate to draw a white mushroom. We will do the drawing of the mushroom in stages, first with a simple pencil. In the last step, you can color the mushroom drawing with paints or colored pencils, and if you draw grass next to it, the picture of the mushroom will be very beautiful and attractive.
1. Let's mark the legs of the mushroom

First, draw just two circles for the stem of the mushroom. The circles will help you further accurately maintain the correct proportions of the mushroom pattern.
2. Add a cap to the mushroom stem

Draw two “ears” next to the mushroom leg, like those of Cheburashka. They will help you draw a mushroom cap. At the base of the leg, add a "flattened" oval. After all, mushrooms are not perfectly even, their legs are curved, their hats are dented, so in order to draw a realistic mushroom, you need to take into account these “little things”.
3. How to draw a general outline of a mushroom

You see how easy it is now to draw the shape of a mushroom when there are guidelines. It is enough for you to circle these “circles” with a pencil, almost an arbitrary line, and you will get a real white mushroom.
4. Drawing of a mushroom in detail

Before drawing the mushroom in more detail, remove the extra outlines from the drawing. Completely decorate the mushroom cap and draw the “edge” of the cap with two lines. All the beauty of the porcini mushroom is in its contrasting hat. It is white on the inside and brown on top. A gap at the edge of the mushroom cap will emphasize this effect.
5. How to draw a mushroom. Final stage

Here you can see how easy and simple it is to draw mushrooms, if you draw in stages. In just how many simple steps and you are already preparing to paint over the mushroom with paints or pencils. The drawing of the mushroom looks very impressive in the technique of a simple pencil. If you also think so, you can simply shade the mushroom with a soft pencil, as in my drawing.
6. Drawing of a mushroom. Ambient

Small growing mushrooms painted around the mushroom. Yellowed leaves, grass, twigs will make the drawing more attractive and realistic. If you were able to draw a mushroom beautifully and correctly, try to continue the drawing and draw the surrounding landscape. You can even draw next to the mushrooms. These animals are very fond of picking mushrooms, harvesting them for.
Now you know how to draw a mushroom. If you make an effort, I believe that you will achieve everything you wanted to. Now you can pay attention to the lesson "" - it is just as interesting and exciting. Well, the buttons of social networks are not just there =)
Hi all! Today we have prepared for you a step-by-step mushroom drawing lesson. In general, these are one of the most mysterious living creatures that inhabit our globe with you, and at the same time, one of the most ancient.
If you think that mushrooms appear in a person's life only when he feasts on mushroom soup or julienne, you are slightly underestimating the role of mushrooms. No, not "a little" at all. First, the first antibiotic produced by mankind, penicillin, was isolated from penicillum, a fungus.
Antibiotics became the salvation of people and a revolution, a real breakthrough, after which many infectious diseases ceased to be a death sentence, and a sick person received real hope for healing. Well, today we will not draw a microfungus, but real large forest mushrooms. So let's get started!
Step 1
First, let's draw three flattened ovals, which will later become the caps of our mushrooms. Arrange them in the same way as in our sample, try to convey the size and shape. If everything worked out, go to the next step.

Step 2
Now let's draw elongated cylindrical shapes - hats.

Step 3
Let's add the upper part to the hats so that they acquire such a recognizable mushroom shape. Let's draw the legs a little - add curls on the one that is closest to us and outline the lower part of our drawing. As you can see, there are a lot of smooth lines in this tutorial. If you want to practice drawing straight lines, take a look at our lesson on.

Step 4
The author of this text is not familiar with scientific journals devoted to research in the field of mycology, so the following information will simply be called "information". So, in glossy magazines and on the Internet, the following (rumors? scientific facts? fictions?) information is often found: in one of the universities in Japan, an experiment was conducted with one of the types of mold and a maze that was designed to determine the level of intelligence of mice. Professor Toshiyuki Nakagaki placed a piece of sugar at the exit of the maze, and a piece of fungus that looked like a web at the entrance.
The results of the experiment are quite surprising - the fungus, which usually grows in the form of a wicker circle, directed its shoots towards the sugar cube. Most of the sprouts hit dead ends, but one of them managed to grow in the right direction and reach the finish line. The next fact looks quite incredible - when the scientist separated a particle of the first mycelium that entangled the labyrinth and put it in a new labyrinth, which was an exact copy of the first one, the fungus sprouts moved along the right path, bypassing all dead ends and obstacles. What was it - a phenomenon of memory, a kind of intellect?
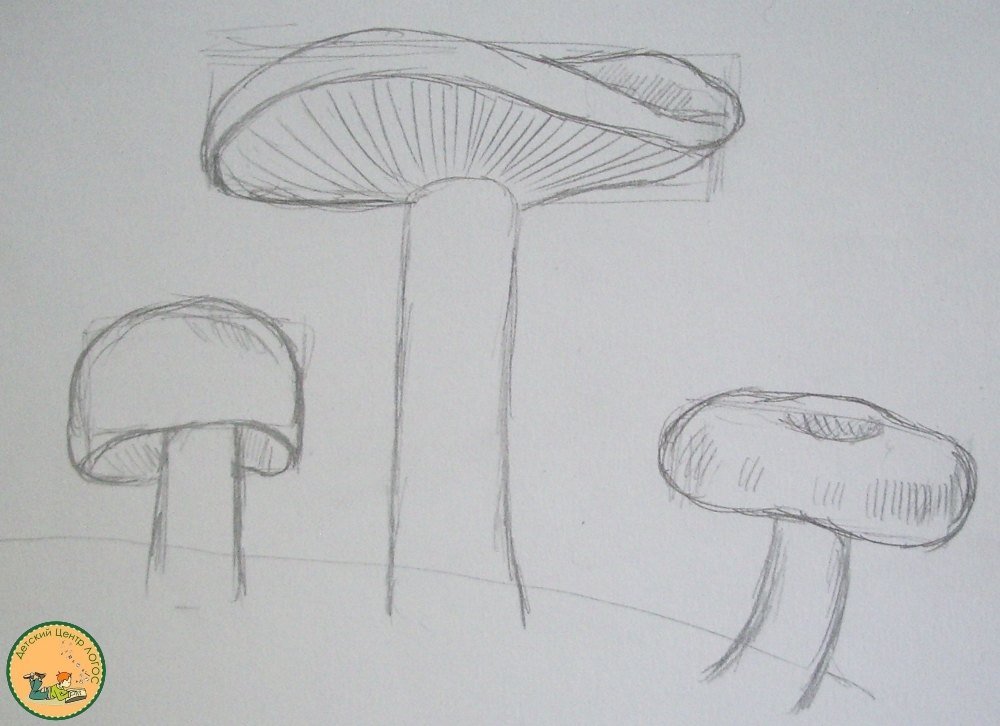
Well, we will return to the drawing and outline the points on the hats, as well as the horizontal lines passing through the center of the conditional circles of the hats of our mushrooms.

Step 5
Now let's increase the number of lines outlined in the previous step, make them more frequent and densely spaced. This applies to the first two mushrooms, in the last one we paint over the inside of the cap a little. Let's also increase the number of dots on the hats. We draw the lower parts of the legs and the grass, we complete the stage by drawing the grass next to the mushrooms.

Step 6
Let's slightly shade the area inside the caps, and also put a thick shadow on the caps of the small and medium mushrooms themselves. Follow the rules for applying shadows, designate areas of light, penumbra and the shadow itself, and the latter should be the thickest.
To achieve rich shading, you can use hatching crosswise, painting over the required number of layers. By the way, we almost forgot about the reflex (the light cast not by the source, but reflected from the surface, usually looks like a bright border on the edge of the illuminated object) - pay attention to how well it is visible on the smallest fungus.

Step 7
Now let's make the shadow even thicker. We will also apply a rich shadow to the cap of the largest mushroom. By the way, we conduct a more detailed analysis of shadows in the lesson, which is dedicated to.

Step 8
Let's shade the hat of the largest mushroom by analogy with the small and medium ones. Let's make the grass surrounding the mushrooms thicker and draw some more blades of grass. Note that the main parts of the shadow are also visible on the cap of a large mushroom, try to convey them.

If you want to practice more in simple lessons, we recommend you an article about that, from the cartoon "Pony friendship is a miracle."
Well, it was a lesson dedicated to that. They turned out to be very nice with us, only our editors would like to warn all readers: DO NOT EAT such mushrooms for food, it is best not to touch them at all. But you can easily draw from them. Send us your work and write in the comments your wishes for new step-by-step drawing lessons. Be healthy!
If a person does not know what to do, often involuntarily he begins to draw. Knowing this fact, you can use it to your advantage. After all, drawing classes not only develop the skill of owning a pencil, but also allow you to develop your imagination. True, it is worth paying attention to what exactly you portray. You should draw non-trivial things, they will help a person go beyond the standard framework of thinking. And what to depict? For example, you can make a sketch of mushrooms, read below.
We study mushrooms
Before wondering how to draw mushrooms, you should carefully study the mushrooms. This knowledge can be useful to a person if he wants to go into the forest and replenish his food supplies there. It is advisable to study mushrooms not from pictures, but from real mushrooms. If this is not possible, then, of course, images are also quite suitable. Take the time to study where mushrooms grow, what groups they "settle", and what shape their hats have. This will help to avoid many errors in the image in the future. You should study the shape of all parts of honey mushrooms well, and also pay attention to their colors. This data collection may not be limited. Do not be too lazy to spend half an hour of your time studying the root system. This will help to understand why and in what direction mushrooms grow.
Pencil drawing

The first experience in drawing any object should be a sketch. How to draw mushrooms in stages? First you should depict a stump. Let's start drawing it with a simple geometric shape. Draw a square and then round off its top corners. Now you need to make roots from the bottom side of the geometric figure. With wavy lines of various lengths, we outline elongated curved ovals. Somewhere they should be thicker, somewhere thinner. And how to draw mushrooms? After the pedestal for mushrooms is ready, you can proceed to their image. The first step is to draw the legs. They have the shape of rounded thick rectangles. Now you should draw hats. We represent them with ovals.
After the large mushrooms are ready, you can move on to the small ones. These should be hats without legs that are stuck to the stump. When the composition is built, you can proceed to its detailing. First, we outline the pattern on the hat with lines, and then we work out the pattern of the bark with wavy strokes. At this stage, the sketch should be considered complete. Optionally, you can add light and shadow, and then you will get not a sketch, but a work of art.
Stylized drawing

The easiest way to depict something is to make the image unrealistic. How to draw mushrooms with a pencil? The shape of the mushrooms should be given quite real, but the insides can be filled not with volume, but with a pattern. You will get a flat stylized image. How to draw mushrooms in this style? First you need to depict the mushrooms. We will draw them in the amount of four pieces. Draw a leg with curved wavy lines, and draw a hat with an oval. Now you should supplement the image with membranes on the leg and roots. Then you need to divide each mushroom into parts so that it is more convenient to fill them with an ornament or pattern. On the legs, you can apply the usual touches, and give a flight of fancy to the hats. They should be divided into 3-4 parts and draw a different pattern in each of them. It can be waves, triangles or circles. Now you should shade these drawings. To make the work look more interesting, you can revive it by planting a snail on one of the mushrooms. She, by the way, is also worth styling.
mushroom people

If you like to fantasize, and the image of ordinary mushrooms seems boring to you, then you should revive the plants. mushrooms in the form of people? The first step, however, should be to depict the outline of an ordinary honey agaric, and only then give it a human appearance. This is necessary so that the artist in the process does not go beyond the framework limited by the contour of the mushroom. Figures can be anything. For example, you can depict a girl trying on a big hat, and next to her a friend who does the same. You can draw a mushroom in profile, and supplement such a sketch with a cigarette or pipe. Do not be afraid of non-trivial combinations. The drawing will not lose from this, but will only be enriched. To make people resemble mushrooms, their silhouettes should be made smooth and wavy, and their hats should be large and round.
Drawing with colored pencils

A colorful sketch always attracts more attention than a graphic image. And drawing in color is always more interesting. How to depict honey mushrooms? You should start with a pencil sketch. First you need to draw the general shape of the entire group of mushrooms, and then each mushroom separately. Do not dig into the details, you should correctly depict the form. Then, you can immediately come to the image of the volume with colored pencils. The whole mushroom, except for the lower part of the cap, should be given a yellowish color. Then shade the leg and shadow on the hat with a brown pencil. Now you need to enter several shades of yellow and orange. The final stage is to draw the back of the hat in dark color.


