Master class "Drawing for the little ones."
Shatokhina Rita Vyacheslavovna, teacher of additional education, MBU DO "House of Children's Creativity in Kalininsk, Saratov Region."
This master class is intended for teachers of additional education, educators of preschool educational institutions. The master class will also be of interest to young artists from 4 years old and their parents.
Purpose: this master class is a small drawing course for the smallest, which shows how to draw with geometric shapes.
Target: creating conditions for obtaining drawing skills.
Tasks: teach your child how to draw familiar images using geometric shapes;
to instill skills to work accurately with paints and a brush;
develop creative imagination and fine motor skills of the hand.
Young children come to classes in my association, but they really want to draw. From the experience of working with children, I realized that it is easier for them to draw with geometric shapes. Children draw according to my show, in stages. When starting a lesson, I never tell the children what we are going to draw today. From experience I know that they are so interesting. In the process, they guess who they are drawing, and it gives them a lot of joy. And everyone's drawings are different.
Drawing master class for children "Snail"
Prepare: A4 landscape sheet, watercolor paints, brushes of different sizes, a jar of water and a napkin.

Before starting to draw, I tell the children that the paints are sleeping and they need to be awakened, gently stroking them with a brush, we will wake up the yellow paint first and start painting.
We draw a bun in the center of the sheet, gradually unwinding the brush, and then draw an arc with brown paint.

We turn the arc into a loop.

We draw horns and paint over.

We decorate the house of the snail.

We draw eyes, a mouth of a snail. Next, the children themselves come up with and decorate the background of the picture: where is the snail?

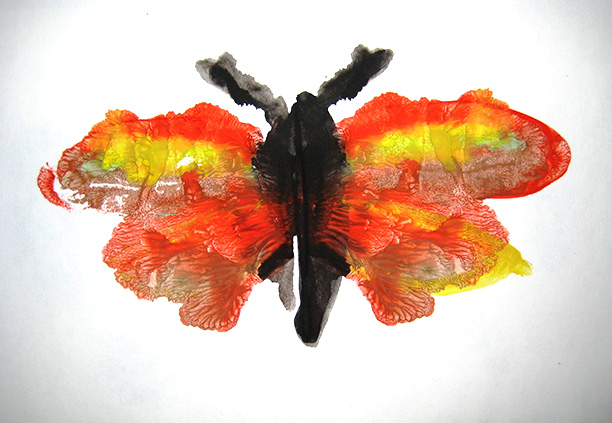
Children's work:


Drawing master class for children "Turtle".
We draw a “kolobok” in the center of the sheet with yellow paint, draw 4 loops with brown paint.

The fifth loop is drawn larger in size, we paint over all the loops.

We draw eyes-circles, from the beginning with white paint, then black.

Decorate the turtle shell. The child can come up with his own pattern.

Drawing master class for children "Fish"
We draw a “bun” with yellow paint, draw arcs: from above and below, it looks like an eye.

We draw a fish tail-triangle. Then decorate the fish with red paint. draw by applying a brush: mouth, fins.

We draw scales, decorate the tail.

We "print" with a brush: draw pebbles and water, draw lines with green algae paint.

We draw the eyes of the fish with black paint. Black paint likes to play pranks, so we are especially careful with it.

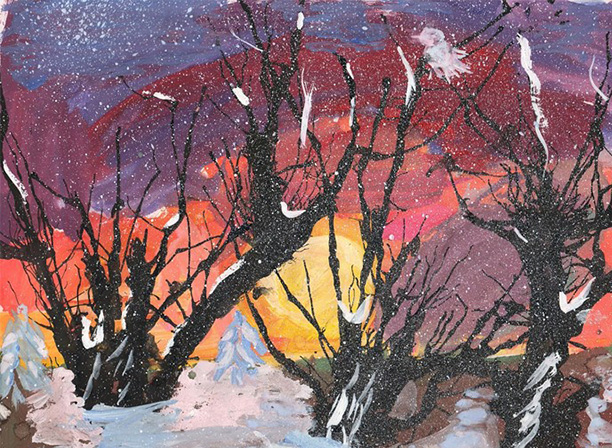
"Winter meadow".
We take a blue sheet, A4 format. We draw koloboks with white paint. We draw lines, draw snowdrifts.

With brown paint we draw a trunk and twigs of trees, hands, eyes, a mouth and a broom for a snowman.

We decorate the picture with snowflakes. We decorate the snowman: we draw a bucket on the head and a scarf. Children complete the drawing, decorate.

By the same principle, you can draw an autumn forest, only initially the koloboks will be yellow, orange and green, and the leaf fall, draw by applying a brush, print. Children's work:


Drawing master class for children "Hedgehog".
We draw a "bun" with brown paint.

Draw a triangle nose.

Child's work.
We draw a clearing for a hedgehog, children fantasize.


Child work:

Drawing master class for children "Frog".
We take a blue sheet, A4 format. We draw in the center of the "bun" with green paint.

We draw one more "kolobok", and on top two "bridges".

We draw paws for a frog, we draw the attention of children that the paws of a frog differ in their structure, which helps the frog to jump well and hold on even on the most slippery surface.

We draw a frog mouth, eyes. We decorate the picture, having previously talked with the children: where does the frog live?

Drawing master class for children "Cockerel".
We draw a large bun-torso, a smaller bun - the head. We connect them with smooth lines, we get a neck.

We draw a cock legs-triangles and a tail, lines-arcs.

With red paint we draw a cockerel scallop (bridges), beak and beard, apply a brush.
Today on the Internet you can find a lot of different information about how, Of course, the approach to work for each artist may differ from each other. And every way of drawing will be correct!
Nevertheless, I also decided to make my tiny contribution to the “web web”, as I work with this type of paint, along with traditional oil and stained glass lacquer paints. You can see my paintings in different execution techniques in
The whole complexity of writing with acrylic paints lies precisely in the details. The general principles for applying these paints and their combinations differ little from oil. But nevertheless, mixing, applying them to the surface, as well as transparent glazing are somewhat specific. Previously, I wrote in painting.
For those who are just looking at acrylic and trying to draw for the first time, it is useful to take the first steps according to a well-established technique. That's why this article came up: I will tell you in it how to paint with acrylic paints so as to take into account their main features. This is of course not an absolute rule, since any painting is a whole living world and accordingly, improvisation in art is only welcome.
Two acrylic sketches
In the photo, I choose one of the acrylic sketches for further work on oil on canvas.
In the art of music, most likely there would be no jazz if it were not for the virtuoso musical improvisation of the musicians. By the way, did you know that many musicians have shown talent in the visual arts as well? Take an interest and see for yourself the talent
In the future, if you decide to continue working with them, you will already be able to experiment with certain subtleties, improvising and creating your own music on canvas! So let's go...
Getting started: preparing a palette, brushes and paints
You can paint with acrylic paints on cardboard, on thick paper designed for acrylic, but it’s better, of course, a suitable canvas is suitable for acrylic painting. Therefore, painting with acrylic paints on canvas will be the right decision!
If you're not ready to paint on canvas right now, start simple with acrylic paper, with canvas structure. You can later stick such work on thick cardboard, hardboard or canvas. And as they say, framed and on the wall!

Accessories before you start painting with acrylics
Already at the stage of preparation for work, it is necessary to take into account the main features of acrylic paints.
First feature: they dry very quickly, both on the palette and on the canvas. Therefore, to prepare paints, you must either use a special palette, or constantly keep them in a liquid state on the floor. If you decide to apply masks pasty or with a palette knife, then this feature will only help you.
How long does acrylic paint dry?
Everything directly depends on the thickness of the stroke, the thinner it is, the faster the acrylic dries! If in acrylic painting the drying speed confuses you, and you do not dare to try them in your work because of this, then do not worry. Today on the Art space appeared special means - drying retarders.

Retarders for acrylic painting
They dilute acrylic paint and it will not dry for hours on the palette, remaining in the right consistency. On canvas it also dries with a noticeable slowdown.
Second feature: acrylic paints after drying slightly darken, fade by about a ton or two. Therefore, initially we select them so that in the working form they are a tone or two lighter than we need in the picture. This is especially important if you are finishing where a smear has already been placed. That is, one stroke over dry paint will be visible ... try it and you will understand for yourself.

Sketch with acrylic paints
The photo above shows an example of a previously made sketch with acrylic paints. This sketch was prepared before the main work - painting on the wall. The drawing must be clear and correctly written. Therefore, the image on the wall must match the sketch, as there will be an exact repetition, only on a larger scale.
Pay attention to the transition from light to dark in the arch opening .... This effect can be achieved by glazing, as if transparently overlapping with one paint from above.
The picturesque colorful layer is the main thing in painting, so we start work with the choice of colors and shades of your future composition. As a rule, novice artists simply take the colors of paints that they have in the kit, that is, in tubes. And if you need colors that are not in the tube? Here the ability to mix colors comes to the rescue, to get a new shade. After all, it is by mixing that we get new interesting color variations!

The richness of shades is obtained by mixing
Glazing with acrylic paints- a separate issue. If you are just learning acrylic, then paint with independent, dense tones, just get used to the colors and their features. Once you've mastered the basics, you'll be able to play around with creating translucent blister layers.
Below in the photo from left to right: the usual method of applying paint, the second option is the postose technique, the third is a light watercolor-lisser technique.

Examples of paintings in different acrylic techniques
Important feature: with each stroke, try to form those contours that you want to see in the final version. Acrylic paints dry in just a few minutes and it may turn out that when you want to finalize the contour, it will already dry and fade, and the new layer on top will contrast with it and prevent you from correctly evaluating the intermediate version.
It is desirable, of course, to immediately outline the contours of objects with contrasting edges. This will make it easier to draw each individual one.
Another caveat: the brush needs to be washed frequently, especially when drawing very fine details. For example, animal hair, grass, small stones require very thin brush strokes. If a large amount of paint sticks to the brush and it dries out, then the hairs stick together and the strokes become thicker and rougher. They fail to create the desired structure.
In one day or evening, it is desirable to complete one complete independent element, at least one of its layers. Then, after drying the next day, you can start with a new element and not puzzle over whether the part completed today will contrast with the one you wrote yesterday.

Painting with acrylics on canvas
On a note
Remember that acrylic paints are practically not washed off clothes. Therefore, it is advisable to write with them in a durable apron or work robe.
This may be your first acrylic painting and it doesn't have to be perfect. Its task is to let you understand how to work with acrylic correctly, how it lays down on canvas or paper, how long it takes to dry, and what result you get when applying it.
When you write it, you will already understand what caused certain shortcomings, and in the next works you will be able to avoid these mistakes. That's why feel free to write, evaluate the result, draw conclusions and improve. Perhaps it is acrylic that will help you to fully reveal your creative potential!
For those who want to improve and want to go further, I offer a complete video course, a guide on the example of a painting in a modern style. Video is the most convenient way to learn, in my opinion. Lesson announcement 📌
Friends, so that the article does not get lost among the many similar ones, save it to your bookmarks. It will always be at your fingertips at the right time.
Ask your questions below in the comments, I usually answer all questions quickly
Watercolor paints are one of the most beloved by artists. Firstly, watercolor has a lot of different techniques, and secondly, it can be used to create a beautiful drawing, even if you don’t know how to draw at all.
These techniques will help beginners learn how to draw, and professionals can refresh their memory and find inspiration and ideas.
1. Painting with a flat brush
Step 1
Draw a square or rectangle to mark the beginning and end of the layer.
Choose a darker shade (it's easier to see) and starting from the top left corner, brush down on the paper and gently draw a straight line all the way to the top right corner.
But: left-handers should draw from the right corner to the left.
Step 2

Fill the brush again with paint.
Start the next stroke from the bottom edge of the first one, try to cover the buildup of paint that formed from the bottom of the first stroke.
Hint 1: If the buildup of paint in the first stroke has not flowed completely into the second, then increase the angle of your easel to help the paint flow freely.
Hint 2: By increasing the angle of inclination, you also increase the chances of getting uncontrolled flows of paint. Therefore, try to work faster or have something like a rag or sponge handy to quickly remove drops.
Step 3

Repeat the previous step, also trying to cover the accumulation of paint in the top stroke.
Hint 3: You can use the flat edge of the brush to "cut off" the beginning of the layer and make it even.
Hint 4: If you want to flatten the end edge of the layer, then at the end of the stroke, pause and brush up and then down as you would with the start edge.
Hint 5: If the stroke is broken, then immediately fill the brush with paint and re-swipe it.
Step 4

Repeat the previous steps until the very end. Try to stick to the same tone of paint.
Hint 6: You won't believe how different the behavior of brushes, paints and paper from different brands can be. Usually, the more expensive and popular brands make your job easier by providing high quality products.
Hint 7: If your strokes break even if the brush is full of paint, then you are using too thick paper, or the paper is too rough. If you come across such paper, then sprinkle water on it, blot it with a clean sponge and let it dry. This will make the surface more receptive to your paint.
Step 5

Rinse the brush and squeeze out any remaining water from it. Carefully pick up the blobs of paint left underneath the last stroke with the brush, but don't take too much paint or you will discolor your drawing.
To create more texture in your drawing, leave it to dry at an angle. So the paint will take on a more interesting look.
Gradient
Step 1

Draw a square or rectangle. Then dip your brush into the darker shade of paint (it's on the palette to mix) and gently stroke the brush.
Step 2

Dry the brush with a sponge or paper towel and dip it again in a lighter shade.
Then draw a new stroke, overlapping the bottom of the previous one. Notice that the left side of the layer has already merged with the previous stroke. Let gravity do its thing.
Step 3

Rinse the brush again and dry it. And then refill the brush with paint and make another stroke. Repeat this process until the very end.
Hint 1: If the stroke breaks or does not go as smoothly as you would like, quickly refill the brush with paint and repeat the layer.


Step 4
Rinse the brush with clean water, dry it and pick up any remaining paint.
Hint 2: Try this technique by working with different colors and creating interesting transitions.

watercolor glaze
Step 1

This technique requires improvisation and imagination. For example, we will draw an impromptu landscape.
First, paint the sky and the river with blue paint. We will separate the paint with a small amount of water, this will be a waterfall.
Step 2

We draw clouds of dark pink color and we start to draw a mountain in yellow color. We will also mark the lower part of the figure in yellow.
The example uses light and transparent tones so you can see how the layers interact.
Step 3

By mixing cobalt blue and ultramarine blue, we will paint the horizon of the mountain and shade the small yellow slope.
Hint 1: let each layer dry. You can use a hair dryer to speed up this process. Keep it at least 25-30 cm away, turn on the cool setting and set the hair dryer to the lightest air flow. No steam or hot air!
Step 4

To shade and add interesting colors, use orange. With it, we will create the coast in the foreground and shade the sky.
Hint 2: if you have drops of excess paint, rinse and dry the brush as you did in the previous techniques, and pick up drops with it.
Step 5

Please note that the images show different brushes for painting. You can use the ones you have available.
Take a dark blue color and shade the top of the mountain with it, changing the pressure on the brush and turning it around to create an interesting texture.
Step 6

Using the same blue color, let's play with the waterfall by drawing some circles. Sometimes visual clichés become your friends.
We will wash the brush and pick up the yellow color, with which we will add visual details to our shores.
Step 7

Once the paint is dry, shade the bubbles in the waterfall with a hint of purple. So we will make them more interesting.
Step 8

We need to link some elements and add trees. In the example, we used round templates for crowns, but you can draw as you like.
Step 9

In brown we will depict tree trunks. Also with the help of blue we will shade the water and the sky a little more. Then, using pink, blue and green, paint the grass in the foreground.
Step 10

Use a mixture of pink and red to add the final details. Our trees are bearing fruit now, and there are several fruits under them.
If you look closely, you can see how each layer interacts with each other. A darker shade has more power, but when the colors overlap, they create an interesting and beautiful combination.
“Wet” technique
Step 1

Wet the paper with water
Step 2

Blot the paper with a clean sponge, removing excess water. Try to achieve an even distribution of moisture on the paper, you should get a satin effect.
If the paper is shiny, it means that it is too wet, blot it again.
Step 3

We will paint the landscape again. Let's start, of course, with the sky. Using this technique, it is easier to draw the background first, then moving on to the objects of the foreground.
Step 4

We continue to draw the sky until we start to like it. The strokes will blur, creating an interesting effect.
Step 5

Now let's move on to the grass in the foreground. Using green, make a few wide strokes, leaving room for the stones.
As the paper dries, the strokes become less and less blurry.
Step 6

Let's add forms. To do this, use different shades of green and draw trees on the horizon.
Step 7

After adding the trees, let's try to add texture to them. To do this, use a darker shade of green to set the accents.
Step 8

Add stones using gray color. We filled in the gaps in the foreground with this color, leaving some gaps.
Try to use either dark or cold shades. Using both dark and cold shades will create visual dissonance.
Step 9

We will place accents to diversify the picture. Using a crimson hue, we depict several floral elements in the foreground. Let the crimson flow as it wants. Then, using a dry brush, remove the color from the middle of the spots.
Step 10

Then, drip clean water into the center of these spots to allow them to blend into the grass.
The hardest part about this technique is knowing when to stop. If you overdo it with blurs and colors, you will end up with a messy drawing.
This technique gives a slightly strange, but interesting result. A drawing made in this technique has a hypnotizing effect.
Dry brush drawing
Step 1

We think the name of the technique speaks for itself. We will need to pick up paint on a brush, blot it from excess liquid with a paper towel or sponge, and only then paint.
Let's start with a pencil sketch. After that, roughly mark the sky, moving the brush over the surface of the paper.
Step 2

Let's draw green trees on the horizon line, outlining what will later become our lake.
Then, by mixing mauve with blue, draw the first layer of the tree trunk.
Step 3

Let the drawing dry and add some elements: the reflection of a tree in the lake and the flow of water.
Mixing green and blue, shade the coast on the background part of the image and let the painting dry again.
Step 4

Mix an intense blue with ultramarine and paint a layer on the trunk of the tree to create the shadows and texture of the bark.
Step 5

Then, using shades of orange, we will depict the autumn landscape by painting the background trees.
Step 6

Having finished with the previous step, with a light orange tint, we will depict the reflection of the trees in the water.
Also, by mixing gray with blue, we will place dark accents on the trees.
We will also add trees on the other side of the horizon. Let's mark the shapes of the trees in orange.
Step 7

Let's take water. Use dark green and brown to achieve the desired color. And with wave-like movements we will draw water in the lake.
Step 8

When painting a lake, change the pressure on the brush to add texture.
Clue: if the brush is too wet, the paint will look flat. Dry the brush to intensify the colors.
Step 9

Let's add some grass under the tree, using the same color as the grass in the background.
Step 10

Let's add some details to the foreground.
We will also darken the lake a bit by adding a blue tint. And also shade the sky with the same color.
We remove moisture
This technique will require several sponges. It is suitable for the image of clouds, soft light. And it can also control the behavior of colors.

Sponges

Makeup sponges are the best. They absorb well and give an interesting effect.
Avoid rubbing the paper with the sponge, and if you do, be very careful not to damage the paper.
Paper towels

With their help, you can create clearer highlights. But paper towels absorb a huge amount of paint very quickly. Therefore, they can absorb fresh paint completely.
Paper towels can come in handy if you make a mistake. Then you can quickly remove the paint.
Dry brush

You can use a dry brush to create a pattern using this technique. To do this, rinse thoroughly and wring out the brush. With it, you can create clear lines.
Other methods:
- You can spray water where you want to remove the paint and then soak it up with a sponge.
- Use different fabrics to add texture
- You can use fingers or other parts of the body. The skin can also absorb moisture.

Discoloration of dried paint
Brushes for watercolor paint

Use clean water and a cloth, wet the desired areas, gently rub the pattern and remove moisture with a dry brush. This method allows you to control the areas you lighten.
Brushes for oil or acrylic paint

Stiff bristles allow you to quickly scrape paint from the desired area. But it is worth noting that this method can damage the paper, so control yourself.
Here, just as in the first method, you must first moisten the area, and then process it with a brush.
Spray and towel

Take a spray bottle and spray on the desired area, and then apply a paper towel to it. This method leaves large light spots and gives an interesting effect.
Sandpaper

Very rarely used, as it can damage the paper. It is best used at the end to add texture. You don't need water for this method, just rub the drawing in the right place.
Blades and knives

Can be used to highlight small areas and create crisp lines. This method is also very risky as it can damage the paper.
Sponges

You can also use sponges. Wet the desired area and dry it with a sponge.
Each of us is an artist at heart. Remember the golden moments of childhood, when we enthusiastically painted with paints “kalyaki-malaki”. The art of painting is the greatest mystery in the world. With the help of paints and brushes, real miracles appear on the canvas. Many mistakenly believe that they do not have artistic talent. In fact, anyone can learn to paint with paints. How to paint real works of art with watercolors? To do this, you only need to follow simple recommendations.
What will we need?
So, we decided to enter the world of art and become artists. How to paint with watercolor correctly? This will require the following tools:
- paints;
- brushes;
- palette;
- sheets of paper.
The choice of accessories should be taken very carefully. The final result - a work of art - depends on them.

Choosing colors
How to paint with watercolors yourself? First of all, you need to choose the right colors. There are a huge number of watercolors on the shelves of art stores. Which one is better to choose?
Do not look at the price category here. High cost is not always a guarantee of quality.
It is better to choose paints made on the basis of beeswax. On the cover should be the inscription "honey". They have the brightest color.
Paint brushes
The brushes are just as important. Which of them are most suitable for watercolor?
The brush should be soft and pick up paint well. Its tip must be pointed. The bristles of the brush should be well fixed on the base. The best option would be brushes made from squirrel wool. Their bristles correspond to the declared parameters.
How many brushes will you need? To paint small parts of the picture, you should purchase a thin brush (number 1 or 2). For the main part - a greater thickness (numbers 5-6 or 7).
Palette
The palette serves as a kind of “draft”, a place for mixing paints. Several paints of different colors are applied to the palette, they are mixed. The result is the desired shade.
You can purchase a ready-made plastic palette. You can also do it yourself. For this, a sheet of thick paper is suitable, which should be folded around the edges.
Choosing watercolor paper
The process of choosing paper should be treated with special attention. The fact is that watercolor is a translucent paint. It requires a lot of water to work. If you draw on plain paper, it can quickly get wet from water. It is better to purchase special paper for watercolor. It is denser and thicker. Its surface is rough. Water particles get stuck on the rough surface of the paper. This prevents spreading.

Let's start drawing
How to paint with watercolors yourself? Having studied the basic features of watercolor paint, we know that it requires a large amount of water. The drawing is translucent, airy, flying. This effect is due to the structure of the paint.
There are 2 main watercolor painting techniques:
- Dry technology.
- Raw paper technique.
Everyone is familiar with the basics of dry technique since childhood: we pick up paint on a brush and draw. Depending on the type of drawing, you can pre-draw its outline with a pencil.
To get the desired color, you need to dip the brush in water, then in the desired paint and apply it to the palette. After that, the brush is washed with water and lowered into the paint of a different color. The resulting colors are mixed on the palette. The result will be the desired shade.
What is the difference between watercolor painting on wet paper? This technique is quite interesting, because. it allows you to create an unusual effect. To do this, before you start drawing, you should moisten a sheet of paper well with water. Until it dries, watercolor paint is applied to the wet paper. When mixed with water, it spreads, leaving fancy patterns on paper.
Let's draw
So, we purchased materials for work. Learned basic drawing techniques. Now you can proceed directly to the creative process.
How to paint with watercolor for beginners? For starters, it is recommended to try to study the paint. What will be required for this? Consider the basic lessons of acquaintance with paints:
- We study colors. Take a sheet of watercolor paper. Pick up the color you like with the brush. Put it on paper. Look at the effect. Now increase the amount of pressure on the brush. See how the color has changed (it should darken). Now fill the brush with more water and dip it into the paint. Draw a wet brush over the paper - the drawing will be translucent.
- We mix colors. Try mixing several colors. What shades are the result?
- Apply yellow, orange, red to the sheet. Study them. What emotions do they evoke? Now apply blue, purple, black to the sheet. What are the feelings now?
- We draw from nature. Now we need to learn how to display the objects around us. Put an apple in front of you. Study it carefully. See what color it is. Try to draw it.
Practical work
After learning the basic skills of the art of painting, you can move on to independent work.
Learning to paint objects around us in watercolor. Look around. What do you see? You can draw a still life. To do this, put in front of you a few items of utensils and any fruit. Try to picture them.
What else can be painted with watercolors? There are no restrictions here. It all depends on the imagination of the artist. You can draw everything that surrounds us. You can draw your own invented world.
You can start learning the basic techniques of working with watercolors by painting flowers and trees.

How to draw a flower?
Draw a flower with watercolors yourself:
- Think about what flower to draw.
- Explore its primary colors.
- Using a simple pencil, draw the main outline on the paper.
- Choose a paint for the background and paint over it.
- After the background is dry, you can start painting with watercolors.
- Paint over the flower with translucent paint.
- After the watercolor has dried, draw the outline with a darker paint.
- After the drawing has dried, place accents on the flower. This will give it volume. To place accents, it is necessary to apply several dense strokes along the contour of the flower with contrasting paint. Our drawing is ready.
Painting with watercolors is a simple and very exciting activity. Each of us can feel like a real artist, creating whole works of art. You just have to listen to the suggested advice.
10 simple magic techniques for children's creativity
1. Monotype
Essence: ink imprint on paper with a smooth surface. What do you need: a piece of glass or tile, paper, watercolor, soft brushes, water. Process: we wet the glass, apply paint spots on it, put a sheet on top, carefully turn it over and remove the glass. What happens: very picturesque stains that give room for the imagination: “Look, mom, these are clouds! And here is the forest… And here are the waves!”Of course, God himself ordered to supplement what he saw among the spots with details. Using this technique, you can make a background, and draw a graphic image on it with a thin gel pen - when it dries.

You can create targeted prints, including symmetrical ones: paint is applied to one half of the sheet, then we fold it - and we get the second half of the picture!
You can “print” with paint from different forms - for example, from leaves or templates cut out of cardboard. Then it is better to take thicker paints - gouache or acrylic.

Or pre-impose cut out simple stencils on the sheet - then the background will turn out to be colorful, and the images will be white.

2. Blotography
Essence: from a colorful blot, you can “inflate” the original figures. What do you need: thick paper, thick brush, gouache, drinking straws. What happens: we drip onto the sheet with paint, then through the straw we blow on it, making lines. Then, depending on what we see, we supplement the image with a pattern or appliqué.
In this technique, it is especially cool to draw trees - the branches turn out to be very naturally curved.
3. Fun dots
Essence: for professional artists, this is a separate style, called “pointillism”. What do you need: paper, gouache, palette, cotton buds. What happens: we apply paint of different colors on the palette, dip the sticks - and tightly cover the space with colored dots. For convenience, we first make a light pencil sketch.
You can also draw with dots with the help of brushes, but, unlike sticks, you will need not to be lazy to wash them. Another cool dot is the outlines for the fabric, but they should be worked carefully so as not to extrude too much and not make puddles.

4. Spray
Essence: what kids love is splashing. And doing it with paint is much more fun, and even with meaning! What do you need: paper, liquid paint, stencils (silhouettes cut out of cardboard), old toothbrushes. What happens: we put our stencils on the leaf - and with the help of a brush we “spray” the paint over the surface, then we remove the cardboard and see the pictures. You can apply several layers - both contour images and paints.
5. Scratches
Essence: this technique has an elegant French name "grattage". What do you need: wax pencils, gouache, paper, liquid soap, a candle and a thin stick (for example, a knitting needle or a used rod). What happens: we color the sheet with pencils, then we rub it with a candle, and on top we cover it with a layer of dark gouache mixed with soap (so that it lays evenly). When the paint dries a little, we scratch the drawing on it. It turns out very unusual and mysterious, especially night and space scenes.
6. Candle art
Essence: the drawing magically appears - white lines on a colored background. What do you need: paper, a candle, watercolors and a wide brush. What happens: we draw on paper the contours of some objects or creatures with a candle, like a felt-tip pen. Then we cover the sheet with watercolor. Since the paint flows off the paraffin or wax, the outlines drawn by them remain white or dotted.
7. Paper mosaic
Essence: ancient artists decorated temples and palaces in this way, and we can do the same at home. What do you need: a sheet of thick paper, glue stick, colored paper, scissors. What happens: We cut colored paper into stripes, and then into small squares. We make the outline of the drawing with a simple pencil, carefully cover the sheet with glue and sculpt a mosaic on it. It turns out beautifully when the slightly protruding background is dark.


