Time inexorably runs forward and now white flies are flying outside the window, slowly sinking to the ground and covering everything around with a snow-white fluffy veil. However, despite the cold, the soul is warm and joyful. And all because suddenly appeared snowflakes herald the onset of the New Year. The most important holiday of the year is already very close, which means it's time to think about New Year's decor, gifts and, of course, crafts.
The days are getting shorter and the evenings are getting colder and longer. What to do with yourself, and even more so with your little fidgets, when it is already too dark for outdoor winter fun? Well, crafts, of course. New Year's crafts can be made from the most unexpected materials: cocktail tubes and much more. But there are also more traditional materials, such as paper. In this article, we have collected for you more than 60 step-by-step master classes for making paper crafts for the New Year. If you still think that only applications can be made from paper, then drop everything and carefully look at our article! Well, for those who are looking for something unusual and know what miracles can be created from ordinary paper, we can only advise you to immediately begin the process of creating New Year's paper crafts according to our schemes and templates.
One of the simplest New Year's paper crafts can rightly be considered a garland. We all remember well from our childhood how they decorated the Christmas tree with such paper garlands not only at home, but at school or kindergarten. A paper garland is made very simply: colored paper is cut into strips of the same width, the first strip is glued into a ring, and each subsequent one is threaded into the previous ring and also glued. This paper craft is perfect for 4-5 year olds.
If the task of entertaining children is not worth it, but you need to decorate the house, then here's another version of a paper garland for your note. It is made even easier than the previous one, but you will need a sewing machine. So, to create such a New Year's paper craft, you will need: a lot of circles of different diameters (the number depends on the size of the garland), a sewing machine. Sew circles through the center on a typewriter and hang a garland. From any gust of air, such a garland will “come to life”.

So, if you decide that the issue with garlands is closed and there is nothing else to think of here, we hasten to upset you - this is only the very tip of the iceberg. Simple paper garlands are an activity for beginners. Professionals prefer more complex tasks, such as voluminous paper crafts. Below is a master class on making a volumetric garland in the form of light bulbs.

By the way, you can decorate an ordinary LED garland with paper lanterns. This New Year's paper craft looks very cool, especially if you decorate the wall with this garland.

Interested in a garland? Then see more ideas:

New Year is the most beloved holiday associated with miracles and magic. The celebration of the new year is characterized by folk festivals and joyful meetings. It is impossible not to love this time of the year, when everything around is transformed, and every house or shop window becomes like scenery for a fairy tale. Everyone wants to participate in this transformation, and therefore they try to decorate their homes […]
Since we are talking about the decor of the apartment, it would be strange not to mention Christmas wreaths, or as they are also called New Year's wreaths. Everyone can make such a paper craft, in addition, a New Year's paper wreath is a reusable decoration that will not deteriorate and will not lose its appearance over time.

A very cool paper craft for the New Year is a wreath of roses. You will have to work hard to create such a craft, so if you decide to make yourself such a paper wreath on the door - stock up on patience and mood!

If you're planning a New Year's themed party, say Cuban or Hawaiian style, then you'll definitely need some kind of decoration to set the atmosphere. Here is such a simple, but very original wreath made of paper will come in handy!

Surely your child at school or in the garden was asked to make a Christmas wreath with their parents. Allegedly for a competition, but the main task of this task is to get parents to spend time with their children. But maybe you should not wait for a task from school, but spend time with your child yourself. In addition, with such a New Year's craft, you can decorate the house in a very original way, and most importantly, get a lot of positive emotions!

Need a Christmas wreath? See more ideas:

Preparing for the New Year is sometimes even more pleasant than the celebration itself. The whole family, including the youngest residents, can take part in the process of decorating the interior. You can decorate an apartment or house for the New Year holidays in a variety of ways, but recently New Year's wreaths, which are better known to us from romantic Hollywood Christmas films, have been very popular. However, trendy […]
So, we continue to decorate the apartment. There is a garland, there is a wreath. Something is missing? Oh, of course, Christmas trees! If you prefer to put a big forest beauty on New Year's holidays, it doesn't matter. By the way, read on. Small paper Christmas trees make a great addition to the decor, and they can also be used as small souvenirs for guests!
# 10 New Year's paper crafts with our own hands: we make a Christmas tree toy "Herringbone"
A Christmas tree made of paper does not have to be on the table or somewhere in the house. You can make a craft out of paper, which you can then hang on the Christmas tree itself, and if there is no Christmas tree, then you can simply hang such voluminous paper Christmas trees around the house. The scheme for making a Christmas tree is quite simple, but if you don’t quite understand what the essence is, or you just don’t have time to figure it out, then you can download a ready-made template.

A very cute Christmas tree can be made from corrugated paper. This paper craft looks very realistic, but it is done quickly and easily.

If you are still interested in a paper Christmas tree, but you want to make something unusual, then use this master class.

The tree does not have to be on the floor, it can also be hung from the ceiling. An excellent Christmas garland will turn out from plain paper.

How to distinguish the New Year's table from the usual festive one? Everything is correct! According to thematic elements of decor. And how to make a suitable New Year's dessert, see.


Do you want more workshops on making paper Christmas trees? See:

The Christmas tree is, of course, the main attribute of the most important winter holiday. It will not be possible to do without the forest beauty, the atmosphere is not the same, and where does the good grandfather put the gifts? It so happened that a Christmas tree is decorated in the house for the New Year holidays: someone puts a live one, someone prefers an artificial one, and someone paper. A paper Christmas tree can not only replace a Christmas tree […]
#17 Christmas paper crafts: making a movable card with wishes
From paper, you can make not only flat or voluminous crafts, but also movable ones. With our ready-made scheme, you can make a postcard with an encrypted congratulation or message. Such an unusual gift will please not only children, but also adults! You can download the finished scheme below.


In winter, wild flowers are not to be found, even in flower shops. But there is nothing to worry about, flowers can be made from paper with your own hands. And our step-by-step master class will help you with this.

A wide variety of flowers can be made from paper, the whole secret is cutting out the ends.


If you want to make a big Christmas star for decorating a wall from paper tubes, then this master class is especially for you!

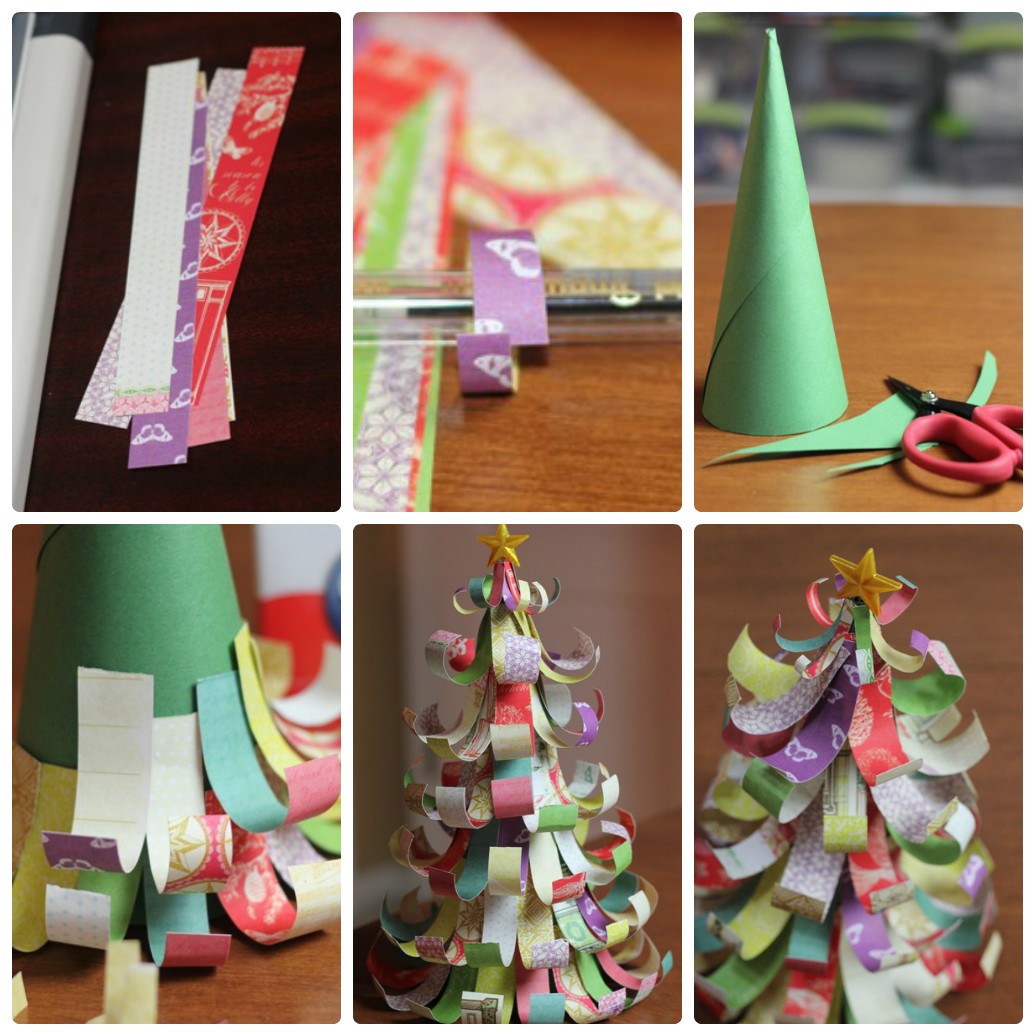
A very themed New Year craft made of crimped paper. Such a paper cone looks very natural and is quite difficult to distinguish, especially if it is used as a decoration. With our master class, you can easily cope with such paper crafts.

There is another technique for creating paper cones with your own hands. This method is more labor intensive and will take you more time. In addition, to create such a New Year's craft, you will need: paper, a foam blank, a lot of safety pins, a ribbon and beads for decoration. However, if you have the time and desire, then pay special attention to this scheme for making a cone, especially if you want to impress.

From paper, you can make very special crafts using the Japanese origami technique. Our step-by-step master class will help you create a New Year's paper ball that can be used to decorate both a room and a Christmas tree.

A step-by-step diagram for creating an origami star with your own hands. You can decorate the top of the Christmas tree with such a star, you can simply create a festive atmosphere in the house, or you can combine it into one big garland.

You can make the base yourself, as in the first picture. Or you can download the finished pentagon blank and, depending on the size of the pentagon, the size of the finished star will change.


At your service is a step-by-step scheme for making a three-dimensional paper snowflake. Follow the instructions and you will definitely get such a miracle.

#34 We decorate the apartment with cones: do-it-yourself Christmas paper crafts
In continuation of New Year's paper crafts, I would like to offer you another scheme for making paper cones. In addition to paper circles, you will need an oval or round blank, glue and fir branches for decoration.

Another great option for decorating an apartment with your own hands is a large voluminous snowflake on the wall. A snowflake can be not one, but a whole ensemble. In addition, on such a New Year's background, you will get great photos!

New Year's gift must be in a beautiful package. In my opinion, the gift itself is not so much important as the intrigue around it. After all, it is this intrigue that will remain in the memory, this is a pleasant expectation and unfolding the paper. Use our scheme for making paper flowers with your own hands and decorate gifts for dear and close people.

It is customary to decorate a Christmas tree with toys, but these toys do not have to be purchased. Even better if they are made by hand. And what could be easier than making a Christmas tree toy out of paper. Use our step-by-step instructions and make your own paper Christmas ball.

Very simple, but incredibly cute voluminous lanterns can be made from ordinary colored paper. Even children can handle this craft, so feel free to get to work if you have little helpers. Well, if not, then you can do it yourself!

You can make completely unexpected crafts out of paper, including gift boxes. And not just boxes, but in the form of delicious sweets. For such a gift box you will need: cardboard cylinder, colored paper, glue, scissors, satin ribbon.

In continuation of the question of gift wrapping, we want to offer you another budget, but very charming option. You can make such a gift elf with your own hands using our master class.

Here is another version of the original packaging of a New Year's gift with your own hands.

Need more gift wrapping ideas? See:

On the eve of the New Year holidays, shop windows are full of gift boxes, decorative bags, wrapping paper for every taste. Smiling sellers helpfully offer to provide services for wrapping New Year's gifts. And all this seems to be great, because you must admit, it is much more pleasant to receive a New Year's trifle in a beautiful package. But on the other hand, the whole meaning of the gift is lost, the very gift that […]


Want more Christmas ball ideas? See:

Today, on the shelves of stores you can find a huge number of a wide variety of Christmas toys, so turning an ordinary Christmas tree into a real festive beauty is not difficult. However, the New Year is a special day! The day when the old year is left behind, and new adventures, new events, new victories await. But after all, the old year did not pass without a trace, […]


#55 A simple paper snowflake pattern: decorating a room for a party

#56 Do-it-yourself voluminous paper crafts: making a snowflake. Scheme


#58 Christmas paper crafts: decorate the house with diamond crystals
Download ready-made schemes and make your own paper diamond crystals.

#59 New Year craft paper ball "Mistletoe" with your own hands
Here you can make such a mistletoe paper ball with your own hands, using ready-made cutting templates. Stock up on patience and New Year's mood!


You can decorate a house not only with standard snowflakes or stars. You can make such a wonderful vase out of paper. Download the finished scheme and assemble the vase following the instructions in the master class.

A wide variety of decorative elements can be made from plain paper, just download the finished scheme, print it, cut it out and glue it. A wonderful Christmas paper craft is ready!

#64 Christmas patterns for cutting: a great photo shoot for the new year
Note! The templates are very large and of good quality, so the download may take some time.

Simple Christmas decorations can be made from paper. In our master class, an example with a ball is given, but it can be other shapes: hearts, stars, Christmas trees and much more. You can download ready-made templates below.

You can make a simple and original Chinese lantern with your own hands using our ready-made scheme.

An excellent decoration for the new year will be a composite paper star. You can download a ready-made template for gluing below.

In our time, you will not surprise anyone with ordinary paper cutters. Volumetric crafts cause much more delight. In this master class, a scheme for creating a simple volumetric star is described step by step. You can download a ready-made template with a large, medium and small star from the link below.

It is quite difficult to imagine a New Year's decor without all sorts of variations on the theme of stars. In this master class, you will learn how to make a volumetric double-sided star out of paper with your own hands. You can download the finished scheme below.

#70 Christmas paper masks
Carnival masks must be included in the list of New Year's paper crafts. Well, what New Year's party can do without masks? That's right, none! In fact, there are a lot of options for making paper masks, and if you turn on your imagination, you can make many wonderful crafts!

Nowadays, paper is the cheapest and most affordable material. What can be done from paper with your own hands? The first thing that comes to mind is, of course, a postcard.
DIY gift
Creative with love
A postcard has long been a companion of any gift for a celebration, and in some cases a wonderful independent gift. A good example is valentines. Thick paper or cardboard, various colors, scissors, glue - this is the minimum set of tools that is needed. The easiest option is to fold the sheet in half and decorate with appliqué. Any decorative material can be used: pieces of fabric, lace, ribbons, buttons, and so on. The possibilities are only limited by your imagination. If you have a child - connect him to this activity, he will be delighted. A little patience, and you can get a great author's work.
From two layers of paper you can make a three-dimensional postcard. To do this, a pattern is applied to the inner layer and cut out along the contour in a certain way. Using the game of two colors, you can get such wonderful postcards.


Postcards made by you will leave the brightest memories of you
Scrapbooking technique
Postcard decoration techniques are widely used in another type of paper craft - scrapbooking.
is the production of family or personal photo albums dedicated to any event: wedding, birthday, travel, any event that can be told about with the help of a photo collage. Scrapbooking has long gone beyond photo albums, and today many things are decorated with this technique: boxes, packaging, pictures, calendars.

Children's photo album
Although you can buy the necessary materials for this exciting activity in specialized stores, there are many recipes on the Internet on how to make special paper or scrapbooking embellishments yourself. In particular, paper is made from newspapers, wrapping paper, perfume boxes or even egg boxes, with the addition of grass, thread, sequins or confetti.

Like postcards, scrapbooking uses half-beads, ribbons, braid and lace for decorations. In addition, paper decorations made according to the technique are used. parchment and quilling
Pergamano technique
- embossing technique on parchment paper. A professional tool is successfully replaced with a regular pin with a round tip or a crochet hook. Nail clippers and the same pin will come in handy for making holes. And the old computer rug will serve as a substrate. Patience and imagination will help you create works of art.

Pergamano was invented in Europe by nuns during the Middle Ages. Thus they designed the pages of Holy Scripture.
It is believed that they were the first to use another technique - quilling: this is the art of making applications from twisted thin strips of paper. The nuns wound thin paper strips with golden edges around a bird feather and used the resulting spirals to decorate books, medallions, and frame icons. Today, quilling masters widely use it in decorating and interior design.

Pergamano "With the newborn!"
The simplest elements of quilling can be mastered even by a child of primary school age. This activity will help develop creativity and imagination in your children.
Various paper applications

Sweet home


Origami - paper crafts

Origami called the art of the whole sheet, because the classical technique forbade not only cutting the sheet, but even tearing it. Children are happy to fold paper figures, this activity will help to cultivate hard work, perseverance and creativity in your child. With the help of origami, you can not only have fun, but also create an amazing item for, for example, a children's room.


White paper butterflies
Large colored butterflies fan out
You can decorate a chandelier on the ceiling with paper products
Paper decorations for any occasion


You can make fan decorations from gift or colored paper.
paper flowers


Draw, cut and round.

From paper with your own hands, you can make not only cute trinkets, but also very useful things in everyday life. Everyone in the house has a stack of old newspapers and magazines. We shift the growing pile from place to place, in the closet, on the balcony, in the garage, until we finally decide to take all this stuff to the trash. In the meantime, you can create such miracles from old newspapers and magazines.

Products from newspaper tubes, twisted in a special way and painted with acrylic paint, cannot be distinguished from wicker products from a vine.


Cardboard furniture


House for children


Cardboard creative

Try to do something with your child, and warm memories of this event will forever remain in his soul.
Paper is the most common craft material for several reasons: low cost, availability, ease of use. Of course, paper cannot be called a very simple material, because it all depends on your skills, the type of paper, as well as the complexity of the craft. It can be a simple application for children, or it can be an origami from modules that young children cannot handle. In this article I want to offer 10 crafts of varying complexity for children and adults. They are made from several types of paper: plain white A4, colored, corrugated, crepe. He even eats one piece of paper for notes. Let's start looking at the various options.
3D postcard for March 8
You always want to surprise with a gift for the holidays, and such an unusual postcard will not leave anyone indifferent. This craft can be quickly and easily done by a child from 9 to 11 years old with their own hands and presented to their mother or grandmother for the holiday. To learn how to make a 3D postcard, you can watch the photo and video description with step-by-step instructions.
You will need:
- Colored paper (4 white sheets and 1 pink sheet)
- Scissors
- PVA glue
- Ruler
- Pencil
- Double-sided tape
- Paint (lilac and green)
Working process:
- Divide the white sheet in half with a line, and then fold 4 sheets together and cut along the line. We need 7 halves, put the 8th aside.
- Take half of the sheet and fold it in half 2 times. We get a rectangle, two sides are closed, and two are open.
- We bend the corners to the closed long side outward. We do this on both sides.
- Now the folded corners need to be bent again in the opposite direction, so we do this only on one side.
- We get a guideline by which we will cut off. Cut along the folded line on one side, then flatten the corner once and cut along the line on the other side. Thus, we get a shape similar to a leaf.
- So we do with the remaining six sheets. So that the shape remains the same for all colors, simply attach the first blank and cut it out.
- Take the resulting flower and cut out one petal from it, and then glue the gap by overlapping the side petals exactly one on top of the other. You should have 6 petals. We do this with all the flowers.
- Fold the flowers in half. Glue pieces of adhesive tape on the side petals of the 1st flower, on the very top of the petal.
- We glue flowers on the side parts, only the side petals, gently applying the petal to the petal.
- Now we glue the 4th flower on 3 flowers, also only the 4th one should have all the petals glued.
- We glue the 5th and 6th flowers on top like 2 and 3 (only on the sides).
- We glue the 7th flower on top of all the others on 3 petals.
- Fold a pink sheet in half, like a postcard, now we will finish our composition.
- We put the flower on half of the postcard and attach adhesive tape to the upper central petal and close it with another sheet of the postcard. Glue the other side in the same way. Make sure that the sheet lies clearly near the fold line.
- The card is ready, it remains only to color the middle of the flowers. You can sign the postcard.
Colored paper caterpillar
Such a caterpillar is easy to perform and will take very little of your time. The craft is designed for children from 2 years old and their parents. You will be able to spend time with your child pleasantly and usefully, you will also develop the motor skills of children's hands. Let's start doing the caterpillar with our own hands. 
You will need:
- Colored paper in different colors
- PVA glue
- Scissors
- Ruler
- Pencil
- felt-tip pens
Working process:
- Make strips of paper 6 cm long and 1 cm thick (red, green, blue, yellow, purple, brown, blue). The colors should be different so that the caterpillar turns out to be iridescent and bright.
- We glue each strip to make circles.
- When the circles are ready, glue them together alternating colors. You should get a strip of circles. We glue the last one a little higher than the rest, this will be the head.
- Draw a mouth and eyes with a felt-tip pen.
- Cut thin strips from colored paper and twist with scissors. Glue them in place of the antennae.
- From a green sheet, cut out the shape of a leaf in size, focusing on the caterpillar. Our funny caterpillar is ready!
Corrugated paper valentine
For Valentine's Day, ordinary heart-shaped cards are always given, but if you want to make a more original card, make it from corrugated paper. And now I will tell you how to make a valentine with your own hands step by step with step by step instructions. 
You will need:
- Cardboard
- Red corrugated paper
- Scissors
- Match
- PVA glue
Working process:
- Cut out a card in the shape of a heart from cardboard.
- Cut corrugated paper into squares a little more than 1 cm in size.
- We apply the square with the central part to the tip of the match and crumple the paper in a circular motion. Do this with all the squares.
- We apply glue to the valentine and begin to glue our crumpled blanks. When the glue dries, fluff up the paper to make it more fluffy. The holiday card is ready, you can give it to your loved one.
Bunny in 5 minutes
If you need a craft for kindergarten that does not take much time, then a voluminous bunny is the perfect option. The most important thing is that you can connect your baby to the execution process. Let's see how to make a simple bunny with your own hands using detailed instructions. 
You will need:
- Sheet of colored paper
- Scissors
- Ruler
- Pencil
Working process:
- From a sheet of paper, cut out 2 strips about 1.5 cm wide along the length.
- Cut one strip into two different strips. The difference is about 3 cm.
- We glue both strips so that we get 2 circles.
- Glue them together.
- Cut the second strip into 3 equal parts. Cut one piece lengthwise. We fold each thin strip in half and glue the ends together. This will be our ears.
- We glue the ears on our blank of two circles, on a smaller one.
- The remaining strips are also cut lengthwise. Paws are made like ears. Glued to the bottom circle.
- From one more strip we make a small circle and make a tail.
- Fold the last strip in half and round the edges with scissors. Spread and glue to the back of the bottom circle and scissors twist them forward. Bunny is ready!
Video how to make a paper bunny in 5 minutes
Beautiful flower
To decorate the interior, you can make an unusual flower from note paper with your own hands. For this, you do not need special skills, a child of 4-7 years old can also help with the implementation. To complete the craft, we have made a detailed description for you with step-by-step instructions. 
You will need:
- note paper
- PVA glue
- Cardboard
- Scissors
Working process:
- Note paper is best used without a sticky edge. Take the sheet with the corner up and fold the side corners and sides together. Glue them. You get buns. Do this with all the leaves.
- Cut out a circle of about 7-8 cm from cardboard. So we get a small flower.
- Now glue the 1st row of petals on the circle with the short side up. Petals should be close to each other.
- In the next row, glue the petals into the gaps of the previous row.
- So we do subsequent rows gradually reducing the number of petals in a row.
- We fill the middle with petals, no longer focusing on the rows, see that it is beautiful and voluminous. The flower is ready, you can hang it on the wall or put it on the table.
Videos flower diy
DIY book
If you want to make an unusual craft that will also be useful for use, you can make a small origami book out of paper. You will not write down your poems or compositions in it, but it will come in handy for small notes, and besides, it will not take up much space in your bag. It is very easy to make such a craft, just follow the instructions with a step-by-step description. 
You will need:
- Sheet of A4 paper - 2 pieces of different colors
- Scissors
Working process:
- Fold A4 sheet in half lengthwise. Open the sheet back.
- Next, fold the sides to the center fold.
- Cut the sheet into 4 strips along the folds.
- Take one strip and fold it in half 3 times. You get a small rectangle.
- Do this for all stripes.
- Open the resulting triangle and now fold it with an accordion. Do the same with the rest.
- Now glue all the pieces together, stacking the last pages of each harmonica one on top of the other.
- When gluing, fold the sides that face each other and glue. This is how we make pages.
- We fold an A4 sheet of a different color in half in width, and then in length. You will have 4 rectangles. Cut out one of them.
- At the rectangle, fold the side long sides towards the center, but not reaching the center by about 0.5 cm.
- Fold the rectangle in half and lightly mark a cent. Now, focusing on the center, make two folds in the central part about 0.5 cm wide. The cover is almost ready.
- Now, trying on the sheets of the notebook on the cover, fold the sheets inward according to the size. Then insert the last pages of the notebook into the cover. For better fastening, you can use glue. Our unusual notebook is ready.
Video how to make a mini book with your own hands
Butterflies for decor
Paper butterflies can be used to decorate walls, windows and gift wrapping. They create a romantic and light mood, because butterflies are so graceful. A child from the age of 3, as well as any beginner, can make butterflies with their own hands. There are many options for making paper butterflies and we want to offer you one of them, quite interesting. And now let's create a beautiful decoration in the form of a butterfly with our own hands. 
You will need:
- Sheet of A4 paper - 2 pcs (yellow and pink)
- Large needle
- Beads and beads
- thin wire
- Scissors
- double tape
Working process:
- We take one sheet and fold it in half, but the fold does not need to be highlighted too much.
- We cut off the corners, more on the lower side, and less on the upper side with a smooth bend in the middle.
- We open the sheet and, moving along the fold line, fold it with an accordion. We made the top wing.
- For the bottom, we do the same, only we will cut the corners of the same size. Next, fold with an accordion.
- We pierce the wings of butterflies in the center with a needle, so that in the future it will be easier to fasten them.
- We fold the wire in half and string the wings on it.
- We put a white bead on the wire at the upper wings, on both fibers. Then two gold pieces for each tendril.
- The rest of the wire is decorated with golden beads. To finish the antennae, we need to insert the tip of the wire into the last seed beads twice. We cut off the excess. We also do with the second mustache.
- Tape the top and bottom wings together.
- On the bottom of the wire we put on white beads of a larger size, about 4 pieces, and then 2 more beads of a smaller size.
- You need to finish the ponytail like the antennae, but for reliability, you can make a few twisting movements and cut off the excess.
- Now spread the wings of the butterfly and you can decorate the interior.
Paper origami tree
To decorate a home, office or kindergarten for the new year, you can make an interesting and unusual Christmas tree out of paper with your own hands. For those who love origami, this Christmas tree will love it. To complete this craft, read the step-by-step instructions, as well as the photo and video description. 
You will need:
- colored paper
- Scissors
Working process:
- From a sheet of green paper we make a square.
- Connect two opposite corners so that you get a triangle.
- Unfold the triangle back into a square and fold the other two opposite corners into a triangle.
- Along the folds along the sides, fold them into the middle, when you fold you get a triangle.
- Now we bend the sides of the triangle to the center, from the beginning on one side, and then on the other. And straighten it again.
- We straighten each resulting triangle along the fold, straighten it along the central fold and fold and make a new fold to the left.
- Divide the resulting structure into equal sides.
- Bend the bottom corners up, and then hide inward.
- We get a blank already similar to a Christmas tree. We make three cuts on the sides a little before reaching the center.
- Now we need to bend the corner to the inside of each incised piece. Thus, we will get the corners of the Christmas tree. We do this work with all the pages of the Christmas tree.
- The Christmas tree is ready to decorate your home.
Daisies from paper
If you want to bring a summer and sunny mood into the interior, make paper daisies with your own hands. They can be used not only in the interior, but also as a gift to family and friends. Such interesting and beautiful daisies will not leave anyone indifferent. 
You will need:
- Crepe paper (yellow and white)
- Green colored paper
- Scissors
- Scotch
- Threads
- Toothpick
- Ruler
Working process:
- Visually divide a sheet of colored paper lengthwise into 4 parts and cut off 1/4.
- Using a toothpick, twist our strip into a tube and glue the tip with tape. This will be our stem.
- From crepe paper, cut out a piece of white 10x25 cm and yellow 20x4 cm.
- Fold the yellow strip 2 times and cut the closed parts on one side with scissors. Now on both sides along the strip we make frequent cuts about 1 cm deep.
- Fold white paper in half and cut the closed part.
- Lay the white paper on the table and the yellow paper on the extreme part of the long side, and in relation to the width, it should lie in the middle.
- Starting on the other side, fold the paper with an accordion.
- In the middle we tie a rope for fixing.
- Round the white ends with scissors.
- With the narrow side of the stem, go around the middle of the flower and secure it with tape.
- Spread the center of the petal towards the top so that it is fluffy. Also spread the chamomile petals.
Colored paper and thin cardboard are the first material from which children begin to make flat or three-dimensional figures. Children's paper crafts develop creativity, spatial thinking and fine motor skills of fingers. This is the simplest way to keep kids entertained in their spare time. They will be carried away by the creative process at any time of the year, especially in inclement weather. The ideas, schemes, instructions and templates offered in the article can be used not only by teachers, but also by parents of preschoolers and children of primary school age.
Making simple paper crafts on your own is fun and affordable. Every year, experts offer new ideas and work techniques that inspire exclusive decor in the interior.
Paper does not mean what can be done, thrown away and forgotten. If you prepare correctly and do everything extremely carefully, paper decor will not look cheap and trivial. From thin colored cardboard and thick office paper, you can make a lot of beautiful and useful household gizmos with your own hands. They are suitable for updating the design in the children's room or decorate the whole house for the holiday:
- for the New Year;
- for Easter;
- by March 8;
- for Valentine's Day;
- for the birthday of each member of the family.

Designers use three-dimensional figurines for interior decor in various styles. For example, branches of delicate sakura with voluminous pink flowers made using the origami technique from modules are a great idea for a Japanese-style bedroom.
A panel with voluminous butterflies, applications in the form of birds or autumn leaves, a tree with owls - a simple and unique decor for a country-style hallway or dining area.
Paper Christmas decorations are the best preparation for the long-awaited holiday.
Enthusiastically use all your boundless imagination:
- openwork snowflakes on the window glass, planted on soap;
- christmas angels;
- moon and planets;
- garlands with colored paper additions;
- Santa Claus, snowmen, hares and other winter characters;
- voluminous and flat Christmas toys.
Children of different ages, girls and boys, are willingly involved in the work. Older students, having practice, on behalf of their mothers, become "instructors" for kids. They can make a complex base in the form of an accordion, fan, flower stem or supporting parts.

Tip: Teach your child to be careful when working with glue so as not to make stains and sagging. And before you cut something, let it measure with a ruler, mark and make marks with dots. The lines from the pencil should go into trim, and not into the main details. Under this condition, all work will be done masterfully, and not like beginners.
Knowing how to make spherical tulips, voluminous daffodils, roses and other flowers, older children are able to make a gift for their mother or grandmother with their own hands. One of the parents will give the child an idea and teach the basic skills of working with scissors, glue and thin cardboard.
A beautiful paper bouquet in an impromptu vase will stand on the window for more than one month, reminding you of the holiday. And for parents there will be another reason to praise their children for their patience and perseverance, to remind them when something does not work out.
It is better for beginners to master various techniques and craft according to the easiest schemes. Simplicity and affordability are the secret of the popularity of crafts made from the cheapest material.

You can start with children 3-4 years old or when the baby begins to show interest.
About how to make interesting paper crafts with your own hands using various techniques, our experts will share their secrets.
Invite your students to watch a video tutorial on creating three-dimensional paper flowers.
How to make easy paper crafts using various techniques?
- Making cardboard toys according to a template is the easiest way, especially if the elders do the difficult work for the baby.
Hares in the grass is a simple toy, it can be made "animated" if the characters are not fixed, but made in slots on sticks.
- Cut out one hare (head and shoulders) as a template and multiply with a child who can circle the cardboard blank with a pencil several times. Do not forget to teach your baby to save paper - apply templates tightly to each other.
- These bunnies will need the plastic "moving eyes" that are sold in the craft department.
- On the cut out faces, it remains to glue the eyes, finish the nose and mouth. If you depict them in different ways, you get bunnies with a different facial expression.
- The length of the ears can be varied or even screwed onto a pencil to lower.
- Next, you need a strip of cardboard with grass cut out in 1 or more rows.
- Behind the grass, it is necessary to cut holes along the width of the hare's body so that they "sit" tightly there. And the bunnies themselves are best attached to sticks or paper tubes in order to control.
The toy is ready, now it can be used - the hares will tell the child a story before going to bed on the edge of the back of the bed. At the same time, mom will move these bunnies in turn. To complete the plot, you can make a wolf or a fox so that the bunnies hide in the grass (we lower or take out the templates).

In a similar technique, do-it-yourself any flat animated crafts made of colored paper. For example, in the window of a house carved according to a template. You can put a doll or a storyteller there. Stories or poems for children can be read at night by a grandfather and a woman with a samovar (other characters). Use an easy plot, understood by children, with famous fairy tale characters.
A dog and a whole family of puppies will look out of the booth, which are driven out by a cat or a rooster. If you manage to make a tower of a “stone” castle, let a princess and a dragon appear in the window with your dialogues - children love to watch this.
- Twisted paper figures are an easy way to add dimension to paper crafts. Experts suggest mastering this at an elementary level, and in a few weeks the baby will make a whole animal world in the children's room.
The easiest way to make paper rings and cylinders:

- Bunny.
- Curl bird.
- Chicken.
- Kitten.
- Puppy.
- Frog.
- Owl.
The paper cylinder is the torso, depending on the design of the toy, it can be positioned horizontally or vertically. Attach the ponytail and paws cut out of paper to this base. It is most responsible to make a head or a muzzle - flat or voluminous (your choice).
If you make birds with a child, then it is better to open the beak. Use chicken feathers or down - this will make the chicken or cockerel more attractive. Eyes can be drawn or glued, for this use:
- halves of peas or beans;
- "shifting eyes";
- black allspice;
- flat beads;
- black sequins.
In addition to the toy itself, it will be interesting for children to make the “habitat” of the character out of paper: grass, a lake, a house, a hollow, a tree, etc. If you are not too lazy, a lot of crafts will come out in a few days on one topic - a whole zoo or heroes of the fairy tale "Teremok" . This story can be memorized and shown in roles to guests on the child's birthday.
- Paper doll dress up is a popular game for girls. You can buy them ready-made or make your own. For those who do not know how to draw, it is easier to cut out Barbie in a swimsuit from the "coloring book" and stick it on a cardboard base.

Outfits are made from:
- white paper and decorate with pencils or markers;
- thin colored cardboard;
- velvet paper;
- foil;
- magazines (illustrations with the texture of fabric or fur).
If a mother or a girl has artistic skills, then a fashionista doll can be drawn independently or copied from a sample you like. Such paper crafts are decorated with paper and fabric appliqué, feathers and flower herbarium. A little more difficult level - puffy dresses made of voluminous elements and pleated skirts made of folds like a fan.
Tip: Do not forget that each outfit should have holders (elements at the edges of the outfit) to cling to the shoulders and waist of the doll. An advanced level is to fix a flat magnet inside the cardboard template, and glue a light metal plate or a shoe stud without a hat under each outfit. Usually, for such help, they turn to dad or grandfather.
Add a Girlfriend and a Prince for the doll, a house or a whole street for walking. If we limit ourselves to only one "fashionista", she needs a box or cardboard box in any technique. It is no less interesting to weave a basket of twisted paper for a homemade doll and make a rug.
This is one of the easiest ways to create color patterns. Even a child of 3-4 years old will master the braided rug step by step.
With this technique, you can do:
- basket;
- bookmark for books;
- patterned rug for paper toys.
Several color combinations have been developed. For those who are interested in what crafts can be made from paper, it is enough to master three:

- monophonic weaving;
- two-color;
- multicolor patterns.
The lightest is braided, where stripes of two close or contrasting shades alternate.
For the doll rug you will need:
- scissors,
- glue;
- ruler,
- pencil;
- 2 squares of colored paper.
We mark the back sides by 1-1.5 cm, but do not cut to the end - a centimeter border is needed along the edge. You should get one form with not completely cut edges on both sides, the second - on one side cut to the edge. These strips will simply run through the first pattern step by step. Then the ends need to be glued. Finish with a border, curly or openwork edges of a different color.

Rolled paper or newspaper toys
Another novelty for those who are not familiar with this technique.
True hand-made craftsmen use this technique to weave wicker and rattan furniture, and interior baskets from newspaper tubes. Easy crafts from twisted white paper start with blanks, then weave according to the pattern.
Rolled-up newspapers will also become products: after painting with an aerosol, letters and photos will not be visible, but the secondary material will become a useful decor for the apartment. According to the general scheme, for example, you can weave baskets for old flower pots and flower pots that need updating.
Another interesting idea is a stationery basket on the computer desk to put small items in there for general organization.
Newspapers are cut with a sharp knife and wound on a thin long knitting needle, after which the edges need to be fixed with glue. From one sheet of newspaper you get 4 tubes, if you fold it in half twice and cut it into 4 identical parts.

It is proposed to weave:
- A vase for dry flower arrangements or paper flowers.
- The casket.
- Plafond for the kitchen.
- Frames for family photos.
- Stands for hot glasses.
- Interior inserts, etc.
In Russia, this type of needlework is not yet as popular as abroad, but the number of admirers of the technique of working with paper is growing rapidly. This is the twisting of long narrow strips to create three-dimensional images. They are combined into three-dimensional images or pasted on postcards.
The examples show how to make paper crafts using this technique.
To begin with, make the easiest patterns with your child - a bird or a flower. It will be something new and surprising for him, then his fantasy will develop. First, children need to be told the density of the twist and the need for creases in certain places. Soon they will begin to understand and make new models from "paper filigree" on their own.
In this technique, they make full-fledged souvenirs or decorate the base. Most popular:
- postcards and invitations;
- photo frames;
- earrings;
- gift packages;
- Christmas tree decorations;
- interior decor.
In needlework stores, you can find ready-made quilling kits, cut colored stripes for do-it-yourself paper crafts, diagrams and templates.

Facing
Another original way to create three-dimensional figures, which requires the same soft paper templates. They are connected and unfolded, getting three-dimensional figures that can be used to decorate the interior or make a festive decor in the house.
Iris Folding
A new type of work with paper for Russia, which develops creative potential. In principle, nothing new - paper spirals are twisted in a special way, which are used to lay out patterns. If you carefully consider the pattern and shades, you get masterpieces that have a place in a frame on the wall.
Invite your daughter to make a young lady in a magnificent dress, but help complete the most difficult stages of work.
Papier mache
This is the oldest technique that periodically comes into fashion and is forgotten again. To some, it will seem new, but to someone it is known for the surprise balls that are hung up for the holidays. They are filled with sweets and various sweets, and the birthday boy must knock down with a bat, releasing goodies.
A lot of interesting paper crafts were made by craftsmen from glue and torn newspapers. Translated from French, papier mâché is “torn” or “chewed” paper. Applying layer after layer of glue-based scraps, it is easy to get any shape.
The same "surprise balloon" is easy to make by wrapping a large balloon with thin paper or newspaper and applying layers of papier-mâché. When the layer is ready, the ball is blown off, and the form remains. It is filled with sweets, and the hole is closed with the same “chewed paper” on glue. Decorated with colored blocks, foil stars on top. This is a popular entertainment at Mexican-style parties.
If durable figures and sculptures are created, gypsum or starch is added to the base. In this technique, it is easy to do anything - from fake hats for a party to decor items in the interior.
Piggy bank in the form of a pig can be made in this simple technique under the original painting and varnished. It can be filled for years, and then broken, and with this money the family can go to the sea.
Layer-by-layer pasting of an object - “mashing”. To remove the finished papier-mâché, you need to carefully cut it, and close the seams using the same technique. Sometimes they make a liquid mass based on shredded paper, which is squeezed out and made into a shape.

Toys based on "accordion"
For children, this is a more difficult level, but a great base for the torso of crafts. Two strips of paper are placed in a square on top of each other alternately at a right angle until an elastic accordion comes out. It remains to glue the paws, tail and muzzle of funny animals to this base.
Try to make easy three-dimensional paper crafts with your child: a caterpillar, frogs, or a arched, yawning cat hiding in the grass.
Paper origami is the most popular technique for children's creativity
Many models do not involve working with glue and scissors - the figures are folded according to a certain pattern.
Advanced level - modular origami of triangular elements. Children with spatial imagination lay out entire zoos and cities in this way. Start with the simplest by watching a video tutorial on how to make paper crafts using the modular origami technique:
To consolidate the acquired knowledge, we propose to do:
Bud of paper (TULIP) step by step
- Fold a square of red paper (preferably two-sided) diagonally.
- Bend the second diagonal (see photo).
- Collapse into a triangle.
- Wrap the corners to the center and top, as well as from the back.
- Colored paper, a sheet of cardboard, as well as a plain white sheet of office paper;
- Glue stick;
- Children's safety scissors.
One of the most popular materials for children's crafts is colored paper. Children's crafts made of colored paper perfectly develop imagination, perseverance and fine motor skills of the hands, besides, this activity allows you to have fun.
The advantages of colored paper as a material for crafts can be listed and listed, but we will not waste time on this, but will immediately offer you the best ideas for colored paper crafts that can be implemented with a child.


Crafts from children's palms
The child may really like to make various crafts from the palms cut out of colored paper. Here there is really a fantasy where to roam! After all, very interesting works can turn out from the palms!

Crafts from circles
Another way to develop children's imagination. Invite the child to fold some shape from circles of colored paper. Circles can be glued whole or divided into halves.

As for ideas, the simplest thing is to make a snowman out of circles, you can also make animals, fish and birds. You will find photos of colored paper crafts both on our website and on the Internet.

Mosaic from colored paper
Very beautiful do-it-yourself crafts are made from mosaics. You can download ready-made templates for laying out a mosaic or draw it by hand.

The smallest children can be offered to tear off pieces of colored paper and stick them on a paper base with a template, while older children can cut neat squares with scissors.


Crafts from accordions of colored paper
Everything is simple here, you need to fold a sheet of colored paper with an accordion, and then straighten it a little and make a fish, a bird, a butterfly out of it.

These crafts can be independent, for example, glued to skewers, or can be used for original applications. Simple and interesting workshops on colored paper crafts can be found without difficulty.

Crafts from lumps of colored paper
A great way to develop fine motor skills of the baby's hands. For crafts, it is better to use thin colored paper, napkins or corrugated paper.

Just tear off pieces of paper and roll them into balls, and then stick them on the template with PVA glue. The works are beautiful and voluminous.


quilling
Older children can be offered to master the quilling technique, this is when a spring is rolled from thin strips of colored paper, using a knitting needle, pencil or thin stick, and then various compositions for postcards are made from these fragments. Trains fine motor skills and perseverance.


Volumetric crafts from colored paper
Despite the fact that the paper is flat, you can make various volumetric crafts from it. For garlands and postcards, as a rule, several identical parts are cut out, folded in half, and then glued together in halves.

From the strips, you can make three-dimensional figures glued together according to the ring principle.

And another type of voluminous paper crafts is to print ready-made templates of 3D shapes, cut and glue them according to the instructions. Now they even sell entire albums with templates for voluminous paper figures, there are also detailed instructions on how to make crafts.

Colored paper garlands
Since we have touched on the topic of garlands, colored paper is ideal for these purposes. From it, you can most quickly make various figures, and at a price such a garland will come out much cheaper than if you use, say, felt, or corrugated paper.

Crafts from paper rings
Remember how we made long New Year's garlands from rings as children? It turns out that from these rings you can make not only a chick, but also very interesting crafts: fruits, crowns of trees, hair for dolls drawn on a piece of paper, make voluminous snakes, lambs and other animals.


Colored paper postcards
For the holidays, you can easily make various postcards from colored paper. Children 2-3 years old can make simple postcards in the form of an application, with older children you can already do complex work with volumetric elements. Here, for example, is how to make a three-dimensional postcard with daisies from colored paper.

Volumetric paper card with daisies
For crafts you will need:

First of all, you need to cut strips of white paper. To make the strips even, mark the same width, and then draw the cut lines with a ruler and a simple pencil.

Now, cut out circles from yellow paper - these will be the middle of our daisies. We return to the white stripes, we will make chamomile petals from them. We glue each strip with two ends in the form of a loop, and then glue it to the middle, which we made yellow.

When the chamomile is ready, you can cut out several leaves from green paper. For a postcard you will need 3-5 daisies. We make the card itself from any sheet of colored paper, fold it in half, and paste our daisies on it.


You can add a postcard with a butterfly. Butterfly cut out of bright paper. Butterfly templates are easy to find on the Internet. To make the butterfly also acquire volume, bend it in half and stick it on a postcard.

Postcard-application with a rabbit
The next postcard will be with a bunny, it can be made as a gift for Easter. From the materials you will need all the same, as well as doll eyes. By the way, I’ll tell you a little lower how you can make puppet eyes yourself.

According to the template, we cut out all the necessary elements of the postcard from paper: a muzzle of a bunny, two ears made of white paper. From pink paper, cut out a nose and a smaller silhouette of the ears. Cut out grass from green paper.

We collect the figure of a bunny on a sheet of brightly colored paper. We glue puppet eyes on the bunny and draw antennae with a felt-tip pen or a black ballpoint pen.

And now let's digress a little, I'll tell you how you can make puppet eyes for children's crafts on your own. They are made from an ordinary tablet plate, two cells are cut out, and beads, small beads or peppercorns can be used as pupils.

Origami
And the last type of colored paper crafts is origami. For beginners and small children, there are simple schemes for folding various shapes; for older children, you can offer to do something more complicated.

For origami, it is best to use double-sided colored paper so that the pale side of the sheet does not “shine”. If your kid is seriously interested in this art, then you can purchase special paper for origami.

Photo of colored paper crafts


