Culture, art, traditions of Japan never cease to amaze and delight us to this day. What the inventive and incredibly sensitive to the beauty of the Japanese did not come up with! And here is another amazing phenomenon: patchwork paintings - the so-called kinusaiga.
Strictly speaking, "patchwork paintings" - this is inaccurate. Kinusaiga is a kind of synthesis of several techniques.
This is, firstly, the application technique, secondly, patchwork (it was this technique that gave reason to call kinusaiga patchwork paintings), thirdly, mosaics, and fourthly ... wood carving.
In other words, kinusaiga is a technique of mosaic patchwork application on a tree.

Kinusaiga is an artistic genre that arose, so to speak, on the basis of economy. Or rather, Japanese frugality. It was originally a way to "recycle" old worn-out kimonos.
Kimono silk is an expensive and beautiful fabric, I wanted to come up with a “second life” for it. And they came up with!

Patchwork pictures of kinusaiga are created like this. Firstly, the draft of the future patchwork picture is drawn on paper. All lines are transferred to the tree. And along these lines, grooves-grooves 2 mm deep are cut in the tree.
Then the paper picture is painted - each fragment is a certain color. These fragments are numbered (both on paper and on wood), and according to the shape of each piece of fabric, exactly the same piece of the same color is cut out, only a little more.
The technique of application on wood requires that a 1 mm allowance be left along the edges of each piece. This edge will tuck into the groove cut in the tree when the fragment itself is glued to the appropriate place.
Do you represent?!
What meticulous work! Just look how many of these grooves you need to cut, how many flaps to pick up! Pay attention to how finely the color is chosen - every line, every speck. I'm just at a loss. It's such a delicate and time-consuming work!

Pictures of kinusaiga, even in Japan itself, are not very common - this is an exclusive art form. Pictures are always created exclusively by hand, they are very expensive.
Therefore, kinusaiga is a rather rare genre: not all Europeans who have visited Japan were lucky enough to look at patchwork paintings. But for those who manage to see them, they make an indelible impression.
Usually at first glance (and not only at first glance) it is difficult to understand how this is done. Until the guide explains, the audience does not realize that this is a kind of application technique. And having understood, they are amazed at the amazing “liveness” of patchwork paintings.

Usually kinusaiga are quite large in size, most often depicted on them are urban landscapes. But sometimes these are still lifes, paintings of nature, etc.
There are usually no people in the pictures of the kinusaig, except perhaps with their backs. A very thin object for mosaic technique is a human face. True, sometimes kinusaiga artists even manage to do this. More often these are the faces of old people, furrowed with wrinkles.
An artist who takes up the creation of a patchwork picture spends a lot of time - which is not surprising given the technique described - both on the applications themselves and on lengthy preparations for them.
But this work is rewarded with a wonderful result: the kinusaiga painting is a very rare and amazing work of art.
elena kochemaeva
I really like technology « kinusaiga» or « patchwork without a needle» . Having at hand pieces of fabric, foam and cardboard, you can truly create masterpieces. The Land of the Rising Sun - Japan, gave the world famous wonders like origami, temari, ikebana, bonsai, anime, aikido and much more. The inhabitants of the Land of the Rising Sun are subtle connoisseurs of beauty in all directions. They are also known for their careful attitude to everything that surrounds them. Including often and skillfully remake old things into new ones. They do not throw away pieces of kimono, but turn them into amazing paintings. So in 1987 the technique was born « kinusaiga» - This is a special patchwork application from old kimonos. The Japanese remake so masterfully that the work does not look like a combination of dissimilar patches, but like a completely realistic picture or even a photograph! Most often, landscapes, parts of houses and flowers are depicted.
« Kinusaiga» reminiscent of many handicrafts at the same time technician: patchwork, batik, painting, mosaic, appliqué.
In the European version, art « kinusaiga» is more practical. We call him « patchwork without a needle» because they are used not only for "scenic" paintings and colorful panels, but also for decorating various household items.
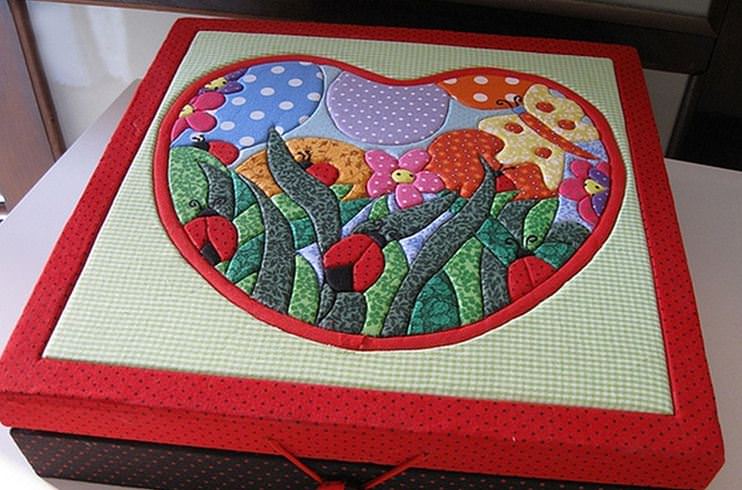
What is used for « patchwork without a needle» ? First of all, these are all kinds of panels and paintings that serve as interior decoration. Caskets, boxes, covers of albums, notebooks and books are decorated with such an application. This technique has become very widespread in the field of making souvenir Easter eggs, Christmas tree decorations. And also « patchwork without a needle» used to decorate lampshades and even furniture. « Kinusaiga» interesting not only for adults, but also for children. The use of this technique contributes to the development of interest in this type of activity and has a great educational and developmental effect on the development of children. Bright handmade works will become loved and expensive. During work, fingers develop and strengthen, sensory impressions, figurative and spatial thinking, visual-motor coordination, imagination are enriched, Creative skills.
I want to present you my paintings made in this technique.


Open lesson on the subject "Labor training"
patchwork technique on foam
"Kinusaiga"
The purpose of the lesson:
Creation of a decorative panel using the kinusaiga technique.
| Lesson objectives | |
| educational | Organize search activities for students to familiarize themselves with this technique. To promote the manifestation of various types of creativity in children, to study and understand new technology, to be able to find bright and harmonious contrasts in the color and texture of the fabric. |
| Educational | The formation of students' ability to communicate through group work, the ability to listen and correctly evaluate the answers of classmates. Awakening children's interest in new techniques. Education of culture of artistic perception. |
| Educational | To stimulate the work of students to expand the vocabulary of emotions; the development of figurative speech, the development of skills and abilities to work with different sources of information; development of imagination, creative inclinations. |
Lesson type : integrated.
Teaching method : visual.
Forms of organization of educational activities:
frontal
group
individual (independent)
Lesson equipment and resources :
Computer, multimedia projector
Software Microsoft Power Point, Microsoft Word.
Technological maps for each group
Materials needed: Styrofoam, cloth, pencil, scissors, stationery knife.
Structure and content of the lesson
| Lesson stages | Teacher activity | Student activities | Form of activity |
|
| Organizing time | Greet students and get them to work. | Fulfill the requests of the teacher. | Frontal |
|
| Setting the topic of the lesson | Introduces the topic of the lesson | They are divided into groups. | Frontal |
|
| Knowledge update. | Asks questions about the topic | They answer the questions asked. | Frontal |
|
| Solving a learning problem | Organizes work on the topic of the lesson | They solve the educational problem through work with previously prepared material, with an explanatory dictionary. | Frontal Group Self-guided |
|
| Reflection. | Helps formulate conclusions by asking questions. | Formulate conclusions. | Summing up |
During the classes
1. Organizational moment.
class greeting;
Checking readiness for the lesson;
Organization of the workplace (the class is divided into groups).
2. Introduction to the topic of the lesson.
Teacher:
What types of patchwork do you know today?
Children:
Answer options: patchwork, patchwork technique, patchwork mosaic, textile mosaic.
Teacher:
Do you know the patchwork technique?
Patchwork is a type of needlework in which, according to the mosaic principle, a whole product is sewn together from pieces of fabric (patchwork). In the process of work, a canvas is created with a new color scheme, pattern, and sometimes texture. Today we will get acquainted with one of the varieties of "patchwork" is the "kinusaiga" technique. (1 slide)
3. Teacher:
Where do you think this technique came from?
Children:
From Japan
Teacher:
The kinusaiga technique is one of the oldest types of needlework, which is based on the idea of making handicrafts from recycled materials. Old kimonos, which were always sewn from natural silk, woven by hand and decorated with skillful embroidery, became such a recyclable material. Therefore, it was not customary to throw them away, and thrifty housewives found a way to extend the life of a kimono. Like the English patchwork, kinusaiga is the result of the ability to save money. (2, 3, 4 slide)
The most famous master and trendsetter of the modern kinusaiga style is the artist Maeno Takashi. In her works, she uses fabrics of different textures: viscose, cotton yukata, silk - everything goes into action. (5 slide)
The basis of the kinusaiga technique is patchwork, appliqué, mosaic, and wood carving familiar to Europeans. Today, kinusaiga is very common in many European countries and is presented as a patchwork technique. Modern European craftswomen use a more convenient material for processing - foam plastic as a basis. Therefore, the traditional Japanese name for the technique - kinusaiga - sounds less and less. Today, the name of the technique sounds like foam inlay or patchwork without a needle. (6 slide)
Teacher:
Look at the works in the kinusaiga technique, what do you think should be taken into account in order to make a quality work?
Children:
Color, fabric texture, work size
Teacher:
What do you think should be done to get started?
Children:
It is necessary to prepare all materials (slide 7).
4.Teacher:
Progress:
prepare all the necessary materials;
select (create) a sketch for work; (9 slide)
prepare the base
duplicate the sketch on the prepared foam; (10 slide)
Cut along the contour of the pattern grooves for kinusaiga; (11 slide)
Choose a fabric according to the color scheme in accordance with the color and texture; (12 slide)
Apply the fabric to the designated area, and push the fabric into the slots; (13 slide)
Trim excess fabric along the contour of the part
Duplicate each element, collecting a full-fledged panel. (14, 15, 16 slide)
See where you can apply this technique (17, 18, 19 slide)
Practical work:
Divide into groups of 3-4 people.
prepare the necessary material
Each group works according to its own technological map, where a sketch is already set.
5. The result of the lesson. Reflection.
Exhibition of children's works.
- I became aware that...
- I was especially attracted and interested ...
Children share their experiences.
Teacher:
You have done interesting work. I especially like the way you worked together as a group. Well done! Group leaders will now tell the self-assessment of each of the students.
LIST OF INFORMATION SOURCES
1. Vali B.D., Rikolfi R. Patchwork. - Per. from Italian, - M .: OOO Mir knigi, 2002. - 80 p. : ill.
2. Zaitseva A.A. Patchwork without thread and needle / Anna Zaitseva. – M.: Eksmo, 2010. – 64 p. : ill. - (ABC of needlework)
3. Patchwork fantasy. Artistic application. R.F Taran, AST - Stalker 2007
4. Secrets of skill. Rhombus motifs in a quilt. Jen Krentz. Niola publishing house - press 2007
5. Needlework Encyclopedia D.V. Nesterov. AST Publishing House LLC, 2007
6. http://caesararts.com/blogs/LadyBloom310/5921/
7. http://coolwom.ru/index.php/kinusayga-loskutnie-kartini
8. http://kinusaiga.com/
9. http://www.jlady.ru/hobby/pechvork-bez-igolki.html
The needlewomen know. But what is kinusaiga, many have only heard. The unfamiliar magic word actually means the art of making pictures from silk patches. A kind of patchwork, only without a needle. This type of needlework was born in Japan. At the origins of the kinusaiga was Setsu Maena, a professor at a Japanese university. Over time, kinusaiga spread beyond the borders of the homeland and European craftswomen immediately adopted this technique of creating beauty with their own hands. But how can you get past the creation of amazing things from the scraps and remnants of silk fabric? Simply put, European needlewomen got the art of creating masterpieces, saving on expensive materials.
At the origins of the kinusaiga stood Setsu Maena - a professor at a Japanese university
Kinusaiga or patchwork without a needle: details about the technique and tools that are needed
The kinusaiga technique does not involve the use of a needle as in the patchwork technique, but is based on making a sketch on paper, which is then transferred to a wooden board.
A cut is made along the contour of the sketch - a recess. After that, the picture itself is made directly with shreds of silk. These pieces of Japanese silk were taken from old kimonos, which the economical Japanese never threw away - silk after all.
The shreds are laid out on the cut elements of the sketch and the edges of the shreds are pressed into these same slots. With the right selection of colors and colors, the paintings are uniquely beautiful. And it would seem - scraps of an old kimono! We can say that the natural economy of the Japanese became the parent of this art - kinusaigi.
Gallery: kinusaiga (25 photos)


Kinusaiga: master class (video)
How to make a picture on foam plastic from fabric with your own hands: a master class for beginner needlewomen
You can talk about the art of kinusaiga for a very long time. But it’s better to see how to make at least a small masterpiece with your own hands. Below is a technique for creating a painting on foam for beginners.
What you need to start the master class:
- foam sheet (thickness not less than 1 cm;
- scraps of fabric of different colors;
- scissors;
- clerical knife (scalpel);
- nail file (for stuffing fabric into foam);
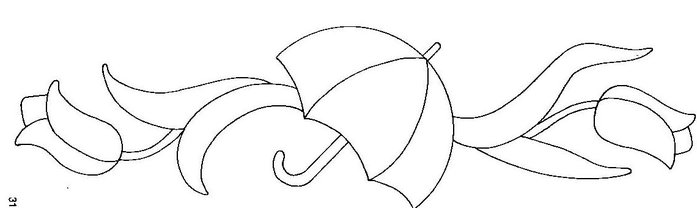
- sketch (your own or you can take any ready-made);
- carbon paper.
The fabric must be selected not stretchy and thin enough. The edges should not crumble.
First, look at what is in stock: old scraps, remnants of fabrics that were not thrown away after sewing some kind of wardrobe item. Everything will go to work. If the check of the storerooms did not give a result, then you will have to take whole pieces and cut out the elements of the planned picture from them.
Process:
First you need to decide on the pattern. For the first time, you should not choose something complicated, with many elements. Let it be light geometric shapes. And from them you can already build a small nice house.


Using a sheet of carbon paper, you need to transfer the sketch to a piece of foam.

With a knife or scalpel, make a cut along the contour of the sketch to a depth of about 3 mm.

Cut the selected fabric into pieces of the desired size. With a nail file or something more convenient, fill the pieces of fabric into a sheet of foam. Thus, fill the whole "picture". The edges of the fabric should be tightly fixed in the slots.

Cut off the excess edges of the foam with a scalpel or clerical knife.

Further, the resulting panel can be framed. It can be purchased, or you can make it yourself. If there are suitable materials. You can simply make a border with decorative tape, which you need to fasten with beautiful pushpins. These buttons are available at any stationery store. Buttons of bronze or gold colors look beautiful.


Often the kinusaiga technique is used to decorate lids for boxes or boxes (for example, for sewing accessories or cosmetics).

Stunning Christmas decorations and crafts are obtained using this technique.

Kinusaiga: simple patterns and their execution
Kinusaiga allows the use of any scheme that is at hand. You can buy templates or you can make your own. The easiest way is to use stencils. As an example, below is a kinusaiga master class on a simple template.
To complete this needlework you need:
- A3 size cardboard;
- A4 size cardboard;
- scraps of fabric of different colors;
- synthetic winterizer;
- glue;
- nailfile;
- threads;
- needle;
- scissors;
- acrylic paints;
- the brush is thin;
- cord (soutache) of different colors;
- pins;
- frame.
Scheme for creating a picture:

In the work, you can use any shreds that you can find.
- The drawing must be transferred to tracing paper. Cut into component parts - details.
- After the division is completed, you need to number the parts of the picture. Then cut out the elements from the fabric along them. At the edges you need to leave an allowance of 3 mm.
- Then prepare the canvas for the future painting. For this purpose, you need to take a sheet of ceiling tiles. The thickness should be half a centimeter. Glue the sheet onto thick cardboard.
- Glue the second copy of the drawing that was printed out in advance to the foam. Cut a groove in it, the depth of which should not exceed 2 mm, along the contour of the sketch.
- Apply glue to the cut grooves with a glue stick. When doing this Japanese needlework for the first time, it is recommended to smear the entire surface with a glue stick.
- This is followed by the process of creating the appliqué: the edges of all the parts made from fabric must be pushed into the grooves so that their edges sink into the grooves and are tightly fixed there.
Some ideas and schemes for decorating a kitchen using the kinusaiga technique
Below are sketches and diagrams for decorating and decorating the kitchen with kinusaiga paintings.


This whole application is not done quickly, but the result is worth it to spend time on it. Embroidery with needles takes much more time than paintings made using the kinusaiga technique. When the basic knowledge of the kinusaiga technique is fixed, you can take on more complex panels and paintings that will surely decorate the house and become a great gift for any occasion.
With the spread of the art of kinusaiga around the world, specialized shops began to open, in which they began to sell tools for this type of needlework. Also, special sets of fabrics appeared on sale (not every European has an old kimono at home that can be put into patches).
In addition to fabrics, you can also purchase combined sets in such stores, which include tools, fabrics and drawings - sketches of varying degrees of complexity. Such sets are designed for both beginner needlewomen and those who have been practicing this art for more than a day.
Here's what these sets look like:


Acquaintance with the art of kinusaiga was successful. And for sure the number of his fans will increase after reading this article. Try to complete at least one painting using the presented technique - after that you will want to do something more and more. Kinusaiga tightens very quickly. And this is good. Because housewives-needlewomen have a new occupation. You always want something new.
Kinusaiga: making a flower (video)
8530
20.05.14 15:40
Since ancient times, the Japanese have been famous for their needlework techniques, which made it possible to turn almost every product into a work of art. This is origami, and artistic painting on fabric, and ikebana, and embroidery with silk threads, and kanzanshi. Recently, a new type of needlework has been added to the list - kinusaiga. At first glance, the technique resembles patchwork, but in fact everything is much more original.
History of Kinusaig
The kimono is a traditional Japanese clothing. Since the 19th century, it has become a national costume. They sewed it from natural silk, which cost a very long time, so the old kimonos were not thrown away, but tried to be reused, for example, to create other things.

A new needlework technique arose when a Japanese woman, Maeno Takashi, figured out how to use old silk kimonos. It was she who came up with the idea of making panels on a wooden base from pieces of silk. So the old kimono got a new life, and Japanese women, and women all over the world, learned how to create beautiful panels and paintings from fabric.

Analogues of this technique existed in the times of Russia, when old things made of fabric were used for patchwork. Often kinusaiga is also called "patchwork without a needle", since the patches do not need to be sewn together.
Technology features
Kinusaiga combines patchwork, woodcarving, batik. Pieces of silk are not sewn together, but fastened with a special method. At first glance, it is very difficult to recognize in what technique the picture was created. From afar, it resembles painting, but in fact, like a mosaic, it consists of a large number of small silk shreds.

First, a sketch of the future panel / painting is created. Then the drawing is transferred from paper to a wooden board. Next, wood carving is carried out, recesses are made on the plank along the contour of the image (about 2 mm deep). Then the silk blanks are cut into small pieces (at the same time, allowances of 1 mm are left on each side in order to be able to fix the fabric parts in the cut grooves).
Scenes for paintings using the kinusaiga technique can be landscapes, people, flowers. Since small details are difficult to achieve, the images are stylized.
The art of kinusaiga today
Today kinusaiga is popular all over the world. For the manufacture of paintings and panels, not only silk, but also other fabrics are used. And instead of a wooden plank, foam is used, the recesses in which are made with a clerical knife or scalpel. Beginning needlewomen can buy ready-made kits with all the blanks for creating panels and paintings in specialized stores.

The sequence of execution of the picture in the technique of Kinusaiga
The principle of application using the kinusaiga technique is quite simple, just try a few times to get the hang of it.
Necessary materials:
- foam plastic with a thickness of 1 cm;
- fabric patches of suitable colors (the fabric should not be too thin, it should also not stretch, and its edges should not crumble);
- sharp scissors;
- clerical knife (scalpel);
- a tool for fixing the fabric in the foam (wooden stick, nail file with a sharp end);
- drawing sketch;
- carbon paper, pencil.
With the help of carbon paper, the drawing is transferred to the foam. They pass with a knife along the contour of the pattern, making indentations of 2-3 mm.
The fabric is cut into shreds of a suitable size, taking into account allowances.
Fill in the details in order, tucking the edges of the fabric into the slots. The rest of the fabric is cut off. In order for the fabric to be well fixed, the foam base on which the fabric will be applied can first be smeared with glue.
The picture is framed, or a fabric frame is formed, fixing it with buttons.
Using this technique, you can create not only paintings and panels, but also arrange gift boxes, caskets.
The art of kinusaiga is the beauty and color of Japanese subjects, delicate work, an amazing combination of colors, textures and artist's skill.


