A compact USB drive, known to most users as a flash drive, is today considered the most common device for storing and exchanging various data. A common problem: “No files are visible on the flash drive” can have rather disastrous consequences. After all, important documents of a confidential nature, unique photographs and other valuable information often transferred to a USB Flash Drive can be in a single copy. If this is the first time you have encountered such a problem, do not panic. There is a high probability that the disappeared data is still in the same place - on a flash drive. You just can't see them because they are hidden. To solve the problem of "invisibility", let's turn to the practical experience of experienced and consider the main aspects of digital recovery.
Two main reasons: Why did the information disappear?
So, when you insert a USB drive into your computer, you find that no files are visible on the USB drive. In the vast majority of cases, it is the user who is the culprit of this kind of trouble. And most often it is as a result of improper operation that the Flash device starts to work in the “magician” mode. Of course, one cannot discount factory defects in the manufacture of a product and unfavorable accidents of a metaphysical nature. However, the harsh reality shows that the cause of the malfunction can be either hardware or software.

Files not visible on the flash drive: ways to fix the problem
The first thing to do is to conduct a visual inspection of the object of our attention. It is possible that the information transfer device is purely mechanically damaged. A once-spilled cup of coffee can also be directly related to the disappearance of files. Make sure the flash drive contacts are not oxidized. If the device is equipped with a signal LED, the operability must be confirmed by the glow of the indicator. However, if the computer detects a connected device, then, most likely, the “hero of the occasion” has software roots that can be undermined by a malicious one. However, such “tricks” can be exposed as a result of using special software, but first…
Standard methods of dealing with "invisibility"
If no files are visible on the flash drive, try the following steps:
- Connect your USB device to your computer.
- Use the Win+R key combination to open the Run window.
- Next, in the checkbox, enter "cmd".

- In the "Command Editor" write "Attrib -h -r -s /c /d k:\*.*", where the Latin k should have the literal value of your removable media.
- Press "Enter" and the hidden files will become visible again.
Second Windows Solution: Changing System Preferences
It is quite possible that the folders and files that are on the flash drive have been assigned the “hide” attribute. In this case, the Flash drive connected to the PC will be displayed as empty.
- Go to the "Control Panel" menu.
- Now go to the Appearance and Personalization section.
- In the "Folder options" block, activate the "Show hidden files" link.
- The last element of the list must be activated. That is, the item "Show hidden files, folders ..." must be marked with a marker.
If this method did not have the desired effect, and everything is also not visible, try the method described below.
Option three: checking the parameters of one of the registry branches
As a result of a virus infection, malicious code can change entries in the Windows OS system log. Therefore, it is necessary to ensure the integrity of the parameters involved. It is worth noting that when working with the registry, you should be extremely careful, since incorrect actions and incorrectly made changes can critically affect the full performance of the Windows system as a whole.

- Open the "Run" menu
- Enter the "regedit" command.
- After the utility utility opens, follow the path: HKEY_LOCAL_MACHINE\SOFTWARE\Microsoft\Windows\CurrentVersion\Explorer\Advanced\Folder\Hidden\SHOWALL.
- The entry of the "CheckedValue" key (the right area of the working window of the editor) must correspond to the value "1".
- In the "Type" column, except for "REG_DWORD", there should be nothing.
If the entry did not match the specified pattern, your PC is probably infected with a computer virus, which means that you need to check the system for "destructive code".
Understandable question: "How to open invisible files?" and an effective response
Action algorithm:
- Download Malwarebytes Anti-Malware Free to your PC.
- Run the installed software.
- Scan all partitions of the PC hard drive and USB drive.
- If a "digital infection" is found, remove the source of infection.
It is worth noting that in some cases, even after processing the hard drive and the storage area of the flash drive with antivirus software, the problem will not disappear. Since as a result of the destructive activity of the unfavorable code, the service files of the OS and even the structure of the disks could be changed. In such cases, the recovery process, and in the case of the system, a complete reinstallation of Windows, simply cannot be avoided.

How to recover lost data
As a rule, as a result of incorrect manipulations with removable media, beginners have a question: “Why does the flash drive not see the files?” To resolve this kind of difficulty, you need to download and install a special program on your PC. Among the huge amount of such software, the most attractive is the free Recuva data recovery utility, which you will learn about from the section below, as well as learn the basic methods of working with it.
Recuva is a free data reincarnator
So what needs to be done?
- Download this software product from the official website.
- After installation, run the utility.
- Select the type of information you are looking for. The most acceptable option is all files.
- In the next window, select "On the memory card".
- Once you have confirmed your choice, the scanning process will begin.
- In the case when the result turned out to be ineffective, go to the "Advanced mode" tab in a special program window.
- Check all inactive items and repeat the startup process again.
- The files found in this way must be restored. Click the button of the same name in the lower right corner of the program.
- Check the checkboxes next to the found files.
- After activating the "Restore" button, your data will be saved to the directory you specified.

As you understand, this program will just as effectively cope with a possible difficulty when the memory card does not see the files. However, with the help of Recuva, you can recover deleted information from almost any type of media.
Instead of an afterword
So, you have learned what to do if the flash card does not see the files. Nevertheless, do not forget about the elementary operational rules, the observance of which guarantees the long-term operation of the storage device:
- Do not save information to a USB flash drive that has not been previously checked by antivirus software.
- Remember that you need to disconnect the USB drive correctly by deactivating it using the Windows tool: "Safely Remove Hardware".
- Do not use the same flash drive in different systems. This warning is especially relevant for mobile storage devices (such as SD memory cards).
- Don't forget to make a copy of the data from the USB-drive to your PC's hard drive.
- In some cases, in order to recover lost files from a certain modification of the storage device, you may need specific specialized software.
All the best to you and flawlessly working Flash-devices!
Can not see
not in "it is clear, in the meaning of the tale.
Russian spelling dictionary. / The Russian Academy of Sciences. In-t rus. lang. them. V. V. Vinogradova. - M .: "Azbukovnik". V. V. Lopatin (executive editor), B. Z. Bukchina, N. A. Eskova and others.. 1999 .
See what "not visible" is in other dictionaries:
it is seen- See, therefore, you can’t see anything ... Dictionary of Russian synonyms and expressions similar in meaning. under. ed. N. Abramova, M .: Russian dictionaries, 1999. visible, visible, noticeable; Consequently; a visible thing, is it noticeable, go, as I look, it’s distinguishable, ... ... Synonym dictionary
IT IS SEEN- IT IS SEEN. 1. wordless, in meaning. predicate, with wine. (when negative from birth). You can see, consider. From here you can see the whole village. You can't see the house from behind the mountain. || with union what. You can see and understand. It is obvious that he is in dire need. 2. in value introductory ... ... Explanatory Dictionary of Ushakov
You can see the bird in flight- You can see the BIRD IN FLIGHT. Razg. Express. By deeds, deeds, behavior, you can judge what a person is. But this bird is now visible in flight: a gentleman, burly ... speaks dignifiedly, he is speaking important (I. Kokarev. A fist and a horse dealer) ... Phraseological dictionary of the Russian literary language
it is seen- (Source: “Full accentuated paradigm according to A. A. Zaliznyak”) ... Word forms
It can be seen that the Danube and the Volga will not converge.- It can be seen that the Danube and the Volga will not converge. See TRUE KNOWLEDGE...
Apparently, he crossed the threshold with the wrong foot.- It can be seen that he crossed the threshold with the wrong foot (or: inappropriately). See GOOD MERCY EVIL... IN AND. Dal. Proverbs of the Russian people
You can see the first work: and the fingers to know.- You can see the first work: and the fingers to know. See CARE EXPERIENCE... IN AND. Dal. Proverbs of the Russian people
It can be seen that she is not straight, if the shirt is fragile.- It can be seen, unscrupulous, if the shirt is fragile. See CARE EXPERIENCE... IN AND. Dal. Proverbs of the Russian people
Evidently, Arsenya will have to wait until Sunday.- Apparently, Arsenija wait until Sunday. See PORA MEASURE SUCCESS ... IN AND. Dal. Proverbs of the Russian people
Apparently, you boast more than praise.- It is evident that you boast more than praise. See PRAISE PRAISE… IN AND. Dal. Proverbs of the Russian people
It can be seen that the city is great, that there are seven governors.- (Moscow Seven Boyars). See Rus' RODINA ... IN AND. Dal. Proverbs of the Russian people
Books
- You can't see the borders from space, Garan Ron. About the book A timely book by an experienced astronaut about the fact that no borders are visible from orbit, and the Earth looks like a small common home for all mankind. During spacewalks and long…
Pictures are displayed, but only the icon of the program that is used to view images, and it's much more convenient to see photo thumbnails. Thumbnails are reduced images, that is, you can immediately select the photo you need from the list without even opening the picture in a special program.
 This issue can occur due to registry changes and incorrect folder display settings. Another reason may be that you have installed a third-party image viewer along with some application, which in turn may not support thumbnail view. This situation does not occur often, since the built-in utility has sufficient functionality, and therefore it makes no sense to develop a bicycle in a new way. So what to do if pictures are not displayed in folders?
First, it is worth considering a simpler solution to the problem, usually it is enough if you did not use dubious applications or all kinds of cracks.
Display images in thumbnails using File Explorer
- Navigate to any folder using File Explorer;
- Next, if you have Windows 7, click on the button in the top menu called "Organize". If you have Windows XP, you need to click "Tools" in any folder, and select "Folder Options" in the drop-down menu;
- In the drop-down list, find the item "Folder and search options";
- Go to the "View" tab;
- Uncheck "Always show icons, never thumbnails".
 Similar procedures must be performed in other versions of Windows not described in this method.
In the event that you do not have a checkmark in this item, check it, apply the changes, and then uncheck it again.
This option can also help, but if you still cannot restore the correct display of pictures, you will have to use the second method, which requires the use of a registry editor.
Restoring Thumbnail Images Using the Registry
In general, most of the failures in the display system are directly related to changes in the registry. It stores almost all the variables used by Windows to personalize the system, in the event that something is displayed for you, but it should not, or vice versa - this is the fault of the registry setting. Unfortunately, in automatic mode, thanks to programs, this problem is not solved, due to the fact that these settings are personal options that each user is free to set at will.
- Launch the registry editor, to do this, open the "Run" line by pressing Win + R and enter the keyword regedit or enter this key in the search;
- Next, go to the branch HKEY_CURRENT_USER\Software\Microsoft\Windows\CurrentVersion\Policies\Explorer;
- Find and remove the DisableThumbnails setting;

- Restart your computer.
Usually this is enough to restore the desired look of images, but there are times when the settings are reset again.
The reasons why the settings are reset again: the first is that the system is infected with viruses, which usually manifests itself as a symptom of an illness, because changing the display of thumbnails is not the purpose of viruses.
To solve this problem, use antivirus programs and do registry manipulations again. Another reason is also in programs, but not malicious ones. For a solution, you should disable unnecessary applications. If the problem persists, install the program that caused it and configure it correctly.
How to disable unnecessary applications at autorun?
1 way
- Open the run prompt and type msconfig;
- Uncheck the apps you don't want to see when you boot up your computer. Also, such an action will have a positive effect on system performance and Windows boot speed.
2 way
Another option is to use special programs, for example:, for this, go to the "Tools" tab and select "Startup".
 Restoring images in thumbnails using the performance tab
The problem may be caused by the fact that you have the maximum performance mode enabled, usually used by computers with low performance, which also does not have the function of displaying photos in thumbnails. It, in addition to other settings that remove a beautiful view in favor of maximum speed, also removes the display of thumbnails, which can significantly reduce the loading time of a folder that contains a lot of images.
3. You need the "System and Security" group;
 4. You will need to click on the "System" link, or you can right-click on "My Computer" and click on the "Properties" option;
 5. Click on the link in the right menu "Advanced system settings";
6. In the "Advanced" tab you will see the "Performance" section;
7. Go to "Settings ...", located in this block;
 8. You can select the appropriate option from the list, or simply select "Give the best view".
Due to the fact that the changes will affect not only the desired element, but also various other visual effects, you should use the provided method as a last resort when other options have not worked. If this method doesn't work for you, you can always follow the same path and set the "Maximize performance" option. The difference between these two options can be very noticeable, especially on older computers.
If you still have questions on the topic “Images are not displayed in folders, what should I do?”, You can ask them in the comments
if(function_exists("the_ratings")) ( the_ratings(); ) ?>
Our Universe is made up of several trillion galaxies. The solar system is located inside a fairly large galaxy, the total number of which in the universe is limited to several tens of billions.
Our galaxy contains 200-400 billion stars. 75% of them are dim red dwarfs, and only a few percent of the stars in the galaxy look like yellow dwarfs, the spectral type of stars to which ours belongs. For an earthly observer, our Sun is 270 thousand times closer than the nearest star (). At the same time, the luminosity decreases in direct proportion to the decrease in distance, therefore the apparent brightness of the Sun in the earth's sky is 25 magnitudes or 10 billion times greater than the apparent luminosity of the nearest star (). In this regard, due to the dazzling light of the Sun, stars are not visible in the daytime sky. A similar problem occurs when trying to photograph exoplanets around nearby stars. In addition to the Sun during the day, you can see the International Space Station (ISS) and flares of satellites of the first constellation Iridium. This is due to the fact that the Moon, some and satellites (artificial satellites of the Earth) in the earth's sky look much brighter than the brightest stars. For example, the apparent brightness of the Sun is -27 magnitudes, for the Moon in full phase -13, for flares of satellites of the first constellation Iridium -9, for the ISS -6, for Venus -5, for Jupiter and Mars -3, for Mercury -2 , for Sirius (the brightest star) -1.6.

The magnitude scale of the apparent brightness of various astronomical objects is logarithmic: a difference in the apparent brightness of astronomical objects by one magnitude corresponds to a difference of 2.512 times, and a difference of 5 magnitudes corresponds to a difference of 100 times.
Why can't you see the stars in the city?
In addition to the problems of observing stars in the daytime sky, there is the problem of observing stars in the night sky in populated areas (near large cities and industrial enterprises). Light pollution in this case is caused by artificial radiation. An example of such radiation is street lighting, illuminated advertising posters, gas flares from industrial enterprises, searchlights for entertainment events.
In February 2001, an amateur astronomer from the USA, John E. Bortle, created a light scale for assessing sky light pollution and published it in Sky & Telescope magazine. This scale consists of nine divisions:
1. Completely dark skies
With such a night sky, it is not only clearly visible, but individual clouds of the Milky Way cast clear shadows. Also visible in detail is the zodiacal light with counterradiance (reflection of sunlight from dust particles located on the other side of the Sun-Earth line). Stars up to magnitude 8 are visible in the sky with the naked eye, the background brightness of the sky is 22 magnitudes per square arc second.
2. Natural dark skies
With such a night sky, the Milky Way is perfectly visible in it in detail and the zodiacal light along with the counter-radiance. The naked eye shows stars with an apparent brightness of up to 7.5 magnitudes, the background brightness of the sky is close to 21.5 magnitudes per square arc second.
3. Rural sky
With such a sky, the zodiacal light and the Milky Way continue to be clearly visible with a minimum of detail. The naked eye shows stars up to magnitude 7, the background brightness of the sky is close to 21 magnitude per square arc second.
4. Skies of transitional terrain between villages and suburbs
With such a sky, the Milky Way and the zodiacal light continue to be visible with a minimum of detail, but only partially - high above the horizon. The naked eye shows stars up to magnitude 6.5, the background brightness of the sky is close to 21 magnitude per square arc second.
5. The sky of the outskirts of cities
With such a sky, the zodiacal light and the Milky Way are extremely rare, in ideal weather and seasonal conditions. The naked eye shows stars up to magnitude 6, the background brightness of the sky is close to 20.5 magnitude per square arc second.
6. The sky of the suburbs of cities
With such a sky, the zodiacal light is not observed under any conditions, and the Milky Way is hardly visible only at the zenith. The naked eye shows stars up to magnitude 5.5, the background brightness of the sky is close to magnitude 19 per square arc second.
7. Skies of transitional terrain between suburbs and cities
In such a sky, under no circumstances is there any zodiacal light or the Milky Way. The naked eye only shows stars up to magnitude 5, the background brightness of the sky is close to magnitude 18 per square arc second.
8. City sky
In such a sky, only a few of the brightest open star clusters can be seen with the naked eye. The naked eye only shows stars up to magnitude 4.5, the background brightness of the sky is less than 18 magnitudes per square arc second.
9. The sky of the central part of the cities
In a similar sky, only star clusters can be seen. The naked eye at best shows stars up to magnitude 4.

Light pollution from residential, industrial, transport and other objects of the economy of modern human civilization leads to the need to create the largest astronomical observatories in high-mountain regions, which are as far as possible from the objects of the economy of human civilization. In these places, special rules are followed to limit street lighting, minimum traffic at night, the construction of residential buildings and transport infrastructure. Similar rules apply in the special protection zones of the oldest observatories, which are located near large cities. For example, in 1945, a protective park zone was organized within a radius of 3 km around the Pulkovo Observatory near St. Petersburg, in which large-scale residential or industrial production was prohibited. In recent years, attempts to organize the construction of residential buildings in this protective zone have become more frequent due to the high cost of land near one of the largest cities in Russia. A similar situation is observed around the astronomical observatories in the Crimea, which are located in a region extremely attractive for tourism.

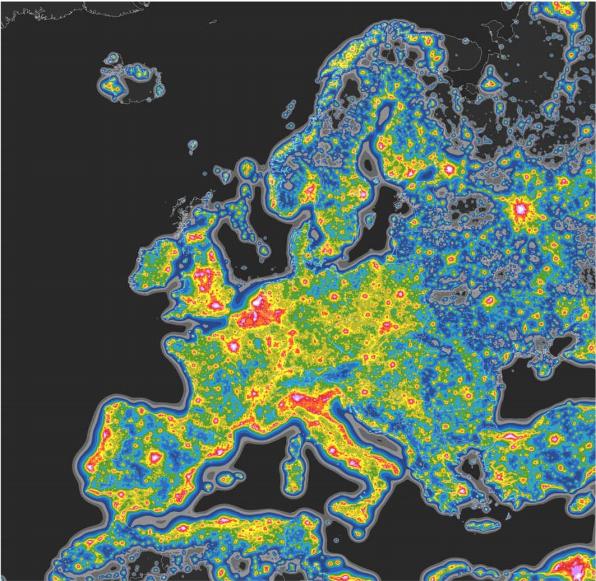
The image from NASA clearly shows that the areas of Western Europe, the eastern part of the continental United States, Japan, the coastal part of China, the Middle East, Indonesia, India, the southern coast of Brazil are most heavily illuminated. On the other hand, the minimum amount of artificial light is typical for the polar regions (especially Antarctica and Greenland), the regions of the World Ocean, the basins of the tropical Amazon and Congo rivers, the high Tibetan plateau, the desert regions of northern Africa, the central part of Australia, the northern regions of Siberia and the Far East.
In June 2016, a detailed study on the topic of light pollution in various regions of our planet (“The new world atlas of artificial night sky brightness“) was published in the journal Science. The study showed that more than 80% of the world's inhabitants and more than 99% of the inhabitants of the United States and Europe live in conditions of strong light pollution. More than a third of the world's inhabitants are deprived of the opportunity to observe the Milky Way, among them 60% of Europeans and almost 80% of North Americans. Extreme light pollution affects 23% of the earth's surface between 75 degrees north latitude and 60 degrees south latitude, as well as 88% of the surface of Europe and almost half of the surface of the United States. In addition, the study notes that energy-saving technologies for switching street lighting from incandescent lamps to LED lamps will lead to an increase in light pollution by about 2.5 times. This is due to the fact that the maximum light emission of LED lamps with an effective temperature of 4 thousand Kelvin falls on blue rays, where the retina of the human eye has maximum light sensitivity.

According to the study, the maximum light pollution occurs in the Nile Delta near Cairo. This is due to the extremely high population density of the Egyptian metropolis: Cairo's 20 million inhabitants live on an area of half a thousand square kilometers. This means an average population density of 40,000 people per square kilometer, which is about 10 times the average population density in Moscow. In some areas of Cairo, the average population density exceeds 100,000 people per square kilometer. Other areas with maximum illumination are in areas of the Bonn-Dortmund urban agglomerations (near the border between Germany, Belgium and the Netherlands), on the Padan Plain in northern Italy, between the US cities of Boston and Washington, around the English cities of London, Liverpool and Leeds, as well as in the Asian metropolitan areas of Beijing and Hong Kong. Residents of Paris need to drive at least 900 km to Corsica, central Scotland or the province of Cuenca in Spain to see dark skies (light pollution levels are less than 8% of natural light). And in order for a resident of Switzerland to see an extremely dark sky (the level of light pollution is less than 1% of natural light), he will have to travel more than 1360 km to the northwestern part of Scotland, Algeria or Ukraine.
The maximum degree of absence of dark skies is typical for 100% of Singapore, 98% of Kuwait, 93% of the United Arab Emirates (UAE), 83% of Saudi Arabia, 66% of South Korea, 61% of Israel, 58% of Argentina, 53% of Libya and 50% Trinidad and Tobago. The ability to observe the Milky Way is not available to all residents of the small states of Singapore, San Marino, Kuwait, Qatar and Malta, as well as 99%, 98% and 97% of the residents of the United Arab Emirates, Israel and Egypt, respectively. The countries with the largest share of the territory where there is no opportunity to observe the Milky Way are Singapore and San Marino (100% each), Malta (89%), the West Bank (61%), Qatar (55%), Belgium and Kuwait (51% each). %), Trinidad and Tobago, the Netherlands (43% each) and Israel (42%).
On the other hand, Greenland is characterized by minimal light pollution (only 0.12% of its territory has an illuminated sky), the Central African Republic (CAR) (0.29%), the Pacific territory of Niue (0.45%), Somalia (1.2%) and Mauritania (1.4%).
Despite the continued growth of the world economy, along with an increase in energy consumption, an increase in the astronomical education of the population is also observed. A vivid example of this was the annual international action "Earth Hour" to turn off the light by the majority of the population on the last Saturday of March. Initially, this action was conceived by the World Wildlife Fund (WWF) as an attempt to popularize energy conservation and reduce greenhouse gas emissions (the fight against global warming). However, at the same time, the astronomical aspect of the campaign also gained popularity - the desire to make the sky of megacities more suitable for amateur observations, at least for a short time. The action was first carried out in Australia in 2007, and the following year it was spread all over the world. Every year more and more participants take part in the action. If in 2007 400 cities from 35 countries of the world participated in the action, then in 2017 more than 7 thousand cities from 187 countries of the world participated.

At the same time, it is possible to note the minuses of the action, which consist in an increased risk of accidents in the world's energy systems due to the sharp simultaneous switching off and on of a huge number of electrical appliances. In addition, statistics show a strong correlation between the lack of street lighting and an increase in injuries, street crime and other emergencies.
Why can't you see the stars in the pictures from the ISS?

The picture clearly shows the lights of Moscow, the greenish glow of the aurora on the horizon, and the absence of stars in the sky. The huge difference between the brightness of the Sun and even the brightest stars leads to the impossibility of observing stars not only in the daytime sky from the Earth's surface, but also from space. This fact well shows how great is the role of "light pollution" from the Sun in comparison with the influence of the earth's atmosphere on astronomical observations. Nevertheless, the fact that there are no stars in the sky images during manned flights to the Moon has become one of the key “proofs” of the conspiracy theory about the absence of NASA astronauts flying to the Moon.

Why can't you see stars in pictures of the moon?
If the difference between the apparent luminosity of the Sun and the brightest star - Sirius in the earth's sky is about 25 magnitudes or 10 billion times, then the difference between the apparent luminosity of the full Moon and the brightness of Sirius decreases to 11 magnitudes or about 10 thousand times.

In this regard, the presence of the full moon does not lead to the disappearance of stars in the entire night sky, but only makes it difficult to see them near the lunar disk. However, one of the first ways to measure the diameter of stars was to measure the duration of the lunar disk covering the bright stars of the zodiac constellations. Naturally, such observations tend to be carried out at the minimum phase of the moon. A similar problem of detecting dim sources near a bright light source exists when trying to photograph planets near nearby stars (the apparent brightness of the Jupiter analogue in nearby stars due to reflected light is about 24 magnitudes, and the Earth analogue is only about 30 magnitudes). In this regard, so far astronomers have been able to photograph only young massive planets when observing in the infrared range: young planets are very hot after the process of planet formation. Therefore, in order to learn how to detect exoplanets around nearby stars, two technologies are being developed for space telescopes: coronagraphy and null interferometry. According to the first technology, a bright source is covered with an eclipsing disk (artificial eclipse), according to the second technology, the light of a bright source is “nullified” using special wave interference techniques. A striking example of the first technology was, which since 1995 has been monitoring solar activity from the first libration point. Stars up to magnitude 6 (a difference of 30 magnitudes or a trillion times) are visible on the 17-degree corona camera of this space observatory.
Liked the entry? Tell your friends about it!
- Translation
One of the questions that keeps popping up in the "Space" reddit thread is, "Why don't you see the stars in the photo?" Usually these are photographs from the moon landings of the Apollo missions or from Earth satellites, but sometimes they are pictures of Jupiter or the Moon. There have been a lot of Falcon Heavy Starman photos popping up here lately.
I kept telling myself that I should write an explanation for non-professionals, but I never had enough time. And finally, I was finished - one comment with a question asked for the millionth time finally convinced me to do it. And now, when someone asks about it, I can just give him a link here.
So, here it is. The explanation of why stars are not visible in many space photographs is from the point of view of the photographer.
The Basics: Cameras and Exposure Numbers

In a camera, light passes through lenses and hits a sensor, or, in ancient times, film. On the sensor are millions of small photocells that collect particles of light, photons. To simplify things a little, each of the photocells corresponds to a pixel in the final image, and the brightness of this pixel is determined by the number of photons collected. In the final photo, dark areas correspond to those places where fewer photons collided with the sensor, and light areas correspond to those where there were more photons. You can think of them as a bunch of buckets collecting photons - a bucket that has collected more photons will have a lighter tint in the final image.
The amount of light that hits the sensor is measured in exposure numbers, each successive number doubling or halving the amount of light. Intuitively, this can be imagined as an excerpt. By leaving the shutter open for twice as long, you will collect twice as much light into each bucket. The following image shows what this means. Each step is approximately equal to one additional exposure number. The excerpt is listed below.

Doubling the shutter open time changes it from 1/500th to 1/250th of a second. Another doubling gives 1/125 of a second. This is the exponent squared. An exposure of 1/125 is two steps away from 1/500 but collects four times as much light. Another doubling up to 1/60 exposure (which is an approximation) means three steps, but eight times more light. It turns out that on the image from left to right, an increase in light hit is performed, equal to four exposure steps - that is, the right photo received 2 4 , that is, 16 times more light than the left one.
In addition to shutter speed, there are two more ways in the camera to change the amount of light entering the photomatrix - change the lens aperture or ISO. Aperture is the size of the hole through which light passes.

Ignore the numbers, just keep in mind that the larger the aperture, the more light passes through it. ISO measures a camera's sensitivity to light, and works in much the same way as exposure numbers - ISO 200 is twice as sensitive as ISO 100, and ISO 400 is twice as sensitive as ISO 200.
Dynamic Range
In the image showing different exposures, the rightmost photo shows that in bright areas - the sky and clouds - it is almost impossible to distinguish details, they just look like a white spot. The amount of brightness that the camera's sensors are capable of is limited, and the highest brightness in the photo looks like white. Once the photocell reaches this exposure level, increasing the number of photons coming into it will not produce an increase in brightness. If you think of photovoltaic cells as buckets, then when the bucket is full, trying to add more photons to it won't make it fuller. When the brightness of the scene pushes the photocells beyond this limit, the result is large white highlights without any detail - this is exactly what is shown in the photo above.
Lights can be seen in this photograph of astronauts working on the ISS. The back-facing astronaut has large patches of pure white on the suit and toolbox, and can also be seen in the brightest parts of the ISS at the top of the photo.
On the other hand, photocells also have a lower limit of light recognition. Photocells that did not capture enough photons will be represented in the photo by black pixels. Reducing the amount of light to values below this limit will not make the pixel darker, it is already as dark as possible. You can't get a bucket more empty than completely empty.
Areas of the image that are darker than this limit will appear as black spots with no detail.

In this photo of the third stage and the Saturn V lunar module, you can see many shadow areas.
The luminance distance between the darkest blacks and the brightest whites is called the dynamic range. It indicates the range of brightness in which the camera can capture image details. Everything below this range will be black in the photo, and everything above will be white.
Modern digital cameras have a dynamic range of 10-15 exposure steps. You can see the list of dynamic ranges of the highest quality digital cameras. Exposure steps are listed as Evs . Film has about the same dynamic range.
Since the dynamic range varies as a power of two, the difference in light intensity between the black and white pixels of a 15-stop camera would be 215, or 32,768. the limit for capturing details before exposure is 32,768 times the lower limit at which the photocell does not work.
photo in daylight
One important thing to understand about photographs of the moon and planets, including the Earth, is that they are lit by daylight and show the day side of the subject. In other words, the object is illuminated by the sun's rays.
This photograph of the Earth shows the day side of the Earth facing the sun.

This photo from the Apollo 15 landing site is a daytime photo. You might think it's a night photo because the sky is dark and it's the Moon as seen at night - but the photo was taken on the side of the Moon facing the sun and the brightness is the same as it is on Earth during the day.

This is a daytime photo of Jupiter. She is not nocturnal. The sky is dark and Jupiter can be seen in the night sky, but this photo shows the day side of the planet facing the Sun. The same is true for the recent launch of SpaceX Tesla - the car was lit by the sun.
Comparison of daylight and starlight photos
Now that we have all the necessary knowledge, let's start to figure out how to compare pictures of the Earth and the Moon in daylight with pictures of stars at night. First, let's see what settings were used during the Apollo missions and other photos of astronomical objects in daylight and ground photos. Then we'll look at the settings used to capture the stars. Finally, we will enter various settings into the calculator and see how many exposure steps there are between properly exposed star photos and Apollo and other daytime photos of astronomical objects.If we find that the difference in exposure stops is more than 15, this would mean that cameras that capture things in space like the dayside of the moon, the Earth or other planets, or daylight objects like Tesla, will not be able to capture images of the stars. . Also remember that 15 is the maximum difference between the brightest and darkest hues in the camera, so the functional number of exposure steps between the subject and the darkest parts will be less, since usually the subject is exposed at medium brightness, not at maximum. In the photo of Earth above, the planet is not at the high end of the brightness scale, so the distance between the Earth's brightness and the low end of the dynamic range will not be 15 stops, but something like 7, since the Earth is somewhere in the middle of the photograph's dynamic range.
But to simplify the calculations, we'll just use 15 stops as a reference figure - if the correct exposure for the stars is more than 15 stops away from the correct exposure for the Earth in daylight, or the Moon, or any other planet, then we we can be sure that no stars will appear in these daytime shots.
Looking for real exposure settings - starlight
As examples of star shots, I chose three images from our subreddit. For each of them, the photographer specified the exposure settings.
Bioluminescence in Malibu and the Milky Way; shutter speed: 13 seconds, aperture: f/1.8, ISO: 4000

Milky Way before dawn over the Atlantic; shutter speed: 25 seconds, aperture: f/3.5, ISO: 2500

Milky Way over the yacht; shutter speed: 13 seconds, aperture: f/4.0, ISO: 6400
Looking for real exposure settings - daylight
There's a rule of thumb in photography called "Sunny 16" (the F/16 rule) that states that to get the right exposure for a photo in sunlight, set your aperture to f/16 and your shutter speed to the reciprocal of ISO; a photograph taken at ISO 100 must use a shutter speed of 1/100 second. We will take this rule as the first reference point for appropriate daytime photo settings: ISO 100, f/16 and shutter speed 1/100.
The second strong point will be the lunar images of Apollo. A picture of some photographic equipment shows the actual settings used for photographs taken on the surface of the moon. Look at the roll of film on the left. ASA is the film equivalent of ISO, so we have ISO 160. The shutter speed is set to 1/250 s. The instructions say to shoot with apertures from f/5.6 to f/11. Since the average will be f/8, that's what we're using as a reference. The difference between f/5.6 and f/11 is only two stops, so it doesn't really matter.

The final reference will be this image of the moon, taken by astronaut Paolo Nespoli. The camera settings are listed on the original page: ISO 400, f/6.3 and 1/500.
Putting it all together
So how many steps are there between daytime shots and photos of the stars? There are several online exposure calculators, but I used this one. To do the calculations, we input the settings of the two photos and it outputs the difference in exposure in stops. Here is a table of the difference between daytime and stellar photographs. Remember, the magic number is 15. Anything over 15 definitely means too much dynamic range, and any attempt to capture both objects will result in either blowout or shadow.Here's your answer: the difference in brightness between photographs of daytime objects, such as the surface of the Moon, views of the Earth and other planets, and photographs of stars is too great to be captured in one image. The dynamic range of 20 exposure stops is beyond the capabilities of our cameras, so the stars are not visible in photographs of objects illuminated by daylight in space. There are photographs showing dim stars and daylight objects such as the Earth or the day side of the moon. The result is very dark. Here are some examples:


Tags: Add tags


