Gorodets painting, which comes from the Volga villages, originates in the middle of the 19th century. At that time, woodworking crafts were actively developing in Russian villages, surrounded by wide forests. Currently, the elements of Gorodets painting are being studied, starting from preschool institutions in the classroom in arts and crafts.
Technology specifics
In Old Gorodets, from where this painting takes its name, there was a main sale of wooden household items painted in a special style created by the then artisans.
Initially, painting was used to decorate spinning donets. The fact is that the Gorodets spinning wheels themselves consisted of several parts, the bottom itself served to secure the spear with a comb. They sat on the bottom during work, then the spinning wheel was disassembled, it was hung on the wall. So there was a need to decorate the boards, turning them into pictures for a while. With their design decision, the Trans-Volga craftsmen attracted many residents to purchase such a product, which gave the development of Gorodets painting as a folk craft.
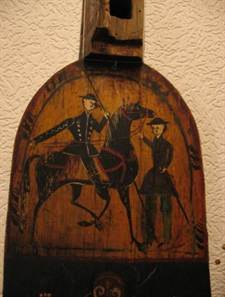
Frozen storylines were depicted on the bottoms. Everyday, idle or other events in the life of peasants and merchants. Ladies and gentlemen in magnificent dresses walked at fairs, drank tea, sitting at a round table, the background was not detailed, only protected by columns, flower arrangements, the drawing could not be divided into tiers, framed by simple lines.
Gorodets painting is characterized by black horses, cats, capercaillie birds, peacocks, as well as flower arrangements.

The painting was applied directly on the wooden surface with tempera paints, on egg yolk. Sometimes red and yellow paints could be used for the background for the ground. The color scheme has saturated, as well as diluted shades of red, yellow, black. In later works, green and blue appear.


Drawing technique
The main elements of Gorodets painting have changed only slightly over time. The style and principles of her drawing are studied in the practice of drawing on wood for preschoolers. At the initial level, she practices drawing floral ornaments, recognizable among different types of art. The motifs used schematically depict symmetrical buds of roses, rosans, daisies and cupavkas, and have their own characteristic features. There are quite simple schemes by which you can learn to draw in the style of Gorodets painting.

Drawing takes place in stages and requires the use of paints that dry and do not mix with the previous application, for example, gouache. Flower arrangements can form garlands, rhombuses, or frames.
- "Fairy lights";

- "Rhombuses";
- "Frames" are usually used to frame the main picture.
So, for starters, a pencil sketch is applied, which determines the positions of the main elements of the painting.
It is not necessary to detail the drawing, since the first thing drawing with paints begins with the so-called painting, applying only spots, circles for buds and leaf outlines with basic slightly diluted flowers. For example, as shown in the photo below. The first step in creating bouquets.
In the second layer, we apply a darker shade with arcs for shading, that is, undiluted, saturated colors or darkened. Drawing defines the contours of the buds.

And the last step is to apply white paint to create a colorful picture. In drawing animals, white strokes have a final meaning in painting wool and plumage. This process is not without reason called "revival".

These are the simplest basics for drawing Gorodets painting, used in arts and crafts classes for children at preschool and school age.
Birds and animals are drawn in the same step-by-step actions, cockerels and pheasants are drawn quite simply and schematically.


Horses are depicted in black paint or ocher, in the Gorodets style they are also dressed up in reins and saddles, have an elegant frame and lush manes.


Application in life
Of course, unlike the old works, a new step in the development of painting occurred due to the emergence of new colors and technologies. The technique of craftsmanship in the modern interpretation of creativity is much brighter and more elegant and is mainly used for souvenir and decorative purposes, as well as for the development of artistic skills. Nowadays, elements of the imagination of artists are added with new images in the form of butterflies and insects, and even drawings of wonderful unicorns are allowed.
Nadezhda Kovalchuk
Hello, dear friends and guests of your favorite site!
Gorodets painting- this is one of the traditional decorative crafts and is among the highest achievements of Russian folk art.
Oh Russia, you are Russia
Glory has not diminished
You are a city, you are a city
She became famous all over the world.
Today I bring to your attention a master class "Samples of step-by-step execution of painting flowers from Gorodets patterns"
Description: the master class will be of interest to older preschoolers, educators and parents. Children 6-7 years old will be able to do the work with the help of adults, and older children - on their own.
Purpose: master the step-by-step drawing of Gorodets flowers to compose a composition of Gorodets painting for decorating dishes or making a bouquet.
Target: to teach children, educators and parents the phased implementation of the painting of Gorodets flowers.
Tasks:
To consolidate the three main stages in drawing 5 types of Gorodets flowers: bud, cupavka, rosan, chamomile and rose;
Develop a sense of composition and color;
Raise interest and respect for the folk art of Gorodets masters.
Materials: thin and thick brushes, gouache paints - red and pink, blue and light blue, orange, black and white, whole sheets and halves of A3 paper.

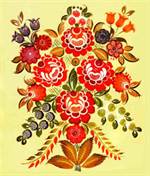
Flowers are an indispensable part of any Gorodets work.
Gorodets painting is symbolic. Flowers in it are a symbol of health and prosperity in business.
Flowers of Gorodets painting:
Bud
Chamomile
Rosan
Kupavka
Rose
Gorodets craftsmen love color and shade, and therefore they use red (cherry) and pink paint, blue and cyan, as well as brown, black and white for animation.
The execution of flowers in the technique of Gorodets painting is divided into three stages.
I stage of painting - Underpainting- This is a colored circle that will serve as the basis of any Gorodets flower.
II stage of painting - Tenevka- pointing petals. When we have drawn circles of different colors we need (underpainting), we give the gouache time to dry. Then we begin to draw the petals, depending on the flowers that we want to depict. On a pink underpainting, the petals can be drawn in red, on blue - in blue. In general, the guidance of the petals is always done with a darker contrasting paint.
III stage of painting - Animation- decoration of flowers with white dots and strokes. The pattern is animated. It is carried out with the thinnest brush. To do this, we need art brushes No. 2 or No. 3, as well as white gouache.
Rosan. Step by step drawing.
1. Draw circles on a sheet of paper with a simple pencil.

2. Using a thick brush, draw and paint over an orange circle.


3. Draw a small red circle in the middle of the orange circle.

4. Above and below the large circle, draw a petal.

5. We continue to draw rounded petals along the edge of the circle.

6. Making animation. Carefully dip the tip of the brush in white gouache and decorate the rose with dots. First of all, we put a white dot in the center of the circle, and then in a circle.


Gorodets rose. Step by step drawing.
1. Draw the middle (bud) and petals with a simple pencil.

2. Paint over the middle and rose petals with red.

3. With black paint, add a circle, an arc on top, circle the rose petals with black paint with a thin brush. We begin to direct the arc at first only lightly touching the paper with the tip of the brush, then we make a strong pressure on the brush (the brush leaves a wide smooth mark) and complete the arc again with a thin line.

4-5. Rose revive: dots, petals.


Kupavka. Step by step drawing.
3. At the top of the large pink circle is a small red circle, then draw an arc, and below, in the center, a red petal.
4. Draw red rounded petals to the top with a decrease.
5. Animation of the cup: a dot in the center of a small circle, an arc and petals, dots in the red petals.

Chamomile. Step by step drawing.
1. Draw circles with a simple pencil.
2. Draw and paint over the circle with pink paint.
3. In the center of the pink circle is a small red circle.
4. We draw symmetrically one petal at the top and bottom (the method of sticking.
5. Add petals.
6. Animation with white paint: dot in the center of the chamomile, dots in a circle, white petals between red ones.

Bud. Sample step by step drawing
1. Draw a small circle with blue paint.
2. Add a small blue circle at the top.
3. With a thin brush, draw a blue arc in the form of a month.
4. Draw white arcs - below and above.
5. Draw a blue arc in the middle of the bud.
6. Variants of a bud with a mesh.


Thank you for your attention!
Related publications:
The New Year is just around the corner and we all think about what kind of presents our preschoolers can make for their relatives. I want your attention.
Master class for parents of older preschoolers "Kaleidoscope of fun games with images of animals" Master class for parents of older preschoolers Topic: "A kaleidoscope of fun games with images of animals" Purpose: to introduce parents.
Master class: "Enrichment of the active vocabulary of older preschoolers through the use of word games."
Now there is more and more diversity in creativity. So I decided to try to color the stones with the children. Stones are natural.
M. Ilchenko, S. Mishin
Methodological guide for
Gorodets painting
The painting, which is now called Gorodets, was born in the Volga region on the banks of the clear and bright river Uzola. There, the peasants of several villages painted spinning wheels and took their products to the Nizhny Novgorod fair to sell. Therefore, the painting was first called Nizhny Novgorod. More precisely, even before the advent of this painting, the spinning wheels were decorated with carvings. Over time, the carving began to be slightly tinted - for greater elegance, and later the carving on the spinning wheels was completely replaced by painting.
You will never confuse with anything the joyful colors of Gorodets painting, its black horses with a hooked leg and swan neck, its birds with outlandish tails in the form of a butterfly wing. Horses are always depicted in profile, and people - only full face. And all this - surrounded by luxurious flower garlands.
Gorodets painting is symbolic. The horse in it is a symbol of wealth, the bird is a symbol of happiness, and the flowers are health and prosperity in business.
The subjects of the ancient Gorodets painting were horse riders, young ladies in crinolines, weddings, feasts, tea parties and other solemn scenes from the life of the townspeople. But because all this was depicted by peasant artists, an extremely peculiar style of painting was created, in which the pomposity and pretentiousness of urban elements are naively mixed with the simplicity and sincerity characteristic of the common people.
Today, the heritage of the old masters has not died: their best traditions are being revived by artists working at the Gorodets painting factory in Gorodets. Fortunately, the ancient Volga painting is now in the safe hands of talented contemporary artists. Five of them are Laureates of the Repin Prize. This is the highest award for artists of our country. The names of these artists: Bespalova L.F., Kubatkina L.A., Kasatova F.N., Rukina T.M., Sokolova A.V. There was a time when Gorodets painting almost perished, but there were kind and talented people who revived it, and the artists I named were among them. They are our national pride.
In this manual, I will tell you about the elements, plots and techniques of Gorodets painting. These will be the simplest, elementary truths, but they must be well learned and not violated when you start painting.
Gorodets painting, as already mentioned, is wood painting. But we will begin to learn how to draw Gorodets elements on paper. Subsequently, when you master the simplest techniques of Gorodets painting, it will be told how to prepare wooden surfaces for painting, how to paint and varnish them.
Well, now stock up on paper, paint and brushes.
PAPER I need a white one from an album for drawing, drawing paper or semi-drawing paper. For the first trainings in painting, you can take worse paper: then, after all, you will still throw out unsuccessful drawings, and carefully redraw the successful ones into an album with good paper.
PAINTS. Gorodets masters paint their works with oil paints. And we will perform gouache painting.
From the school set of gouache (12 colors), take only eight colors: black, white, scarlet, kraplak (cherry), light cobalt blue (bright blue), as well as yellow, chromium oxide (dark green) and red ocher.
You will use the first five colors directly from the jars, and the last three are not suitable for Gorodets painting, they will need to be mixed with each other to get a range of colors reminiscent of Gorodets. This is discussed in more detail below. By the way, one more paint is needed - cinnabar. This is a bright red paint, but it is not found in the gouache paint set. Although this paint is expensive, you can't make a good painting without it, so you'll have to buy it from an art store.
BRUSHES. For painting, it is desirable to have at least three brushes: squirrel art (N2 or N3), kolinsky art (N1 or N2) and flute (N2 or N3) - this flat brush made of soft hair is used for underpainting, framing, etc.
We have already agreed that we will carry out our Gorodets painting with gouache paints. Do a simple experiment. Take a piece of paper and put on it one stroke of paint from each jar of gouache that are in the kit. Now look critically at the resulting palette of gouache paints. Isn't it a dull gamma? There is nothing to dream of making a decent painting "under the gorodets" using only these colors. To get a cheerful, harmonious color scheme inherent in Gorodets painting, we will have to tinker a bit with mixing colors. So far, we have to get three new colors from the gouache set: light blue, light pink and Gorodets green (that is, green with a warm “swamp” shade). So let's start mixing. Take two clean jars of gouache. In both jars, put half a spoonful of white paint (zinc white) and add a little cobalt blue light (bright blue paint) to one jar, and a little cinnabar to the other. True, cinnabar may not be available, then you will have to do with what is in the gouache set - scarlet paint. Stir well. If the paints are thick, add 2-3 drops of water. Stir again. Two new colors were obtained: pale blue and pale pink. But we will call them like this: blue razbel and pink razbel.
Make sure that when mixing these whites, brushes, paints and jars are completely clean, then the whites will turn out to be bright, clean, luminous. It very often happens that when mixing pink tint to white paint, they add not scarlet, but kraplak, and then the tint of a soft pink color does not work, but cyanotic paint comes out, which is decent to paint perhaps a drowned man. But since we are not going to do this, we will have to throw away the unsuccessful break and mix in a new one, already with the addition of scarlet (or better, as I said, cinnabar).
Now, if your whites turned out good, close them tightly with lids and put gouache in your set. You will use them all the time.

In addition to these two whitewashes, we need to mix the Gorodetsky green paint, which is used to make the underpainting of the leaves. Remember, when I said which colors from the gouache set we will use for our painting “under the gorodets”, I named five colors: black, white, scarlet, kraplak and cobalt blue. These are the colors that we will use in painting without mixing.
I singled out these three colors in a special group, because they are not used in painting, but new shades of colors, characteristic of Gorodets painting, are mixed from them. I will tell, for now, only about one, which is obtained by mixing these three colors. So, again we take an empty jar of gouache. We put half a spoonful of yellow gouache in it, add a drop of red ocher and a little chromium oxide (dark green paint); mix, try on a piece of paper - you should get a paint of a warm green swamp shade. That's what it is gorodets green dye. The paint should be creamy. Close the jar with a tight lid and make sure that it does not dry out. If it becomes thicker than you need, add a little water to it. Put a jar of this paint in your kit. Just like the whites, you will need it in your work.
One more note. It is clear that everyone who mixes the paint will get very different shades. Gorodets green, therefore, by changing the number of constituent colors, get the shade of Gorodets green that you like best. It will be your gorodets green. And yet there is a general advice for everyone: take more yellow, and less green, because of this Gorodets green will be lighter, more airy, and black animations will look good on it. If you already mixed a darkish paint, then the animations on it may be yellow.
Gorodets painting is carried out in two stages: underpainting and revival. And flowers - in three stages.
For underpainting, wide flat brushes - flutes are used. The flute is dipped in paint and all the figures of the product being painted are painted over at once (usually in 5-6 colors).
For example, all horses are completely painted over with black paint, except for the harness, which is dyed with cinnabar. Also, the bodies of birds are painted with black paint, the tails of birds are painted with kraplak, the underpainting of flowers is blue and pink, and the wings of birds and leaves are green.
Performing underpainting is a simple painting technique, it is accessible even to five-year-old children. In fact, with the same brush strokes that underpainting is done, we paint the frames and floors at home. The main thing here is to smear the paints with a thin, even layer, so that there are no gaps or influxes of paint anywhere. For this, wide brushes are used.
When the underpainting of the entire product is completed, the second stage begins - revival. The animations are done with white paint. But for animation, other brushes and other painting techniques are needed.
For animation - brushes are needed artistic. And the performance of animations is no longer a painting technique, but an artistic one, and in order to do them well, you will have to practice a lot. The tip of the brush is dipped in white paint and a lot of dots and various strokes are applied over all the underpaintings, which in a matter of minutes so dramatically transform the appearance of our painting that the thought immediately comes to mind, what a lucky word it is - animations! And exactly! From the white, like lace, decoration, Gorodets and birds, and horses, and flowers, which were completely flat before that, instantly come to life. Just don't think that once you've dipped an art brush into white paint, you have the right to scatter white dots with the generosity with which millet is sprinkled on chickens. Beginners, by the way, like to put these white dots in a multitude so much that before you have time to look around, they will already cover up all the work with them. This should not be done in any case: everything is good only in moderation. Shakespeare said: “Be neither a spendthrift nor a miser. Only in a sense of proportion is true good.
Those are golden words! In moderation, there should be animation, only then they are fabulously beautiful, and if you overdo it, all the charm of the work will disappear, as if covered with snow. And note that the painter can sometimes change the colors of the underpaintings, but the animations are always the same, because there is a certain canon, an unbreakable rule, how to make animations on horses, like on flowers, and only on the bodies of birds with animations you can be a little free .
It remains to tell that when we make animations, white strokes come in several forms. These are arcs, droplets, strokes and dots. How they are performed will be detailed later. Most importantly, remember that when making animations, the brush must be held vertically in your hand and touch the product with the thinnest tip of the brush so that the strokes are neat, elegant and elastic: all the beauty of Gorodets work depends on the animation.
Now that we are familiar with What depicted in Gorodets painting, and with what paints and brushes this can be done, let's talk in detail about the various elements of this painting. And start by yourself (simultaneously with reading the text) to depict on paper everything that will be discussed in subsequent chapters.
Gorodets painting comes from the icon, and, just like in the icon, there is a lot of symbolism in it. The bird is a symbol of family happiness.
Look at Gorodets birds - they always have a fat belly. In my long practice of teaching, I met many people who did not like this particular feature of the Gorodets bird. Many who begin to try their hand at Gorodets painting try to “improve the figure” of the Gorodets bird by thinning its body. I want to save you from this gross mistake. Such an outline of a bird is a tradition, and trying to thoughtlessly change it is the same as depriving an ancient symbolic image of its meaning. Some of you will say: “Just think, what a crime! I just wanted to make the bird thinner - so it is even more elegant.
But remember, the bird is a symbol family happiness. Perhaps this “unaesthetic” (according to others) tummy just symbolizes the birth of a new life and is the key to family happiness!
I don’t know if I correctly guessed the intention of our ingenuously wise ancestors regarding the bird, but I simply urge you to respect the tradition and draw birds the way thousands of artists painted them before you.
The bird in the Gorodets painting has a sharp silhouette: it has a flexible line of the neck and chest (sinusoid), a tail in the form of a butterfly wing, a filiform beak and legs. The traditional color of the bird is: the body is black, the tail is cherry (kraplak), the wing is green.
Two of these three colors are available in the set of gouache paints: black and kraplak, and Gorodets green is mixed.
Gorodets birds are depicted in two stages: first, underpainting is done with three colors with a brush - this is the body, wing and tail of the bird, and then animations are painted on it with white paint.
Figure 1 shows the most characteristic variants of the Gorodets bird's revival. Animations are made on the bird with white paint - using a thin artistic brush. Here you can use the entire arsenal of Gorodets animations: arcs, strokes, droplets, and dots.

strokes are very different in length and width, and they are performed as follows: the brush is held vertically in the fingers and, barely touching the paper with the end of the brush, draw a thin line at the beginning and end with more or less pressure in the middle. The strokes made the animations on the wing and tail of the bird, on the neck and at the bottom of the tummy.
Droplets are made using the priming method, known to modern children since kindergarten, where they are taught this technique. Droplets are made like this: sideways with the tip of an art brush (with white paint) easily and smoothly
touch the paper, which leaves a trace in the form of a drop.
How dots are put is easier to understand than to explain.
How to perform arcs is described in detail in the section of this technique “Flowers are a symbol of health”.
I advise you to start drawing a bird of traditional colors. Later, of course, you will try other coloring options for Gorodets birds. And yet, over time, you yourself will come to the conclusion that the combination that I called traditional is the most successful of all.
Have you heard such a word - "horseless"? When it is used even in our time, they mean the extreme poverty of the person about whom they say "horseless". Now times have changed. I have a lot of acquaintances, and not one of them has a horse! And I don't. And yet no one says about us that we are “horseless”. Some even have cars...
But in the old days, those peasants who did not have a horse were the poorest people in the village: neither to plow the land in the field, nor to bring hay to the cow, nor to go to the market to sell something from their harvest, nor to deliver a doctor to the sick .. .
In a word, it was bad on the farm without a horse. And the horse was so significant in the life of rural residents that in peasant painting it became symbol wealth.
The Gorodetsky horse is only black. This is also a tradition. And she went from that distant time, when Gorodets spinning wheels were decorated not with painting, but with carvings. Then the horse, carved from black (bog) oak, crashed flush into the light bottom of the Gorodets spinning wheel. This work was hard, as oak is a very hard wood. Therefore, over time, the masters who made the spinning wheels began to simply paint over the horse on the spinning wheel with black paint, thereby imitating their work under the inlay with bog oak. It was cheaper. Spinning wheels were made for sale.
And then they began to tint other parts of the spinning wheel, and gradually the expensive carving was replaced by coloring (painting).
Since then the horse in Gorodets painting is always black.
The Gorodetsky horse, like the bird, is sharp in shape and color. The whole horse is black with white rims, the saddle and harness are red. The horse has a flexible neck and chest line (and, mind you, exactly the same as a bird!), a rounded croup, a bushy tail and very thin legs. Moreover, they are thin only below the knees.
One hind leg is bent under the belly with a hook, and one front leg is steeply bent at the knee in front of the chest.

The Gorodets masters of the horse paint in two stages: underpainting and revival. I advise you to first draw the outline of the horse, then paint over the saddle and harness with red paint (Fig. 2a), then the horse with black paint (Fig. 2b), and then make animations with white paint using dots, strokes, droplets (Fig. 2c) .


A droplet on a horse is done like this: with the tip of the art brush, which must be held vertically, quickly draw a thin elastic line and at the end of it, slightly tilting the brush, stick a drop. They make little drops of animation on the chest and rump of the horse, and from such animation the horse becomes, as it were, shiny and smooth; “full”, as the peasants say. And this did not mean that the horse had a good meal, but that he was in good shape, round and thin at the same time, handsome and sleek.
Gorodets horses are of two types, they differ only in manes, in everything else they are always the same, except for small minor details.
Flowers are an indispensable part of any Gorodets work.
For a good mastery of Gorodets painting, it is enough to be able to draw only four flowers. Subsequently, it will be told especially about one more flower, the most beautiful, but without which you can perfectly do without, without compromising the quality of the painting.
So, let's learn how to draw only four flowers first. They are drawn in three stages:
- underpainting;
- pointing petals;
- animations.
So, prepare paper, a pencil, one art brush and for now only one paint from the gouache set - kraplak. And with God!
Let's draw four circles in a row on a sheet of paper with a pencil: the first one is smaller, the rest are the same (see Fig. 3).

Using a brush and cherry paint (kraplak), draw a round colored spot in each of these circles; on the first two - from the side, and on the other two - in the middle (Fig. 3). For convenience, let's call this spot a nose in the future. Now let's finish these four flowers with the same paint (kraplak).
Draw on the first circle arc. To do this, holding the brush in the fingers vertically (perpendicular to the sheet of paper), we begin to direct the arc at first only lightly touching the paper with the tip of the brush, then we press hard on the brush (the brush leaves a wide smooth mark) and complete the arc again with a thin line. It turns out a beautiful arc in the form of a young month (Fig. 3a).
On the second circle, draw the same arc, but now not along the edge, but inside the circle. And along its edge - rounded petals in shape are exactly the same as the arc, only smaller. The result was a flower somewhat reminiscent of a rose (Fig. 3b).
On the third circle, we draw the petals along the edge of the circle (Fig. 3c).
On the fourth circle, we finish the droplets using the priming method. They are located along the radius around the spout drawn in the center (Fig. 3d).
Now compare your flowers with those in the picture ... And if they are similar, I congratulate you from the bottom of my heart: you have coped with perhaps the most difficult part of the Gorodets painting!
Of course, flowers are always painted on colored circles, but at first, color will only distract you from the correct “writing” of these very important painting elements.
If the flowers are not very good, practice until you can draw them with ease.
Make sure that all arcs are rounded and convex, like sails inflated by the wind, so that the noses of the third and fourth flowers are large enough (no less than 1/3 of the diameter of the circle in which they are placed).
Now let's agree on terminology. It will be more convenient to give a name to these four flowers:
- bud (Fig. 3a);
- rose (Fig. 3b);
- rosan (Fig. 3c);
- chamomile (Fig. 3d).
And we had to name these flowers ourselves. Therefore, you can name them the same as we call them in our work team, or rename them in your own way. Agree that it doesn't matter. As the people say: "Even though you call it a pot, just don't put it in the oven."
We have already, I hope, mastered the second stage (pointing the petals), and now we will start from the first stage (underpainting).
Let's talk about what color the flowers that we learned to draw will be.
For now, we will draw all the flowers only in pink and blue. There are many pink flowers in the painting, but few blue ones. There may be no more than one quarter of the total number of flowers, or even fewer, or even not at all in the Gorodets painting. But this will be discussed in the second part of this manual.
So that's what's interesting: Gorodets flowers are always drawn on colored circles. When they begin to paint the work, at first they draw only colored circles (this, in fact, is the underpainting). Why so? Really, even great masters could not make Gorodets painting without circles?
We could, of course. But such is the tradition.
You see how simple-hearted and unsophisticated this peasant painting is, that it does not make any secret of the method of drawing their luxurious flowers, and even in the works of the famous masters of Gorodets, these four flowers are always painted on colored circles. It turns out that in order to create unthinkably lush and beautiful Gorodets compositions, it is enough to be able to depict only four flowers, which are described here, and the impression of a huge number of these flowers is created only thanks to their color - red, pink, blue, blue, ocher, brown, cherry and even black ones.
There are no flowers only orange, yellow and purple.
So, again we draw the same four circles from which we began to learn how to depict Gorodets flowers.
Any of the four circles will be painted with blue white, and the remaining three with pink white.
Now on these underpaintings we will draw the same flowers as in Figure 3.
I advise you to carefully sketch these flowers in your album - they will be included in your atlas of Gorodets elements. Please note that on the blue circle we point the petals and the nose of the flower with cobalt blue, and paint the pink underpaintings with red paint.
This is how you will paint: bright blue on blue and red on pink.
Now let's move on to the third stage: it remains to make animations on the flowers. The animations on the flowers are made with white paint using an N2 and N3 art brush.
The tip of the brush is carefully dipped in white gouache and the flowers are decorated with dots and elastic strokes.
First of all, they put a white dot in the center of all the noses, then they circle the noses of roses and daisies with dots, and the noses of the bud and rose are circled with a white arc (how such an arc is drawn has already been explained).
And then the animations on the rose (those that are located along the “meridians”) are finished with very elegant strokes.
All! We learned to write flowers! My advice to you is to make animations on flowers only as shown in the picture.
This is a tradition. Tradition must be respected..
Gorodets flowers are always surrounded by many leaves. The Gorodetsky leaf is simple and unpretentious in shape: its contour resembles a pumpkin seed, but the spectacular effect of luxurious Gorodets garlands largely depends on the leaves.
The leaves are painted over with Gorodets green paint.
If we compare the ancient Gorodets murals with modern ones, we will see a big difference in the craftsmanship: the masters of our time have succeeded in virtuosity in writing the elements of Gorodets murals, but the shape of the leaves has changed little. True, they began to be depicted as if “back to front”: before they were turned to flowers with a wide end, and now, on the contrary, with a narrow one. I think that this is due to the fact that before the leaves “hovered” freely near the flowers, and now in modern painting, the leaves are arranged in groups in the shape of a fan, and this can be done only by greatly thinning one end of the leaf.
It has already been mentioned that it is easier to depict a Gorodets leaf in the form of a pumpkin seed. But I advise you to write a more complex sheet like this: draw a smooth arc with a brush and connect the ends of this arc with a “sinusoid”, making sure that the sheet remains wide at one end (see Fig. 4).
Gorodets is a small town in the Nizhny Novgorod region. It was there almost 2 centuries ago that traditional art was born, which is now commonly called "Gorodets painting". The first samples of images of this type are found on old spinning wheels, and later began to be found on furniture elements, doors, and shutters. These bright pictures are somewhat reminiscent of the famous Khokhloma painting, but at the same time they have their own specifics and are a little easier to execute, because. the drawing is applied directly to the wooden base. Let's study the elements for creating a beautiful Gorodets painting.
The drawing is done in bright, saturated colors using black and white strokes. Traditional images in the style of Gorodets painting are floral motifs, genre scenes and even images of various animals (horses, leopards, roosters). Typically, image types are divided into three groups, we will consider each of them in more detail.
We study the main elements of Gorodets painting for needlewomen
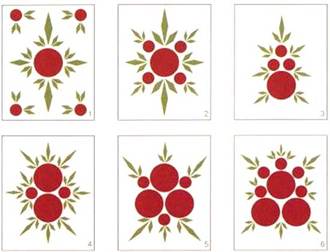
Flower painting.This type of images is used most often, because. he is the easiest to do. The simplest option will be the image of only one large flower, written out in large strokes. Round objects, for example, elements of dishes, are often decorated as follows: on the sides of the product, a floral ornament is depicted, and on the lid - a pattern of buds. To decorate rectangular objects (for example, bread bins), a floral ornament can be inscribed in a diamond shape.
Consider the main elements of the floral type of painting.
"Bouquet".This type of ornament is a symmetrical image of buds. It is usually used to decorate round objects, such as the lids of some dishes or wooden boards.

An elongated "subspecies" of the bouquet. One large flower is depicted in the center, and smaller buds and leaves diverge from it in different directions. It can be used when painting wooden boards, furniture for children, boxes.
"Rhombus".At its core, it is a "bouquet", but not round, but diamond-shaped. This element of Gorodets painting can often be found on shutters, cabinet doors or other rectangular objects. The photo shows a kitchen board with a similar pattern.
"Flower Stripe"One of the oldest types of patterns in the style of Gorodets painting, this is how spinning wheels were painted in the 19th century. As the name implies, it is a dense strip of flowers of different sizes, which alternate symmetrically, and small leaves. Now this type of painting is used when painting round volumetric products, for example, caskets. It seems that Gorodets painting is replete with an incredible amount of flowers. However, if you look closely, you can identify several repeating elements. Among the most popular is rosan.

As the name implies, it is a "flower strip" closed in a ring.
In addition to flower drawings, images of animals are also often found in Gorodets painting.

Elements of this type for Gorodets painting can often be found on kitchen boards, but they can also be found on furniture, and even on smaller items, such as wooden spoons. Often the drawings are paired and are depicted symmetrically on both sides of the conditional central line of the product. At the same time, both sides may not necessarily be exactly the same; complementary drawings (black and white horse, cockerel and hen) are also common options. Sometimes there are sets of three elements, where the two extreme ones are symmetrical, and the central one does not have a pair.

Horses and birds are depicted in the middle of trees or surrounded by lush ornaments. It is believed that such motives have a certain meaning. For example, a rooster or a horse is considered a symbol of the sun, good luck, and prosperity. The paired image of a rooster and a hen is a guarantee of family well-being, a wish for happiness and many children.
Narrative Gorodets painting.The most difficult to draw. These pictures depict scenes from village life - harvesting, dating, dancing. Also often there are illustrations for various fairy tales.
Of course, the image of each figure has its own hidden meaning. The young man on horseback is the groom. The beautiful girl standing near the birch is the bride. The image of feasts is very popular, and the table filled with food is written out no less carefully than the characters. This is a wish for wealth and prosperity.

Gorodets painting is great for classes with children of all ages. For preschoolers, simple floral patterns that are drawn in large strokes are more suitable, and with older children, you can already try more complex images.
Video on the topic of the article
For more clarity, we suggest watching the following videos, which demonstrate the implementation of Gorodets painting in stages.
Emma Zhavnovskaya
Gorodets painting- one of the traditional Russian folk crafts. This wonderful painting difficult to confuse with another. Paints Gorodets painting bright, juicy, cheerful - and everything in it is symbolic. Black horses with a steep neck and thin legs are a symbol of wealth, unprecedented birds are a symbol of happiness, and flowers- health and success in business. Let's try draw the simplest pattern flowers and buds. Here's one.
For this we need: brushes of different sizes, gouache or acrylic paints.

With a wide brush, we tint the circle under the "tree".

Mixing white gouache with red and blue, we get shades of pink and blue. Hold the brush vertically. We draw circles, the so-called "underpainting"

With blue and red gouache we draw "underpaintings" of a smaller size, slightly going to the main circle.

We decorate our rosan with petals, on buds draw arcs.


Now we proceed to the image of leaves and twigs. Applying with a brush, we make symmetrical leaf prints.

And finally, the most important thing. Our pattern needs to be revived. We take the thinnest brush and with a light touch we apply “animations” with white paint in the form of dots, arcs, droplets, strokes. Do not overdo it. The main thing here is to comply
knowing of limits.


As you can see, nothing complicated. Good luck everyone!

Whistle birds.


Decorative plates.


