"Crown of the Snow Queen" costume fragment. Master - class from a series of master - classes "Working with waste material"
Realm of the Snow Queen
... On a sparkling ice floe
I look dreamily
There, inside it is a picture
I live find:
Behind the transparent smooth edge,
Perfectly clean and strict
illuminated by radiance,
The royal palace is visible! ..
Illa Mushe
I offer you another idea of using waste material - SD disks.
Audience age: children of middle and senior school age, technology teachers and teachers of additional education.
Purpose: Crown for the Snow Queen costume.
Target: Craft a crown for the Snow Queen costume.
Tasks:
- to work out the ability and skills to carefully cut out the parts according to the drawing with a burner on the fabric;
- to form the ability to distribute a drawing according to a given shape;
- develop imagination and creativity.
The crown was made of precious metals (mainly gold) and richly decorated with precious stones and pearls. Crowns had different shapes (tiaras, diadems, hats, crowns, hoops with leaves, teeth and plates, etc.).
Creating the costume of the Snow Queen for the New Year's holiday, thinking about the crown of the Snow Queen, something cold, icy, iridescent seemed to be.
If you buy rhinestones - it turns out expensive for the price. And the disks are the best! When hit by rays of different colors, the disk shimmers with different colors of the rainbow. In the finished product, the illusion of rhinestones is created.
At low cost, the product looks decent. The peculiarity of the product is that the choice of disc sizes is limited and therefore the size of the crown depends on the selected discs.
To create the shape of the crown, you need to turn on the fantasy! I used one large and two small discs.
Progress:

1. Materials required for work:
- the remains of white fabric on a synthetic basis, bandeau, sequins, beads.
- SD disc, DVD large and small, threads, snowflake patterns.
- paper for transferring the picture, tracing paper.

Tools:
- scissors, pins, pencil, marker, ruler, fabric burner, copy table (glass with backlight), iron.
2. Step by step process of making crafts

- We make a pattern of the crown. To get a symmetrical pattern, we bend the paper in half. We decorate the lower edge of the crown with a curved line, taking into account the size of the head (you can make an allowance for a different head size). We distribute disks. Finishing the top edge

- Cut out a drawing from paper (in this case, according to the principle of snowflakes). The size of the picture corresponds to the size of the disk from the outside. Closer to the center of the disk, do not go beyond the mirror part.
The drawing should resemble rhinestones of various shapes

- We translate the pattern of the crown onto tracing paper, in the intended places we translate the pattern from the "snowflakes". Outline with a marker

- We attach white fabric to the tracing paper with pins. We sit down at a backlit copy table and burn out the internal fragments from the middle of the work to avoid displacement or “bubble” of the fabric.
Attention! If you burn directly on the disk - the disk will burn through!

- Remove excess fabric

- We translate the pattern of the crown into a gang and cut it out. (Bando is a dense adhesive fabric).
We glue the bandeau with an iron on a white fabric intended for the lower part of the crown

- Put the discs between the top and bottom of the crown

- fasten with pins

We sit down at the backlit copy table and weld both layers of fabric together along the outer contour of the gang, simultaneously burning the contour lines of the two layers of fabric. A strong weld is formed along the cut line

- In order for the disks inside the crown not to move, we fix them along the contour - we sew sequins. If desired, you can additionally embroider with sequins all over the crown

- We fix the ends of the crown according to the desired size on the head. Crown ready

This technique can be used in the manufacture of stage costumes, for example, the Elvis Presley costume.
Enjoy your work!
Thank you for your attention!
At the New Year's carnival celebration, girls often play the role of a snowflake or a snow queen. If for the first case it is not difficult to choose an outfit, then in the latter case, the problem of finding a suitable headdress may arise. Unfortunately, a beautiful crown for the snow queen is rarely found in stores. Therefore, you usually have to make it yourself.
Ice Accessory
Such a crown has a "candy" effect due to the use of non-standard material.

In working on the product you will need:
- transparent PVC film or plastic (you can take old document covers);
- tulle with a silver pattern;
- cardboard;
- shiny fabric (under silver);
- thread, needle;
- scissors;
- thin wire;
- silver braid;
- elastic band 2 cm wide;
- hot glue;
- decorative elements (for decoration).
First of all, the circumference of the head is measured. Based on the measurement obtained, it is necessary to calculate the width of the base of the peaks of the future crown. There are seven of them in the product.

The height of the triangles is chosen individually. It is only necessary to take into account that the central triangle will be the highest. Details adjacent to the central part are cut out 2 cm shorter than the main one. The next two triangles are 2 cm lower than the previous ones, etc. Based on the principle described above, 7 triangles are cut out of the PVC film. Separately cut out the same parts of tulle.

A corresponding tulle detail is superimposed on each blank. A wire is sewn along the edge of the blanks using an overcast seam. All triangles are framed with silver braid. It is desirable to bend the figures slightly so that they keep their shape better. Finished transparent parts are assembled on an elastic band. The easiest way to do this is with a sewing machine. The ends of the product are connected into a ring.

To create a three-dimensional effect, you need to complement the crown with opaque elements. To do this, two triangles are cut out of cardboard. Since these details will be located on the front of the crown, their height should be just below the transparent triangles.
Cardboard blanks are sheathed with a shiny fabric and fixed with safety pins to the front "ice" of the crown, as in the photo.

Dense and transparent parts are attached to each other. It remains to decorate the crown to your own taste. In the work, you can use rhinestones, beads, sequins, lace elements.

The royal ice accessory is ready.
Quick option
Advice! It is quite possible to make a crown faster if you do not cut each clove of the product separately, but use the continuous pattern technique.

To do this, prepare:
- cardboard;
- fabric packaging for flowers;
- scissors;
- gum;
- silver braid;
- silver paper;
- threads;
- glue;
- sequins in the form of snowflakes.


A crown pattern is drawn on cardboard. The workpiece is cut out. The pattern is superimposed on the fabric and outlined with the expectation of allowances.

The fabric part must be cut out, then put on a cardboard layout. Allowances are folded to the back and glued to the cardboard.

Glue is applied from the wrong side of the workpiece, after which the crown is glued onto silver paper. Thus, unsightly allowances are hidden on the back of the product.

The crown is carefully carved. The product is decorated with large sequins in the form of snowflakes.

The contour of the crown is framed with a silver braid. Depending on the quality of the braid, you can glue it with hot glue or sew it on with your own hands.


The crown is ready. If the holiday is already “on the nose” and you urgently need to acquire a “snow” crown, then you can try a simplified version - a cardboard product. So that the crown does not look like a "hasty craft", it is advisable to replace the cardboard with a piece of light-colored wallpaper with a pattern.

A crown is drawn on it. The template needs to be cut out.

Then the workpiece is stained with silver spray paint. Since the aerosol tends to be sprayed in all directions, it is recommended to foresee this moment and paint in the corridor, after covering the floor with newspaper or polyethylene.
First you need to paint the wrong side of the product. On the front side, you need to carry out two stages of staining. After applying the first layer, you need to dry the product, and repeat the staining.

When the crown is completely dry, you can start decorating it. The edges of the product are decorated with piping with rhinestones or any silver braid. The crown is decorated with additional elements corresponding to the theme of the carnival costume.

The final step is to sew a wide elastic band around the edges of the product. You need to measure the elastic so that the crown fits snugly around the head.

The carnival headdress is ready to please its mistress. Any proposed master class will allow you to create an accessory not only for a child, but also for an adult. This is especially true for kindergarten teachers and leaders of theater groups.
Video on the topic of the article
A video compilation will help you better understand the process and make the product faster.
draw the Snow Queen with a pencil
need a little effort. First, draw the figure of a woman in a magnificent dress and with long hair.

The second step is to draw small legs at the bottom of the dress, the dress itself needs to be made wavy. Then we finish drawing the palm, and on the hair, which we loosen a little, we will plant a crown.

The third step will be drawing ribbons on the shoes and sleeves, drawing the face and curls. On the left side of the face, you can add a small body art, outline the crown.
The Snow Queen can be drawn with a pencil in several stages:
We start with an oval and an approximate marking of the face.

We draw the eyes.

We finish the eyes and draw the outline of the eyebrows.

We draw us and lips.

Then we draw the crown.

We put a pattern on the crown.

We draw the shoulders and neck.

Adding a cape.

Let's put the finishing touches on.

It can be painted blue if desired.
The Snow Queen is the main character in Hans Christian Andersen's famous children's fairy tale The Snow Queen. She is a very proud owner of an ice castle that is made of ice and snow. She lives in the north and is not shown to people. You can draw it very simply if you follow the step-by-step photo cheat sheets. Good luck!


Personally, in my mind, the Snow Queen looks like this

That is why I advise you to draw e as I describe below.
So, the snow queen should have sharp features, a sharp chin and a thin face, so the first step is to draw just such a face.
Since we are drawing a queen, we do not forget about the crown (you can draw any crown, but I recommend a voluminous one, which is under criticism.
If you draw a character in full growth, then draw a robe that completely covers the legs, so it will look more solid.
The drawing can be colored in red using blue, gold and white.
First, let's define the look. The Snow Queen must be strict, thin and cold. First of all, we draw an oval of the face - be sure to have a sharp chin and thin eyebrows shifted to the bridge of the nose. We paint a crown to the face. It should have more sharp parts (crystals, a snowflake or a radiant star). The nose is thin and straight. Be sure to highlight the cheekbones with a dark line. Traditionally, the Snow Queen has Caucasian facial features. Therefore, we make the shape of the eyes relatively large, but always pointed at the edges. We draw a long thin neck and a thin figure. Open shoulders and neck. And a thin, flowing dress with a train.
The Snow Queen must have a bad temper. So her face can be drawn strict. Pay special attention to the eyes, the crown, the dress will not take much time. Add shine to the details and shadows to the folds. Step by step drawing of the Snow Queen:

The Snow Queen looks different, this is how she was depicted in the famous cartoon:

You can try to draw such a Snow Queen:

The sheet is divided in half and as we see our Queen is the same on both sides, it is better to start drawing her from top to bottom, starting from the crown and ending with the dress.
Such a Queen is more difficult to draw, but you can try to draw it:

Here are some easy options I think. I think that almost everyone can handle it without step-by-step drawing.

The second photo is a sketch of the Disney Snow Queen, in my opinion she is very pretty :)


I will tell you how to draw a Snow Queen for a child.
Tatyana Efremova
Abstract direct educational activities in the educational field "Artistic and aesthetic development" with children 5-6 years old. Subject: « Crown for the Snow Queen»
Integration of educational regions: "Speech development", "Cognitive Development", "Productive Activity"
Educational tasks: To consolidate the knowledge of children about Gzhel painting, its features, elements and color.
Learn to make a pattern on a new form - crown, highlighting the middle with a large pattern, smaller along the edges.
Learn to complement the pattern with small details (Curls, tendrils, mesh, dots, etc.)
materials: Gzhel products, samples blue crowns, blue, purple colors with the image of a pattern, made by the teacher. Envelope with the image of the ice kingdom, silhouettes crowns different shapes for each child. Blue, purple gouache, brushes, cotton swabs.
preliminary work: A conversation about smart, festive and everyday clothes. Examination of illustrations depicting clothing and headgear. Exhibition of Gzhel products: small sculpture, crockery, caskets. Consideration of Gzhel flowers, patterns. Reading the fairy tale by G. H. Andersen « The Snow Queen» looking at an illustration in a book.
Do you believe in miracles? Believe it or not, we received a letter. (Demonstration of the envelope with the image of the ice kingdom) Look at it where it's from (From the magical realm snow queen) .
Let's read what it says.
“Spring is coming. Everyone is looking forward to it. But The Snow Queen does not want to fly away kingdom. At The snow queen's crown disappeared somewhere. A competition for the production of the best snow queen crowns.
The teacher puts on crown on the head. And showing samples crowns of blue, purple flowers with the image of a pattern.
Examining samples.
What color are these crowns? (Blue, purple)
What masters use blue and purple colors in painting? (Gzhel masters.)
How are they decorated (Sprigs, flowers, leaves, curls, etc.)
What familiar elements of patterns is decorated with crown? (Dots, snowflakes, arcs, straight and wavy lines)
How better draw dots(that's right, cotton swab)
How is the pattern on crown? (Children show with their hands where and what they will draw.)
This pattern is very suitable for snow queen crowns. Against a white background, blue and purple patterns seem even more expressive and beautiful.
Fizminutka.
Coordination of speech with movement
We are in winter we play snowballs, we play. (imitation of modeling snowballs)
We walk through the snowdrifts, we walk. (we walk, raising our knees high)
And on skis we run, we run. (springy movements in place, wide swings of the arms, arms bent at the elbows)
Skating on ice we slide, we slide. (smooth springy movements of the arm are bent at the elbows)
And we sculpt a snowman, we sculpt. (corresponding movements)
We love the winter guest, we love.
(spread hands in bow and put on the belt)
Invite children to choose a form crowns.
Each of you decorate crown for the Snow Queen in her own way, or maybe someone will come up with their own pattern, which no one else in the world has ever seen.


Visual gymnastics "Palming".
Children rub their palms until they feel warm. After that, the palms are placed on the closed eyes in such a way that the center of the palm falls just on the eye. Keep your palms in front of your eyes for 2-3 minutes.
Outcome:
At the end classes consider all the crowns. Choose the most beautiful snow queen crown. try on crowns.
Related publications:
"The tricks of the Snow Queen." Scenario for the preparatory group(free Internet resources used) The hall is festively decorated. There is a tree near the window. The lights don't burn on it. The leader enters. HOST:.
Summary of the integrated lesson in the senior group "Journey to the Snow Queen's castle" Abstract of the integrated lesson in the senior group "Journey to the Snow Queen's castle" Compiled by: educator Uskova M. A Purpose of the lesson:.
Synopsis of the complex lesson "In the footsteps of the Snow Queen" Purpose: To form an aesthetic attitude to winter phenomena. Tasks: to consolidate the system of knowledge about the account, comparison of values; develop.
Synopsis of a musical lesson for children of a combined orientation group of 6–7 years old “The Tricks of the Snow Queen” Tricks of the Snow Queen (Children enter the music room) M. R: I am glad to welcome you to the music room. (Communication is underway.
Summary of the GCD for the preparatory group with elements of experimentation "Journey to the kingdom of the" Snow Queen " Pedagogical intent: Educational field Socialization Tasks: To develop interest in experimentation, the ability to reason, prove.
Learning how to get out of conflict. Abstract of an open lesson in the senior group "Journey to the kingdom of the Snow Queen" Goal: To educate a socially active, creative person who is able to understand and appreciate the world around him. Develop a coherent, monologue.
Snow queens, princesses and snowflakes have always been popular. But after the release of the cartoon "Cold Heart", beautiful ice ladies are just in trend. Both little and big girls like to be the masters of frost and blizzards. Of course, demand creates supply, and it will not be difficult to buy a crown for such a suit. But such crowns are either very primitively made, or they will cost a lot. But the crown of the snow queen with your own hands is not at all difficult to do, you can save a lot and get your own unique decoration.
Simple and budget
The simplest do-it-yourself snow queen crown is made from a minimum set of materials.
You will need:
- Ready-made plastic snowflakes, abundantly covered with sparkles (there are a lot of them in stores before, and after the holiday they can be bought for a penny at sales).
- A strip of white fabric measuring approximately 60 x 8 cm.
- Elastic band 2 cm wide, about 60 cm long.
- Scissors.
- White threads.
- Sewing machine (can be sewn by hand).
- or clear craft glue.
The work must be neat, so you may need a three- or two-liter jar (depending on whether the crown is large or small). It will be convenient to put on jewelry on it and work calmly with a needle or glue.
First, attach the elastic to your head so that it fits snugly, but does not cause discomfort. Cut off the required amount. Then measure the circumference of your head and make a strip of fabric to the desired length. Sew it into a tube of such a size that the elastic fits exactly in it. Don't make the common mistake of cutting as much fabric as the elastic, because it will stretch. Glue the snowflakes around the circumference, taking into account the future tension of the fabric.
Based on "Frozen"
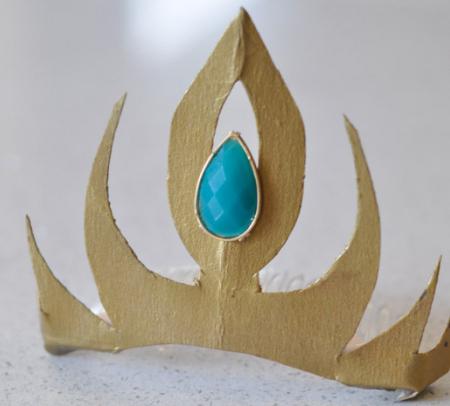
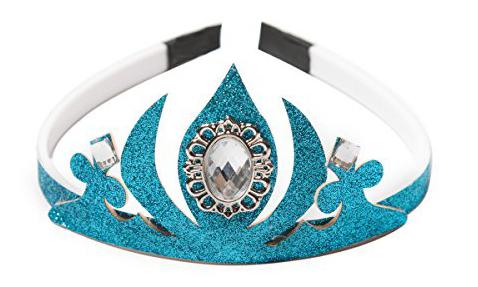
Suitable for little girls in the style of the cartoon sorceress Elsa. To make it, use this master class. The do-it-yourself crown of the snow queen is made from inexpensive materials that are easy to find even without leaving home.
You will need:
- Plastic comb from a hairpin.
- A sheet of thick cardboard about 20 x 20 cm in size (even a thick box of cereals will do).
- Scissors.
- Pencil.
- Golden acrylic paint.
- Turquoise stone with one flat side.
This crown is done like this: fold the cardboard in half and draw the outlines of the crown.

Look at the pictures from the cartoon, note that the base of the crown is the central sharp ledge, and three curls extend from it. It is not difficult to repeat the shape, but if it doesn’t work at all, print out a picture of the crown and copy it. Add 1 cm to the bottom for attaching to the scallop and cut carefully.

In the center of Elsa's crown is a notch and a turquoise stone. Make this cutout, but don't forget to leave some cardboard for the bead to stick on. Paint with golden paint, glue a pebble. Press the crown lightly to make it round and glue on the comb.
More Paper Crown Ideas
By a similar principle, the crown of the snow queen can be made with your own hands from cardboard, glue and sparkles for manicure.
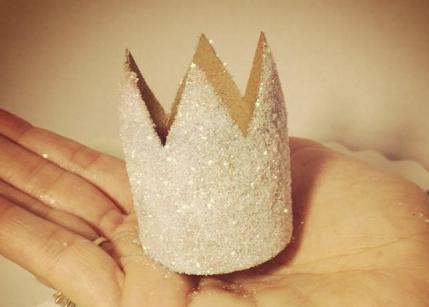
To make it functional, you need to glue a strip of cardboard inside, buy a white or shiny hairband and glue this crown to it.
Well, and another more complex variation made of cardboard, sequins, a headband and a brooch.
A crown of glittering icicles
For an older girl, you will need a more elegant crown of the snow queen. It is also easy to make it with your own hands.
For manufacturing you will need:
- 70 cm hard wire.
- 5 m of very thin wire.
- Oval beads.
- Teardrop beads.
- Sandpaper.
- Colorless varnish.
- Wire cutters.
- Elastic band 20 cm.
A large do-it-yourself snow queen crown takes longer to make than children's cardboard counterparts, but it will easily survive more than one carnival or photo session.

First you need to prepare the base of the crown. To do this, cut the required amount of wire around the circumference of your head, leaving 2 cm of stock on each side. Bend the ends into a loop and treat with colorless varnish so that they do not scratch the skin and do not cling to the hair. The crown can be left in this form and fixed in the hair with hairpins, or you can thread the elastic through the loops and securely fasten it to your head.
Then, with a couple of turns, we fix a thin wire on the base and begin to make an imitation of icicles. To do this, we string 10 beads, teardrop-shaped and another oval. We pass the wire back through 11 beads, except for the top one. It turns out a small icicle of beads. Similarly, we do the rest, but of different lengths. In order for the icicles to stand evenly, you will need to twist them horizontally with each other. It turns out sparkling, like a snow queen. With your own hands, you can make earrings or a bracelet suitable for the costume from the remnants of materials.


