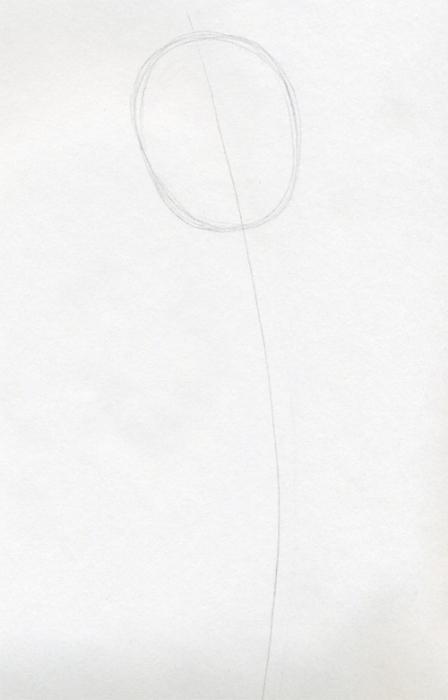
Let's start by marking a "reference" point on a piece of paper. It should be centered on the page and about 1/3 from the top of the page.
Step 2
We outline the outline of the future flower. To do this, draw a "fork" with a pencil. Our reference point should be in the center of this fork, as shown in the figure.

Step 3
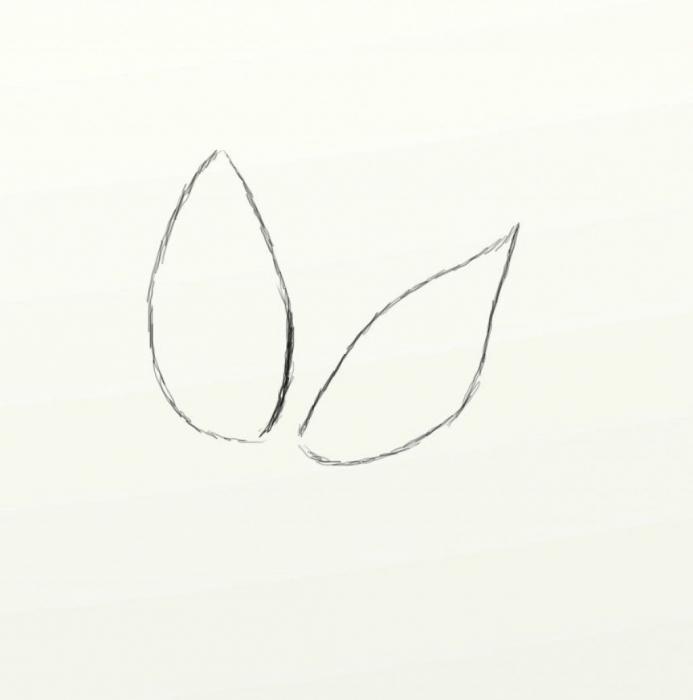
Now we outline the contours of the leaves. Tulip leaves are long and wide. The lines of the contours of the leaves must be drawn from the lower end of our "fork" and bend these lines in the upper part a little outward.

Step 4
Now we begin to draw the petals of the tulip. Note that the outer edge of the petal is more rounded than the outer line of the fork. Thus, our tulip will have a cup-shaped shape. The inner edge of the petal is a simple arc that goes to the center of the flower - the reference point.

Step 5
In the same way, we draw the second, symmetrical, petal. Please note that the tulip will look more realistic if one petal slightly overlaps the edge of the other at the bottom.

Step 6
And finally, in the center we draw another petal.

Step 7
Let's move on to the stem and leaves. The stem of the tulip is thick - draw two lines on the sides of reference line- "handles" of our "fork". Draw the outer edges of the leaves along the prepared contour, and draw the inner edges of the arcs leading to the stem.
That's all. Our tulip is ready. Color it with your imagination!


Tulips - amazing flowers they have a wide variety of shapes. You can only slightly change the shape of the lines - and you get a completely different kind of tulip.
Do you like to draw flowers? With the help of a few lessons given in this article, you will learn how to draw a tulip quickly, easily and naturally. You'll like it!
Lesson #1
Draw a tulip with a pencil
For ease of understanding, we divide the lesson into 7 steps. So make sure you have clear sheet paper, and in his hands - a sharpened simple pencil. A good soft eraser will not be superfluous. How to draw a tulip in ten minutes? Let's draw in five! Your preparation must have taken longer. Let's get started.

In the center of a sheet of paper, draw the first petal in the shape of a tear. It's easy, you can do it.
To the left of the drawn one, draw another petal of a teardrop-shaped bud. Note that they are not in contact with each other, but are located a little at a distance.

Now draw a tulip petal between the two already drawn.

Then draw the rest of the petals that are further away from the foreground. Only their tops will peek out at the top of the bud.

It's time to draw the stem. Draw it slightly bent under the weight of the flower head.

Let's go back to the button. Draw veins in the center of each petal - draw a pair parallel lines and connect them at the top. The flower immediately became voluminous, right?

Let's finish the drawing with small shading in places of shading.
With how to draw a tulip in stages, it seems that they figured it out. Let's increase the level of skill by depicting a tulip in color.
Lesson #2

Look carefully at the sample. Notice how the stem is curved, what shape the bending leaf has, what the proportions of the bud are.
Draw a thin line following the curve of the stem. At the top, make a rough sketch of the bud. At this stage of learning how to draw a tulip, try to keep the proportions.

With light strokes of the pencil, draw the outlines of the leaves. They, as a rule, are straight in tulips, but in the lower part of the stem they are larger, and therefore gracefully bend. Displaying such nuances makes the drawing more realistic.

The thickness of the stalk must also correspond to the bud. It cannot be too thick, nor too thin.
It is important to place the leaves correctly. In one place they cover the stem, in another they slightly overlap each other.

There is nothing difficult in how to draw a tulip, but in 3D drawing Just like photography, there are rules to follow. Draw the petals of the bud, pressing lightly on the pencil until you are satisfied with the result.

With a sure touch of the pencil, outline the contours of the tulip and erase unnecessary lines.
How to draw a tulip in color? At this stage, you will need two pencils: pink and light green.

Outline the sketch of the tulip. Erase the rest of the simple graphite pencil. So much better, right? At this stage, you already have a colored tulip template in front of you.

Shade the entire flower with pencils. Pink - bud, light green - stem and leaves. There are no shadows in the drawing yet, so it seems to be smoky, just add a little more color in some parts of the petals and leaves.

Take pink pencil one tone darker than what has already been used, and red. Paint over the petals, paying attention to the color transition from almost white at the stem to deep red at the edges of the bud petals.

Similarly, add shadows to the stem and leaves with a dark green pencil. The two upper leaves hugging the flower trunk have darker inner sides than the outer ones, because they get the least amount of sunlight.

Blend the colors with a piece of cotton wool or just with your own finger.
Now the question "how to draw a tulip with a pencil" is not a question for you! Draw, experiment, and your flowers will be perfect.
On the eve of many holidays, children want to please their mothers, grandmothers and even sisters by making their own hands, albeit simple, but very beautiful postcards and pictures of flowers. Roses, orchids, daisies are the most popular solutions among young artists. True, not every child can draw them on their own. That is why in today's article we propose to start from the very simple flower, popular in the spring and the holiday of March 8 - tulip.
One or more tulips on a white sheet to draw with a pencil and color is not as difficult as it seems at first glance. If stick step by step photo instructions and recommendations below, you can reproduce a real masterpiece that will appeal not only to adults, but also to yourself.
So, a tulip pencil drawing, how to draw? Let's find out!
Tulip - pencil drawing step by step on the photo
Like any other flowers, tulips are very beautiful. They have various colors, a long green stem and symmetrical leaves. They have no flaws, and the aroma of freshness and spring mood cannot even be compared with the same roses. Apparently that's why even men love them.

- Step #1
Take White list A4 format or a base on which a tulip will be depicted. Prepare simple and colored pencils, an eraser.
- Step #2
Visually divide the sheet into 4 equal squares. In the middle of the sheet, draw the first petal, not much like a drop of water.
- Step #3
Next to the first petal, draw another one so that their contours do not touch each other, but are located at a short distance.
- Step #4
In the middle of the two petals, draw a third, as if connecting the right and left sides of the picture.
- Step #5
Draw the rest of the petal tops shown in the background.
- Step #6
Draw a stem to the bud, slightly curved to the left.
- Step #7
On each petal, select a vein (two strips at a distance of 1-2 mm).
- Step #8
Apply light strokes to the stem and bud to add extra volume to the pattern.
Tulip bud - pencil drawing in the photo
As for the previous drawing, to reproduce the bud, you will need tools such as: white base(sheet, cardboard, drawing paper), a simple pencil. If you want to color the tulip, you can use colored pencils or watercolor.


- Step #1
Draw two triangles so that they intersect each other. big figure should be in the middle, and the small one on the left side. Recreate a bud from a large one, and a petal from a small one. Erase the triangles themselves with an eraser.
- Step #2
Draw the stem. It should move away from the bud, affecting the left petal.
- Step #3
Outline the flower with a pencil to get a clear border.
- Step #4
Draw two curved stripes inside the bud, as in the photo below.
- Step #5
Draw another petal, as if located in the background.
- Step #6
Apply strokes (you can use colored pencils that are in harmony with each other in color).
What shape can a tulip be? 4 options for drawing
Tulips even in real life differ in variety, color and even shape. Therefore, it is not at all surprising that many artists depict tulips in their paintings in different ways. Some give the bud a closed shape, as if the flower has not yet blossomed, others prefer to draw open or slightly withered tulips.

- oval shape
If you need to depict a closed bud, just getting ready for flowering, then it is better to choose an oval, slightly diamond-shaped shape.
- Rounded square
A square with soft edges is a bud that has just decided to bloom.
- Inverted trapezoid
A fully opened tulip resembles a reverse or, as it is also called, an inverted trapezoid shape. Depicting it is not as easy as it seems from the outside. Each side must be even.
In order to draw us tulips with a pencil, we need simple pencils and eraser. I drew with hard (4H), soft (2B) and very soft (6B) pencils. You can link whatever you have or whatever you like. You can draw with one pencil, you just need to adjust the degree of pressure on it. I took an A4 sheet and turned it over (height is now the longest side (29.7 cm), width is smaller (21 cm)), I got tulips somewhere on 2/3 of this sheet. This is the second part of the tutorial on how to draw tulips with a pencil step by step. In the first part, we drew three tulips step by step, the result is below in the picture.
Step 2. We take hard pencil and note the dark areas of the tulips, also on the stems and leaves.

Step 3. We take a medium-soft pencil and go through our marked areas again, while making transitions. How to make transitions from dark to light,

Step 4. Take the most soft pencil and make the colors more saturated.

Step 5. Let's move on to drawing the top tulip. draw stems and leaves, as in the picture. My pencil was completely blunt and I sharpened it. And while it is sharp, I circled all the lines and applied strokes where there should be very dark areas. And then my lines at the edges acquired the effect of Gaussian blur (as in Photoshop), now it seems to be normal.

Step 6. We paint over the last tulip and finish the leaves.

Step 7. We take a piece of cotton or something soft (cloth, napkin, etc.) and lubricate the body of our tulips, do not rub the edges of the petals, a little leaves, well, if you somehow manage, then the stems. It should turn out something like the picture below.

Step 8. We take an eraser and walk along the edges of the petals of tulips, lighten up the areas near the petals, leaves, stems from above. Where you feel like it's not enough dark color, we pass with a pencil in that place and rub it. In general, in order to evaluate a drawing, I take it to outstretched hand and I appreciate it, it’s somehow easier for me, then in the butt you don’t always notice obvious sides.

Well, that's all, we did it, well done.
Hello! New lesson drawing is already waiting for you, and today we will return to the flower theme again. As you saw from the preview, today we will go through a lesson that will be dedicated to.
It is very pleasant if in the spring such beautiful flowers bloom on the site in front of yours - by the way, they bloom once a year, only a few days, usually this period falls on the May holidays.
Step 1
According to the idea of our artists, the tulip in our lesson will look like a plant in a flower bed, with a couple of buds, leaves and stems. Therefore, now we will outline the conditional "stickman" of our tulips. The lines of the stems and leaves should be smooth and slightly curved. On the upper parts of the stems we outline the bowls of the buds. They should be quite large, but do not overdo it with the size.

Step 2
It seems that there are too many lines appearing here, but if you follow the correct sequence, you will definitely not get confused. AND correct sequence will be preserved if we draw a tulip from top to bottom, that is, starting from the bud.
Then we draw the stems (just draw one more line for each stem) and work on the leaves. The sheet to the left of us has two lapels, the right one bends in one place.
By the way, not so long ago we drew another representative of the plant world -.

Step 3
Now let's draw the petals. Alternate smooth and straight lines, as in our sample. On the lower bud, draw an unfolded petal.

Step 4
Slightly shade the resulting flower. The shadow here is applied with the usual dense hatching. Be sure to have shadows at the junction of the bud and stem (and the shadow should be slightly beveled, look at our drawing).
More shadows are present at the lapel of the leaf and where the lower bud approaches the stem of the neighboring flower.
It was a lesson in which we told you about. The artists of the drawingforall site were with you, all the best and see you soon!


