In today's drawing lessons you will learn how to draw snakes. If you are afraid of reptiles to such an extent that you are afraid to draw them, it doesn’t matter. Our snakes are very cute, I think everyone will like them.
We present to your attention several snake drawing lessons. After all, the symbol of the coming 2013 will be the Snake!
Lesson #1. "How to draw a snake"
Learning to draw a snake is very simple. Snakes have a thin, elongated body, which is drawn with wavy lines. The snake's head is very interesting: it is small and tapering, looking like a small triangle.
Lesson #2. "How to draw a cartoon snake"

This is the easiest lesson I've ever written: if you can draw a circle and a line, then you can draw a snake! Of course, the base will need to be supplemented with various details, but you can certainly handle this.

You don't have to draw the snake exactly the same way as here. For example, you can change its position by wrapping the snake in a ring.
Because We have a 3/4 view, we start drawing from the left eye. We draw all other details based on this. The lesson will help you understand the general principles so that you can create your own characters.

You need to color the drawing in such a way that it is immediately clear what kind of snake it is. In our case, it’s fictional :)
Using such a snake as a base, you can very simply turn it into a cobra - just finish drawing the hood.
Lesson #3. "How to draw a realistic snake."

It's good to start sketching out the shape "in sections" with overlapping ovals. It should look almost like an egg chain.

Using the chain shape as a guide, outline the kite. Remember to use smooth curves, no straight lines!

Lightly separate the body into segments. Please note that the lines should be twisted into the curve of the snake's body.
Using the principles from the previous step, add patterns in that place. You just need the basic outlines for now.

Fill in the spots with charcoal, or if you don't have charcoal fill them in with a pencil. Don't be too concerned about filling them out perfectly.
More interesting.
Before I start the story, let me remind you what other lessons we have on the topic of mystical characters and various horror stories:
- (he is also a bastard);
And in this lesson we will learn. I picked out some interesting pictures. Try to follow the step-by-step instructions, I hope everything works out for you.
Step one. Let's draw the shape of the snake's head. Notice the groove on the top of the head.
Step two. On the created template we draw the shape of the future head, first the upper part, then the lower part, as well as the jaws. The snake's jaws are slightly elongated.


Step three. The snake has a very expressive eyes, they reflect the soul of the victim - she can eat even without remorse! Try to emphasize the characteristic features of a predator. Pay attention to the nostrils of the snake, they are similar to those that we drew in the previous lesson "". Do not forget to periodically work on the sketch with an eraser, removing unnecessary strokes, and detail the already drawn object by adding new elements.

Step four. Draw an outline around the edge of the snake's mouth as you see in the picture. Also check the edges of the eyeball and the pupil slit. In the mouth, add curved lines to form an arch for the tongue.
 Step five. Let's draw. And we add some details inside the mouth, detailing the tongue.
  Step six. The last thing you have to do is draw the elongated neck.
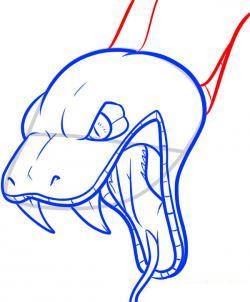
The last step. We remove the auxiliary lines using an eraser, and once again carefully outline the contours of the snake. This is what we should get:
 I wonder what kind of snakes you drew? Show off your drawings. Here's mine pencil drawing of a snake:
Snakes, lizards, crocodiles, alligators and... dragons, they all have one thing in common - they are covered with natural armor. There are many types of scales, each type has a special pattern that performs a protective function and imparts strength. Once you learn how to create this pattern, you can draw realistic scales on any animal!
What you will need
- Pencil HB
- Pencil 2B
- Pencil 5B
- Pencil 8B
- Ruler
- Pencil sharpener
- Eraser (optional)
Before we start, take a look at what we'll be drawing. It is very important to draw things as they really are, and not as we think about them!
The scales of snakes and lizards are very similar in design, so I will show them side by side. Feel free to choose the one you like best!
Step 1
First draw the boundaries of the body, including a line down the center. For this purpose, use an HB pencil and a ruler, do not press too stylishly on the pencil - we should close them easily later.

Step 2
Draw the first scale at the top. Its shape and size will determine the rest of the pattern. Snakes tend to have longer and smoother scales than lizards.

Step 3
Take your ruler again and draw a line across the body, right under the scale.

Step 4
Divide the body into equal segments. You can use a ruler to measure the height of the scales if you want, but it's not necessary, just make sure they look fairly uniform.

Step 5
Draw a curve across the four segments.

Step 6
Copy this curve along the entire body. Be careful - these curves must be the same shape, otherwise you will end up with a chaotic pattern of scales of different sizes.

Step 7
Draw the same curve, only inverted….

...and again copy this curve along the entire body. The pattern should appear!

Step 8
Draw a row of scales, within the boundaries of the guide lines. Don't fall for the trick: don't outline each diamond in the pattern, but rather draw a rounded scale inside it that will come out of the diamond at the top.


Step 9
Depending on the species, scales can have different shapes. Some snakes have rounded and convex scales that taper at the base. If the scales are not very densely located, then you can see this narrowing at the base. Lizards, on the other hand, often have scales with a keel, with “spines” at the end.

Step 10
The scale pattern is ready! Before we get into shading, it's good to first look at the color scheme. Dark colors shade differently than bright colors. The pattern on the snake's body usually follows the pattern of its scales. In lizards, colors are often distributed throughout the body, independent of individual scales. The scales can also be individually painted.
Use a pencil HB for a base of bright colors, and a pencil 2B for the dark ones. Tilt the pencil and draw freely with the pencil.

Step 11
Use the same pencils and press a little harder to make the sides darker, giving the texture a more rounded appearance.

Step 12
Now shade the individual scales, remembering their 3D shape. Take another look at the original image if you're having trouble imagining it.

Step 13
Go one step softer for each shade to create higher contrast. Observe the pattern of light.


Step 14
Take a look at your drawing to decide what else needs to be done. Don't rush - the last phase should take the longest!

Despite its apparent simplicity, drawing snakes baffles parents of children. Children cannot always draw a snake believably themselves, which is why they ask adults. So, let's look at the process of drawing snakes step by step.
How to draw a snake step by step
Stage 1 - First, draw an oval of the snake's head. Then from the head down and to the right we will draw the contour of the body in the form of a winding line.
Stage 2 - We thicken the drawn “skeleton” of the body with two parallel lines, and near the head they should be located wider, and near the tail they should smoothly taper, and draw a line for the upper part of the head.
Stage 3 - drawing the details of the head. We draw the nose in the form of a dot, depict the eyes, the pupils which are located vertically. On the left side of the oval we draw a forked tongue. Let's decorate her body with these various spots.
Stage 4 - use an eraser to remove all auxiliary lines, trying not to disturb the drawing, and make the main outline clearer.
Stage 5 - now you can start coloring the picture.
I prepared today’s two pictures of snakes for an article, but as I prepared the step-by-step drawings, I began to think a lot. I have long been surprised - if according to the plot of a fairy tale you need to draw a lying or crawling snake, then all children draw like this:
In essence, it turns out to be a worm with a forked tongue and eyes. There is no question of beautiful and ominous twists, twisted loops and other poses common to snakes. This is understandable - children who have never seen snakes (except for a tortured python in the circus) follow the path of maximum simplification. Well, it turns out that their drawings don’t even remotely resemble snakes. Well, let’s learn to draw beautiful and elaborately curved snakes. First we will draw from a photograph, We will draw from our imagination when we have already gained a lot of experience - before that there are still seven miles, or rather, many boa constrictors. Or vipers.
How to draw a beautiful snake -1
Let's start with this one:

One might say it wrapped up surprisingly symmetrically. A sort of living, patterned dollar. But the funny thing is that it is necessary not only to convey the shape of the twist itself, but also do not forget that the snake is voluminous. Her body is round in cross-section, and the loops of twists also partially obscure each other.

Resembles an arrowhead. Moreover, the characteristic patterns are also not distributed on a plane, but along the rounded back and sides:

How to draw a snake (snake) - 2
The second snake - again a viper - I tried to choose an even more twisted one:

Here the pose is good precisely because of its whimsical asymmetry. I will draw step by step with a pencil. And this time I’m not copying one-on-one, I’m depicting it in a mirror. No, well, seriously - it’s not all stupid to copy - it’s time to use your skills.

The outline of the kite turned out like this:

Very pretentious and unconvincing - not enough volume. Well, let's create volume using a pattern. The diamonds are distributed on the sides, and as we twist, we see first one side and then the other.

I first drew the pattern with a pencil and double-checked myself again: the logic of the drawing and the voluminous body of the snake were not violated. Okay, here's the final drawing: