Hey bro. Today I will give you not one, but THREE lessons! The first two will be about drawing a Chinese dragon and a water dragon. The third one, I don't know what it's called. You can think of a name for it yourself. I also want to congratulate everyone on the coming New Year, wish you new creative success, find your true calling and love. Here =) If it’s more convenient for you to watch a video lesson on drawing dragons, then I’ll give you a video right away. You can go to my YouTube channel and subscribe to get new lessons in your news. More pictures of dragons to come! Before I start, let me say that this is not the only lesson about mythical creatures on DeiFan. Here you will find many tutorials, and I advise you to try later:
And now let's get down to business! Today we will find out how to draw a dragon step by step. First, let's figure out what kind of creature it is. Most people have an idea of what it is, but they cannot give a specific and unambiguous answer. According to Wiki, dragons are primarily, they do not exist in nature, but, nevertheless, they entered the popular stories of different peoples as inhabitants of reservoirs, or even their owners. They are depicted in a very diverse way, usually this is a creature consisting of the body of a reptile, sometimes in combination with body parts of other animals, birds, fish. Human fantasy naturally added many details to this image, they are even credited with a connection with the devil and they see many heads (such as the Serpent Gorynych). But, in general, we will not delve into history. Our dragon will be kind and beautiful, and will only benefit people. If you want to know how to become a great artist, read the article. Step one. We draw a position - the dragon flies in the air, in place of the future torso, head, tail and limbs we make circles and ovals. To make him look at least a little intimidating, we will add horns on his head and the shape of a “face” as you can see in the picture. Imagine that he will breathe fire on anyone who dares to go against his will. He will be insidious, like predators from the movie "Power of Fire".  Add a comb on his head and back.
  According to legend, Japanese dragons have three fingers on each paw, which distinguishes them from other dragons of Eastern mythology. That is why I will draw like this =)
  Carefully draw the wings
  Do not forget to add details, small touches on the body and wings. Start with the belly and back leg. Then add more details and you can move on to the next step.
  Our dragon is almost ready. It remains to add the tail and tweak the wings:
  What should we end up with:
  Of course, I myself tried to draw this wonderful bird. Here's what I got:
  If you liked my dragon drawing lesson with a pencil, write in the comments. Show your work. If you are interested in how to draw other animals with a pencil, write in the comments what lesson to prepare. Let's learn to draw together =) I give you two more instructions: 1)
  2)
2)  And I also recommend that you, my dear readers, try to draw this.
Drawing with a pencil is a simple, at first glance, task. However, in order to breathe life into a black and white drawing, it is worth working hard. And it doesn’t matter what you expect to see as a result - drawings of dragons with a pencil, a simple flower or a sketch of clothes: for the most realistic image, you need to stock up on high-quality paper, pencils of different hardness,
eraser and, of course, patience.
revived myth
Have you ever been amazed by pencil drawings of dragons? Of course, we are talking about professional works, where every dash, every shadow falls in a precisely defined place, and every detail is drawn with amazing clarity. However, unattainable, at first glance, the professionalism of images - this is not a reason to despair and put an end to your career as an artist. In order to draw a dragon, you only need to follow a few rules. And let fantasy escape reality.
Look at the drawings of dragons in pencil: snake grace in the body, curved neck - there should not be straight lines in your drawing. An elongated muzzle, wide nostrils, sharp long teeth, round or cunning with cat pupils - turn on your imagination, combine lizards and dinosaurs. Powerful clawed paws - what they will be depends on you: long or short, bent or straightened - the main thing is not

forget to equip them with razor-sharp claws. Whether your dragon will have wings is also your decision. As a rule, they look like huge wings, however, season them with additional claws - and your myth will become even more real.
Don't Forget the Details
Having finished the schematic drawing of the dragon, we move on to the little things that will breathe life into your pencil drawing. The animals you draw, regardless of their realism, must be clearly drawn. Start with the muzzle: emphasize the eyes and teeth, draw the scales, decorate the head and spine with a crest (avoid too smooth lines, let it be bristly). Do you want a fire-breathing dragon? Puffs of smoke from the nose and flames from the mouth will help you achieve the desired effect. Dress your neck in plates, and cover your body with scales - their shape depends only on your imagination! Relive the wings - cover them with a network of folds, and the tail can be crowned with a beautiful "knob".

Let's breathe life
To make your drawings of dragons in pencil more alive, do not forget about the volume. You can achieve the desired effect using pencils of different hardness: draw the lightest areas (H, 2H, 3H), but draw small details and “shaded” parts of the body with soft ones (2B, 3B, 5B). Do not forget about highlights: smooth scales must certainly reflect sunlight. And, of course, add a shadow under your "animal" - so the dragon will seem even more realistic. Now that you know how to draw three-dimensional drawings with a pencil, do not be afraid to try your hand - even if you fail the first time, from the fifth or tenth sheet a piercing look will be thrown at you by the real
 Bizarre mythical creatures - Since ancient times, they excite the imagination of children and adults. Dragons are the heroes of Russian folk tales and legends, as well as the characters of modern science fiction films. A special place is given to these creatures in Eastern mythology. For example, the Chinese glorified the dragon, suggesting that it has a good beginning. In ancient times in the East, the dragon was associated with fertility, spring rains, and vitality. And now, adherents of the Feng Shui teachings are sure that the green Chinese dragon is a talisman of prosperity and abundance. In turn, the Slavs and Europeans believed that the dragon is the bearer of evil or the messenger of the devil.
How to draw a cartoon dragon for a small child?
Be that as it may, even today fairy tales are interesting to children. That is why our today's master class will be devoted to the topic of how to easily draw a beautiful dragon with a pencil in stages.
Example 1
Of all the variety of lizard-like images, the smallest artists like cute and friendly cartoon dragons, which, unlike their more realistic relatives, are endowed with positive qualities. Therefore, in order not to scare the crumbs with terrifying pictures, let's start our creative process by recreating the images of cartoon characters. So, your attention is a detailed instruction on how to draw a little funny baby dragon step by step with a pencil:

 |
 |
 |
How to draw a beautiful dragon for older children?
Example 2How many legends and myths are associated with the Chinese dragon. If your baby also managed to get acquainted with this character, then you have a great opportunity to surprise him. You can invite the kid to draw a Chinese dragon together, and we will tell you how to do it now.

Example 3
In order not to offend and interest an older audience, which you will not be surprised by the picture of a formidable fire-breathing dragon, we offer you the following master class.

Example 4
Our next instruction will tell you how to draw a Chinese dragon for older children.
Articles on this topic:
|
It is not so easy to draw a beautiful house of the correct forms, as well as proportions. All the kids love to draw, and they will definitely like such ideas. We offer some options for children of different ages. With the help of your parents, you will certainly get a wonderful picture! |
The theme of dragons is so exciting that it does not bypass any parent. Kids are interested in fairy dragons and, of course, want to learn how to draw them.
How to teach a child to draw a dragon?
Step-by-step lessons are not a panacea, but sometimes you really want to draw with your child not just doodles, but something really beautiful, just fabulously beautiful. We are pleased to offer you just such a lesson. In just 7 steps, a cute cartoon dragon will be happy to decorate your creative evening with your child. You can draw a simple dragon not only with a pencil on paper, but also with finger paints in the bathroom, like any picture.
Difficult? No, but of course you will have to practice in advance. Even kids can be offered a ready-made picture and paint it together with homemade paints from mashed broccoli or pre-boiled and squeezed spinach leaves. There will be no limit to the delight of the little one!
Dragon anatomy is a problematic topic, mainly due to the fact that they are mythical creatures. However, I can show you how to create a believable body for this mythical creature based on basic anatomy theory. In this tutorial, you will learn about the dragon's skeleton, muscles, and movement. If you want your dragons to look real, this material is for you!
1. Skeleton
We all know that dragons, like dinosaurs, have six limbs - they are able to actively fly and breathe fire. They lay eggs and are covered with scales or plates. In addition, they are carnivores with sharp teeth and long claws. These are the only statements that all dragon fans will agree with. The rest of the statements are dubious - are dragons warm or cold-blooded? Covered in fur and/or feathers? How long is the tail, how many toes do they have? I will try to give you the most universal advice for building a dragon. The rest is up to your imagination!
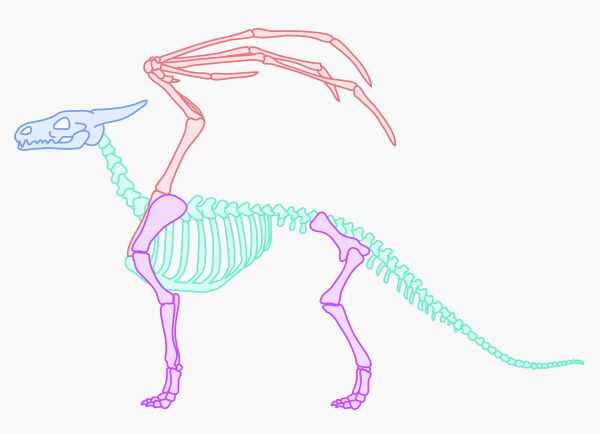
Step 1
It is ideal to start with a skeleton. Convincingly placed bones and joints will make your dragon look quite realistic no matter what you do with it afterwards! To create this skeleton, I mixed a dog, a tyrannosaurus rex and a bat.
Step 2
Did the previous photo annoy you? You thought, "Hey, dragons have shorter legs/longer necks/bigger wings/etc." Everything is fine! This image is only a template that you can modify. Want a huge, heavy silhouette? "Try on" this one.

Step 3
Or a winged dragon? They are technically not dragons (only four limbs), but they are certainly their close relatives. Also, in Skyrim, wyverns were popularized as dragons, so maybe it's time to change the definitions?
As you can see, you can change many things in the skeleton and find your favorite position. Just remember:
- The elbow should be located on the same level with the knee;
- There should be space between the chest and hips; the more - the wider the range of their movement;
- Wings must be at least as long as the body. The bigger, the better.
- The neck should start at the back of the skull (and not at the bottom);
- The joints should have a limited range of motion - see the next step for more information on this.

Step 4
Even the most correctly formed anatomical structure will not save if the joints have no restrictions. They are critical to correct posture. You know what a displaced joint is, don't you? Don't do this to your dragons!

Step 5
I certainly don't encourage you to draw a complete skeleton every time you draw a dragon. This is what you should really see when looking at the collection of bones:

Step 6
With this picture in your head, you will end up drawing the desired position:

2. Muscles
Step 1
Dragon muscles are quite problematic to draw, because. there are no animals with both arms and wings. Here you have to use intuition. Though of course the wings should be built just like another pair of arms (more on wings). To draw other parts of the body, you can borrow muscles from any other animal with the same movement style as your dragon. I took partially a dog and a horse.

Step 3
Although it is quite easy to create the muscle structure of a dragon, it is usually very difficult to remember. And we don't want to constantly resort to a pattern when drawing a dragon! I will try to show you a mnemonic diagram so that you can better remember the location of the muscles. It's not very perfect, but it should help you with the hardest parts.
Let's start with the front leg (arm). Do you see a heart with legs and a cute creature with big, fin-like arms? Draw them!

Step 3
In the forearm we see a bird covering two sticks with its wings.

Step 4
When drawing the hind legs, draw on the skeleton. Both bones should be covered with large pieces of muscle.

Step 5
Now pay attention to the knee and three more sticks between it and the heel.

Step 6
A large winged creature is trying to eat the thigh!

Step 7
Now just connect both parts to both muscles.

Step 8
It's time to draw the wing muscles. The hand is quite easy to remember - first cover the bone with a narrowed muscle ...

Step 9
Then just add the biceps.
Those were the hardest parts. The rest of the muscles should be easy to remember, even without mimics - just look at them.

Step 10
If your dragon is fully armored, you don't need to sketch all the muscles. Just outline the shape of the body. If your dragon is covered in scales like a snake, you need to emphasize the muscles.

3. Paws
Step 1
How many fingers does your dragon have? It doesn't matter much. I personally prefer tyrannosaurus rex paws with three toes, but you can do it differently. The important thing is that the middle finger/fingers should be the longest and the outer fingers should extend a little beyond for better support.

Step 2
Let's draw the leg. Start with two circles and draw three or four finger lines.

Step 3
Draw a circle at the end of each finger. Again, the middle finger/fingers should be bigger. The last circle in the background looks the smallest because he is the farthest from us.

Step 4
Add other circles connected to the previous ones. They should be larger and fairly consistent in size. Leave a space between them and the first two circles.

Step 5
Add claws. Don't make them too pointy! Plus, they look (and work) better when slightly curved.

Step 6
Now you can simply connect all the circles with lines, creating a body.

Step 7
You can use the same shapes that you used when drawing the wrinkles on the foot. They should help you draw the skin correctly.

Step 8
Here is my dragon with paws:

4. Tail
Step 1
Okay, you're right - everyone knows how to draw a tail! However, if you don't want it to look flat or unnatural, this tip may come in handy.
The basic rule is quite simple - a tail has two sides, and they cannot both be fully visible at the same time. The more you see on one side, the more the other side disappears. To achieve a natural effect, first draw the center line (pink) and then add some on both sides.

Step 2
The tail of the dragon does not help you fly. It is usually heavy (dragons can crush buildings with them, right?) and too rounded to help lift into the air. You can make it more useful by adding some "fins" to it.

Step 3
When it comes to the tail, there is another thing that has evolved from dinosaur anatomy. The bare tail looks pretty boring, so we'll add some pseudo-practical embellishments to it. Empty inner spikes will do, but it is dangerous to lift a large, heavy ball into the air. When you want to add some interesting features to your dragon (anywhere on the body), always think about the practical side first.

Step 4
The body of our dragon is almost ready!

5. Dragon armor - scales and plates
Step 1
Before you start drawing armor, you need to think about what it is really needed for. Just adding scales here and there won't be practical for a dragon. Certain areas on his body have different purposes and therefore different coverage needs.
- Weapons (yellow) - designed to impact and these places will most likely seek contact with the enemy's body or weapon. They are solid and very well protected.
- Front (green) - although this area is easy to defend with claws, the attacking dragon will aim at it. We need good protection here!
- Back (Pink) - This area is far away from attack weapons, so it can't be defended. The dragon tries not to expose this area to the enemy. However, she must also be armored, as there may be many enemies, or one, but fast.
- Flexible spots (purple) - Large, rigid plates are best for defense, but they can barely move. In some places, stronger flexibility is required - small plates or scales that will not restrict the movement of the dragon.

Step 2
There are many shapes you can use for scales. They can look like leaves, hands, stones, or simple ellipses. You need to see which ones are suitable for the areas we just identified.
Tip: There is no better exercise for drawing scales than sculpting a clay dragon. This will help you understand what the purpose of their shape and size is.

Step 3
There are two types of scales:
- The lamellar scales are similar to the large shields on knight's armor - they are hard and tough. The more plates, the stronger and heavier the armor. They also enhance the silhouette as they are not attached too tightly.
- Suture scales are smaller and are used to connect the plates - like chains between armor plates. The more seams between the plates (and the smaller they are), the more mobile the dragon. In addition, the smaller they are, the closer they are to the skin.

Step 4
Once you learn how to separate the scales, you will be able to dress up the dragon. There are many ways to do this - you just need to follow the four areas rule to create beautiful and realistic armor.
Step 7
Add a row of small seam scales. On the tail, they directly connect the top and bottom.

Step 8
Now just fill the empty space with whatever fits.

Step 9
Now you can do whatever you want with your line art. If you want to achieve the same effect as shown below, use gray/brown paper and watercolor for traditional drawing, then touch up the sketch with a black marker.

Step 10
You ask why I showed you the entire muscle structure if it is completely invisible under the scales? There are two reasons for this:
- The skeleton determines the position, but it is the muscles that give shape to the body;
- When you want to draw a flexible thin dragon like below, you won't be using large plates and the muscles will be visible.

RRR! Now you can draw... a real dragon!
Now you know how to create your own dragon based on realistic anatomy. You can tailor these rules to your imagination, because only an artist can bring the dragon to life!


