Watercolor paints are one of the most beloved by artists. Firstly, watercolor has a lot of different techniques, and secondly, it can be used to create a beautiful drawing, even if you don’t know how to draw at all.
These techniques will help beginners learn how to draw, and professionals can refresh their memory and find inspiration and ideas.
1. Painting with a flat brush
Step 1
Draw a square or rectangle to mark the beginning and end of the layer.
Choose a darker shade (it's easier to see) and starting from the top left corner, brush down on the paper and gently draw a straight line all the way to the top right corner.
But: left-handers should draw from the right corner to the left.
Step 2

Fill the brush again with paint.
Start the next stroke from the bottom edge of the first one, try to cover the buildup of paint that formed from the bottom of the first stroke.
Hint 1: If the buildup of paint in the first stroke has not flowed completely into the second, then increase the angle of your easel to help the paint flow freely.
Hint 2: By increasing the angle of inclination, you also increase the chances of getting uncontrolled flows of paint. Therefore, try to work faster or have something like a rag or sponge handy to quickly remove drops.
Step 3

Repeat the previous step, also trying to cover the accumulation of paint in the top stroke.
Hint 3: You can use the flat edge of the brush to "cut off" the beginning of the layer and make it even.
Hint 4: If you want to flatten the end edge of the layer, then at the end of the stroke, pause and brush up and then down as you would with the start edge.
Hint 5: If the stroke is broken, then immediately fill the brush with paint and re-swipe it.
Step 4

Repeat the previous steps until the very end. Try to stick to the same tone of paint.
Hint 6: You won't believe how different the behavior of brushes, paints and paper from different brands can be. Usually, the more expensive and popular brands make your job easier by providing high quality products.
Hint 7: If your strokes break even if the brush is full of paint, then you are using too thick paper, or the paper is too rough. If you come across such paper, then sprinkle water on it, blot it with a clean sponge and let it dry. This will make the surface more receptive to your paint.
Step 5

Rinse the brush and squeeze out any remaining water from it. Carefully pick up the blobs of paint left underneath the last stroke with the brush, but don't take too much paint or you will discolor your drawing.
To create more texture in your drawing, leave it to dry at an angle. So the paint will take on a more interesting look.
Gradient
Step 1

Draw a square or rectangle. Then dip your brush into the darker shade of paint (it's on the palette to mix) and gently stroke the brush.
Step 2

Dry the brush with a sponge or paper towel and dip it again in a lighter shade.
Then draw a new stroke, overlapping the bottom of the previous one. Notice that the left side of the layer has already merged with the previous stroke. Let gravity do its thing.
Step 3

Rinse the brush again and dry it. And then refill the brush with paint and make another stroke. Repeat this process until the very end.
Hint 1: If the stroke breaks or does not go as smoothly as you would like, quickly refill the brush with paint and repeat the layer.


Step 4
Rinse the brush with clean water, dry it and pick up any remaining paint.
Hint 2: Try this technique by working with different colors and creating interesting transitions.

watercolor glaze
Step 1

This technique requires improvisation and imagination. For example, we will draw an impromptu landscape.
First, paint the sky and the river with blue paint. We will separate the paint with a small amount of water, this will be a waterfall.
Step 2

We draw clouds of dark pink color and we start to draw a mountain in yellow color. We will also mark the lower part of the figure in yellow.
The example uses light and transparent tones so you can see how the layers interact.
Step 3

By mixing cobalt blue and ultramarine blue, we will paint the horizon of the mountain and shade the small yellow slope.
Hint 1: let each layer dry. You can use a hair dryer to speed up this process. Keep it at least 25-30 cm away, turn on the cool setting and set the hair dryer to the lightest air flow. No steam or hot air!
Step 4

To shade and add interesting colors, use orange. With it, we will create the coast in the foreground and shade the sky.
Hint 2: if you have drops of excess paint, rinse and dry the brush as you did in the previous techniques, and pick up drops with it.
Step 5

Please note that the images show different brushes for painting. You can use the ones you have available.
Take a dark blue color and shade the top of the mountain with it, changing the pressure on the brush and turning it around to create an interesting texture.
Step 6

Using the same blue color, let's play with the waterfall by drawing some circles. Sometimes visual clichés become your friends.
We will wash the brush and pick up the yellow color, with which we will add visual details to our shores.
Step 7

Once the paint is dry, shade the bubbles in the waterfall with a hint of purple. So we will make them more interesting.
Step 8

We need to link some elements and add trees. In the example, we used round templates for crowns, but you can draw as you like.
Step 9

In brown we will depict tree trunks. Also with the help of blue we will shade the water and the sky a little more. Then, using pink, blue and green, paint the grass in the foreground.
Step 10

Use a mixture of pink and red to add the final details. Our trees are bearing fruit now, and there are several fruits under them.
If you look closely, you can see how each layer interacts with each other. A darker shade has more power, but when the colors overlap, they create an interesting and beautiful combination.
“Wet” technique
Step 1

Wet the paper with water
Step 2

Blot the paper with a clean sponge, removing excess water. Try to achieve an even distribution of moisture on the paper, you should get a satin effect.
If the paper is shiny, it means that it is too wet, blot it again.
Step 3

We will paint the landscape again. Let's start, of course, with the sky. Using this technique, it is easier to draw the background first, then moving on to the objects of the foreground.
Step 4

We continue to draw the sky until we start to like it. The strokes will blur, creating an interesting effect.
Step 5

Now let's move on to the grass in the foreground. Using green, make a few wide strokes, leaving room for the stones.
As the paper dries, the strokes become less and less blurry.
Step 6

Let's add forms. To do this, use different shades of green and draw trees on the horizon.
Step 7

After adding the trees, let's try to add texture to them. To do this, use a darker shade of green to set the accents.
Step 8

Add stones using gray color. We filled in the gaps in the foreground with this color, leaving some gaps.
Try to use either dark or cold shades. Using both dark and cold shades will create visual dissonance.
Step 9

We will place accents to diversify the picture. Using a crimson hue, we depict several floral elements in the foreground. Let the crimson flow as it wants. Then, using a dry brush, remove the color from the middle of the spots.
Step 10

Then, drip clean water into the center of these spots to allow them to blend into the grass.
The hardest part about this technique is knowing when to stop. If you overdo it with blurs and colors, you will end up with a messy drawing.
This technique gives a slightly strange, but interesting result. A drawing made in this technique has a hypnotizing effect.
Dry brush drawing
Step 1

We think the name of the technique speaks for itself. We will need to pick up paint on a brush, blot it from excess liquid with a paper towel or sponge, and only then paint.
Let's start with a pencil sketch. After that, roughly mark the sky, moving the brush over the surface of the paper.
Step 2

Let's draw green trees on the horizon line, outlining what will later become our lake.
Then, by mixing mauve with blue, draw the first layer of the tree trunk.
Step 3

Let the drawing dry and add some elements: the reflection of a tree in the lake and the flow of water.
Mixing green and blue, shade the coast on the background part of the image and let the painting dry again.
Step 4

Mix an intense blue with ultramarine and paint a layer on the trunk of the tree to create the shadows and texture of the bark.
Step 5

Then, using shades of orange, we will depict the autumn landscape by painting the background trees.
Step 6

Having finished with the previous step, with a light orange tint, we will depict the reflection of the trees in the water.
Also, by mixing gray with blue, we will place dark accents on the trees.
We will also add trees on the other side of the horizon. Let's mark the shapes of the trees in orange.
Step 7

Let's take water. Use dark green and brown to achieve the desired color. And with wave-like movements we will draw water in the lake.
Step 8

When painting a lake, change the pressure on the brush to add texture.
Clue: if the brush is too wet, the paint will look flat. Dry the brush to intensify the colors.
Step 9

Let's add some grass under the tree, using the same color as the grass in the background.
Step 10

Let's add some details to the foreground.
We will also darken the lake a bit by adding a blue tint. And also shade the sky with the same color.
We remove moisture
This technique will require several sponges. It is suitable for the image of clouds, soft light. And it can also control the behavior of colors.

Sponges

Makeup sponges are the best. They absorb well and give an interesting effect.
Avoid rubbing the paper with the sponge, and if you do, be very careful not to damage the paper.
Paper towels

With their help, you can create clearer highlights. But paper towels absorb a huge amount of paint very quickly. Therefore, they can absorb fresh paint completely.
Paper towels can come in handy if you make a mistake. Then you can quickly remove the paint.
Dry brush

You can use a dry brush to create a pattern using this technique. To do this, rinse thoroughly and wring out the brush. With it, you can create clear lines.
Other methods:
- You can spray water where you want to remove the paint and then soak it up with a sponge.
- Use different fabrics to add texture
- You can use fingers or other parts of the body. The skin can also absorb moisture.

Discoloration of dried paint
Brushes for watercolor paint

Use clean water and a cloth, wet the desired areas, gently rub the pattern and remove moisture with a dry brush. This method allows you to control the areas you lighten.
Brushes for oil or acrylic paint

Stiff bristles allow you to quickly scrape paint from the desired area. But it is worth noting that this method can damage the paper, so control yourself.
Here, just as in the first method, you must first moisten the area, and then process it with a brush.
Spray and towel

Take a spray bottle and spray on the desired area, and then apply a paper towel to it. This method leaves large light spots and gives an interesting effect.
Sandpaper

Very rarely used, as it can damage the paper. It is best used at the end to add texture. You don't need water for this method, just rub the drawing in the right place.
Blades and knives

Can be used to highlight small areas and create crisp lines. This method is also very risky as it can damage the paper.
Sponges

You can also use sponges. Wet the desired area and dry it with a sponge.
Looking at the paintings of famous artists, you involuntarily admire their creativity, the ability to depict the world around us in bright colors. Each of us can also try to master the art of drawing and make this hobby our favorite pastime. Here are beautiful gouache drawings for beginners, they will allow you to test your talent in painting and master the technique of drawing with paints.
To master the gouache painting technique for beginners, you must have for work:
- A set of gouache paints of twelve colors.

- Paper.

- A pair of flat hog bristle brushes.

- Palette and dishes with water.

The aroma of gouache paints is familiar to everyone since childhood. How to draw with gouache is not difficult to understand, the technique of such drawing is quite simple. It is necessary to draw, starting with a sketch of a drawing with a pencil.
A palette knife is used to apply paint and mix it. With it, you can apply paint with even strokes.

From an early age, we draw in gouache in the album a simple, unpretentious landscape. But, you can draw patterns, flowers, mountains, and even city buildings with such paints. For beginners, working with gouache is just an ideal option.
Drawing a sketch with a pencil, you can avoid mistakes and do the job neatly. If you smear and mix paints directly on the canvas, you will get just dirt in the picture. Therefore, you can add a little water to gouache and it will turn into watercolor.
To learn how to learn how to draw beautifully with gouache, you need to get acquainted with the step-by-step technique. This technique lies in the fact that in the course of drawing gouache is applied only horizontally.
First of all, let's draw the dark fragments of the picture, and only then we depict the highlights with a light color. As a result, we get the desired color without traces of dirt.

Gouache painting techniques
Among the gouache painting techniques known to artists, the following are common:
- A wet layer of paint on a layer that has not yet dried. In this case, the paint lays down tightly and dries for a long time. This method is more suitable for watercolor painting.
- With a dry brush, gouache paints are applied to the dried layer.
- With the help of a sponge, a textured picture is created. This technique is ideal when we paint an autumn landscape, it is easy to depict the bright colors of golden autumn.
- A beginner will cheer up and help overcome the excitement of the technique of splashing paint on the canvas. It is enough to moisten the brush in paint and spray gouache on paper or canvas. It turns out a bright and beautiful painting. Be sure to learn this method of applying paint, which helps to train your hand.

Of course, we can't paint a picture without the right brush. It is advisable to choose brushes made of nylon, goat or pig hair.

On the video: how to beautifully draw the sky with gouache.
Types of gouache
Gouache is suitable for drawing on cardboard, paper, canvas and other surfaces. But not every gouache has such universal properties. Consider the main types of such paints:
- Suitable for application on surfaces intended for painting only. It is absorbed into the material and allows you to apply a second layer, making the colors in the picture more saturated and bright.

- It has a more saturated pigment and bright coloring abilities. She decorates theatrical scenery. Children's gouache contains PVA glue in its composition, so it dries quickly. It is convenient to work with such gouache on plywood, ceramics or canvas. But acrylic paint fits perfectly on any surface, and after drying it is not washed off and does not lose its original color.

- Fluorescent gouache. Amazing in its properties and quality. Under the influence of ultraviolet rays, it glows. The color is too bright, which gives the drawing a special beauty.
A step-by-step method helps to comprehend the basics of gouache drawing even for children. Such lessons will allow you to master this wonderful art and learn how to draw in a certain sequence, choose the right colors to reflect the real beauty of nature, representatives of the flora and fauna on canvas.
It is necessary to create pictures of nature, like drawings on any other topic, from a pencil sketch. The easiest way to draw is to start at the top of the canvas or paper. As a rule, the sky is at the top, which is painted blue along the pencil contours.
Clouds are painted with whitewash, brushing white highlights across the blue sky.

The mountains are depicted in brown colors, and the vegetation in green tones. The trees below are depicted in lighter or darker green gouache. The main thing is that the colors in the picture look like in reality. Paints can be mixed directly on the sheet, periodically changing the water. For the image of fine lines, you need to choose the right brush.
When using gouache, you must adhere to the following tips:
- You can buy gouache in tubes or in jars, everyone chooses the most convenient packaging for themselves.
- The colors you need to choose are those that will be needed to work on the picture.
- Samples need to be done on the palette, only picking up the right color, transfer it to the canvas.
- If the paint cracks, a little gum arabic is added to it and mixed thoroughly.
- To apply the next layer, you need to wait until the previous one dries.
- It is advisable to cover the picture with varnish after drying.
Having comprehended the technique of drawing, you can achieve success in artistic creativity. Moving step by step, from simple to complex, novice artists gradually master the technique of gouache painting. Below are video tutorials, the task of which is to help depict the selected plot on the canvas as accurately as possible. This step-by-step approach allows you to quickly learn how to work with paints such as gouache.
Gouache drawing lessons for beginners (2 videos)
More ideas for drawings (27 photos)


Drawing with paints is not only very interesting, but also informative. The landscape, executed in different techniques, calms, gives positive emotions and instills in the artist a sense of beauty.
From our lesson you will learn how to draw a landscape in stages and what is required for this.
Landscape
Painting in watercolor or gouache provides a wide range of landscapes.
For example, one of the most impressive subjects for drawing is mountains. They can be both smooth, similar to a mountain range, and sharp. By depicting mountains, you have the opportunity to show the contrast between sky and earth, high plains and slopes.
Another significant point is the weather. It is very exciting to draw winter mountains: you can “play” with shadow and light, with different shades and reflections on white snow. Ultramarine, yellowish, turquoise, ocher or burgundy - all this is quite appropriate on the snow cover. The main thing is to choose the right color scheme.
No less interesting for novice artists will be a summer landscape depicting mountains. Picturesque and beautiful: warm shades of grass or cold colors on pine branches, a riot of greenery and colors. At the same time, you do not need to carefully draw them - the bolder and freer the brush lies in your hand, the easier and more relaxed the picture will be.
Important: a landscape is not only nature, but also a certain atmosphere, in the creation of which we put our mood and emotions.
Where does the landscape begin?
Any drawing must begin with a layout on a paper sheet. Make the sky smaller than the earth or vice versa. Please note that these parts do not have to be the same.
If you are drawing mountains, then be sure to think about which peak will become higher and which one will become low. You should not depict the same mountains, although this happens in reality. It is best to make them different compositionally, which will add some dynamics to your drawing.
Pay special attention to objects located in the foreground - what is closest to the artist, that is, to you. The foreground is always drawn more diligently and in more detail than the background.
And now let's try to draw a mountain landscape with gouache.
Landscape in gouache in stages: draw mountains

Stage 1
Take a special A3 drawing paper and make a preliminary sketch, mixing white and blue gouache, paint over the sky. While it is “not dry”, paint clouds with white gouache, making circular movements with a brush to get a mixture of colors. The use of such a technique will make the sky cloudy and a little fantastic. 
Stage 2
We turn to the image of the mountains. Mix white gouache with blue, add a little bit of purple and completely paint over the mountains. Mix the same color with whitewash and immediately paint over the parts of the mountains that are located in the light. In order not to disturb the aerial perspective at the base of the mountains, make the color light.
Now the fun part! Do you want to learn how to draw a landscape in stages for beginners in a variety of ways? Then let's draw snow-capped mountains.
Stage 3
Scoop up white with a palette knife and lightly pressing until the paint is dry, make cuts on the mountain with the tip of this palette knife. Paint over shadow areas in the same way, only with a bluish tint of gouache.
Important: do not use a large amount of gouache and do not mix it with water - the paint should be thick. Practice first on a separate sheet of paper and only then start drawing. 

Stage 4
Mix white with blue gouache, and then walk at the foot of the mountains with smooth strokes.
Stage 5
Now mix blue paint with green paint and draw a forest. Add ocher or other shades of yellow and green for a forest look. Use the same colors to draw the ground.


stage 6
Draw a lake by mixing white and blue gouache and add some green. 
Stage 7
Final step. Again, mix the blue and green paint, and then, making large strokes, paint over the future bushes. 
Stage 8
Using light shades of ocher and greens, complete the image of the bushes. 
Landscape watercolor in stages: draw a sunset

Next, we will look at how to paint a sunset using watercolor. All that is required in this case is watercolor and watercolor paper. Shall we start?
Stage 1
Without making a preliminary sketch and slightly wetting the sheet with water, proceed to writing the sky. To do this, take the blue, purple, pink and orange watercolor color. Clouds can be drawn the way you like, mixing colors and creating unusual transitions. 
Stage 2
Before the paint is dry, mark the background with a darker color - it should be different from the sky. And a little closer to yourself, using a dark purple shade, make the plan even darker. Draw also a small fluffy tree and leave the work to dry completely. 
Stage 3
Using a dark purple hue, draw a tree trunk, adding burgundy blotches in some places. Paint over the ground with the same color to make it as similar as possible to the roots of a tree.
Then, with a thin brush, slowly draw tree branches, different in width and length: thick and thin, long and short. In the background, make the branches a little lighter, and darker in the foreground. 
Ready! You yourself painted a colorful and very beautiful sunset.
There are many techniques for painting a landscape with paints. But if you are a beginner artist, then step-by-step drawing will be easier using gouache. It is easy to use: it does not have a specific smell, it is easily mixed with water and washed off. Any brush is suitable for working with gouache, but it is best to give preference to ponies or synthetics.
This technique is also suitable for beginners because, having made a mistake, it will be easy to correct it by painting over with another layer of paint. In addition, the next layer applied to the dried pigment will not mix with the previous one. The main difference between gouache and acrylic and oil paints is that you can paint with it more freely, without fear of making a mistake.
It does not matter how you draw parts of the picture - all at once or separately. For example, you can first paint over the ground and sky with gouache, and then paint the foreground, trees and clouds.
Note: to speed up the work, apply paint to objects immediately, without leaving "for later". Agree, it is much easier to do everything in one step, and not wait for the picture to “dry”.
This version of landscape painting is no less interesting and is also quite suitable for novice artists. You can easily master the watercolor technique if you know some tricks and important rules.
- Drawing with watercolors is, first of all, working with layers. The paint is translucent, which means that mixing of each new layer with the past cannot be avoided.
- Mistakes are excluded - that's what anyone who picks up a watercolor needs to know.
— The key to success is thick paper. The rough special surface perfectly absorbs watercolor paint and guarantees a good effect.
- Close objects should be painted over with bright colors, everything else should be mixed with water and pale. Unlike oils, acrylics or gouache, watercolors are written “liquid”.
- For watercolors, it is best to use brushes with natural squirrel or pony hair.
And, of course, do not forget that painting a landscape with paints in several stages is a rather difficult task for a novice artist. Many questions arise here: how to arrange everything on a sheet, how to get a certain color, how to highlight this or that object, etc. Answers come only with experience.
The best advice that can be given to all beginners in painting is more practice - draw the most ordinary subjects. Remember that the sooner you realize that realism is directly dependent on highlighting some details and creating contrast, the sooner everything will work out.

So what is a landscape? This is a good training for any artist, which does not allow you to get away from the main theme of the image and at the same time gives freedom to fantasy.
Drawing classes help to relax, calm down and get away from everyday, domestic problems into the world of dreams and fantasies. You can start drawing with anything: pencils, gouache, charcoal, oil paints, watercolors. But only a box of watercolors familiar from childhood can give a ticket to childhood, a world of fantasy and adventure. What can be painted with watercolors?
Where to begin
With ease, they will help you create a variety of images, landscapes, still lifes, everything your heart desires.
To begin with, it is worth arming yourself with desire, patience, various brushes, paints, a palette and water containers. Sometimes it is useful to have sponges, paper napkins, and also simple pencils and sponges on hand. So what can you paint with watercolors? How to make drawings of the highest quality and professionalism?
Watercolor paints - to fight
Both experienced artists and beginners, including the smallest ones, love to paint with watercolors. It contains natural, harmless pigments. The adhesives in these paints are also created by nature. Used mainly such as gum arabic, casein, honey, dextrin, phenol. The brush is wetted with clean water, then paint is picked up, then conceived images begin to appear on the surface of the paper.
What can be painted with watercolors? Due to the transparency of the pigments, they are able to convey weightlessness, lightness, freshness. So, for example, to draw something light, weightless with oil paints, you have to apply several opaque shades one on top of the other until the desired effect is obtained. Watercolor is a universal medium, because thanks to the unique structure of paints, it becomes possible to reproduce all genres, original and unpredictable effects. Pigments on paper seem to melt, spread, their mixtures can create various combinations of colors and shades. What can you paint with watercolor for beginners? Whatever the soul of the artist desires.
The question arises: what about gouache? How are they different from gouache? Transparency is what distinguishes watercolor from gouache, where pigments are mixed with white.
There are many interesting ways to paint with this paint. The main ones are described below.
Flat brush painting
What can be beautifully painted with watercolors? Let's figure it out. Anything can be beautifully painted with watercolors. But there are also unusual ways to do it. There is an interesting method of painting, performed with a flat brush, designed for paints on a wide variety of bases, both water-based and oil-based, acrylic. Its principle is as follows: two different colors of paint are drawn on the edges of a flat brush.

Work is done on a dry sheet of paper. First - a square or triangle outline is drawn to determine the beginning and end of the layer. Next, colors are selected, and a line is drawn along the upper left corner to the right corner (left-handers start drawing from right to left). With this technique you can get masterpieces! So, plants are often drawn:
- flowers;
- petals;
- floral ornaments;
- snow-covered firs.
Differentiated (in certain areas of the picture) blur
This method is the main one among professional artists. It is done as follows:

What can be painted with watercolor in this way? This method is used by artists to depict the sky, large meadows, glades, water, various surfaces where transparency, lightness and immensity are required. It becomes possible to convey in the picture all the shades of natural beauty, natural overflows. Differential blur helps show the richness and magic of natural beauty.
Glazing
What can be painted with watercolors in stages? A method resembling blur, but in this case, the pigment should be applied to a dry sheet of paper. Glazing allows you to adjust the color and tone of the picture, clearly work out the transitions of shades. When working with glazing, each color should be dried separately in stages. This is how the background of the drawing is created, if the artist wishes, the sky, the sea, any extensive surfaces are drawn.
"Wet on wet"
What can be easily painted with watercolors? There is a method developed by European artists that allows you to paint landscapes and natural phenomena in a wonderful way. The secret of the method lies in the fact that the paint is applied to a wet sheet. The entire canvas is evenly wetted with clean water. It is most convenient to do this with a sponge, but a large soft brush will do. Further, the necessary strokes are applied with a brush, creating unique shapes, shades, color transitions in the work.
"Dry brush"
This method requires certain skills and skill of the artist. An almost dry hard brush is used here. Paper - should also remain dry. A large amount of paint is collected on the brush and the study of images begins. On bumpy surfaces, it is possible to create clear marked marks, create effects similar to pencil drawings.

In this way, both independent works are created, and individual elements that are lost in a dull background are worked out. What drawings can be painted with watercolor "dry brush"? Very often this method is used to create portraits, landscapes, still lifes. In a word - wherever detailed elaboration of images is required. A “dry brush” is able to bring clarity, clarity to a drawing, like a pencil - to show the necessary lines and curves, one might say - to write a whole work about what the artist painted.
flushing
What can be painted with watercolor paints? There is another unusual way of using watercolors used by professional artists. In this case, the pigment needs to be washed off after it has completely dried. The part of the work that needs correction is wetted with water. Next, blot this area with a soft absorbent cloth. Excess paint, along with water, will remain on the fabric. This technique creates unusual shapes, curves, lines, gives volume to figures, color depth.
Drawing with water on paint
A layer of watercolor is applied to a sheet of paper. When the paint dries, take a clean brush, wet it with water and drip drops of water on the desired areas. This allows you to create layering, volume, the illusion of cracking rounded shapes.

Glaze
Watercolor paints of light tones are applied one on top of the other in a certain order: lighter shades are lower, darker ones are higher. The pigment is transferred to a sheet of paper with the thinnest brush strokes only after the previous layer has dried.

As a result, volumetric figures will appear, in which all colors will complement each other without mixing, allowing you to see the boundaries of multi-layer paint application.
scratching
A method that allows you to remove individual areas of paint on a dry surface. In some cases, in this way, within the same tone, its enlightenment is made.
Disguise
What can be painted with watercolors easily for kids? In principle - anything, but in this method - there is an element of mystery and mystery that can attract the attention of any child. On a sheet of paper, before applying a layer of watercolor, with the help of wax or paraffin, areas that should remain unpainted are closed. Next - work is done with paints. As soon as all the paint dries, the wax can be rolled up with your hands, with a brush, or left on the canvas.

Addendum
A different color is added to the wet areas of the future work, which in a unique way creates illusions, bizarre overflows. Using this method, you can create different color solutions that are not possible with the usual mixing of paints on a palette.
A little history of watercolor painting
Even primitive people discovered and began to use watercolor natural pigments. They mixed them with water, applied them to the rocks with their fingers, as well as simple tools (sticks, bones).
In ancient Egypt, water-soluble dyes were used to create amazing, original paintings on the walls of the palaces of the pharaohs, tombs, religious buildings; during excavations, intricate watercolor drawings depicted on papyrus were found.
Watercolor paints were known to masters from Japan and China.

The works were carried out on silk, as well as on handmade rice paper. The artists of the Far East painted contemplative landscapes in the tradition of their schools, filling the images with literary allusions and calligraphy.

In the 18th and 19th centuries, a classical technique was developed in England, which absorbed all the most important, interesting things, which made it possible to achieve amazing results with the help of watercolors. Watercolor pigments were used in the wash technique, allowing light reflections from the paper surface to be transferred to the canvas.

For centuries, artists have been preparing water-soluble paints for themselves, keeping unique recipes in secret. In watercolor painting, the surface on which the artist works also plays an important role. The texture of the canvas is also an obvious and important factor in the work of real professionals. The texture of the surface of the paper changes under layers of paint, the slippery smoothness of pastels, under the overlay of collages. All these changes need to be felt, caught as if they are a continuation of the artist himself, and directed in the right direction.
Not only children dream of learning how to draw, especially since many adults have talents that have remained unrealized. There are various easy techniques that allow you to make drawings with paints for beginners. The easiest way to learn creativity is with gouache, you can also use watercolor or oil paints, but certain skills are needed to work with the latter.
Artist's Kit - Components
To learn how to draw, you can not do without paints. It is better to buy high-quality paints right away, because too cheap ones fit worse, therefore, the learning process will be less productive. A beginner should not spend money on a professional set: to start drawing from scratch, it is enough to have basic colors:
- titanium white;
- yellow (lemon, medium yellow, yellow ocher);
- red (carmine, cadmium);
- blue;
- emerald and light green;
- black.
The easiest way to work with gouache, but an adult or a schoolboy can easily cope with watercolor. The ideal option is not an ordinary nursery, but a watercolor for artists, which has the best quality. Budget sets of 24 colors cost 400-500 rubles. In principle, five tones (red, blue, yellow, white, black) are enough for the artist, and the rest can be created by mixing. To combine paints, you need to immediately buy a palette. Form, material can be any. On sale there are round, oval, square palettes, wood products, plastic. The size of the palette is also left to the user's choice.
It is equally important to choose a good brush. For beginners, three brushes of different sizes are enough. You can also buy an additional thin brush to make bitmaps, small details. Squirrel brushes are the most popular - they perfectly absorb water, give it longer, therefore they paint without spots, stripes. This brush is good for glazing or creating clear contours.
Suitable for a novice artist and kolinsky brush - round, with a sharp tip. It is also convenient to work out thin contours, elegant details in the technique of watercolor painting. Be sure to include a flat wide brush for pouring. She performs the background or stripes over a large area of the canvas, sheet of paper. Over time, fan, linear, and retouch brushes are usually added to the collection of brushes. It is important to inspect the brushes for the reliability of the connection between the pile and the handle - it must be very strong.
Other accessories in the artist's kit:
- Paper. For watercolors, you should buy special paper with low absorption, which will not allow water to wet the sheet until it is completely dry. On plain printer paper, watercolor tends to bleed. The best option is hot-pressed paper, which additionally has a very smooth surface.
- Thinners. Special solvents will be required to dilute oil paints. Usually linseed oil or turpentine is used for this. Organic solvents are not recommended - they spoil the structure of the oil paint, remove the beautiful shine. However, to clean paint from brushes, you need to buy turpentine, white spirit.
- Canvas. Usually used for painting with oils or acrylics. The stores have ready-made canvases in stretchers made of linen, cotton, synthetics. Natural fabrics are dense, sag a little, drawings look more beautiful on them. You can also make a canvas yourself. To do this, you need to buy a stretcher, cover it with a cloth, then prime it. As the primer dries, pull the canvas a little tighter.
- Easel. It is recommended to purchase it if you plan to take drawing seriously. The easel is placed at eye level, which gives an excellent overview of the picture, helps to work correctly and quickly look for flaws. For small canvases, there are mini easels on sale.
- Protective varnish. It is advisable to cover the picture with varnish, this will help protect it from ultraviolet radiation, make the colors saturated.
Also, to compile an artist's kit, you need to buy jars for brushes, wet wipes, cotton rags. To work with oil, you will need a palette knife - a spatula for thick paint, removing dried material and applying beautiful strokes. Another option is to buy clip-on oilers (single or double) that contain paint and are easy to attach to your palette.
Watercolor painting techniques
You need to learn different ways of drawing in stages, moving from the easiest to the most difficult. At first, most artists use sketching, then they begin to show imagination and create their own masterpieces. It is recommended to start learning how to work with watercolor with the techniques described below.
Flat brush painting
If the drawing is invented, you should follow these steps step by step:
- Draw a square, a rectangle to indicate the beginning, end of the layer. With a dark shade, draw a thin line from the upper left corner to the upper right corner.
- Wet the brush with watercolor. Run the second stroke from the bottom edge of the first line, covering the accumulated paint below. You need to work quickly so that there are no streaks of watercolor or gently wash them with a cloth.
- Repeat this action again with the next line. It is better to use the flat edge of the brush for strokes, which will make the bottom of the stroke more even. Intermittent strokes must be immediately redrawn.
- Completely fill in the intended contour, repeating the steps in the same way. It is important at the same time to observe the evenness of the tone of the paint, not to change the brand of watercolor. On paper that is too thick, the strokes may be uneven. Then it is recommended to slightly sprinkle the sheet with water, get wet, let it dry, and only then start drawing.
At the end of the work, it is necessary to rinse the brush, squeeze it dry, remove all the clots of paint at the bottom of the last stroke with it, preventing the picture from discoloring. To give the picture texture, you can leave it to dry at an angle.
Gradient
First, you also need to work out a square, a rectangle (in the future, this will be the drawing required by the artist). Then the following steps should be taken:
- dip the brush in a dark shade of the desired color, draw a vertical or horizontal stroke;
- wipe the brush with a cloth, paper towel, dip in a lighter shade of the same color, draw a stroke overlapping part of the previous one;
- rinse, wipe the brush, make another stroke (lighter, darker or a completely different color);
- repeat until the shape is filled;
- rinse the brush, dry it, pick up the remaining paint.
With the help of a gradient, you can create very interesting transitions that form the basis of the future picture.
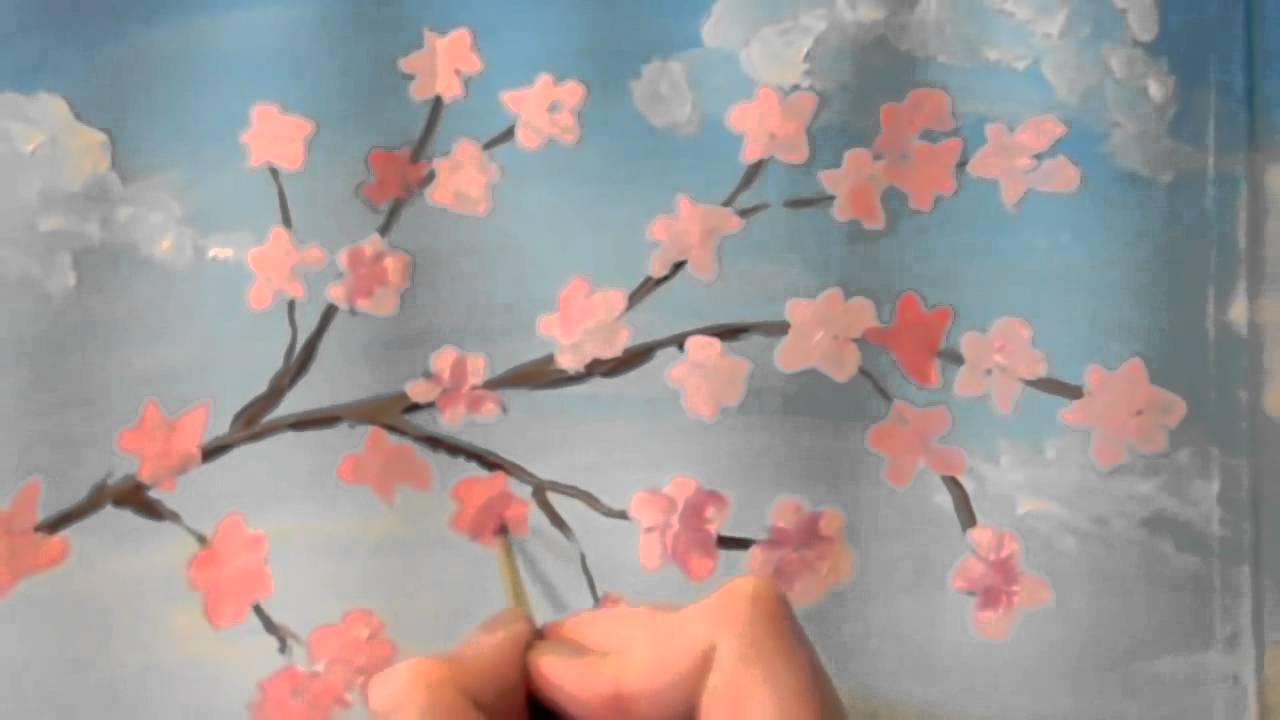
watercolor glaze
The glaze technique requires the imagination of the artist; with its help, the landscape, the image of autumn and summer, the landscape come out well. Description of the technique on the example of the landscape:
- complete the sky above, the river below with blue watercolor;
- dilute the paint with water, draw a waterfall;
- make pink clouds in the sky;
- draw the bottom of the picture and the mountain in yellow;
- let all layers dry well;
- using dark blue to shade the horizon of the mountain and its top, they can also beautifully decorate the waterfall;
- make the banks of the river orange, shade the sky a little;
- as the drawing dries, draw bubbles on the waterfall in purple;
- you can draw trees along the banks of the river - the trunks are brown, the leaves are green;
- shade blue sky, water;
- draw grass in blue, green;
- you can depict trees and fruits under them.
The meaning of glazing is that all layers of paint interact with each other, overlap one another and, when overlapping, give even more interesting effects.
"Wet" technique
Before drawing, you need to moisten a sheet of paper with water. Of course, the paper needs to be thick, not sagging. Wetting is done with a sponge, after squeezing it out. Moisture should be evenly distributed over the sheet and not shine, otherwise there is too much water on it.
- first draw a background, choosing any light shade;
- make a drawing of a vase;
- draw leaves in a vase using yellow, red, orange;
- apply each new shade after partial drying of the previous one, the vagueness of the lines creates very interesting effects;
- at the end of the work, you can place accents with brown, dark brown, burgundy, make shadows;
- with a wet clean brush, do some blurring of the borders, but do not overdo it to eliminate the sloppy look of the picture.
You should not combine cold and warm tones in one picture, this will give a visual dissonance.
Dry brush drawing
It is easy to draw in this technique. The paint must be taken on a dry brush, then a stroke on paper. Preliminary it is recommended to sketch with a pencil. At first, the sketches will be quite rough - for example, the outlines of the sky, trunks and branches of trees, a river. After the first layer dries, details are added, shadows are created, texture is drawn. Then they make a background around, place the necessary accents.
When drawing, you need to change the pressure on the brush, which will add or remove texture. It is important that the brush does not remain too wet after rinsing and blotting. Otherwise, the paint will not give the effect of texture, it will look flat.
No excess moisture
The technique is well suited for drawing clouds, streams of light. Before starting work, you need to prepare a few sponges or sponges for the face. First, strokes are made with a dry or wet brush, then they are rubbed with sponges. It is important not to rub the sheet hard so as not to damage the paper. Highlights can be done with paper towels. After, if necessary, the contours of the drawings and accents are drawn with a thin dry brush.
Discoloration of dried paint
In this case, the already dried drawing is clarified. Moisten the desired areas with a cloth, gently wipe with a dry brush. It is best to use brushes with stiff bristles, which can scrape off the paint a little. Actions must be careful, otherwise there is a risk of damaging the paper. Instead of using a rag, it is acceptable to spray paper from a spray bottle, and then moisten the moisture with a paper towel. Another option is to gently rub the pattern with sandpaper, then you do not need to wet it first.
Gouache for beginners
Usually, learning to draw with gouache is recommended as early as childhood - from 4-6 years old. It is very easy to apply, does not float, and is much easier to work with than watercolor. Gouache drawings can be very diverse - nature, animals, flowers and trees, fruits, etc. Adults paint real landscapes with gouache.
You can make drawings not only on paper, but also on canvas, plywood, wood, fabric, even on stones, pebbles. For this purpose, it is better to purchase not children's, but artistic gouache, which is of high quality. First, a sketch is made with a pencil, after which it is painted over. Start with dark colors, gradually moving to light ones. Mixing paints must take into account the color wheel, otherwise the result will be a gray tone.
Features of oil paints
Experienced artists greatly appreciate oil paints, which are available in a wide range in specialized stores. The paints contain mineral substances, organic and synthetic components. They are diluted not with water, but with linseed oil, which gives brightness, richness of tone. Paints dry for a long time, but the drawing can be corrected for a certain time. To dilute dried, thickened paint, a special oil is also used, which is sold in the art departments.
Types of oil paints
There are three types of oil paints:
- Highly artistic. Usually they are used for professional painting. The price of the material is high due to the excellent quality of the components. For decades, paints do not lose color, do not fade.
- Sketchy. Suitable for beginners, inexpensive, can be used in different techniques.
- Studio. They have an intermediate price between the two listed options, suitable for artists and beginners.
Also, oil paints are transparent, opaque. The latter are denser, do not transmit light. If the packaging is marked with a “*”, such material is very resistant, it lasts a long time. The more stars, the higher the quality of the paint.
Rules and drawing techniques
The oil painting looks very beautiful. The strokes look each on its own, although it is rather difficult to achieve such an effect. There are two main techniques: in one coating (alla prima) and in several layers. For a multi-layer overlay of paints, you will have to try - work quickly, do not dilute the material, know its properties and how one tone will look over the second. Oil consumption for multilayer application is usually high.
Single-layer drawing has its drawbacks. So, over time, strokes can crack due to paint shrinkage, so most professionals dry the first coat and apply at least one more. Thus, material costs can be reduced.
- the lighting should be good, otherwise there is a risk of making unnecessary shadows in the picture;
- first you need to draw a contour, then make oil strokes along the lines;
- colors can be mixed, knowing the basic principles of combining tones;
- usually they paint pictures, starting with bright elements, highlighting the darkest and lightest points;
- after completing the sketch, outline the contours and details, make the necessary accents;
- the finished picture must be allowed to dry for three days, but on the second day you can make some edits;
- the canvas after drying can not be rubbed, touched with hands.
Acrylic paints combine the properties of oil and watercolor, they do not fade, they are not afraid of water. You can apply layers directly on the previous ones, without waiting for them to dry. To begin with, it is better to buy a set of 6 colors, then expand to 18. Acrylic painting is on paper, canvas, fabric, glass, plastic, stones. Dilute the paint with water, solvents. The following techniques are used:
- dry - on paper, canvas;
- wet - on a dampened canvas;
- glazing - applying a thick layer and its subsequent shading;
- impasto - drawing with clearly distinguishable strokes.
To give the picture a complete look, you can apply individual strokes with felt-tip pens, markers, pencils, pastels. At first, simple pictures are performed, then they move on to still lifes, views from the window, and portraits. For training, it will be useful to apply the technique of abstraction - to make spots and add details, giving them an image.
Tips for working with acrylic are as follows:
- nearby it is necessary to have a spray with water to moisten quick-drying paints;
- when adding water, you can make a more transparent material from acrylic paint;
- it is impossible to introduce too much water, after drying the paint may crumble;
- before wetting the brush in the paint, you need to dry it;
- to slow down the drying of the material, the addition of not water, but a solvent will help;
- to preserve the pattern, it is varnished.
Drawings on fabric
It is quite difficult to make fabric drawings, it is better to practice on a different basis. With experience, it is quite possible to draw on silk, synthetics, natural fabrics. First, the fabric must be washed, ironed, pulled onto a frame or placed on a flat surface. Place an oilcloth under the fabric, make a drawing with a special felt-tip pen for matter. After doing art painting. The easiest way is to work on ready-made stencils, but you can make a drawing yourself. After a day of drying, you need to iron the product with an iron, after 2 days it can be washed.
Paintings on canvas
For acrylic, canvas is the ideal base. Paints must be prepared in advance, diluted with water. If mixing is planned, it is better to use a special solvent, otherwise the material will dry quickly. The palette should be periodically sprinkled with water. They begin to draw the largest details, as they draw smaller lines, they change the brushes to thin ones. The rate of dilution of paints with water to create more transparent tones is less than 20%. 
Drawings on paper
For the first time, it is worth trying drawing on paper. Since the structure of the paints is dense (it is, in fact, liquid plastic), ordinary thin paper will not work. It is better to take cardboard or special thick paper. Also, drawings can be done on paper wallpaper that is already pasted on the walls. This is a popular design technique that allows you to decorate plain material and give the room an original look.
glass painting
The pictures on the glass look very beautiful, reminiscent of a finished stained glass window. The contours of the future drawing are made with a thin marker according to the sketch, which is placed under the glass. After that, paints are applied in layers, forming the desired combinations of colors, accents, lighter and darker zones. At the end of the work, acrylic varnish is applied to the painting.
Paints give endless scope for imagination. Learning to draw is easy. Even without talent, you can make beautiful drawings with sufficient diligence and perseverance.


