The article offers you tips and templates for depicting winter landscapes, drawings and characters.
The winter girl is often present in children's drawings as a kind sorceress who brings a fairy tale into everyday life. Most often, the winter girl is associated with a fairy-tale character named Snegurochka. Nevertheless, there are no special rules and requirements for drawing it, the main thing is to convey the subtlety of the pore.
Winter Girl Features:
- Cold colors. They must be present in everything: the main features of the girl, her hair and eye color, her clothes.
- Warm clothes. It is important to depict furs, long coats, large hats, mittens, scarves and other clothes that are associated only with winter.
- Magic. Since the character is fabulous, he may well have unusual abilities: make snow, freeze, ice the ground where he steps.
Drawing in stages:
Sketching and shaping the silhouette  Add small details to the drawing
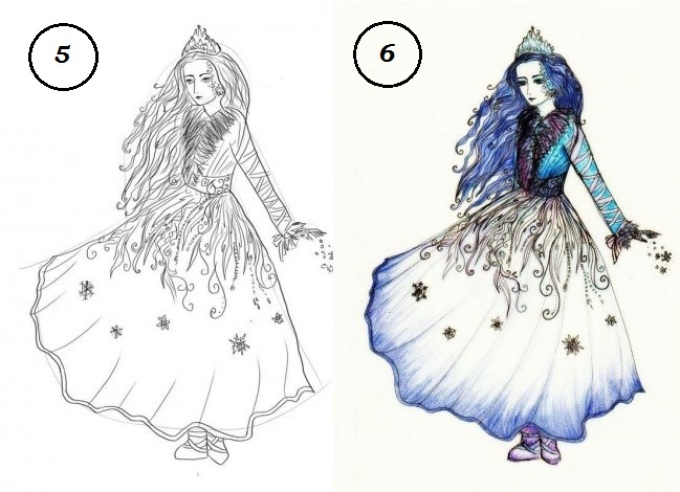 Complete the drawing with paints
How to draw a Christmas tree in winter with a pencil and paints?
The symbol of winter and the New Year holidays is a green Christmas tree, and it is invariably present in any picture with a winter landscape. The Christmas tree can be small or large, green or covered with snow. To make the Christmas tree beautiful in the picture, you need to use the tips for drawing it.
Step by step drawing:

 step by step image
 A simple picture of a Christmas tree
 How to draw a birch in winter with a pencil and paints?
Russian winter is invariably associated with the beauties of Russian nature, and the main symbol of Russian nature is the birch. With the help of step-by-step tips, you can draw a beautiful birch against the backdrop of a winter landscape.
 Step by step drawing of a birch
  Finished drawing: birch in a winter landscape
 How to draw a tree in winter with a pencil and paints?
In addition to birch, you can draw absolutely any tree. The main thing in the image of trees is a lush beautiful crown with many branches.

 Tree drawing step by step
 Finished drawing: winter tree
 How to draw a mountain ash in winter with a pencil and paints?
Rowan in the winter season attracts the eye with bright red berries, massively hanging down from thin branches. By drawing a mountain ash, you will complement any winter landscape, make it contrasting, interesting and unusual. Rowan can grow in a forest or city, near a house or near a stream.
 Young mountain ash: winter landscape
 Winter rowan: finished drawing
 How to draw rowan branches? Bullfinches on rowan: drawing
 How to draw a bullfinch on a branch in stages in winter?
On the branches of mountain ash, you can often find bullfinches feeding on its berries. These bright red-breasted birds are constant symbols of winter. Having drawn a bullfinch, you will decorate any drawing with a winter landscape.
Simple step-by-step drawing of a bullfinch Red-breasted bullfinch: step by step drawing
 Step by step drawing of a bullfinch for children
 Ideas for drawings with a winter girl for sketching: photo
If you do not have artistic skills, you can always draw something on paper by sketching. Choose a suitable template, overlay a sheet of paper and draw a simple pencil along the outline of the drawing. Move the finished sketch with a pencil manually and color it.
Almost always in the drawing of any landscape, a tree appears as the main or additional object, and sometimes even more than one. Before you start drawing a whole grove or even a forest, you need to learn how to draw a single tree, as well as practice drawing different types of trees.
In this tutorial, I want to demonstrate how to paint trees of different types with paints using different techniques. It is very important that the paints are of good quality. Using poor-quality paints will make it difficult for you to control the work with paint, and in general the whole process will not bring much pleasure, and the result will most likely be extremely mediocre.
So, I'll show you how to paint a winter spruce with paints, a deciduous tree, as well as a technique for painting a tree with a sponge. Let's start.
How to draw a spruce with paints
Let's start with the trunk. It shows in which direction side branches grow. Important - if you are not painting with gouache, but with watercolors, then you will need to make a preliminary sketch with a pencil and start painting from light areas, then wait until the paint dries and move on to dark details. If you don't do this, all the paint will mix and you end up with a very messy, ugly drawing. By the way, here is a detailed description of the technique of painting flowers in watercolor.
After you have finished drawing the branches, we outline the main color of the coniferous foliage of the tree. In some places the paint will be a little lighter. We draw the darkest areas in green with the addition of blue - you should get the color of a sea wave.

To add snow to spruce branches, wait for the paint to dry completely. We draw snow with white paint with the addition of a blue or blue tint.

How to draw a deciduous tree with paints
Again, we start drawing from the trunk, from which the branches are directed as shown in the image below.

Here for the foliage we will use a warmer green - you can get this color if you add a little yellow to the regular green - this way you can adjust and change the shade. The more shades of green in your drawing, the more interesting the final result will look. Shaded areas are drawn in dark green and turquoise.

Separate, strongly lit petals can be indicated in yellow. Don't forget to paint the trunk with dark and light shades of brown. Also draw earth, grass and flowers at the base of the tree.

How to draw a tree with paint and sponge
This method is especially popular with children and novice artists. It will require paper, paint and a small piece of sponge or foam rubber.
We start drawing from the trunk. With light movements, using a thin brush, draw branches.

After that, you need to dip the sponge a little in green paint and carefully leave prints on paper in the place where the crown of the tree should be located. You can practice on a draft. Adjust the amount of paint and the degree of pressure to get the best effect.
A snowball outside the window is an excellent occasion to take a brush in your hands and depict all the charm of winter-winter. Show the kids several ways to draw snowdrifts, "crystal" trees, "horned" snowflakes, fluffy animals, and let the winter "painting" bring the joy of creativity and decorate your home.
Music to create masterpieces
So, let's turn on some nice background music and… draw winter with the kids!
Draw "snow"

mtdata.ru
You can imitate snow in the picture in different ways.
Option number 1. Draw with PVA glue and semolina. Squeeze out the right amount of glue directly from the tube, if necessary, you can smear it with a brush (if you plan to cover large surfaces). Sprinkle the image with semolina. After drying, shake off the excess cereal.

www.babyblog.ru
Option number 2. Draw with salt and flour. Mix 1/2 cup of water with 1/2 cup of salt and the same amount of flour. We stir the “snow” well and draw winter!

www.bebinka.ru
Option number 3. Draw with toothpaste. Toothpaste perfectly fulfills the role of "snow" in the drawings. It can be tinted with watercolor or gouache if you want to get a color image.

Drawings with white paste on dark paper look beautiful. And they SMELL delicious!

Toothpaste has gained the greatest popularity, perhaps, because it is easily washed off, so you can draw with paste on glass. Feel free to take tubes in your hands and let's go decorate mirrors, windows and other glass surfaces in the house!
 polonsil.ru
Option number 4. Draw with shaving foam. If you mix PVA glue with shaving foam (in equal proportions), you get an excellent "snow" paint.

www.kokokokids.ru
Option number 5. Painting with salt. If you pour salt on a drawing circled with PVA glue, you get a sparkling snowball.
Drawing on crumpled paper
An unusual effect will be obtained if you draw on previously crumpled paper. The paint will remain in creases and form something like crackle.
Drawing with stencils

img4.searchmasterclass.net
Stencils make the process of drawing easier for those who "don't know how" (as it seems to him). If you use several stencils at the same time, you can get an unexpected effect.

mtdata.ru
Leaving the part of the image covered by the stencil unpainted, you can pay more attention to the background: sprinkle salt on the still wet surface, apply strokes in different directions with a hard brush, etc. Experiment!
 www.pics.ru
Several sequentially superimposed stencils and splashes. It is convenient to use an old toothbrush or a hard bristle brush for this purpose.

www.liveinternet.ru
A knitted snowflake will help create real lace on paper. Any thick paint will do: gouache, acrylic. You can use a can (spray from a short distance strictly vertically).
We draw with wax

Wax drawings look unusual. Using an ordinary (not colored) candle, draw a winter landscape, and then cover the sheet with dark paint. The image "appears" right in front of your eyes!
Who are you? Seal?

masterpodelok.com
The effect of fluffy wool will help to create a simple technique: dip a flat brush into thick paint (gouache) and apply strokes with a “poke”. Drawings with white paint always look better on a dark contrasting background. All shades of blue are perfect for winter motifs.
How to draw winter trees

www.o-children.ru
The crowns of these trees are made using a plastic bag. Dip in paint and dab in the right places - that's the whole secret of "snow caps" for trees.

cs311120.vk.me
Finger painting is great for kids. We dip the index finger in thick gouache and generously sprinkle snow on the branches!
 masterpodelok.com
Unusually beautiful snow-covered trees are obtained using a cabbage leaf. Cover a sheet of Beijing cabbage with white gouache - and voila! On a colored background, such a painting looks especially impressive.
 www.mtdesign.ru
No cabbage - no problem. Any leaves with pronounced veins will do. You can even donate your favorite ficus. The only BUT, remember that the juice of many plants is poisonous! Make sure that the child does not taste his new “brush”.

www.teddyclub.org
The trunk is a handprint. Everything else is a matter of minutes.

www.maam.ru

orangefrog.com
A favorite technique for many is blowing paint through a tube. We create “snowiness” using the fingerprints of a small artist.
 www.blogimam.com
Not everyone will guess how this charming birch grove is drawn. A resourceful artist used masking tape! Cut strips of the desired width and glue on a white sheet. Paint over the background and remove the paint. Draw characteristic "lines" so that the birches become recognizable. The moon is made in the same way. Thick paper is suitable for these purposes, the adhesive tape should not be too sticky so as not to damage the top layer of the pattern.
Draw with bubble wrap
 mtdata.ru
We apply white paint to the pimply film and apply it to the finished drawing. Here comes the snow!
 mtdata.ru
The same technique can be applied in applications.
The snowman has melted. It's a pity…

mtdata.ru
This idea is suitable for both the youngest artists and those who want to make a gift "with humor". Cut out “spare parts” for the snowman from colored paper in advance: nose, eyes, hat, twig hands, etc. Draw a melted puddle, wait for the paint to dry and glue what is left of the poor snowman. Such a drawing can be a great gift for loved ones on behalf of the baby. More ideas in our article.
Draw with palms

www.kokokokids.ru
An easy way to create a wonderfully touching Christmas card is to tell a story about funny snowmen. A whole family will turn out if, on the basis of a palm print, draw carrot noses, coal eyes, bright scarves, buttons, twig hands, and hats to your fingers.
What is there outside the window?

ic.pics.livejournal.com
What does the window look like from the street? Unusual! Invite the child to look at the window through the eyes of Santa Claus or another character who may be outside in the most severe cold.
Dear readers! Surely you have your own "winter" drawing techniques. Tell us about them in the comments.
How to draw a beautiful tree? This skill is useful if you like to draw nature, landscapes or just want to complement the background with a nice element or groups of them. You will need the ability to draw trees in the process of drawing a forest or any other natural location. In addition, trees can be stylized as a fantastic element of a futuristic or space landscape. However, you need to start small - namely, by drawing a simple, but still beautiful tree. In this tutorial I will show you how to draw a beautiful tree step by step with a pencil. As a result, we will get such a nice drawing.
For drawing you do not need exotic materials - just a simple pencil and paper. Use crayons, felt-tip pens, pencils or paints as you wish. We start drawing the tree from the trunk. We will have a fairly slender tree, pay attention to how it expands downward and upward.

Next, we need to draw a sketch of the first branches. It seems that they grow in a chaotic manner, but this is not so. In order to catch exactly how the branches of certain trees grow, watch them in nature or just look at the photo, note the common features. We should have it like this.

Now we draw side branches from the main branches, forming the general outlines of the crown of our beautiful tree. In general, you can stop at this stage if you are drawing an autumn or winter tree without foliage.

In this step we will draw the general outlines of the crown. Since our tree is located far from the observer, there is no need to detail it too much and draw each leaf. If your tree is in the foreground, then, of course, you will have to work hard and add more details and elements. This is how we've got it so far.

Now, on top of the branches, I draw the volume of foliage.

Please note that some of the leaves overlap the tree branches - this means they will need to be erased. We remove the extra lines, we get such a beautiful tree.

Outline if necessary. If you plan to paint a tree drawing using paints, then you can skip this step.
Familiarization of children with a variety of non-traditional drawing techniques stimulates the development of the child's creative abilities. Simple, original techniques are interesting for children, they provide them with complete freedom for creativity and imagination. The main thing is that everyone will be able to choose the image method that suits his taste and abilities.
When winter is angry outside the window, a blizzard is circling, frost is painting the windows with fantastic drawings, invite the children to portray this fairy tale. An ordinary tree can be drawn in different ways, using various pictorial material, both traditional and non-traditional. Coming up with children with their own interesting ways of depicting is a most useful activity! In all cases, if desired, work that has not yet dried can be sprinkled with salt (then gently shake off the excess), which will give the effect of sparkling snow. An excellent exercise for consolidating the skill of drawing straight horizontal and vertical lines is the image of a frame (it completes the work) which you can then decorate as you like.
"First snow"
Materials: ink or gouache blue and brown, a straw for cocktails or a pen without a rod, a toothbrush, a wooden stick, a brush, a jar of water, a napkin.
Progress:
- On a sheet of paper, apply a drop of rare gouache with a brush.
- Draw a tree trunk, blowing a drop through a tube.
- If necessary, we drip more gouache on the base of the branches and continue to inflate the blot “drawing” a tree of the desired height.
- Dilute blue gouache with water in a plate, dip your tooth cheek into it and place it with the villi down in relation to the paper, use a stick to spray the paint on the sheet (snow).
- Dial more paint on the toothbrush and draw snow under the tree.


 "Monotype"
Material:white paper; gouache brown, blue; a jar of water; tassel; hand napkin; glass (paper size) or tile, modeling board or plastic bag.
Progress:
- On a glass or a bag, draw the sky, trees, snow with gouache.
- Wet a sheet of paper with a large brush or foam rubber.
- Blot excess water with a tissue.
- Place a piece of paper with the wet side against the design on the glass or bag.
- Smooth over the top with a paper towel.
- Remove the printed sheet.
- Older children can draw small details on a monotype (branches, hollow, veins on the trunk).


"Snowy tree"
Material:blue paper, gouache, newspaper, hand napkin, water jar, brush.
Progress:
- Dilute white gouache to a state of sour cream.
- With a wide brush, quickly cover the palm with white gouache.
- On a piece of paper, make palm prints at the location of the tree crown.
- Roll up the bundles from the newspaper and, dipping them in a plate with diluted brown or white gouache, (you can quickly paint over one side of the bundle with a wide brush) print the trunk (and branches) of the tree.
- Print white snow around the tree with your fingers.


