
Drawings of a person's face, a portrait is the most difficult type of fine art. Learning to draw a portrait of a person correctly, even with a simple pencil, requires not only time for learning, but also talent. The complexity of drawing a portrait of a person lies in the ability to convey the emotional state of a person, his facial expressions, the depth of his gaze, etc. To do this, you need to correctly draw the eyes, accurately repeat the shape of the person's lips and other features of his face.
How to draw a portrait of a person if you have no experience? It is quite possible to learn a simple technique for drawing a person’s face on your own, but first you can try draw a person's face step by step, with a simple pencil. Perhaps not the first time, but with a strong desire, you will definitely be able to draw a real portrait of a person.
1. The overall contour of a person's face is the most important

To draw correctly portrait of a man it is important to accurately make the first contour, the contour of the face. Without pressing hard on the pencil, repeat this oval of the person's face in your drawing. You may have to draw it several times, repeating this step again. Do not spare the paper, draw until this outline is the correct shape and symmetrical. If you want to draw the same portrait as in my drawing, be patient and diligent.
2. Marking the main parts of the human face

Exactly in the center, draw a horizontal line dividing the portrait into two parts, and a little lower, another parallel line. From the center of the bottom line, draw a perpendicular line, and mark where the tip of the nose will be located on the face. When drawing these lines, do not press hard on the pencil. Don't forget to draw the ears.
3. Eyes - the main part of the portrait

Drawing a person's face in stages is simple and fun. The main thing is to accurately take the first steps. At this stage, drawing will be much easier, but you need to be extremely careful and accurate. Probably, we need to sharpen the pencil sharper, we will need to make thin lines now.
The eyes on a person's face are the most important part of a portrait. So let's start with them and start drawing this step of the portrait. With smooth, oval lines draw the eyes, but first put marks (points) for the lateral, upper and lower borders of each eye. Draw the pupils, the line of the mouth and the initial contours of the hair.
4. Draw the outlines of the eyebrows, mouth and lips

This step will be the most difficult, but after it the portrait of a person will be almost finished. First draw something that is easy to draw. Draw the eyebrows and finish drawing the outline of the hair. Now let's draw a slightly more difficult element of a person's face - lips. The lower lip is easier to draw, so let's start with it, and the upper one will be a mirror image of the lower one, only it is divided in half in the center. Do not draw too wide mouth and thick lips.
Start drawing the nose from its tip, in the form of a "tick", and two arcs along the edges. Now draw a line from the right eyebrow, with a slight deviation to the right.
Gently erase with an eraser from your human face drawing extra contour lines and look, you get a real portrait of a person.
5. Human face drawing is almost finished

If you have reached this stage and are quite satisfied with your drawing of a person, then you are a real artist and apparently you can draw a lot of other things beautifully. Starting from this step, you have earned a rest, and therefore you will not have to draw more difficult things in a portrait of a person. You will only need to draw eyebrows, eyelids on the eyes, hair and draw ears in more detail.
6. Portrait of a man. Creating shadows in a drawing

So we got a real drawing of a person’s face, it remains only to make a portrait, as real artists do. That is, add a soft simple pencil to the shadow drawing, make the picture of the face voluminous. This effect can only be achieved by creating shadows and contrasts.
On the face and hair, many areas need to be shaded with a darker and thicker light. This effect will give the face more realism and depth.
Now you know how draw a portrait person and you can try to draw a portrait from a photograph. Do not try to draw a portrait of a person "from nature", only artists can do this. If you manage to convey the main similarities and express the main feature of a person in your drawing, this is already good. And if the portrait resembles the person in the photo, you can be sure that you have a real talent.
The lesson on how to draw a portrait of a person is an addition to the lesson on how to draw a person in full growth. First draw a standing person, and then, using this lesson, you can draw in detail the person's face.
The drawing of a person's face is, first of all, the eyes. It is this element of the portrait that needs to be given the most attention. In this lesson you can learn how to draw eyes in detail.
The nose of each person has unique features, so it is impossible to give accurate advice on how to draw the nose of a girl, child or man. You can only make an abstract or as they say "academic" drawing of the nose.
If you decide to draw a person's face, it is important to achieve a similarity in the person's portrait and accurately draw any facial features. But the eyes and lips are the most important elements of a face drawing.
It is difficult to draw a ballerina, because you need to convey the grace and grace of the dancer's movements. To make it easier for you to draw a ballerina, this lesson is done step by step.
Let's try to draw a hockey player in motion step by step, with a stick and a puck. You may even be able to draw your favorite hockey player or goalkeeper.
In this lesson we learn how to draw anime comics in manga style with a pencil. Every anime fan wants to be able to draw manga, but it's not easy for everyone, since drawing a person is difficult, especially anime in motion.
The eyes of a human face drawing in anime style are the basis of this style. The eyes always have a distorted enlarged size, and the features of the person's face bear only an approximate resemblance to the person's real face.
This is one of the most difficult types of art. The physique must be studied in detail in parts. We have already considered some elements. Before you start, be sure to read these few recommendations from professional artists:
- First you need to think about the approximate location of all elements
- For sketching, take a sharpened pencil of medium hardness (I used HB and 2B, write in the comments which pencils you used), which will allow you to sketch thin lines.
- Do not erase the sketch lines until the desired result is clearly visible.
- Keep Proportions
- Note that the face has a pointed shape at the bottom and a more rounded one at the top.
- Practice! The more you train, the better you will learn to convey the necessary emotions and nuances of human facial expressions.
And now let's move on to the lesson.
How to draw a person's face step by step:
Step one. The face of this oval shape. First, make an oval and divide it with lines. The vertical line exactly in the middle crosses it, and the horizontal lines are arranged as follows. The first divides the face just below half, and the second still half from the remaining lower part of the face. We can't give exact measurements because everyone's faces are different. But the task of these lines is to outline (this is vertical), as well as the location of the lips (horizontal bottom line). Keep in mind that these will need to be erased later, so don't press too hard on the paper with the stylus. If you press hard on the paper, it will deform, and the drawing will look like a girl who is preparing for plastic surgery. (Will )  Step two. Make indicative strokes at the place where. And also add lines for , and halfway between the nose and chin. Make the line that represents the lower lip wider.
  Step three. Let's move on to drawing. They are located just above the nose. The outer edges of the nose indicate where the inner corners of the eyes will go. Make a sketch as shown in the picture. There is another important factor to consider here. Human anatomy is arranged so that the distance between the eyes is equal to the size of another eye. This is indicated by the red arrow in the figure. Now let's add the eyebrows. Tip: even if one eyebrow is raised and the eyebrows are the same height, start drawing from the inside (points closer to the nose). To get an idea of how high the brows are, add another imaginary eye above the left eye - this should give you more or less the correct height for the brows.
  Step 4 Let's add a mouth. In the previous lesson, we already covered some points. For example, we tried to depict . But there is another important point, a lot of questions from novice artists about how big should the mouth be? Draw mentally two lines from the inner corners of the eyes down. This will be the approximate size of the company, with a smile it can be a little wider.
  Step 5. Now we erase the auxiliary lines that we made in the first two steps. Let's see what we got. In principle, the sketch is ready. Now it remains to decorate, add shadows.
  Step six. Give the shape of the face more specificity. Pay attention to the cheekbones and the shape of the chin. This woman has a strong chin, but try not to make it too strong or she will turn into a man. Draw black pupils, and add eyelids. requires focus. This is the mirror of the soul.
  Look closely at the animation. You will see in what sequence it is best to do this.
 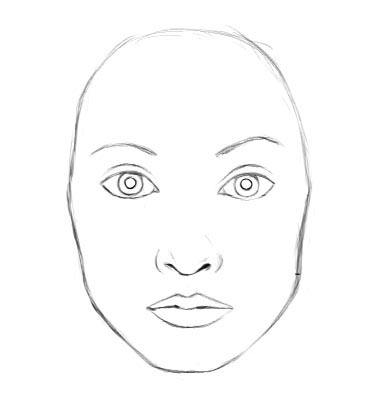 Step last. With a simple pencil, add shadows to give the drawing volume and make it more realistic. That's all. We will look at other parts of the human body in more detail in the following lessons. Leave also your work, and write comments about how, Only we have such lessons, see for yourself.
Drawing a man's face is a little easier than a girl's face. Women's faces are more graceful, without rough outlines. There is one opinion - giving a childish outline to a woman's face adds more aesthetics, for example: a sharp chin, a neat oval, lush lips, a slightly raised nose tip. Such qualities are unusual for a man and make him not so attractive and courageous.
What do aspiring artists need to know?
Remember, anyone can. Before drawing a beautiful portrait of a girl, you need to prepare, gather your thoughts, choose a photo and study it, it is advisable to try to remember it. For quality, you need the following accessories:


Before work it is very important to choose a photo. It should be of high quality, and the girl's head should be slightly turned to the side. It is difficult for beginners to draw a complex hairstyle, so you should select a photo of a girl with a simple hair shape. Chiaroscuro also matters, the light must fall correctly on the face, without excessive glare and dark areas. This is not an academic drawing, but the technique is considered no less professional.
Building a portrait of a girl
To paint a beautiful portrait you need to know the proportions of the face. Determining the proportions is not difficult, here are the basic rules:

These were the rules for constructing a face in full face. Such average proportions are considered correct.
If a 2/3 photograph is taken with the head slightly lowered, slightly different rules apply here:

The first stage of work - drawing the outline of the face
 Initially you should draw an oval of the face. There are two ways: sighting and eye. But this element must be drawn as accurately as possible. To do this, points are measured by sighting in width and height, and then approximately by eye you need to draw an oval of the girl's face. After drawing the oval the axis of the face is outlined with the help of an arcuate line, it is located slightly below the center of the eyes in the position - full face. In this way, the lines of the lips and nose are outlined.
Width proportions are also determined by the sighting method. Each element of the face is measured separately, because there is no one symmetry in width. You need to draw everything as shown in the photo. The drawing must be drawn in stages, after the lines and dots have been placed, you need to start working on the contour of the eyes. At this stage, everything is done by eye, so do not rush, drawing the lips and nose. At the end, you should outline the outline of the hair.
The second stage of work is the outline of the main parts of the face
 Eyes, nose and lips should be given expressiveness. In this case, work begins with, it is advisable to start drawing from the darkest areas. The pupil is drawn in stages, then the iris, then the transition to the eyelids is performed. The darkest pencil is used for the pupil and the edge of the iris. The white of the eye and the inner part of the iris are shaded in gray. Eyelashes, eyebrows and eyelids are drawn in the last step.
nose shape it is not recommended to mark with rough lines. For elegance, it is enough to slightly outline the line of the nose and start working on the base. The nostrils are created, they should be slightly darker than the entire shade of the nose. Next, you need to draw the tip of the nose and shade it all in gray. It would be enough.
This step creates lips. A dark line is made at the place where the lips meet. With the help of shading, the lower and upper lip are outlined. With the help of the tone, the darkest areas of the lips are created, they should not be too pale. This part of the face is slightly detailed, using gray and dark pencils.
The third stage of work - the tone of the face
 Each face has its own color and should be outlined in the portrait. This is done using hatching with soft pencils so that the tone is not too dark, it is recommended to use a 6B pencil. It is important to remember that the strokes are not applied randomly, but in a certain direction according to the shape of the skin. The strokes should be as close as possible to each other, without gaps.
No pressure on the pencil, it is enough to hold it at the level of a light touch on a sheet of paper. Work begins with the lower part of the face - the chin; then slowly move up. The first layer of hatching is applied, it should be uniform. For a high-quality tone, at least two leveling layers should be applied to hide defects.
After the basic tone has been done, it is necessary to start shading to hide some of the rough details. For this purpose, a dense fabric with a small pile is used. The strokes are shaded with neat and smooth movements. After several times, you need to turn the matter over to the clean side so as not to cover up the drawing. For realism, a shadow is applied to the tone substrate.
The fourth stage of work - drawing hair
 As mentioned above, to begin with, a simple hairstyle is selected without expressive complex strands. With the help of hatching, the basis of the hair color is set. Hair should be slightly darker than the main tone of the face, but in the event that the girl is a brunette. Blond hair is much more difficult to draw. A pencil with a softness of 6B is used.
To simplify the task The work can be divided into 3 stages: 1 - the main hair color and the shape of the strands are outlined, 2 - a shadow, 3 - detailing. To achieve high-quality drawn hair, you need to hatch in the direction of hair growth. After this step, the hair is shaded. You should get a gray hair color with their imitation.
At this step, a shadow is cast, but with a smooth transition to light areas. A 7B pencil is taken and dark areas are hatched. For the final effect of realism, you need to draw strands, highlights and perform the final correction. Highlights are made using an eraser, for ease of use, you can give it the desired shape. You need to draw in stages, without jumping between certain levels.
How to draw a person's face with a pencil step by step
How to draw a person's face with a pencil
One of the most difficult types of art is the image of a person. The physique must be studied in detail in parts. We have already considered some elements.
Before you start, be sure to read these few recommendations from professional artists:
First you need to think about the approximate location of all elements
For sketching, take a sharpened pencil of medium hardness (I used HB and 2B, write in the comments which pencils you used), which will allow you to sketch thin lines.
Do not erase the sketch lines until the desired result is clearly visible.
Keep Proportions
Note that the face has a pointed shape at the bottom and a more rounded one at the top.
Practice! The more you train, the better you will learn to convey the necessary emotions and nuances of human facial expressions.
And now let's move on to the lesson.
How to draw a person's face step by step:
Step one. The face of this girl is oval. First, make an oval and divide it with lines. The vertical line exactly in the middle crosses it, and the horizontal lines are arranged as follows. The first divides the face just below half, and the second still half from the remaining lower part of the face. We can't give exact measurements because everyone's faces are different.
But the task of these lines is to outline the approximate location of the nose (this is vertical), as well as the location of the eyes and lips (horizontal bottom line). Keep in mind that these will need to be erased later, so don't press too hard on the paper with the stylus.
If you press hard on the paper, it will deform, and the drawing will look like a girl who is preparing for plastic surgery. (Will be "beautiful" like a gargoyle)
Step two. Make indicative strokes on the place where the nose will be located. And also add lines for the mouth, and halfway between the nose and chin. Make the line that represents the lower lip wider.
Step three. Let's move on to drawing the eyes. They are located just above the nose. The outer edges of the nose indicate where the inner corners of the eyes will go. Make a sketch as shown in the picture. There is another important factor to consider here.
Human anatomy is arranged so that the distance between the eyes is equal to the size of another eye. This is indicated by the red arrow in the figure.
Now let's add the eyebrows.
Tip: even if one eyebrow is raised and the eyebrows are the same height, start drawing from the inside (points closer to the nose). To get an idea of how high the brows are, add another imaginary eye above the left eye - this should give you more or less the correct height for the brows.
Step 4 Let's add a mouth. In the previous lesson, we already covered some points. For example, we tried to depict the lips of a person. But there is one more important point, a lot of questions from novice artists about how big the mouth should be? Draw mentally two lines from the inner corners of the eyes down. This will be the approximate size of the company, with a smile it can be a little wider.

Step 5. Now we erase the auxiliary lines that we made in the first two steps. Let's see what we got. In principle, the sketch is ready. Now it remains to decorate, add shadows.

Step six. Give the shape of the face more specificity. Pay attention to the cheekbones and the shape of the chin. This woman has a strong chin, but try not to make it too strong or she will turn into a man. Draw black pupils, and add eyelids.
Drawing eyes requires concentration. This is the mirror of the soul.
In childhood, everyone picked up a pencil and tried to draw themselves, their loved ones and their entire environment. Over the years, the desire to draw disappears, only some continue to draw, acquire skills, learn different techniques of fine art and become artists. The passion to draw sometimes arises among those who abandoned their childhood hobby. They wonder: "How to draw a person's face?" Having made several unsuccessful attempts, they give up this occupation, but in vain. In fact, most people can learn to draw. The easiest way to start self-study is with a landscape, you can always tell others that I saw this field this way (mountains, forest, river, sea, etc.). The attitude to portraiture is more strict, any mistake in the image of the face is immediately evident.
Where to begin
Each face is individual, but there are basic principles that can be used to draw it on paper. The general contour can be rounded, oval, triangular, rectangular. The first step is to decide on the type of face. Then you should pay attention to the proportions: height and width. Having made an outline of the top and bottom, as well as the right and left edges, we draw a person's face, depicting an oval. Now we need the proportions of the location of other parts of the face. Eyes, eyebrows, nose, mouth, chin are individual, and their location should be copied as accurately as possible from the original.

Eyes as a mirror of the soul
Round, narrow, slanting, close-set, widely spaced, surprised, joyful, dejected, admiring, disappointed - these are all eyes. They remain the same for their owner and at the same time change depending on the mood and situation. How to draw a human face and expressive eyes? Their very fit on the face makes the portrait recognizable. It is important to know how to place them. Having chosen proportions, the centers where the pupils will be located are determined. Eyelids will be drawn around. They are also different, in young people and children there are no folds, in a person with a long life path, wrinkles scatter in different directions. They are also an integral part of the look. By drawing eyes, you can draw a person's face that will be recognized. All other parts of the face are important, but even without them, the portrait becomes similar to the prototype.

Draw the nose
Nose "potato" or aquiline profile, straight or with a slight hump, with wide or narrow wings, Greek or Roman profile - all these concepts refer to the shape of the nose. Any mistake in proportion can cost a lot. Let the nose match the model, but by depicting it more and less, the artist will not achieve similarity. Some portrait painters especially note the size and proportions of the nose when answering the question: "How to draw a person's face?" By drawing a dimensional grid, you can achieve a perfect match between the real and the painted nose.

How to draw a mouth
Many argue that character is reflected in the eyes, but they are wrong. Skillful artists can give the eyes any expression, making a wise man out of a limited person. But the mouth betrays the human essence. A small tightly compressed mouth with thin lips or a wide slightly open mouth with thick lips will give completely different information about the owner. A smile or a rueful smirk will let you judge the mood. Lips and mouth are the external manifestation of the essence of each person. Even twins with complete similarity often differ in the type of mouth. The leader has more pronounced features, the second twin is only a reflection of the first, and his mouth will indicate that he is the follower in this pair. When drawing a mouth, you should first apply only thin strokes. Later, the artist's hand, bypassing complex reflections, will itself give the necessary details. The main thing is to start drawing, and then the mental exchange between the model and the artist will work.

General contours of the face
How to draw a person's face, showing his attitude to reality? The contours of the face with sharp or light shadows will give the desired status, reflect the character of the prototype. They are very different in real life as well. There are women with masculine faces, and there are also men with mustaches and beards who have retained much of the feminine in their appearance. The general contours of the face are responsible for the life position drawn in the portrait. In the photograph, the facial features of a person are not so expressive, only the artist can convey the actual vision of the person he is drawing.
To answer the question for yourself: “How to draw a person’s face?” - once you start drawing, you need to continue this hobby. All people see the same thing, but only the artist is given the opportunity to show everyone else how he sees it all. Painting differs from photography in that the artist paints the world, which he spied with his own eyes and conveyed it in the form of a work of art.


