, Blue , White , Acrylic Art Blue PhC , Cobalt Green Dark , Yellow Medium , Acrylic Hobby De Luxe Egyptian Papyrus ;
Tools: paraffin; sandpaper; ruler; chalk; synthetic brushes round and wide flat; palette.
Step 1. Surface preparation.
We cover all surfaces of the wooden blank of the box with acrylic primer using a wide synthetic brush. We dry.


Step 2. Scuffs.
We cover all the edges with brown Acrylic-Hobby paint and, after drying, rub it with paraffin.


Step 3. Primary colors, background.
We paint the lid of the box in "Acrylic-Hobby" Blue, the rest - in the color "Acrylic-Hobby De Luxe" Egyptian papyrus.


Step 4. Painting.
Drawing a hydrangea is easy. We start with the shape of the inflorescence. With a thick layer of paint, draw an uneven oval. Left side "Acryl-Art" Blue FTS, right side - "Acryl-Hobby" Blue.


To the right edge we make a lighter shade, adding a little white to the blue.

Without waiting for the paints to dry on the surface of the box, we collect only white color on a round synthetic brush. And we begin to fill the circle, starting from the edge of the light side, with flowers of four petals. Each petal stroke is created by moving the brush from the edge to the core of the flower.


We work quickly, in the process of drawing the petals, the paint from the brush gradually mixes with the background and we get beautiful stains. Moving towards the middle, towards the dark shades of the background, add Blue on the brush to the Acryl-Hobby white, and as you approach the darkest edge of the circle - Blue FC. This will give volume to the hydrangea inflorescence. We draw all the flowers and leave to dry.
A hair dryer cannot be used in this case, since we used paraffin to separate the paint layers.


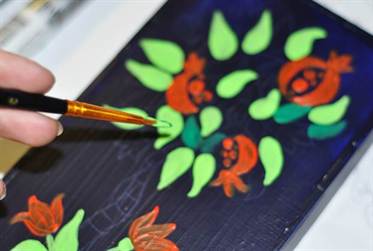
Step 5. Greens.
We collect green (Cobalt Green Dark) and yellow (Yellow Medium) paint on a round brush at the same time.


We draw the leaves in arcs, from the edge to the middle of the leaf, reducing the radius with each stroke.


Step 6. The pattern on the lid.
Using chalk and a ruler, mark the lid of the box. First, we draw lines diagonally, then we draw lines at an equal distance from each other parallel to the previous ones. We get a grid.


We collect a little white paint on a thin brush and draw a pattern, step by step following the scheme:


Circuit sketch for repetition:

Step 7. Scuffs.
We process all the edges of the box with sandpaper. Thus, we get scuffs and emphasize the shape of the box.


If desired, you can paint the inner walls with paint or decorate in any other way.


Step 8. Varnishing.
We cover the entire box with several layers of finishing varnish. We dry.


Step 9
With a glass outline or gold paint, we designate the cores of hydrangea flowers and in the center of each rhombus in the pattern on the lid. We dry.


The box with painted hydrangeas, complemented by a pattern and scuffs, is ready.


Artist: Anna Sebilkova
Beginners in decorative art should pay attention to painting boxes with their own hands. The master class will help you prepare the necessary materials, as well as tell you how to decorate the box using different painting techniques.
What is necessary
Caskets are traditionally made of wood. Finding a wooden box for painting is not difficult: in modern hobby stores, you can pick up blanks of rectangular and round boxes of different sizes. You can also adapt any wooden boxes with a lid that look like boxes.
The painting is usually done with acrylic paints for wooden surfaces. They apply well, hold color and dry fairly quickly. A set of paints can be bought at any art supply store. You will also need natural or synthetic soft brushes of various sizes and shapes.

To obtain lacquer boxes, it is necessary to cover the finished painting with varnish in one or more layers. It is worth noting that wooden products are covered with a glossy varnish exclusively for wooden surfaces, for example, parquet or furniture. As a rule, it is made on a water basis, has no color and smell. The varnish will not only protect the painting and the box, but also give it a pleasant shine and smoothness.

Let's start creating
Consider what kind of painting and how can be done on a wooden box.
You can paint the box in different ways, using various techniques: from free painting to folk traditional styles. Painting and painting can be supplemented with "aging", decoupage or all kinds of accessories.


Before proceeding with the direct painting and decoration of the box, you should process the blank or wooden box and prepare it for painting. To do this, follow these steps:
- Sand the surface of the future box so that it is completely smooth, without roughness and burrs;
- Prime the product with acrylic primer from the outside and from the inside (several layers can be used) and dry.


The primer is needed for a more even and bright paint application. If the workpiece is sufficiently even, smooth and white, then you can skip this step. It is also possible not to primer if it is initially planned to make a dark general background.
Perhaps one of the simplest, but at the same time time-consuming techniques is dot painting. It is done with contour paints. The essence of the technique is to fill the drawing with multi-colored dots. The most suitable images for this painting are complex patterns and ornaments that are applied on a stencil or template.


Artistic painting is done by hand on a free theme and can contain any plots and elements. If we are talking about a box, then most often it depicts flowers, leaves, berries, birds (you can use stencils and templates). However, sophisticated craftsmen can give free rein to their imagination and depict everything their heart desires on a small box format.


Do not forget that there are different styles of folk painting. Dowry boxes and chests were decorated with simple ornaments as far back as the Middle Ages. Each locality had its own tradition of painting wooden utensils and utensils. Many types of painting that have survived to this day can be considered a cultural heritage.

Traditions from the people
What kind of folk painting can decorate the box?
The painting from the Palekh area (Vladimir province) is perhaps the most recognizable. Not only caskets, but also brooches, trays, dishes, etc. were decorated with such paintings. The main feature is careful detailing and drawing, while the format for painting is usually small. Frequent plots are illustrations of everyday life and fairy tales.

Palekh painting usually done with tempera paints on a black background. The predominant colors are green, yellow, red. On the sides, as a rule, the box is decorated with gilded ornaments.

Gorodets painting decorates boxes with birds, flowers and whole plots. The painting can be recognized by its bright colors, rounded colors, and frequent depictions of horses and people.


To make such a painting is easy even for a beginner. It is enough to use templates:


Khokhloma painting it is best to decorate round and large caskets, since Khokhloma is lush flowers, berries and birds, as well as bizarre curled patterns and ornaments.

To make such a painting is quite simple. Using Khokhloma as an example, consider how to paint a box.
First you need to prepare:
- wooden blank;
- multi-colored acrylic (red, black, green, yellow, white);
- a jar of golden or bronze paint for the background;
- brushes (wide, thin);
- masking tape;
- ready-made template or sketch;
- tracing paper and pencil;
- varnish and brush.

Progress:
- Cover the prepared workpiece with golden paint and allow to dry;

- Transfer the main elements (large details) of the Khokhloma pattern to tracing paper;

- Fix the tracing paper on the lid of the box and circle the pattern with a little pressure (there should be a trace as in the photo);


- Outline the drawing with black paint using a thin brush;

- Seal the edges of the cover with masking tape, indicating an equilateral frame, and paint over the background of the picture with black;


The most magical and incredible time is the procedure for receiving a gift. The mystery, the hope to receive the secret and the festivity of everything that happens makes any person experience intimate moments from childhood, when all dreams were shattered by a wave of the parents' hand. How to draw a gift so that it differs from a regular box or parcel? Easily. It is enough to add a beautiful wrapper and a large, colorful bow to it.
Black and white side view example
Let's now figure out in detail how to draw a gift box. Let's start with the box. We draw a rectangle. This will be the box itself. We place a lying rectangle on it, but its height should be small, and the length should be greater than the length of the bottom one. Now in the foreground vertically draw a strip of tape. From above we attach a bow, which consists of two semicircles and two ends of the ribbon.

We direct the drawing with a bolder pencil or felt-tip pen.

Erase the guide lines. Present box is ready.
Second option
Let's slightly change the configuration of the product and consider how to draw a gift with a pencil. We recall geometric shapes and draw a three-dimensional brick.
On the front and sides we make a strip of wrapping tape. From above, they should cross at a right angle. At this point, we make six turns in the form of ovals.

We guide all the lines with a bold felt-tip pen.

Shade the box with a blue pencil and add blue round polka dots to its entire surface. We paint over the tape itself in red. To add realism to the work, draw a shadow behind the box with a black pencil.
green gift
Now let's unfold the box and look at it from the end. So, how easy it is to draw a gift. In the foreground is the edge of the box. From it we draw two rectangles to the left and right sides. Above. Retreating a little from the border, we draw another line parallel to the top. This will be the border of the lid. We draw a straight line from the edge diagonally, which will end on the opposite edge. Draw another diagonal on the sides. It turns out a box.

On the lid in the area of the cross we make a large bow.

We select with a felt-tip pen all the necessary zones, leaving undrawn parts, areas on the strip.

Erase the guide lines.

We make the box green. And the bow and ribbon are red. An excellent and high-quality present is ready.
Half a turn
If the three previous options could not be mastered perfectly, then you should proceed to this step-by-step master class. We analyze in detail how to draw a gift in stages. We arrange the box so that in the foreground there is not only an edge, but also a little edge. We make two rectangles of different sizes, draw a part of the lid on them.

Add the top rectangle and wrap the gift in a ribbon. Attach a bow on top.

It remains to paint it. We make the side faces pink, and the upper part of the box - light pink. We paint over the tape in a yellow tint.

The final touch: add a shadow in the form of a dark stripe under the lid, and make white polka dots over the entire area of the box.
Drawing with children
The last option is a group of such presentations. Consider how to draw a gift for a child. We make a low but wide box with hearts on the front side. From above we cling a bow.
Behind this box we draw a narrow but high one with circles on the front face. Draw a bow on top.

In the background we make the box bigger and taller. On the front face, draw oblique lines.

It remains to paint them in bright colors at your discretion.
Such a bright decor will allow you to somewhat decorate a modest package design. The more interesting and mysterious the shape and size, the more fun it is for the birthday boy to guess the contents. Often a small but very expensive present can be packed in a large number of different bags, boxes and other containers. As a result, the holiday turns out to be really exciting and exciting.
Every novice artist often thinks about how to draw the desired object easier and faster. The article shows how to draw two similar objects step by step: a box of matches and an open cardboard packaging box.
How to draw a box
A box is a small box for matches, most often small in size, with an obligatory strip on the sides for lighting matches. To draw it, you need to remember the school geometry course. The box is an ordinary parallelogram figure created from two equal parallelepipeds connected by vertical lines.
- Step 1. In a simple way, then all the faces of the box are rectangles, slightly flattened at the corners to give perspective and realism to the image, in geometry they were called parallelepipeds. Therefore, in order to draw boxes, you need to draw such a parallelepiped. The box in the figure will be open, so we divide the figure into two unequal parts. The part that turned out to be larger will be the body of the box, and the smaller part will be its sliding box:
- Step 2. Then you need to make a three-dimensional rectangle from a flat rectangle, for this you need to finish the remaining faces. The lower similar rectangle is located at a small distance from the upper one, and some of its faces are invisible, so they are not displayed in the picture. However, all internal and external edges that are visible to the eye should be clearly visible in the figure. All lines from the top surface of the box to the bottom should be strictly vertical, and the rest of the lines should be parallel to each other.
- Step 3. Inside the box we outline the matches. It is desirable that they be the same size, and it is easiest to draw when the matches fit snugly together. Then we draw and color the heads of matches. We paint over the side of the box completely, since there is a rough layer for lighting matches. And the boxes take on real sizes and shapes. As you can see, drawing boxes is not so difficult.

- Step 4. Finally, we add some shadows, come up with an inscription, and we get a fairly realistic box of matches.

How to draw a box with a pencil. Step-by-step instruction.
A box is a soft box for storing various items. Most often it is made of cardboard, fabric or plastic. The box weighs much less than the box. However, the main difference between these containers is the ability to fold the box when it is not needed and reassemble it if necessary, while the box cannot change its shape and takes up a lot of space when empty.
Similarly, a box of matches can be drawn and an ordinary cardboard box. Consider how to draw a box with a pencil step by step.
- Step 1. The beginning of the box image is the same as in the case of the box of matches: it is a rectangular shape with the corners slightly modified to show the fullest perspective.

- Step 2. Next, you need to finish the side sheets of the box with which it is closed during packaging, the dimensions of the sidewalls coincide with the dimensions of the faces, and their height is significantly lower so that the box can be conveniently packed. Consider how to draw an open box.

- Step 3 Let's remember the geometry again. The next step is to remove extra lines that cannot be seen by the eye when looking at the actual box.

- Step 4 And finally, add some shadow with hatching to give visual volume and realism to our image.
What is the best way to apply hatching to a drawing?
- Strokes should be applied with soft, gentle movements.
- At the end of each stroke there should be no curvature and curls.
- Strokes should be very similar to each other visually in length and thickness.
- Different pressure on the pencil is not allowed when drawing hatching on one side.

You can lightly rub the drawing with the pad of your finger, and then the shading will smooth out, and the box will turn out to be less angular and visually softer.

Little tricks
- For drawing, it is better to take a soft pencil marked M or 2M.
- The eraser is also better to use more often than less often.
- It is better to choose an eraser for softness and quality of pencil removal, and not for appearance.
- Never use an eraser on the end of pencils. Most often they spoil the paper and the drawing does not look so neat.
The box is a useful item for storing other things. In most cases, these are jewelry. For some, jewelry is gold and diamonds, while for others, letters from a loved one and photographs of old friends who have long been no longer with us. People have always been and will be sentimental about such things, so they created special places to store memories. After such a lyrical introduction, I now have to teach you how to draw a box with a pencil. In my example, it is wooden, but there are other modifications, from different available materials. I guess your grandparents also have a wooden box. Do you have?
How to draw a box with a pencil step by step
Step one. I draw a parallelepiped and another rectangle next to it. The first will then turn into a box, and the second into a lid for the box.  Step two. Both of these items are connected using a simple metal mechanism that is used in doors, windows and any opening items.
  Step three. I add a chain and outline the contours of the box.
  Step four. There is always a shadow inside the box. The deeper, more capacious the box, the darker its inside will be. Here's how to add shadows to the box:
  Let's draw some more, shall we? I advise you to draw now.


