Spruce? It is very difficult to find a person who has never painted this tree in his life. But if you do not know how it is done, our article will teach you this simple matter.
Spruce - a symbol of the holiday!
Spruce - this is which everyone associates with the holiday, the New Year! This evergreen coniferous beauty for children becomes a real green fairy, delighting them on the morning of January 1 with gifts hidden under the branches. Does your child ask you to draw a Christmas tree? Or maybe you need to make some composition with her for a children's party or a matinee in the garden?
We will be happy to provide you with some simple master classes that will teach you how to draw a fir tree step by step.
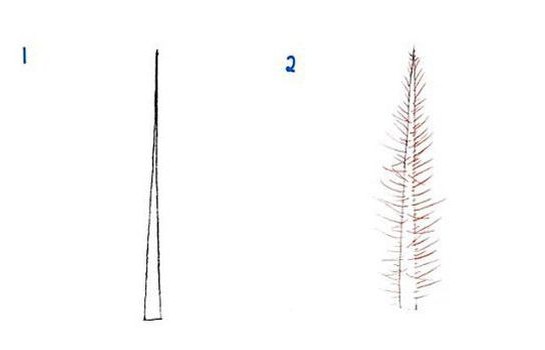
Method number 1: top to bottom
The first method, which we will consider in our article, will be based on drawing a tree from its top. Learn to draw such a spruce. And then it will not be difficult for you to create a whole forest on a piece of paper!
So, how to draw a fir tree, starting from its top? Everything is very simple!

Method number 2: from the bottom up
The first way of depicting spruce is not bad, but, you see, it is much more convenient to draw from the bottom up, and not vice versa. This makes it much easier to adjust and plan the height of the tree.
How to draw a fir tree from bottom to top? Now let's show!

Method #3: Easy!
How to draw a fir tree in the simplest and most unpretentious way? We know it and will definitely share it with you. With this method, even a small child can draw a Christmas tree.
How to draw a spruce branch
But what if you don’t need the whole tree, but need, for example, only one of its branches? Well, we'll tell you about that too. Arm yourself with pencil and paper, let's get started!

The drawing is ready!

Now you know how to draw a spruce branch yourself. You can even teach it to your child, for example.
Using the methods described above, you can draw a branch of a coniferous tree or the spruce itself with a pencil, felt-tip pens and even paints. The tool in this case does not really matter. Draw, create yourself and with your children.
New, interesting master classes will tell you step by step and in detail how to draw a Christmas tree with a pencil, watercolor or gouache paints. Following these tips, not only a schoolboy with some artistic experience, but also a child from a kindergarten who is just starting to master the bright and colorful science of painting can easily learn to portray a New Year's beauty. A Christmas tree drawn by a kid for the New Year 2018 will be an excellent decoration for a playroom, a school class or a living room in a home apartment and will create a pleasant, joyful, festive and optimistic atmosphere in the room in advance.
How to draw a Christmas tree with a pencil easily and beautifully - a step-by-step master class for beginners
A very easy and affordable master class with step-by-step photos will tell novice artists how to draw a beautiful Christmas tree with a pencil. If you strictly follow the advice and correctly perform each action, the work will not take much time, and the finished result will delight you with a pleasant appearance and create a festive mood in your soul.

Necessary materials for a beautiful do-it-yourself Christmas tree drawing with a pencil
- sheet of A4 paper
- simple pencil
- ruler
- eraser
- a set of colored pencils (optional)
Step-by-step instructions on how to easily, quickly and beautifully draw a Christmas tree with a pencil for a beginner

How to draw a Christmas tree with paints for beginners - a lesson in stages in watercolor

A step-by-step lesson will help novice painters to paint with watercolors a luxurious forest beauty - a Christmas tree. Creating an image will take time, accuracy and a well-lit workplace. The picture will turn out realistic and will look impressive and attractive.
Necessary materials for creating a Christmas tree pattern with watercolors
- landscape paper for drawing
- watercolor paints
- set of brushes
- simple pencil
- eraser
Step-by-step instructions for beginners to paint a Christmas tree in watercolor

A lesson on how to draw a Christmas tree with gouache garlands in stages for a child in kindergarten

Following the recommendations of this step-by-step lesson, even a child who does not have a pronounced talent as an artist can quickly draw a Christmas tree with a garland in kindergarten. The originality of the work lies in the fact that the kids are invited to make the base of the tree not with a brush, but with their hands, previously dipped in bright green paint. There is no need to worry about children getting dirty. Gouache is easily washed off both hands and face with ordinary water and does not require the use of aggressive solvent components.
Necessary materials for a phased drawing of a Christmas tree with gouache paints for kindergarten
- landscape thick paper
- gouache paint set
- brushes
Step-by-step instructions on how to draw a gouache Christmas tree with garlands for a child in kindergarten
- In a small wide plate, dilute green gouache paint. Dip the palm of your hand and attach it to a sheet of paper located vertically. Put the first print approximately in the center from the top. Under it, make a row of two prints, then three and the final one of four. In this way, the total area of \u200b\u200bthe crown of the tree will be made.
- When the paint dries, take a thin brush and draw several tiers of garlands. Draw it in the form of small multi-colored balls arranged in horizontal rows on top of spruce needles.
- Add a star on top, and paint New Year's toys of various shapes on the branches.
- At the bottom, paint over the base of the tree in a dark brown tone, and next to depict New Year's gifts in the form of small boxes with bows.
- When the picture is completely dry, fasten it with buttons to a thick cardboard base and hang it on the wall.
How to draw a Christmas tree with toys step by step to school

At school, children regularly attend drawing classes and easily cope with larger genre images. Therefore, it will not be difficult for them to draw a Christmas tree with toys in the picturesque setting of a fairy forest. A detailed step-by-step master class will be an excellent adviser in creating a spectacular New Year's picture.
Necessary materials for drawing a Christmas tree with toys for school
- paper
- simple pencil
- eraser
- paint set
- brushes
Step-by-step instructions on how to beautifully depict a Christmas tree with toys for the New Year
- With a simple pencil, without pressing too hard, make a preliminary sketch. Mark the location of a wooden house made of timber on the left side of the picture, draw a background in the form of a forest on the right, and draw a lake and a Christmas tree outline in the foreground.
- Ultramarine-blue tones cover the sky in the background. Towards the edges, make it darker, and closer to the outline of the house and trees, slightly loosen the color to make it more contrasting. Try to make the transition from shadow to light smooth and blurry.
- Pay attention to the forest in the distance and with a thinner brush outline brighter silhouettes of trees over the dried sky.
- To tint the house, use brown ocher. Paint over each beam with a golden-red color, and add darker stripes below to give relief and volume. Draw straight black lines between the logs. Mark the intersections of the beam with brown circles.
- Work out the frames on the windows in brown, make the glass bright yellow (luminous from the inside), paint the shutters in contrasting colors, for example, red and green.
- Walk along the dried background in a grayish-blue tone, adding the silhouettes of trees in the snow.
- Take up the foreground, depicting snowdrifts and a frozen lake in front of the house.
- Cover the Christmas tree with different shades of green paint to make it voluminous and realistic. In some places, add a few strokes of brown, revealing the trunk in this way.
- Then “decorate” the tree with balls of bright colors, arrange them randomly along all the branches of the New Year tree.
- At the final stage, draw smoke coming from the chimney and a small bush in the snow near the lake. If you want to arrange the work in a frame.
 How to learn to draw portraits?
 DIY New Year's card for the year of the Monkey 2016
Drawing master class for children 4-5 years old "Herringbone"
Author: Ostanina Victoria Alexandrovna, educator of MDOU DS KV "Rainbow" SP "Silver Hoof"
Description: Let's draw! This master class gives you the opportunity to take gouache, brushes and start painting! And what do we especially want to draw on the eve of the wonderful holiday of the new year? Of course the Christmas tree! But what if you can’t draw very well, but really want to? I offer you a very easy and simple way to draw: the poke method. Don't be afraid to try, start drawing!
Purpose: The master class provides a wonderful opportunity to teach children how to draw a Christmas tree. Each educator, primary school teacher can safely introduce drawing using the “poke” method into his work. And caring parents can draw small Christmas trees and large spruces together with their children!
materials: white sheet of paper, gouache, brushes, glass of water, cloth napkin.

Progress:
Soon, soon will come to us
Bright holiday New Year!
We will dream with you
And gifts to choose!
To make the holiday brighter
I didn't forget about the tree!
Here are toys with tinsel
We hung with you!
May the good Santa Claus
Our magician red nose!
All the guys in order
Handing out chocolate!
That's probably exactly what every boy and every girl dreams of on New Year's Eve. We want the holiday to come to us as soon as possible! And what is needed for this? We need a tree! And the trees grow in the forest!

Reminds me of my childhood! In the early bright morning, my grandfather and I always went to the forest for a Christmas tree. We tried to choose the most beautiful!

And they dressed her up at home. Everyone tried to choose the most beautiful and favorite toy and tried to hang it on the most visible
place! Here we have such a beauty.

I would like to say in the words of Elena Ilyina:
"Look
In the door crack -
You'll see
Our tree.
Our tree
High
Gets
Up to the ceiling.
And on her
Hanging toys -
From stand
To the top…”
But now in our modern developing world, you don’t have to go into the forest, you just have to stand on a chair and get a magic box from the closet in which an artificial Christmas tree is stored.

And now the toys...

Now we decorate the Christmas tree.

And no hike in the woods, no magic. But you can make the world brighter without destroying a single Christmas tree! How, you ask? Just! You need to plant a Christmas tree under your window! And dress her up every year!

And I suggest you draw a forest beauty. Make it easy and simple! I propose to use a simple drawing method for work - the “poke” method.
Basic rules for drawing using the poke method:
1. Draw with a hard semi-dry brush. This means that we do not dip the brush into the water before setting the gouache on the brush.
2. After washing off the paint from the brush, it is necessary to blot the brush on a cloth. This is necessary to keep the brush semi-dry.
3. To draw a picture, we do not apply it with traditional strokes, but we poke it into a sheet of paper, holding the brush vertically. Hence the name - the "poke" method.
4. After setting the paint on the brush, the first “poke” should be done on a spare sheet of paper, as this will allow the drawing to be more evenly colored. The first "poke" always leaves a brighter trace, which is not always necessary in work.
5. When drawing a large object, such as the body of an animal, it is important to first go along the contour, and then proceed to fill in the middle.
Once you understand the basic rules, you can get started.
We draw a Christmas tree:
1. Let's start with the image of the trunk of the Christmas tree. To do this, we need a brush number 3 protein.
First, draw the trunk itself. We make the crown thinner, and to the bottom of the trunk we make a thickening, applying strokes close to each other. I start each stroke from the crown and smoothly lead to the very bottom, spreading to the sides. Now we draw branches - small semi-arcs, starting from the trunk and spreading to the sides.

2. Now we draw needles. We do it in an unusual and interesting way - by the “poke” method. Let's not forget the rules.
We start work from the base of the branch.

And so we continue to the very end. And so on each side of the branch, making it fluffier with each “poke”.

3. We do the same with each branch. First, on one side of the tree,

Then the second side, trying to make parallel branches the same.

4. Now, with darker gouache, add bright colors to the bottom of each branch.

5. Each Christmas tree in the winter forest falls under the snowfall, and snowflakes and even a lot of fluffy snow remain on its paws. That's it for this we need white gouache and a hard semi-dry brush. Again, using the “poke” method, draw fluffy snow on top of each branch.

The Christmas tree is ready. Let's make a frame. To do this, we will use blue gouache and draw a frame using the “poke” method. By placing the "pokes" tightly to each other right near the edge of the sheet. Try not to rush to make the frame dense and bright. Now our Christmas tree is ready.

It will become a worthy decoration of our house on the eve of the most beloved holiday by all children.

Whatever place we find her, she will definitely please us!

Even a child can draw such a Christmas tree. This is how I saw and drew a Christmas tree Vanya, 5 years old.

You can decorate our Christmas tree by hanging painted tinsel and balls on it.

Or draw a whole forest.

Show your imagination. Don't be afraid to experiment!
If you ask any child which of the holidays is his favorite, then, without a doubt, any kid will answer you: “This is the New Year!” New Year is one of the most famous and favorite holidays for both children and adults! We are all waiting for a miracle from New Year's Eve, some kind of magic, we believe that everything will change. What about gifts? What could be more exciting than this? The New Year comes to us with snow, with cold weather, everywhere you can smell the smell of tangerines and Christmas tree needles. Today we will learn how to draw a mandatory attribute of this holiday - a New Year tree with gifts! Someone in the house puts a live Christmas tree, spruce or pine. And someone, in order to save living trees, prefers artificial Christmas trees, which are currently very similar to natural ones. Drawing a Christmas tree is not at all difficult. Just follow our tips, carefully look at the pictures and get to work.
Stage 1. With the help of a ruler, we will draw auxiliary lines for our future Christmas tree. One vertical and two horizontal ones - shorter at the top, where the very top of the tree will be, and longer at the bottom, where its base will be.

Stage 2. Now let's start drawing the outline of our forest beauty. Stepping back a little from the upper horizontal line, we begin to mark the branches of the Christmas tree on both sides of the vertical. We try to arrange them neatly, symmetrically, so that our Christmas tree is ultimately beautiful and fluffy. This will be like the back layer of branches.

Stage 3. Now we will draw the front layer of the Christmas tree paws. We place it ahead of the previous one. These branches, as it were, overlap the back layer of branches and make our Christmas tree even more fluffy and sprawling. Don't forget to mark the top of the tree by sharpening it along a vertical line.

Stage 4. We place Christmas decorations on the branches of our Christmas tree - balls of different sizes. Just draw circles of different diameters on the branches. It is necessary to arrange these toys evenly throughout the Christmas tree so that there are no empty areas left and our Christmas tree is beautiful and elegant. Below, under the tree, you need to draw gifts for the kids. Gifts are wrapped boxes containing various items that children want to receive for the holiday. They are drawn like this. Mark a vertical line with a ruler and two oblique lines extending from it at a certain angle at the top. Then connect them together. It turns out the figure of a cube. On the sides of the sides of these cubes we draw lines of future bows with which the boxes are tied up.

Stage 5. Now at the top of our Christmas tree we draw a star. She is five-pointed. In order to draw it even, you can also use a ruler. The main stages of drawing a star have already been given. Below, we will draw a trunk of a Christmas tree, decorate it with a large bow. The bow consists of two identical parts, which we place symmetrically on both sides. We also decorate the upper faces of gift boxes with large tied bows like roses or flowers. We draw everything with smooth lines. The edges of the bows descend onto the boxes.

Stage 6. Now you can shade the boxes a little, give them a certain flavor. We also designate stripes on the bow around the trunk.

Stage 7. Finally, let's start decorating the Christmas tree. Naturally, the Christmas tree is only green in different shades. The trunk is brown or grey. We make the balls on it multi-colored. The star can be red, yellow, blue. Gift boxes - according to your taste and desire. Look what a beautiful Christmas tree we have! More like New Years!


