Tree leaves are perhaps the most beautiful of natural decorations. That is why, leaves can often be seen in the paintings of various artists - from beginners to professionals. If you don't know how to draw leaves yet, this article is for you.
Don't be put off by the fact that the photo shows only one oak leaf. Having learned how to draw it, you can easily draw any other leaves - the main thing is to correctly understand the principle.
How to draw leaves quickly and easily
First, draw the outlines of the leaf. To do this, approximately in the middle of a paper sheet, draw a vertical strip, slightly curved - this will be the middle. And to it - add a drop-shaped detail. This is the basis of the future oak leaf.

Now, it's time to turn this sketch into a more detailed drawing. To do this, right inside the drop-shaped part, draw carved wavy lines - like a real oak leaf. In some places, you can slightly go beyond the edges of the sketch outlines - or, conversely, not reach them. It doesn't matter. Your drawing does not have to exactly repeat the photo. After all, no two leaves are exactly alike. And you also need to slightly change the lower part of the leaf - making a stem from a simple line.

There is very little left. Erase the extra pencil lines left over from the sketch with an eraser. And then - draw the veins of the leaf. It's very simple - just draw a few straight small lines on each side to the vertical line in the middle.

That's all! Now you know, how to draw leaves. And, not only oak. In the same way, you can draw maple leaves, and birch and any other tree.

Draw with pleasure!
Hi all!
Today we will talk about how to draw autumn leaves (and not only autumn ones). I will show you the patterns of drawing leaves.
So how to draw a maple leaf?
I offer several options and several schemes.
To begin with, I want to draw attention to the fact that all large veins must pass into the stalk.
Moreover, the midrib divides the leaf exactly in half.
We draw a maple leaf (scheme No. 1)
To draw a maple leaf, start with an oval. Divide it in half with a vertical line, outlining the two halves. Draw each half more clearly. Add cloves along the edges of the leaf and get a maple leaf.
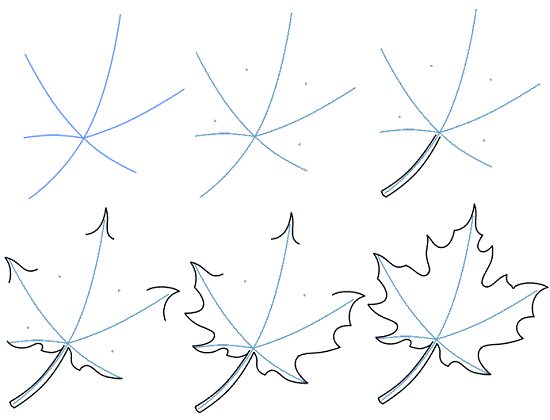
We draw a maple leaf (scheme No. 2)
Start by displaying the leaf shape. Note that the maple leaf has five main veins that converge into one "knot". Mark each vein. Connect them with lines to make the sheet even. Then draw jagged edges.
We draw a maple leaf (scheme No. 3)
Let's start with a square. Divide it in half, depicting the spine. From the middle of the sheet, draw three veins, as shown in the figure. And then around each vein - teeth.

We draw a maple leaf (scheme No. 4)
We start with veins. We draw them, as shown in the figure. Dots mark the deepest cuts of the sheet. Then we draw the spine. And then - the most prominent parts. We smoothly connect them with the marked points and get a maple leaf.
How to draw an oak leaf?
Very simple. We start with a tapered oval. In the middle of the oval, draw a vein that goes into the spine. Then the edges of the sheet, which look like waves.
We draw an oak leaf (scheme No. 2)
We start with the shape of the leaf and divide it in half, drawing a vein that goes into the spine. We form the borders using a wavy arc. We give it a clear shape and edges.

How we love to draw nature, various landscapes, which often contain trees and shrubs, as an indispensable element of many landscape drawings. Trees and shrubs have leaves. They densely sit on the branches, rustle in the wind, sway, creating a pleasant coolness on a hot summer day. From the heat, lush foliage can shelter a weary traveler who has stopped to rest under a sprawling tent of tree branches. Leaves are different in their structure. Simple and complex, with different arrangement of veins - they are usually an integral part of every herbaceous plant. With the help of leaflets, plants receive nutrients, water is transported through the veins to all organs of the plant.
Acacia leaf. First, in the first part of our lesson, we will learn how to draw a complex sheet. Let it be a leaf of a well-known shrub - a yellow acacia. In botanical terminology, it is called unpaired pinnately dissected. In a pinnate leaf, leaf blades are always located on the main petiole opposite each other.
Stage 1. First, we denote the main petiole (leaf stalk) with auxiliary straight lines, from it we draw additional direct petioles, two in different directions.
Stage 2. We draw a clear line of the base of the main petiole.
Stage 3. On the first two straight lines, draw a lot of small leaves sitting on additional stems.
Stage 4. On the second two straight lines and on the main stem in front, we also draw a lot of small leaves. At the top of such a leaf is an unpaired leaf blade.
Stage 5. We erase the auxiliary lines, leaving only the main ones.
Stage 6. Outline the main contour of the leaves with a clear line.
Stage 7. Let's decorate our leaves, naturally, in green.
Lilac leaves. Lilac is a very beautiful shrub with clusters of small flowers of lilac, purple or white. Lilac has a very pleasant smell. It usually blooms in May. And then a wonderful unique lilac smell floats above the ground ... Let's try to draw the leaves of this beautiful shrub.
Stage 1. Lilac leaves are single, simple, they each sit on their petiole opposite each other (opposite). We draw a small, not very plump petiole.
Stage 2. From this petiole we draw two straight lines located opposite each other. These are the rods of future leaf blades. On each of them we will depict half of a semi-heart-shaped leaf blade.
Stage 3. Now, in the same way, we depict the second halves of the leaf blades. They also remind us of half a heart.
Stage 4. With clear bold lines we denote the median veins of each leaf. They are the largest.
Stage 5. From the median vein of each leaf blade, we show numerous veins that extend in different directions and create a patterned network on the sheet.
Stage 6. Now we erase all auxiliary lines, outline the remaining drawing clearly.
Stage 7. Let's color our leaves. It is a green color of various shades. The veins can be made gray, brown or black. Or maybe dark green.

Pencil drawing is a fun activity. Following the advice of the masters, anyone, regardless of age and ability, can learn how to create masterpieces.
What do you need to draw with a pencil?
You can draw anything with a pencil: animals and plants, people, buildings, cartoon characters. In general, everything that is enough for imagination. This article explains step by step,
For successful work, a novice artist should have everything necessary at hand. Prepare good quality paper, a sharply sharpened medium-hard graphite pencil, a soft eraser, and a "How to Draw a Maple Leaf" card. In addition to the instructions, it is good to have on hand and carefully consider a few real maple leaves. At first glance, it seems that drawing them is very simple. However, in reality, everything will be a little more difficult. has a complex structure of several repeating elements. To help you cope with the work, we will show you how to draw in stages.
How to draw a maple leaf step by step
Step 1. You need to create a foundation. To do this, draw a vertical line and a horizontal line crossing it. Then, through the intersection point of these lines, draw 2 more inclined lines to the left and right. You will get six intersecting lines, as shown in the figure.
Step 2. Draw numerous small "branches" from large lines. They should be placed unevenly, which will make the finished work more natural.
At the first stages, the maple leaf is drawn with a pencil without pressure. The tool should be held in the hand gently, without tension. The lines should be light and light.

Step 3. We have a preliminary frame on paper for the future drawing. Now you need to make the correct contour. To do this, circle the lattice of twigs with broken curved lines, as shown in the figure.

Step 4. Using clear strokes, carefully draw the main skeleton and petiole of the leaf. The figure shows that they should be slightly thicker compared to the secondary branches. Their appearance resembles - narrowed from above and expanding from top to bottom.

Step 5. With light small strokes, add small veins to secondary branches. At this stage, we already have an idea of how to draw a maple leaf. However, we have only a sketch. To obtain a real picture, it is necessary to properly distribute light and shadow over the sheet. Then it will be not just a picture, but the work of an artist.

Step 6 This is the last step. At this stage, you need to give a sheet of realism. This must be done by shading the sheet. Look at the "live" maple leaf through the eyes of the master. You should note which areas are darker and which are lighter. One should try to convey such a play of light and shadow on paper.

Now you know how to draw a maple leaf. To achieve the best result, here are some more general tips:
- at the beginning of work on the drawing, do not press hard on the pencil;
- circle the contour with stronger pressure to get a clear line;
- shade the drawing gradually, do not immediately make too sharp transitions from light to dark.
Drawing is a fascinating and useful activity that not only develops your artistic taste, fine motor skills and logical thinking. Creating even a simple drawing trains memory, increases attentiveness and develops imagination.
Autumn time pleases us not only with a rich harvest, but with a riot of colors. The bright decorations that the trees “dress” will leave few people indifferent. Colorful images of autumn foliage will help to save a particle of autumn on a winter day. How to create them?
Draw autumn leaves: maple
Several techniques can be used to obtain a maple leaf image.
Scheme 1
- Draw an oval.
- Draw a vertical line dividing the image in half (line A).
- On each half, lay 3 vein lines dividing each of the sectors into 4 unequal parts. All lines come out of one point located in the lower third of line A.
- Using chaotic teeth, connect the intersection points of the lines and the oval.
- Turn the lower third of line A into the base of the sheet.
Scheme 2
- You start work by drawing the veins of the leaf - the central line and 2 side lines coming out of it.
- Then go to the contour in the form of a jagged line, which you lay at a short distance from the veins.
- Adding smaller details.


Scheme 3
- Draw a square with an emphasis on one of the vertices.
- Divide it in half with a vertical line. The line continues a little down outside the square.
- On each of the halves depict 3 veins.
- Draw soft teeth around each of the veins.

Draw autumn leaves: oak
Scheme 1
- Start with the image of an oval, narrowed on one side.
- Through the middle of the oval, draw a winding vein line, and from it - smaller strokes.
- With a wavy line, draw the edges of the sheet (within the oval).
- Delete the extra outline.


Scheme 2
- Draw the outline of the sheet in the form of an elongated hexagon.
- Divide it in half and draw smaller veins from the middle line (3-4 on each side).
- Form a wavy outline around them.


Draw autumn leaves: linden
Linden leaf is one of the simplest graphic images.
- Draw a vertical, but with a slight slope, line - the central vein.
- From it you make 2 - 3 strokes on both sides. Even smaller veins can be drawn from them.
- Draw the outline of the leaf in the form of a rounded triangle. In the place of attachment of the tail, the contour of the sheet is depicted in the form of 2 converging arcs.


Unusual techniques for drawing autumn leaves
Stencil
- Place an autumn leaf on the work surface.
- Place a sheet of paper on top of it.
- Tightly pressing the paper, with light strokes pass over the surface of the sheet with wax crayon.
- You will see how not only the contours of the sheet, but also all its veins appear on paper.

leaf print
If working with a pencil is boring and you want to learn new techniques for creating autumn motifs, prepare foliage and paints. It is best to work with gouache, but if it is not available, watercolor is also suitable for these purposes.
- Apply paint to the sheet, paying special attention to the veins. Use multiple colors for more vibrant and whimsical patterns.
- Turn the sheet over and make a print on paper.
If the leaves are large enough, then you can get not only colorful foliage, but entire trees.

As you can see, drawing leaves is quite simple. With a little patience and skill, autumn colors will burst into bright fireworks.


