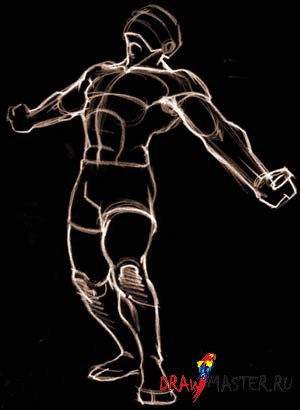
When drawing a person, special attention should be paid to both the face and the hands. First, besides the head, the arms are the most exposed parts of the body. Secondly, they are also expressive and mobile. Along with this, due to the complexity of the articulations, convex and flat parts of the hand, the hands can be, and usually are, the most difficult part when studying the structure of the human body.
The first mistake when drawing is too small hands. And here the ability to draw a head comes to the rescue. If you know how to correctly build the proportions of the head, then we can assume that you already have the correct proportions for drawing the hand. If you put your hand to your face, the tip of the middle finger will be at the hairline, and the brush ends at the level of the chin. Here is your main way to measure brush parameters.
I hope now you understand the importance of being able to draw the human body. If you can draw the human body, you can draw anything for two reasons: 1) you already know enough about the volume of the human body; and 2) if you place this body in a room with various objects, you can easily determine the dimensions of these objects in relation to the body. And you will also already know that all these objects have their own volume and shape.
Let's get back to the topic - Building a hand.
The hand has two volumetric bulges: one is at the base of the thumb (B), the second is the palm (the rest of the hand) (A). Double rows of finger bones, or carpal bones, are connected to the hand, creating one whole. The wrist does not exist separately, and it is not attached to the hand with a ball-and-socket joint, as in wooden dolls. The movement of the hand starts from the wrist. It narrows slightly at the junction with the forearm. The wrist can also be considered a universal connector because it moves in all directions - up and down, side to side, and can rotate.

The center of the palm is slightly lower than the rest of the hand. For example, if you put your straightened arm on the table with your palm down, you will notice that the wrist does not touch the surface of the table. You will notice that the wrist rises where it joins the hand.
The area of the thumb is much larger than the area at the base of the little finger. The hand is wider at the base of the fingers than at the junction with the wrist: however, closer to the wrist it is higher. Now pay attention to your hand: the palm is longer than its reverse side. The thumb is attached to the palm by an independent and highly mobile ball-and-socket joint, which allows it to actively move independently of the rest of the hand. The palm consists of elastic and soft areas - pillows. The surface of the fingers and the entire palm are covered with many pads. The fingertips are pointed, the middle finger - the longest - is the highest point of the hand. The pads at the fingertips are pointed so that they go in the middle - towards the middle finger. If you measure the length of the thumb from the top side, it will be equal to the length of the middle finger. The thumb is more powerful than the rest. The component parts of the fingers are more square in shape than it might seem at first glance, on the last square there is a nail, almost triangular in shape, with bulges on both sides, forming a place for the growth of the nail. You will better remember the structure of the hand if you study the structure of the skeleton of the hand, after which problems with drawing the hand will never arise again.
Knowledge of the structure of the joints, their movement and limitation in movement is very important. The first joint of the thumb and the first two joints of the remaining fingers are articulated. They can only move up and down, but not sideways and rotationally. When the fingers are spread apart, the uppermost knuckles of each finger arch back. The lower knuckles of the fingers will lean forward, while the upper knuckles or fingertips cannot be bent even at right angles. Note that the top two articulated joints can only be bent at 90 degrees. The lower joints of the fingers, as well as on the wrist, are spherical. There are many hand positions and structures for you to learn. Even when you are drawing, you can use your free hand as a model. Place a mirror in front of you, and this will give you more opportunities to study the positions of your free hand.
1. The first step in drawing a moving hand is the position of the fingers and hand. Draw a hand in motion and determine the approximate position of the hand.
2. Then select voluminous places - divide the brush into parts, this will help you determine where are the convex and where are the flat areas.
4. At the end, add shadows.

Remember this lesson, buy an anatomy textbook and study it. You can study the structure of the hand forever, and you may never be able to draw a hand in the same position twice. Every time you practice drawing a hand, you learn something new. Remember, the hands are just as important as the face. And they require the same attention and close study.
I hope you find this lesson helpful.
Successful work!
Hands are a personal and unique part of the body. Often they can tell about a person's life with their shape and size. For many years people have been studying their lines and structure, trying to read the future along the lines. Today we will learn draw hands with a simple pencil with a step by step tutorial. We will pay special attention to their construction and the imposition of shadows, so that the drawing comes out the most realistic.
Tools and materials:
- White sheet of paper;
- Eraser;
- Solid simple pencil;
- Two soft simple pencils.
Stages of work:
Photo 1. The figure will show two hands. One lies on top of the other. Let's start with the hand that will be on top. For construction we use a hard pencil. Let's denote the shape of the first hand with simple lines:

Photo 2. Place the second hand on the bottom left. It will be turned sideways. We are not in a hurry to draw fingers. Just outline the wrist and hand:

Photo 3. On the left hand, draw the fingers and folds on the bends. We do not stylishly press on the pencil, the pressure should be weak at the first stage. Otherwise, then the contours will not naturally stand out. The fingers are slightly unevenly spaced so that they peek out from behind each other. The little finger has the most folds, because it is the most bent:

Photo 4. Now let's move on to the right hand. She is on the top left. Add fingers and two parallel lines at the level of the bones, at the level of the bends. This will make it easier to navigate when building:


Photo 6. We continue to hatch gradually adding more volume. Let's draw a little contour and work on the right hand. The little finger and ring finger are on a bend, so we add more shadow on them than on the rest:

Photo 7. Let's add folds and a contour on the bends. Let's draw the details of the upper hand, in parallel we make the volume on the lower one:

Photo 8. Let's make more shadow, but try not to darken it. Strokes are applied gradually. This trick helps to make the hands realistic:

Photo 9. Let's add more contrast. We continue to add a shadow:

Photo 10. Let's refine the contour again, it will highlight the foreground. The rest of the places are left untouched.
People who try to draw human hands for the first time face a number of difficulties. How to understand the shape of the hands? How to learn patterns in their structure? Plastic anatomy for artists helps to understand these issues. In this article, I have made a series of anatomical drawings, sketches, and diagrams to help beginners understand the basics and pay attention to key aspects. I have tried to make this material as simple and to the point as possible. I do not exclude that somewhere I could make small inaccuracies, but the essence of this does not change.
1. Main titles
The arms are made up of three main parts:
- shoulder;
- forearm;
- brush.
The forearm is made up of two bones:
- ulna (thickening at the elbow);
- radius bone (thickening at the wrist).
Main muscles:
- deltoid muscle (raises the entire arm);
- biceps or biceps brachii (flexes the arm at the elbow);
- triceps or triceps muscle of the shoulder (extends the arm at the elbow);
- muscles responsible for the movement of the hand, fingers and rotation of the forearm with the hand (pronation-supination).

The two main muscle groups of the forearm are:
- on the side of the external epicondyle of the humerus is a group of muscles (a), which includes the extensors of the hand and fingers;
- from the side of the internal epicondyle of the humerus there is a group of muscles (b), which includes the flexors of the hand and fingers;
- these two muscle groups are clearly visible and distinctly separated by the ulna.

2. Anatomical structure of the hand. Core muscles
The shape of the hand depends on the shape of the bones and muscles. Therefore, in the process of drawing a person, you need to pay attention to the anatomical structure of the hands. It is important to “see” which muscles are located where. To understand plastic anatomy, the following drawings, which depict the skeleton and musculature, may help. In each such drawing, I added a diagram in which I highlighted the key, clearly visible muscles with color. These muscles are pronounced, so they should be visible in the drawing of a person. Of course, the muscles of women's hands will be more refined and miniature than men's. In addition, there are full people, and there are thin and "wiry". This means that their muscles will also be different. But the main muscles indicated in the drawings will be visible to one degree or another in each person.


3. Pronation and supination
If you stop and pay attention to how the hand moves, you will notice that it is able to rotate. That is, we can turn our hands palms up, or we can turn our palms down. If up - then this position of the hand is called supination. And if from top to bottom - then pronation. In this case, the radius of the forearm moves around the ulna. For clarity, I made a schematic diagram showing how this happens.

In the process of drawing, you need to constantly compare sizes. This helps to correctly convey the proportions. Hand drawing is no exception. If we talk about the forearm, then in its widest part the abdomens of the muscles are concentrated, and in the narrowest part - the tendons (although there are also some muscles there). Knowing this feature, it will be easier to draw human hands.

5. Shoulder and forearm are angled relative to each other
When a person holds a straight arm, the arm will not be absolutely straight anyway. This is due to the fact that the shoulder and forearm are located at an angle to each other.

6. The connection of the shoulder and forearm is like the connection of chain links.
The chain example is very helpful in understanding the shape of the hands. How is the widest part of the shoulder rotated relative to the widest part of the forearm? This is clearly seen in the schematic drawing. If you remember this feature of the structure of the hand, then further drawing of the hands will be much easier.

The elbow joint provides a movable connection of the humerus, ulna and radius. The principle of its operation is clearly visible in the schematic drawing. The head of the ulna is like a wrench. The joint of the radius and humerus resembles a ball and a cup, because the radius rotates around the ulna, and also moves up and down, like the ulna, providing flexion of the arm at the elbow.

8. Three visible points in the elbow joint
Some novice artists may ask: “Why do you need to know the structure of the joint if you can’t see it anyway?” The answer is simple - the joint affects the shape of the hand, its movements, and three of its elements are also visible. Internal condyle, external condyle and head of the ulna. If the elbow and internal condyle are visible to a greater or lesser extent in any position of the arm, then the external condyle is noticeable with the arm bent. When the arm is straight, he hides in the hole. These nuances affect the appearance of the hand, so it is important in the drawing.

9. Drawings of hands in pencil
After studying the anatomical features, you need to be able to apply knowledge in practice. Therefore, in the conclusion of this article, I give as an example pencil drawings in which human hands are depicted in various positions. Notice the shading. It seems to repeat the shape of the muscles of the hand, bending around the surface. This is an important point in the technical side of the drawing. If we talk about chiaroscuro, then both on the whole arm and on individual muscles, you need to learn to see light, penumbra, shadow - just like in the drawing of a jug or geometric shapes. However, in order for the drawing to become confident and professional, you need to practice a lot. It takes time to develop skills in drawing.
 Drawing hands is one of the most thorny tasks that a novice artist faces. What are hands? Yes, we see them every day, they are constantly in front of us, because we perform most of the actions with the help of them, but at the initial stage hand drawing- these seemingly visual parts of the body, difficulties always arise. In this online drawing lesson, I will try to teach you how, without much difficulty, to understand the plasticity of the hand and the technique of its execution.
1) To learn how to draw hands, first you just need to try to copy (at least from the drawings below), from your own hands, from photographs, and after that, when you encounter certain difficulties, you can study this article in detail and here you will already find answers to common mistakes and some subtleties and tricks when drawing hands.

2) Each drawing, of course, begins with a sketch or sketch. A drawing that is done correctly and proportionately owes, first of all, a sketch. A sketch, especially of parts of the human body, can only be done correctly with knowledge of human proportions or anatomical structure. So, what do we know about the proportions of the human palm. In the figure below, we see that the human palm can be measured relative to the head - from the jawline to the hairline.

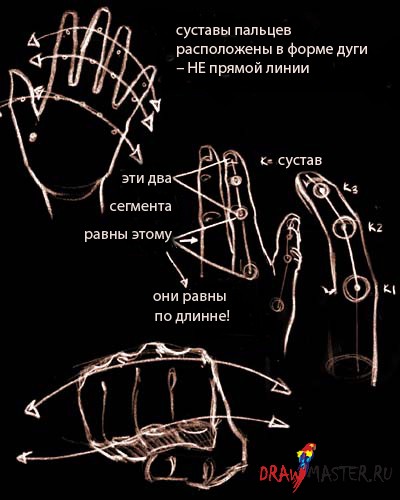
3) The next thing we need to know about the structure of the hand for drawing is that the bones, or knuckles, are not located in a straight line - this is a common mistake - they are located in an arc (see example). And in general, as for the hands, there are almost never parallel and even lines. Here everything moves, the hand is multifunctional, the hands are a separate creature, they live their own lives.
4) Fingers on the hand of different lengths. The longest finger is the middle one, the next in descending order is the ring finger, then the index finger (the last two differ slightly in length), the little finger (reaches the upper joint of the ring finger) and the thumb, although the thumb is equal in length to the little finger, it turns out to be lower than all the others and this seems to be the shortest. You also need to know that the length of the middle finger is almost half the length of the palm. The thumb slightly misses the second knuckle of the index finger and basically, when working and moving the hand, it is 90 degrees in relation to the other fingers. The width of the palm is approximately 75% of the length of the palm, or slightly more than half.

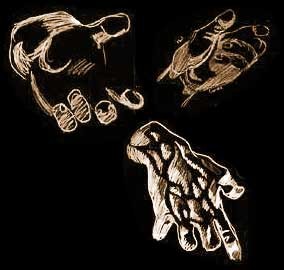
5) Despite the fact that the hand is the most flexible and unpredictable, at first glance, part of the body, there are laws by which the hand, palm and fingers live. We all know these laws, but when we start drawing hands, for some reason we forget about them. The mechanical principle of the hand is that the palm can only close and open, and the fingers bend or curl down to the middle of the palm, squeezing the pastern, like a closing flower bud. The hand is concave on the inside, and convex on the outside, the fingers grow tightly, when the fingers are folded, they are a continuous continuation of the palm. An incorrect drawing is one on which the fingers are widely spaced from each other or, when added together (mentally), gaps are obtained.
To master this, you need to watch the hand while it holds something, reaches out, grabs it. Only knowing how the hand works, which phalanges are involved in a particular reflex process, can one convincingly draw a hand in motion or in a static state. Here is another tip that I will give you in order to learn how to draw hands: always divide the palm into three parts: the first part is the base of the palm, the second is the base of the thumb, which cuts off a significant piece from below, the third is the upper bases of the remaining four fingers. The muscle of the thumb (the second part of the palm) is the most powerful of all located in the palm of your hand, it is the most important and most visible, the most convex and voluminous. In the middle of the palm on the inside there is a characteristic hole with the lines of fate. My advice to you: when drawing a hand, first sketch out the lines of the hand, then build blocks or those same three parts based on the lines, it will be easier to depict a natural hand.

 6) The bones in the palm and fingers are visible only in the form of knuckles on the back of the hand, in other cases they only form shapes and, when sketched, they can be depicted with lines along which the hand will be built. The fingers consist of several bones, thanks to which they have a rhythmic shape - from each knuckle to another they narrow and expand. In places of joints, the fingers look a little thicker, on the inside there are folds that are located just above the joint. You also need to study the articulated ability of the fingers to bend, so that later you do not draw an implausibly bent finger. The first two joints can bend at a right angle, and the upper ones cannot even at a sharp one. Look at the unconscious dependence of the joints, for example: when the second joint bends, the upper one automatically bends. When the fingers are extended, the upper joint tends to lean back.
The tendons on the hand, visible on the back of the hand, appear as threads or lines that form a straight line from each of the midline of the fingers. They appear when the palm is very tense or arched. It would be a mistake to depict the tendons of the back of the hand in children, adolescents and overweight people, since in these cases they are hidden, not visible or underdeveloped.

7) Another important thing that we will cover in the online lesson "how to draw hands" is the location of the lines of the fingers. Note that the line of the middle finger divides the palm into two equal halves. This line is also at right angles to all the others. This finger is unclenched and compressed exactly to the palm, while the rest, when compressed to the palm, tend to its center, and take an angle.
8) How to draw female hands. As elsewhere, when depicting a woman and her parts, one must remember that the main things here are smoothness and roundness. The knuckles on the fingers and the outer side of the palm of a woman are smaller, the fingers are mostly thin. With clenched fingers, they tend to one point more clearly than in a man, as if a few more centimeters and they would merge into one point.

A hand is such a drawing subject that is always at hand (sorry for the tautology). Even when you draw with one hand, you always have a second one in order to see how the palm or finger, or phalanx behaves in this or that case. Of course, in the technique of drawing a hand, practice is considered the main thing, studying anatomy, behavior and structure is half the battle, and then you need to train and train. The hand is a part of the body that you don't have to draw twice in the same position, so each time you will learn it in a new way, but with the basic knowledge that you have received, these will be little things that you can easily build around the outline base.

Follow the releases of the site and in the next updates of the Articles section, there will be new tutorials on drawing parts of the human body.
Do you want to make a good impression on the people around you? In the Duhi Original online store you will find Montale perfumes that you can buy at the most reasonable prices. A wide range of products with flavors for every taste.
It is necessary to develop and bring to perfection any skill, even having a talent from birth, you need to constantly develop and hone it.
That absolutely everyone can learn to draw, and we hope that you have already begun to implement our tips. Today we want to touch on another “sore” topic for novice artists, namely, drawing such complex body parts as hands, feet and, of course, eyes. As a rule, these parts of the body are always the most difficult to draw and that is why it is worth giving them a little more of your time and attention when you learn to draw.
How to draw hands
A few basic rules:
1. It is necessary to practice drawing the palm in different positions. The same principle works here as everywhere else - Practice, practice and more practice.
2. Children's palms are thicker than fingers.
3. The female palm is thinner and more elegant.
4. To make the palm more masculine, add some angularity to it.
5. On the palms of older people, we put more emphasis on the knuckles and draw more wrinkled skin.
To begin with, we need to understand a little the anatomy of the palm. Take a close look at your hands. Your main goal is not to remember what is called, what part of the brush, study the proportions and shapes. Please note that the phalanges of the fingers are not in the same line, and the fingers cannot be perfectly even and are always tilted to one side.

The index, middle, ring and little fingers are quite closely related and cannot be far apart, while the thumb has a fairly wide range of motion.
Try tracing your hand and filling in the outline with details. This will help you get a little better idea of what the palm should look like in the drawing.

Before you start drawing a hand, first of all, you should outline its overall size and the points where the ends of the fingers will be located. Only after that the sketch is divided into several parts.
When drawing hands, there are generally accepted proportions. For example, the length of the palm is equal to the length of the index finger multiplied by 2. The index finger is equal to the ring finger, sometimes the ring finger can be slightly longer than the index finger. The little finger reaches the top phalanx of the ring finger.

The nail should occupy half of the phalanx. Women's nails are drawn more rounded, and men's more square.
If you find it difficult to draw fingers, imagine that the phalanges are cylinders connected to each other.
Don't forget to add shadows to make the hand more realistic.

Starting to draw, first try simpler options, for example, an open or unfolded palm. Gradually complicate the task, for example, by drawing a hand folded into a fist.
How to draw feet

As in the first case, before drawing, you must carefully study the anatomy of the foot.
The structure of the hands and feet are somewhat similar to each other, however, the proportions will differ.
The length of the foot is usually equal to the length of the head of the person you are drawing. The foot consists of two parts - the heel and metatarsus (the part that is connected to the fingers). The top of the foot rises to the top. The bone that is outside is always lower than the inside. The lower part of the foot has a curve, it is not drawn flat. The thumb is always drawn parallel to the ground, and all the others will be lowered to the ground.

Another note, if you draw the foot from above, then the toes will be longer than in the drawing of the foot from below.
The lower part of the nail is at half of the upper joint, the width of the nail is longer than its height. The thumb is the width of two second fingers.
How to draw eyes

If your goal, of course, is the ability to draw portraits, then the eyes will have to devote a lot of time. Look - what first of all needs to be conveyed by drawing eyes.
The first step is to draw the shape of the eye. In the future, when drawing portraits, this step will have to be given quite a lot of time, since an incorrectly shown shape will ruin your entire drawing.
After that outline the cornea. Immediately apply highlights to the pupil. Don't miss any of the little things you see. The iris of the eye should not be completely round. From below and from above it is cut off by a century. The iris that falls under the upper eyelid will always be slightly darker. The rest of the darkening and highlights will depend on your desire or on who you are drawing.
Darken the whites of the eyes. On the edge of the shadow should be somewhat darker.
Eyelashes are drawn as the final step. They are thicker at the base than at the end. Note that the eyelashes are slightly reflected in the eyes.

Finally, we remind you once again that the main thing is practice. Start simple and gradually bring your skill to perfection, gradually complicating your tasks.
Draw and be inspired with us.
The main photo is taken from the website.


