Everyone likes to draw animals: both children and adults. Especially often we draw cats and dogs, because these pets live in almost every home. Dogs are amazing creatures that are distinguished by devotion and kindness. Of course, an inexperienced artist will begin to doubt his own abilities and will surely be sure that he cannot draw such a “difficult” drawing.
But I would like to note that our lessons were created just by the masters of the pencil and eraser. So stock up on everything you need and get to work. This lesson includes several steps with vivid examples. Start drawing now.
Draw step by step
Stage 1 - draw the outlines of the animal
Unfold an A4 sheet of paper vertically. Our dog will stand up, so you should have enough space to fit every part of the body, from the ears to the tail. Redraw the image as shown in the example. Your lines should sometimes break. This helps to make more correct contour lines.
It is not necessary to create a perfect silhouette right away, because in the process of drawing the body of the animal will change a little. Mark the area of the eyes and nose. Put small strokes near the future ears. Do not forget about the limbs - the dog's hind legs are slightly bent, and the front legs stand straight.
Stage 2 - give the body flexibility and add details
Now you should depict the smooth transitions on the body that the dog has. From the neck down to the back, thigh, legs, etc. The picture shows how to correctly draw the paws, belly and tail of the animal. Note that the dog's tail is curled up. Draw upright ears on the head.

Stage 3 - draw fur and eyes
Our dog will be fluffy, so we should add wool to her body. Wool is easy to draw - the main thing is to make light broken lines - strokes. You should “dot” with such strokes the neck, tail and torso of the animal.
You also need to draw a shadow on the ears with a darker pencil. Paint over the nose in a dark color, highlight the eyes. It is advisable not to forget about such small details as eyebrows and mustaches, because they will “revive” the dog on paper.

Stage 4 - final
The last step in creating the image of a dog involves adding a few more strokes and a shadow. A shadow is a prerequisite in every drawing, because without it it will be an ordinary faceless drawing. You need to draw a shadow not only on the animal itself, but also on the floor.

A puppy is a baby dog
Before how to draw a puppy with a pencil I started looking for something interesting on the net. I came across a forum of dog breeders, where the owner gives interesting statistics, the result, so to speak, of acquiring a tailed friend:
- Network cable - changed about once a week for three months
- Toys - an unmeasured amount, we gnaw to this day.
- Linoleum in the corridor is gnawed into trash
- In two years, he thoroughly trashed the bathroom three times (everything from shampoo tubes to a washing machine suffered)
- Once they ate a TV antenna.
Fun, in short! In order for a full-fledged dog to grow from a small fluffy lump, you need to seriously take up his upbringing literally from the cradle! Here are some tips for raising a puppy:
- While the dog is small, or even a small breed, carefully open the doors. Do not jump from chairs or bedside tables! Always, always look under your feet. In general, move around the apartment with extreme caution!
- At the first moment, you will only want to squeeze and squeeze your fur friend, but in fact it is time to educate. Literally from the moment you met!
- The first commands to be learned are: "Come" and "fu!".
- The importance of the first you will understand at the first walk. Actually, the second one is the same.
- For training, the method of stick and carrot is used. If your dog understands you perfectly, you need to let him know that you really, really like it.
- Play and play with your puppy again. After all, it is a social animal!
- Make sure you have toys. Otherwise, your toys may be damaged: shoes, furniture, wires from the computer, etc.
- Walks! Walk, walk more often! This will contribute to the physical development of your pet, and you as well.
Be patient and good luck. We know how to raise a puppy, let's start drawing!
How to draw a puppy with a pencil step by step
Step one In the very center of the sheet, draw a circle. This is the future head of our dog. From it down we draw the lines of the contour of the body. And on the left we draw a small oval - this is the thigh.  Step Two We draw the details of the head: curved ears, an oval muzzle. Now let's show the paws. Carefully consider their position in the figure to depict them as well.
  Step Three On the "face" draw the eyes of the nose, down from it - the mouth. A small tail sticks out from behind the leg. On the paws - "lumps" fingers are visible. And one foot is deployed and its “sole” is visible. Try to draw it too.
  Step Four Let's give the ears a rounded shape. Let's draw the eyes. Above them are eyebrows and skin folds. There are a couple more wrinkles on the forehead. The body also needs to be turned from angular to realistic, with smooth lines. Individual hair sticks out in places.
  Step Five Let's outline the fur along the contour of the dog. It looks a bit like shading. Let's show a couple of skin folds on the paw. Let's make the outline brighter.
  Step Six Let's do the hatching. This is a crucial moment. We need to show the relief of our picture, but not too dark. In places of folds - darker. Also a darker muzzle. Well, how? You should be able to too!
  I also suggest you try to draw other quadrupeds.
Probably, since the advent of "Carlson" Lindgren, all parents know exactly what is needed for the happiness of the whole family. Dog for kids! It is for this reason that a year ago we had a sandy-gold lump, a Rhodesian Ridgeback, which was named Gray. This miracle quickly became a member of the family and everyone's favorite. And that is why, when we decided to learn how to draw a dog with a pencil, the choice fell on the representative of this breed.
The history of the appearance of the "portrait" of Gray
For a week we “ran” after our dog, recalling “Prostokvashino” with a more than prophetic statement about our case: “I ran after her for half a day to take pictures!” But we never got a good photo. Our tomboy managed to successfully avoid imprinting. That tail, then his nose all the time turned out to be closer to the lens. Having suffered, we went another, simpler way. It turned out that finding a suitable photo on the Internet, similar to our Gray dog, is easy. It is for him that we can draw a dog in stages.But while we were looking for "Gray", my child and I saw that the choice of potential models is huge. We could draw a husky with a pencil in stages, or a German shepherd, or even a husky. All of these are beautiful, graceful and intelligent dogs. Each of the representatives of their breed has characteristic features that are unique to them, but there are also personal qualities and features common to all dogs, for which we love them so much and value their friendship. For example, loyalty and the ability to rejoice at the owner, obedience and frankness (they cannot hide their emotions at all).
Already at the initial stages of working on a drawing of a dog, when we just examined the varieties of these pets, we learned that they also differ in temperament, for example, there are choleric, sanguine, melancholic and phlegmatic, we got carried away. We wanted to learn how to draw not just an animal with four legs, ears and a tail, but also learn how to draw kind and grinning dogs, we wanted to try to draw a spaniel, a dachshund or a shepherd dog in stages with a pencil. But it will be later. In the meantime, our "test of the pen." Today we will show the dog in pencil in stages, and it will be our one-year-old Rhodesian Ridgeback. We took him as a model.
Work plan
It turned out to be not at all difficult to draw a dog with a pencil in stages, if you move exactly according to the plan. What does it include:- Preparation;
- Image of the paws and body of the animal;
- Work on the muzzle of our pet;
- Picture formatting.
Step by step image of a dog
Stage 1. Preparation
It includes, first of all, the organization of the workplace.
Learning to draw, starting with auxiliary lines. We make two ovals that only touch each other. Required: the upper oval is almost 2 times smaller in size than the lower one. And it looks more like an uneven circle.
Even for beginners, this stage will not be difficult, and even a child will cope with it. But in the future, it would be nice if parents helped their baby in step-by-step drawing.

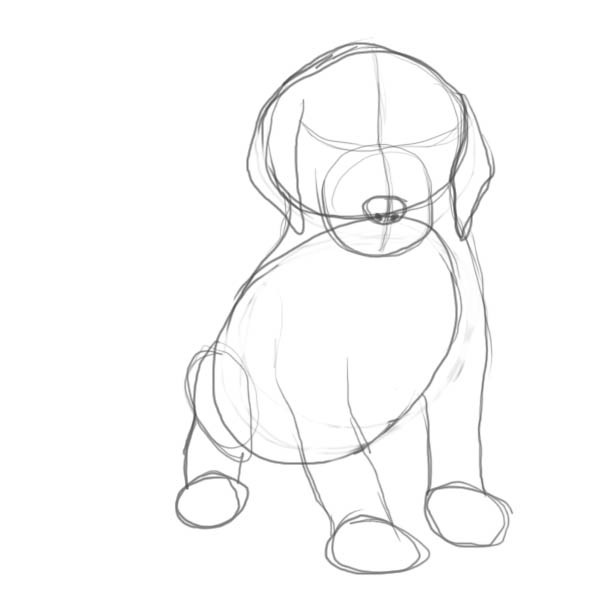
Stage 2. Image of the paws and body of the animal
How to draw paws for a dog? To do this, draw lines down from the lower oval, at the end of which there will be soft pads. The front paws are fully visible, we make them in their entire length, taking into account the proportions. Back - only one is visible, and since it is bent, we depict its upper part as an egg-shaped figure along the lower right side of the oval. And already a small part of the dog's paw comes from it.Draw the dog's neck with two curved lines. On the left side, we make the body a little larger.
We make a small circle at the bottom of the upper oval, which will also go to the lower one.

Stage 3. Work on the muzzle of our pet
How to correctly complete all the details of the head? To do this, we divide the upper oval with two arcuate lines, horizontal and vertical, into 4 parts.On the one that runs horizontally, the eyes will be located.
The drawn small circle is also divided in half by a vertical line. In the middle of it will be located the nose of the dog.
On the sides of the muzzle we make hanging ears characteristic of the Rhodesian Ridgeback.

We depict the eyes, we perform the nose of the animal more accurately.

Stage 4. Designing the picture
We have mastered the basic principles that help us understand how to draw. There are nuances left that will make our picture look like the original. Namely, we perform “fingers” on the paws, do not forget about the tail.
We remove all unnecessary lines. We provide the necessary details.

Outline each part of the picture with the desired color. Do not forget that the Rhodesian Ridgeback, although a smooth-haired breed, still has tiny hairs.

Now, having selected the desired color, decorate the picture. Our Gray appears before us.

This picture is quite simple. Having already mastered a little, you can try more complex models, for example, figure out how to draw husky dog or some other breed. Good luck with this!
Animals are loved by both adults and children. It is not surprising that children draw them very often. If your child comes to you with a question about how to draw dogs, don't be alarmed, it's not very difficult. This lesson will help your child to draw a pet in the easiest way, even with anatomical details. Your help will not be superfluous, and you will enjoy the process itself.
How to draw a dog for children and what is required for this?
- Drawing paper.
- Pencils.
- Eraser.
- Desire to draw.
Types of pencils
Since it will be easier to draw a dog with a pencil than with paints or felt-tip pens, we need simple pencils. It is better if they are of different hardness: with a harder pencil we will outline the contours, and with a soft one we will already create the drawing itself. Before we draw dogs, we need to deal with the hardness of pencils. In other words, find out the hardness of the lead, which is indicated on the product itself. You can see the letters next to the company name: M, TM or T if the pencils are made in Russia, and B, HB, F and H if the manufacturer is European. What does this mean?
- The letter M or B denotes a soft lead, we will definitely need such a pencil.
- TM, HB or F - the average hardness of the pencil, we will also need these, we will use them to make the initial drawing.
- T or H are hard pencils, in our case it is better not to use them. They are difficult to erase with an eraser and can tear the paper.
So, let's start the lesson: "How to draw dogs?"
1. Take a harder pencil and lightly draw two simple shapes, a circle and an oval. It is easy to guess that our circle will serve as the basis for the head, and the oval for the body.
2. The next stage is the muzzle and, in our case, three paws, because the dog is sitting, and the fourth leg is not visible. Try to draw with light movements, do not press hard. As you can see in the picture, we are using ovals and circles.

3. After the legs, we go back to the muzzle. Divide the head circle into four parts as shown. Now you can see where the nose will be. Don't touch your eyes just yet. Mark where the ears will be.
4. The auxiliary lines with which we divided the circle of the head will help outline the eyes of the dog. Mark the line of the mouth.

5. Now move away from the drawing a little and look at it from afar, so you can see what to correct. Paint on the paws, add a little fur. Dream up.

6. It's time for the eraser and soft pencil. Erase unnecessary outlines and see what your dog looks like now. Correct the lines with a soft pencil, add details.

7. Now is the time for shadows. They help to make the drawing voluminous. Add shadows at the muzzle, under the ears, on the paws. All this is done with a soft pencil. You can rub the shadow around the ears with your finger (give a soft volume).

8. The final stage of the drawing: give more volume. Shade in the shadows more strongly, do not be afraid - the tail, paws, under the muzzle. Draw the claws and with an eraser make a highlight on the puppy's nose.

The drawing is ready!
Now you know how to draw dogs and you can help your child. Next time try to change the puppy, draw it with a raised ear or paw. When you start drawing, you never know what the result will be, which is why it's so exciting.
Today we will look at how to draw a dog in stages for children. Several variations of the image of dogs will be shown at once. You will learn how to draw adult dogs and small puppies. The instructions are clear and easy for kids. Let's not waste time and get started right away!
How to draw a dog for children: the first option

A dog is a true friend of a person and, of course, of any child. Many children constantly dream of a dog and really want to learn how to draw it. Today I will tell you how to draw an ordinary domestic dog. Most parents and children want to learn how to draw a dog in this form, without unnecessary anatomical features and realistic details. There is nothing difficult here, everything is extremely simple. It is only necessary to depict the dog in a very simplified way, without going into multiple details.
Stage 1
Start drawing the dog from the head. Draw an oval muzzle and a pair of oval ears. 
Stage 2
Draw two dots, these will be the eyes, now a smile and a large black nose. It turned out a cheerful and cute dog face. 
Stage 3
In this step, draw the torso of the dog. It is also drawn in a simplistic way and looks very much like a rectangle with slightly rounded corners. The bottom line of the dog's torso should be broken in two places in order to then draw the paws. 
Stage 4
The paws can already be drawn, again very simply without any extra details. Now the ponytail and all. Congratulations, you just learned how to draw a simple domestic dog!
How to draw a dog for a child: the second option
Stage 1
Draw the dog's head. The head consists of an oval and a semicircle. In the center of the head, draw a pair of eyes and eyebrows. Draw a heart-shaped nose on the muzzle. 
Stage 2
Further on both sides of the head, draw two large ears, draw the neck from the bottom of the head, and then the torso. 
Stage 3
The next step is to draw the paws of the dog. The two front legs should be the same, and the back ones should be slightly larger than the front ones. 
Stage 4
Draw the hind legs and decorate the dog. 
How to draw a dog from the cartoon Tom and Jerry

Another option how to draw a dog
Stage 1
Draw three ovals for the head, muzzle, body. Add four circles for the back and front legs. Add lines to the paw circles on both sides of the circles. 
Stage 2
Draw the ears and nose. After that, draw a wide smile for the dog. Draw the eyes. Then delete all extra extra lines. Decorate the resulting dog. 
You are great! You have a wonderful drawing!
How to draw a shepherd dog in stages for children

Many children love sheepdogs. Therefore, now we will try to show how to draw these dogs correctly and easily.
Stage 1
Draw the shape of the body in the form of a bean, which should be somewhat elongated. 
Stage 2
Now draw the base for the parts of the shepherd's body. A pair of triangles will become the ears. Draw a rectangle for the nose. From below it will be slightly curved. Draw fur on the chest. Label the tail as shown in the example. 
Stage 3
Draw from top to bottom, add a couple of small circles for the eyes and a few curved triangles to make it look like the hair is sticking up. Draw fur on the neck with thorns. Add a complete tail and draw the part for the lower and upper paws. 
Stage 4
Start by simply adding a line to make the smile and bottom of the lip. Draw some elements on the neck to make it more fluffy. Continue drawing the base for the paws. 
Stage 5
At this last stage, it remains only to draw a small bang on the head, as well as finish the paws. 
Stage 6
That's all, your shepherd is completely ready.
How to draw a puppy with a pencil

So, with adult dogs sorted out, now you will learn how to draw small dogs and puppies. You will find that drawing a puppy is not difficult at all. You will definitely be convinced of this. The steps in this lesson are very simple, you will have fun and learn at the same time how to draw a puppy step by step with a pencil for children. Enjoy this fun and interesting instruction "how to draw a puppy for kids".
Stage 1
Start by making a very simple egg shape for the head and then another small egg shape for the torso. After that, draw special lines dividing the face, as seen in the example. 
Stage 2
All you have to do here is basically draw out the shape of the puppy's head. 
Stage 3
After that, draw out the discouraged, but very cute ears. Make sure they are large enough for the size of the puppy's head. 
Stage 4
Almost done! Make two oval eyes. Then paint them, except for two dots, as in the picture. Add a dash for the eyebrows and move on to the fifth step. 
Stage 5
Draw the nose, and then the cheeks and a small mouth. When this is done, you can add a small tongue sticking out of the puppy's mouth. 
Stage 6
Now draw the chest, front paws. 
Stage 7
Now pretty close to completing the drawing. Draw a back paw and a cute wagging tail. Erase the extra lines and shapes you drew in the first step. 
Stage 8
Everything, the puppy is almost ready. All you have to do now is paint it with some color. 
How to draw a spaniel puppy for a child

Now let's try to draw a spaniel puppy.
Stage 1
First, draw two shapes that will help you in the process of drawing this very cute dog. Draw a circle for the head and an oval shape for the body. Then draw a vertical line directly along the circle for the head, which will help in the process of drawing the muzzle of the puppy. 
Stage 2
Start drawing the face. To do this, draw the inner sides of the ears and draw the lower part of the head. 
Stage 3
Continue drawing the head. To do this, draw fluffy and long ears, and then draw large oval eyes. 
Stage 4
Finish drawing the muzzle, for this draw the eyebrows, nose and mouth. After that, draw the front paws, as well as the contours of the hind legs. As in the example. 
Stage 5
Here, all we have to do is draw all the other parts of the paws, then draw the line of the back, the tail. After that, erase all the additional lines that came in handy during the drawing of this dog. 
Stage 6
You see, drawing this cute dog turned out to be very simple. And all that remains to be done is to color it as needed. 
How to draw a terrier puppy

Now let's try to draw a cute terrier puppy.
Stage 1
First, with light strokes, draw a circle for the head and an oval for the body of the terrier. 
Stage 2
Draw ears. Wavy lines should outline the outline of the dog's muzzle. 
Stage 3
Now you need to depict the torso and paws. 
Stage 4
Now add everything else - mouth, eyes, nose and tail. 
Stage 5
The image of the terrier is ready. Now you know how easy it is to draw this dog. 
How to draw a German Shepherd puppy for a child

Now let's try to draw a German Shepherd puppy.
Stage 1
Draw a circle and draw a small horizontal line in it. 
Stage 2
Now depict the puppy's mouth, as well as the tongue sticking out of it. 
Stage 3
Sketch out the outline of the head, as well as sharp ears that stick up. 
Stage 4
Draw the nose and big eyes of the dog. 
Stage 5
In this step you draw the front paws. 
Stage 6
And on this - the back. 
Stage 7
Draw the tail. 
Stage 8
Cheerful German Shepherd puppy is almost ready. You just need to color the drawing. 


