Drawing is at least a great hobby for creative people. Many believe that for this you need to have some kind of special talent, when, in fact, everyone can learn to draw - with a certain perseverance and systematic practice. We will help you figure out how to learn to draw with a pencil and what beginners need to know about this lesson.
Drawing supplies
You should have a set of simple pencils. They are denoted by the letters H (T in Russian marking) - a hard pencil, B (M) - soft, and a number is placed in front of the letter that indicates the degree of hardness or softness, for example, 2B.
Beginners should start with the HB (TM) pencil - this is a standard pencil, medium hard-soft. Once you get used to it, you will find it easier to control the pressure when using other types of pencils.
Take white and thick paper, best of all grainy - pencil shades will be clearly visible on it. If possible, buy one sheet of paper to check and rub it with an eraser - if it immediately becomes loose with spools, then the quality of such paper leaves much to be desired.
Remember to take a good eraser to correct future blots. Choose a soft eraser so that when erasing, the paper is not severely injured.
Where to begin
First of all, you need to familiarize yourself with the basic principles of drawing: composition, volume, perspective, dynamics. These basics apply to any style, not just pencil drawings.

After that, you should decide what exactly you are trying to learn and how you want to draw, which style to choose. Even if you want to be able to do a little of everything, stop at something specific first and don’t try to embrace the immensity - master one style, and then move on to another.
If you want to learn how to draw portraits, you will have to learn the basics of anatomy, the proportions of the human face and body. To learn how to draw landscapes, you need to practice drawing natural objects - plants, mountains, sea waves, etc. If you want to draw anime, then you need to know the features of drawing characters in this genre.
From simple to complex
You must learn how to draw geometric shapes in 2D and then in 3D. This will become a very important step in your practice, because, in fact, all objects, and even we ourselves, conditionally consist of different geometric shapes. And when you are just learning to draw objects and people, and even after gaining experience, you will still sketch circles, ovals, squares on paper, indicating the proportions of the objects you draw.

Draw a lot of simple objects, animals in a simplified form. Don't shy away from drawing seemingly boring objects like a cup, an alarm clock or an apple on a table - even a simple 2D outline drawing will require some skill from you.
Let's try to practice a little right now and draw a cute mouse.
1. Take a soft pencil and draw two ovals next to each other, with a slight intersection. One of them will be smaller - this is the future mouse head, and the second will become the body. 
2. Draw circles for the ears, outline the paws and outline the curly tail. 
3. Now let's draw a muzzle for the mouse - an eye in the form of an inverted droplet, a nose with a ball, a smile, and also do not forget to draw the ears. 
4. Erase the inner contours on the muzzle and make a more saturated stroke. Color the pupil and nose with black, with a white highlight in the middle. 
5. Draw paws for the mouse and shape the tail by erasing the auxiliary contours along the body. Circle the rest of the mouse. 
After two-dimensional images, start mastering three-dimensional ones, with the transfer of volume. When studying black and white drawing, start with the classic task - draw a ball with a falling shadow. If you don't have a suitable balloon at home, use a chicken egg as an object. How to perform such a drawing can be seen in the following video.
At first, it is very important to learn how to draw from nature - you must develop a sense of form on real objects, observe shadows and light, and see volume.
The main principle in drawing is the movement from the simple to the complex, from the general to the details.
Do not rush and do not expect that after a couple of drawing sessions you will be able to create brilliant paintings. Be patient: sometimes you will have to learn how to draw the same figure over and over again until you achieve a decent result and only then move on to more difficult tasks, for example, drawing people.
Basic pencil drawing techniques
The main pencil drawing techniques include shading and hatching.
In the initial stages, it will be easier for you to master shading. Although sometimes students of art schools, for example, use only shading, and shading is considered the wrong technique. In any case, it will be useful to master both techniques, as they help to achieve different results in the drawing.
Hatching
Hatching is done by drawing short thin lines with a pencil on a piece of paper. The lines are placed at the same distance from each other. At the same time, the pencil comes off the sheet: after drawing one line, you do not pull it across the paper in a zigzag to its original position, but return it back without leaving marks. It is important to hatch the drawing in one direction.
The degree of saturation of the tone is controlled by the different frequency of strokes and their direction - strokes can be vertical, horizontal, diagonal. An increase in color depth is achieved using cross strokes of different directions, for example, diagonal strokes are superimposed on top of vertical strokes.

There are also relief strokes - they are used to convey the relief and are performed with curved, arcuate, broken, but not straight strokes.
Through shading with a pencil, both light and shade and tones are transmitted, as well as various textures: backgrounds, surfaces, materials, etc.
The hatching technique is quite difficult for beginners and requires a lot of practice. It will most likely be a long time before you can develop your own hatching style. Therefore, for beginners, the shading technique is suitable, which will help to correct the flaws in the shading if necessary.
It is with the help of shading that the realism of the image is achieved with a smooth gradation of tone.
It is carried out as follows: hatching lines are applied to the paper with a pencil, and then rubbed with a special tool - blending, or with a cotton swab, a piece of soft paper, fabric or suede. You should not shade the lines with your finger in order to avoid the appearance of greasy spots in the drawing.

In fact, shading is an optional stage after hatching, but with its own peculiarity: it is better to hatch before shading with cross zigzag lines. Do not do horizontal shading - rub the pencil lines only in the direction from top to bottom.
It is important that the shading is uniform. In extreme cases, you can carefully shade the light areas with a pencil again, and weaken the dark ones with an eraser.
In this video you can see how to perform different types of hatching and shading.
When the basics are learned, pencil techniques are mastered, it remains only to practice drawing more often. Remember that practice is the key to your success.
There are many tutorials for beginner artists, where you will see special lessons on drawing individual objects or paintings with a pencil. You can either buy these publications in a specialized store or take lessons from the Internet. The main thing is to practice as much and as often as possible. Let drawing become for you, first of all, a pleasant leisure.
The craft of a good draftsman is based on 2 basic things: the ability to control your hand and the right vision. If you want to create or design websites, then you can’t do without special training.
The next 6 sections of the article, in fact, are the first step in this direction - you will learn how to learn how to draw and where to start. Immediately after that, proceed to the second part of the topic and go on.
This is a translation of a note from Medium by Ralph Ammer (all graphics are his own).
Advice. For the next 6 tasks, use one type of pen and one type of paper (for example, A5).
Hand dexterity - two workouts
The first two moves are about controlling your hand. You should fill your hand, and also learn to coordinate the vigilance of the eye and the movement of the brush. Mechanical practices are great for beginners. You can later use them to try out new tools. They also allow you to relax and take a break from mental or physical work. So, how to start drawing correctly.
1. Lots and lots of circles
Fill a sheet of paper with circles of different sizes. Try not to overlap the circles.
Learning to draw circles is not as easy as you might think. Note that the more circles on the paper, the more difficult it is to add the next one. Draw them in two directions and as many as you can.
Advice. Shake your hand when it starts to cramp, do this after each set.

2. Hatching - creating a structure
Fill in a sheet of paper with parallel lines.

Diagonal lines are the easiest for us, as they correspond to the movement of our wrist. Note that the left-hander prefers the opposite direction of strokes than the right-hander. Take a look at your favorite artist (in my case, Leonardo da Vinci) and try to guess which hand he wrote with?

Try other stroke directions. Have fun with the hatching process. Combine different strokes and enjoy how the paper is covered with various shadow spots.
Advice. Do not rotate the paper. It is very important to train your hand in different directions.
So, after we have trained the hand, we need to do exercises on the eyes!
Perception - learning to see
Drawing is primarily about seeing and understanding what you see. People often assume that everyone sees the same thing, but that's actually not the case. You can always improve and develop the quality of vision. The more you draw, the more you see. The following four tricks will make you expand your view of familiar objects. This is exactly what they begin to learn to draw in different courses.
3. Contour - show me your hands!
Do you see these different fascinating contours of your hand? Draw them on a piece of paper. Do not try to recreate everything, choose only a few of the most interesting ones.

Whether you're drawing a person, a plant, or your favorite animal, you create the outline of what you see. Outlines define the body or object and make it possible to recognize the pattern. The task is not to immediately display all the existing distinguishing features, but to learn how to see them!
Even if you know the shape of an object, it's still worth taking a closer look and re-examining it.
4. Chiaroscuro - apply light and shadow
Draw a piece of fabric. Start with the outlines, and then use your hatching skills to find the chiaroscuro transitions.

This exercise will help you learn how to convey light and shadow on paper. I must admit that this is not the easiest way for beginners. Keep in mind that it is not necessary to make perfect chiaroscuro transitions. The fabric is a playing field to practice the skills learned in the previous lessons. Plus, you will also understand how to learn how to draw chiaroscuro using only your hand.
Advice. You can do curved hatching to create shape, and cross hatching to achieve deeper shadows that resemble the texture of fabric.

Advice. Close your eyes a little while looking at the fabric. You will see a blurry image of the fabric and increased contrast between light and shade.
5. Perspective - Cubes in 3D Space
Let's draw cubes! Follow simple steps.

A drawing in perspective is a projection of a 3D object into 2D space (your sheet of paper).
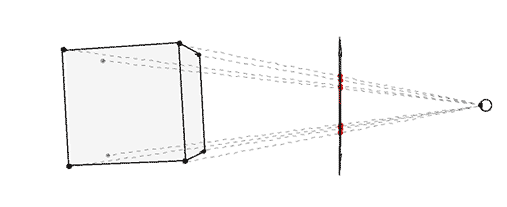
Building a perspective is a separate science, which is unrealistic to be fully considered within the framework of one article. However, we can have some fun with a simple technique that gives us an intuitive feel for the magic of drawing in perspective.
Step 1. Draw a horizontal line. This will be the horizon.

Step 2. Put two points along the edges of the line - two invisible vanishing points.

Step 3. Draw a vertical line anywhere.

Step 4 Connect the ends of the vertical line to the vanishing points.

Step 5 Add two more vertical lines as shown below.

Step 6 Connect them to the vanishing points.

Step 7 Now use a black pencil or pen to trace the cube.

Repeat steps 3 to 7 for as long as you wish. Enjoy building! Have fun drawing, then you will succeed. You can shade the sides of the cube.

Advice. When you draw cross lines, it's best to overlap one line slightly over the other, so the shape is more visible.

Mastering perspective drawings will help you create the illusion of depth. And most importantly, you will teach your brain to see and recognize three-dimensional space. This is a great practice for how to start drawing from scratch without any skills.
Even if you decide to ignore the rules of perspective and make “flat drawings”, this knowledge will never be superfluous, but on the contrary will help expand your horizons and sharpen your visual receptor.
6. Building a composition - why here?
Make 5 different drawings of the same object. Position the item differently each time.
As you create different options for the arrangement of your subject on paper, try to trace how this changes its connotation - meaning.

The author Ralph Ammer has some more interesting articles, but this one should be looked at first in order to understand where to start drawing with a pencil and more. In the comments, I would like to see your opinion about the pros and cons of the presented methodology. Which exercises really gave you pleasure, which did not? What else do you want to know on the topic or, perhaps, you have your own experience on how to learn to draw from scratch - write all this below.
P.S. Free and complete SEO analysis of the site page - sitechecker.pro. In promotion, not only external factors are important, but the web project itself must be good.
If you want to learn a new interesting activity and learn how to draw with a pencil from scratch, there are special methods for beginners. They make the process of creating an image easier. Even if you have never gone to an art studio or art school, if you wish, patience and perseverance, it is quite possible to master this technique.
Selecting the main instrument
If you decide to learn how to draw with a pencil from scratch, first of all, you will need leads of various hardness. Most often, HB or TM is used in the Russian version, but it is also necessary to have H (T), B (M), 2B (M). The marking indicates softness, and the number corresponds to its degree. Number - 2H (2T) is the hardest one that is commonly used. It leaves a very thin, barely noticeable line. If you press hard with a well-sharpened pencil, a scratch may even remain on the paper. The designation HB corresponds to medium hard-softness. The larger the number of the B (M) marking, the darker and wider the line on the sheet will be.

Three different leads are enough to learn. It is worth noting that graphite can be sold both in a wooden frame and in the form of rods for a mechanical tool. They also produce sticks with a diameter of an ordinary pencil, which are covered on the outside with a special non-staining layer. In this case, it is convenient to use the side surface of the sharpened part for hatching large surfaces. They are often bought for quick sketches. You can choose any option.
What else is needed?
If you are trying to learn how to draw with a pencil from scratch, be sure to prepare a good eraser. It should be soft so as not to injure the paper layer once again.

For the same purpose, apply contours with thin lines. Keep in mind that pencils should always be sharp. It is acceptable for a beginner to use a sharpener, but professionals use only a knife. This is due to the resulting shape of the pointed part. To perform the correct hatching, it is recommended to gently sharpen the tool, that is, the stylus is freed from the tree by one or even two centimeters, making a gradual transition of the cut to the sides of the pencil cylinder. A beginner should know this only for general information. Do what is easier and more convenient for you.
Possible execution techniques
Learning to draw with a pencil from scratch is easiest in a linear fashion. easier to do than with tonal study.

Sometimes it seems to an inexperienced artist that he made a portrait very similar to the original, but in the process of shading, the opinion changes. For training, you can perform several works exactly linearly, applying only light shadows in some places. It will give the impression of a quick sketch. After all, it is not necessary to tell everyone that you simply do not have enough experience yet.
In the process of practice, the hand will gain confidence, and you will be able to move on to performing the chiaroscuro elaboration of the form. In the manuals "How to learn to draw with a pencil for beginners" they often suggest using shading. It is the rubbing of graphite on a sheet.

In this version, you will not see separate lines, and the transitions between tones will be very smooth. Hatching is harder to master. Each individual element must be very tightly located next to the neighboring one, otherwise the object will not be whole, but there will be an impression of stripes, hairiness - anything but a single shape.
So, at the first stage, use shading. You can rub the pencil mark with a soft piece of paper or even your finger, but it is worth remembering that professionals do not do this. If you are going to study at an art school, you will have to forget about this way of drawing. With serious intentions, it is better to immediately master the hatching technique, gradually developing the hand. This will come in handy in the future.
How to do hatching?
If you decide to act in a professional way, it is better to practice on regular sheets first.

Try pencils of different softness in action. Try to make tonal transitions with the same lead. The main thing is to try to make the strokes fit snugly against each other, do not use lines crossed at right angles. It is better to impose them in shape, that is, if you have a cube in front of you, then hatching should be done either in the vertical direction or parallel to the lines of the faces. Do more exercise. Remember, skill comes with experience.
How to correct errors?
If during work something does not suit you in terms of quality, the pencil is easily erased.

However, in order not to remove the excess, it makes sense to make a cut on the eraser with a knife, forming a thin edge. If you start to actively erase hatching, you can smear too much of the work done or severely injure the paper. A new layer of graphite does not fit well on a damaged surface. To remove a large amount of hatching or a partial weakening of the tone, if the subject turned out to be too dark, use a special erasing mass. It resembles plasticine or In professional slang it is called a nag. It easily absorbs excess graphite. The same property has a lump of crumb of ordinary bread. So, even if you overdid something in your first experience, mistakes can always be corrected. The main thing - try not to repeat them next time.
What is better for beginners to draw?
If you are interested in how to learn how to draw with a pencil in stages, everything is simple - the work must always be done from simple to complex and from general to detail.

Whichever plot you choose, the sequence of steps will be similar. Of course, it is better for beginners not to use too complex motifs with a large number of constituent elements. This can be done only with clear visual step-by-step instructions. For independent drawing, choose simple objects and compositions from them, for example, a still life of household items, fruits, vegetables lying on a table or in a basket.
It is worth being patient if you decide to learn how to learn how to draw portraits with a pencil.

This is one of the most difficult tasks even for a professional. It is very difficult for a beginner to master it. Of course, everyone has objects that, regardless of the level of skill and experience, they want to portray. Choose your favorite subjects, just try to find and learn as many tips and tricks for drawing them as possible. We are talking about such complex objects as animals, flowers, architecture, cars, motorcycles, boats, people.
How to learn to draw cars with a pencil? You can draw them from a photograph (for example, by cells, the technique is described in more detail in the next section). For novice artists, it will be easiest to depict the car from the side.

pencil?
Performing a person's face is one of the most difficult tasks. A beginner can be offered a method for creating an image by cells from a photograph.

It allows you to more accurately convey the proportions. To do this, take the following steps:
1. Draw a honeycomb structure on a transparent film.
2. Overlay it on the photo and fix it so that it does not accidentally move.
3. On your sheet of paper prepared for the portrait, also perform an auxiliary construction in the form of cells.
4. Compare how the lines on the original cross the cells, try to repeat them as accurately as possible with a pencil.
So, you have learned how to learn to draw with a pencil. It's pretty easy step by step. Most importantly, follow the sequence of work from general to detail, and also at first try to choose simple objects to complete.
If you want to learn how to draw beautifully in a matter of days, then you have come to the right place. Since this article will help even the most inexperienced beginner master drawing techniques and learn how to draw with a pencil on your own.
The main thing in the article
Basic rules for drawing with a pencil
To learn how to draw, you need to master this art step by step. As with any creation (work), there are certain rules in drawing, without knowing which, it will be very difficult to study this science. Let's get acquainted with the basic six rules for drawing with a pencil:

How to quickly learn to draw a person with a pencil?
Before starting work, you need to make small mathematical calculations. For a proportional view of a drawn person, the head is taken as the basis. Next, the rest of the body parts are calculated. For a realistic picture, men take: 
- from head to hips - size 2.5 heads;
- from hips to knee - 1.5 heads;
- from knees to heels - 2 heads.
For the image of a woman, the calculation changes slightly: 
- from head to hips - size 2 heads;
- from hips to knee - 2 heads;
- from knees to heels - 2-2.5 heads.
The greatest attention is paid to the face, since there are many lines that need to be conveyed with the greatest accuracy. You should draw a face in stages, you will find more detailed drawing instructions below.
How to learn to draw landscapes with a pencil?
Landscape is an artistic genre of fine art, the main subject of which is the image of the nature around us.
For example, consider how to draw landscapes with a pencil.
To get such a picture, you need to prepare a pencil and a white sheet. Now we perform the following steps:

How to draw anime with a pencil?

Anime- a popular modern cartoon direction, which is "addicted" not only to teenagers, but also to young artists. When drawing anime, you do not need to adhere to the classic rules for drawing a person. And this greatly simplifies the drawing process. The main elements in this drawing are the head, eyes and hair. And cartoon anime is drawn like this:
- Initially, an oval of the head is drawn. It is divided in half with a straight line, after which the same oval is divided across into three parts.
- Now you need to mark out where the nose, mouth and, most importantly, large eyes will be located.
- Outline the eyes. Between them there should be a distance of one eye. Begin to draw big eyes from the arch of the upper eyelid. A feature of the eyes of anime characters is the glare in the pupils, which are given a lot of attention.
- There is only one requirement for an anime nose - it must be small. Basically, artists perform it in the form of a tick.
- Eyebrows should be drawn over large eyes. They are performed in the classical style, in other words, these are two even arcs.
- The lips on the cartoon face are drawn with two small lines that interlock with each other.
- As for the hair, they are drawn in triangular plates that fall randomly and slightly cover the eyes.
How to learn to draw beautifully at home with a pencil?

The basic rule for drawing a house is using straight lines.
Thanks to them, the structure comes out stately and beautiful. Also, in drawing a house, you should maintain a certain technique:
- D Ohm is drawn in the same way as they are built - from the bottom up.
- The basis of the future house is an ordinary rectangle. It is done in straight lines.
- Mark the foundation by drawing it across the entire width of the house.
- Straight lines outline doors, windows, corners and other elements.
- The roof according to the standard is drawn in the form of a triangle. If desired, it can be modified. The roof is decorated with tiles, since it is this coating in the figure that looks very impressive.
- Now pay attention to the details of the house. It is necessary to draw windows, shutters, a doorway, steps, a porch, etc.
- Shade the drawing, remembering the basic rules of drawing.
- Place trees, flowers, bushes around the house.
How to learn to draw animals easily with a simple pencil?
Drawing animals can be done not only with children. Lovely representatives of the fauna turn out great on canvas and touch the eye. Therefore, pick up a pencil and start drawing amazing friends of our smaller ones.
How to draw a dog with a pencil?
Drawing a dog on paper is quite simple. Based on:
- a circle that will act as a muzzle;
- oval - the body of the dog.
After the muzzle and paws are formed. All the details are applied and the dog is ready. 

How to draw a horse with a pencil?
To draw a horse, an artist must have certain skills, since not everyone can convey on paper all the power and pride of this animal. Below is a step by step guide to help you with this task. 

You can try to draw a simpler option, for example, a cartoon horse. 
How to draw a cat with a pencil?
A cat is a favorite pet in many families, so it is not surprising that artists depict this animal very often. Cats in different styles look equally beautiful, while they are drawn quite simply, and the diagrams below prove this once again. 


How to learn to draw people's faces with a pencil: basic principles.
Let's return to the topic of drawing a person, and to be more precise, consider the basic principles and stages of drawing: 
- Initially draw an oval . It is divided by axes of symmetry into 4 parts. The axes should converge in the center of the oval.
- Now oval to give the contour of the face. You should start from the chin, moving up, drawing the zygomatic region, the temporal zone. The lines need to be shaded with a piece of leaf. This will make the outline not so heavy.
- Barely noticeable lines divide the face into three identical parts across. The tip of the nose should be on the bottom line.
- The nose is drawn from the tip. Depending on the type, it can be round, square or pointed. Then we finish drawing the wings of the nose and the bridge of the nose.
- Mouth start draw from the curve of the upper lip located opposite the edge of the nose.
- Since in the portrait the soul is transmitted through the eyes, we will dwell on this element of the portrait in more detail below.
How to learn to draw eyes well with a pencil?

Since the eyes play an important role in the portrait, maximum attention should be paid to their drawing. When drawing this part of the face, consider the following:

How to learn to draw cars with a pencil?
The car is drawn with a pencil according to the following plan:
- The external outlines of the car are indicated depending on the brand.
- The resulting template is divided in half.
- The body is indicated by bold lines.
- After the wheels are drawn.
- Next, windows, doors, mirrors.
- Parts of the car are distributed (headlights, bumper, etc.).
How beautiful it is to draw sketches of clothes with a pencil?

Many girls dream of becoming famous fashion designers since childhood. But without the skills of drawing sketches of clothes, this is simply impossible.
A sketch is a fuzzy drawing of a model that focuses on clothes, shoes, accessories, leaving the silhouette of a person in the background.
Consider the basic rules for drawing clothes on models:
- Attention to detail. For the integrity of the image, you need to pay attention to all the little things, not forgetting to draw accessories, ruffles, patterns on the fabric.
- Also follows take into account the density of the fabric, because it depends on how the thing will sit on the figure of the model. Dense fabrics in the sketch look a little baggy, but light fabrics will flow around the figure.
- Thoroughly draw folds on the fabric, curves of the figure, in order to convey the realism of the clothes as much as possible. Folds on clothes are also depicted in different ways. On thin fabrics, they are intermittent, small, but on dense fabrics, the folds are more wavy.
- When coloring a picture pay special attention to the depicted print. Consider on the folds how it can break.
It is difficult to see the nuances of the cut on the sketches, therefore, a flat layout of the thing must be attached to each model, so that by examining it, you can identify all the nuances for creating a model.
How to learn to draw flowers with a pencil?
Each flower is unique, and it is not so easy to convey all its beauty on canvas. We suggest below to consider step-by-step schemes for drawing flowers. 


Video: How to learn to draw with a pencil for children
Pencil drawing lessons for beginners: video
Love indoor flowers? Then watch short videos of flowering anthuriums, hibiscus and other house flowers.
Learn to draw cartoon characters
Animal Drawing Lessons
Pet Drawing Lessons
Lessons of drawing birds with a pencil
Nature drawing lessons
We will do the drawing of the mushroom in stages, first with a simple pencil. In the last step, you can color the mushroom drawing with paints or colored pencils, and if you draw leaves and grass next to it, the picture of the mushroom will be very beautiful and attractive.
To begin with, remember that a rose consists of petals adjacent to each other. This is the biggest difficulty for drawing this flower. To make the rose flower look more realistic, draw the stem of the rose with leaves as well.
It is better to draw flowers with paints, a black and white drawing of flowers cannot convey the beauty of flowers. In this lesson we will learn how to draw flowers in a bouquet in stages with a simple pencil.
To draw a picture of a snowflake, in addition to a pencil, you need a ruler. Any drawing of a snowflake has the correct geometric shape and therefore it is better to draw with a ruler.
A butterfly, as well as flowers, is best painted with paints. But first, draw a butterfly in stages with a simple pencil.


