How to paint fruits in watercolor?
How to draw fruits or vegetables in watercolor so that “drooling”? So that the painted fruits are as fresh and juicy as natural ones?
How to convey the volume and texture of the fruit, and at the same time “not dry” the watercolor?
These questions will be answered by a step-by-step master class of drawing a lemon in watercolor!
Basic principles of how to paint fruits in watercolor:
- Best of all, the juiciness and freshness of fruits is conveyed by the a la prima technique, watercolor painting in one layer.
One layer of paint is maximally penetrated by light rays. The light that has passed through the ink layer reflects off the surface of the paper and returns the purest color wave to us.
- In the case of multilayer painting follows:
- apply layers from light to dark
- use transparent, not opaque pigments
- use purer original colors for complex shades
The principle of multilayer writing is based on optical color mixing. That is why you should alternate the layers correctly so that they do not cloud the previous ones, do not reduce the transparency of the final watercolor layer.
For more information on the correct selection of colorful pigments in watercolor, see here:
Perhaps it is better to illustrate these principles with the example of a finished study. Let me show you how to draw fruits in watercolor step by step.
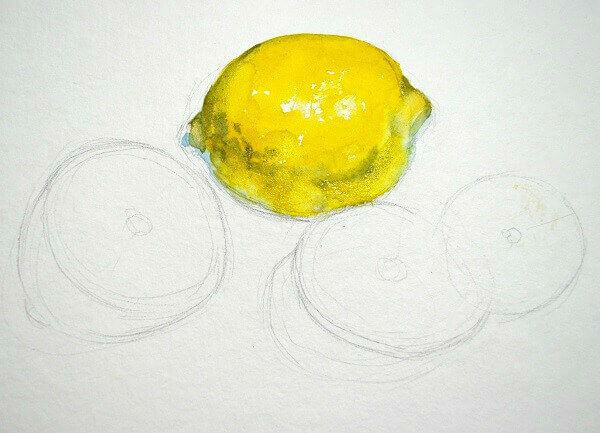
We draw a sketch of a lemon in stages.
So, here it is, my vitamin nature. The more I look, the more “drooling flows”. 🙂 I'll try to keep this feeling of lemon juiciness in the sketch.

Stage I. Study of a whole lemon fruit.
- I'm starting to draw a lemon from its illuminated part.
Here its color is as bright and clear as possible. I use a mixture of lemon yellow and cadmium yellow.
In the most convex part of the lemon, we can see highlights - small light areas on the tubercles of the peel. They must be shown in order to plausibly convey the texture of the surface of the lemon.
To do this, I use the “dry brush” technique. 
2. At the bottom of the lemon there is a patch of light reflected from the surface of the table, reflex. I paint this place with a pale blue tint.
3. Will complete the creation of the volume of the lemon darkening own shadow.
To get the shade shade, I mix cadmium yellow with natural umber.
I write the shadow immediately, until the edges of the illuminated part and the reflex have dried up. This ensures a smooth flow of color into color.
On the border of my own shadow, I emphasize the small pimples of the lemon peel.
Thus, to pass the invoice i use two tricks:
- gaps on the convex part in the light
- roughness of the border at the turn of light and shadow
4. drop shadow from lemon completes its volume.

To write the shadow, I use a mixture of yellow and purple. I make a fill with a predominance of one or the other color. This helps convey the transparency of the drop shadow and connects the lemon to the surface of the table.
5. Since the drop shadow has the same color everywhere, at the same time I write the shadow from the lemon slices: 
As you can see, it takes quite a bit of effort to draw a whole lemon fruit. For this, the a la prima technique is quite suitable. Especially if this fruit is not the main object of the composition, and I do not need its detailed study.
But with lemon slices there will be more work. Juicy pulp, its brilliance, fibers - all this requires more careful work, which means multi-layered painting.
 Start painting with watercolors today!
Learn the basics of watercolor painting with a popular course
“The Taming of Watercolor”
Stage II. Image of lemon slices
1. I prescribe the side surface of half a lemon in the same way as described above.
2. I begin to depict a cut of the fetus.
I pick up several shades of yellow, from pure to mixed with umber, and draw radially spaced pulp fibers. At the same time, I leave white paper in places of glare and jumpers: 

3. In the humid environment of the laid spots, in some places I introduce even more shades. 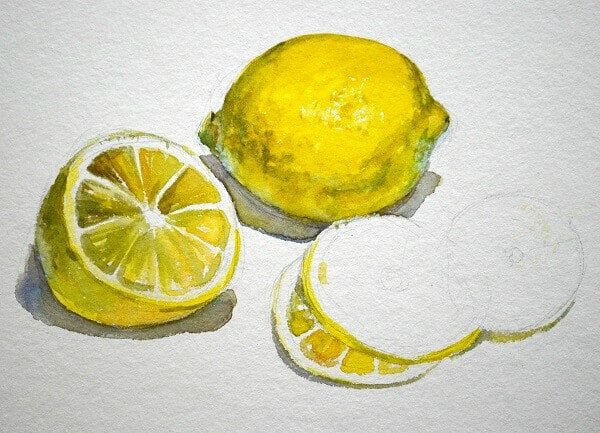
I leave this layer to dry.
More useful stuff:
4. Slices can be written and otherwise.
For example, on these lemon rings, I first completely registered the cut with a pale yellow tint of the illuminated part of the pulp. Wherein. again, left gaps of glare. 
5. When this large light spot dries up, I give radial strokes in darker shades: 
These strokes are quite large. I leave them to dry so that I can divide them later.
6. In the meantime, you can touch a little background.
With a very pale shade of grey, with wide fills, I fill in the background around the lemons.
At the same time, I touch the light areas of the zest on the slices. 
How to draw fruits?
Drawing not only develops fine motor skills of the hands, instills a sense of beauty, but also calms the nerves, brings peace and concentration. Below we will give general tips on how to draw fruits and on which sites you can find good step-by-step instructions and videos, by watching which you can easily learn how to draw still lifes. Still life - a drawing (picture) that depicts a group of inanimate objects or one object. The word came to us from the French language "nature morte", which translates as dead nature. Various items can be used as nature: household utensils, vegetables, fruits, flowers.
Draw a still life
- First you need to create a composition. Decide whether it will be one object or several, take care of the background. It is advisable to use plain fabrics or a wall.
- Now on paper we determine the center of the composition and make sketches with a pencil. How to draw fruits with a pencil? We start with the simplest shapes: an apple - a circle or an oval, a pear - two circles, grapes - several balls, etc. you should carefully monitor that proportionality is respected, everything is located in its place.
- Now we enter the fruits into the shapes. These lines should already be clearer.
- We delete the auxiliary lines and refine the contours of the fruit, draw small details.
- Shadows are superimposed with a pencil, the correct tone alignment is created. Carefully follow the hatching, darker places are darkened first, then those that are lighter. This is done with a well-sharpened pencil, layer by layer.
- At the last stage, we check and refine all the details, paying special attention to the areas of light and shadows. After that, you can start coloring if we draw a still life with watercolors or other paints.


Very well shown how to draw a still life with fruit on the following sites.
You can eat food, that's a fact. Why not try painting with food?! Vegetables and fruits can replace the brush. Let's say "YES" to fruit and vegetable masterpieces!
What to do with kids? How to develop creative thinking and stimulate the craving for creativity? How to show empirically that everything around has a multifunctional value, one has only to forget about the usual purpose of things? Invite your child to draw with edible fruits and vegetables, making stamps out of them. The “side effect” of such drawing is that the baby will quickly remember the names and classification “fruit - vegetable”.
Try not to limit your child's imagination. Likes to draw - provide all the necessary materials and show how you can use for your own purposes something that at first glance is not at all intended for this.

Do you drink tea with lemon? The child already knows that a lemon is yellow, sour, juicy, etc. Let him expand his horizons - let him paint with half a lemon as a stamp. The kid will see what mark the peel leaves on the paper, and what texture the slices give. A round shape is obtained if the fruit is cut across, and what kind of imprint will come out if you make a longitudinal cut?

The PROCESS itself is important for children. If you want to find a use for a drawing, stamp paper for wrapping gifts, decorate napkins or a tablecloth with prints, make a postcard, etc. There are special paints for glass, fabric, and ceramics. A children's masterpiece will take its rightful place in the house and will remind you of an unusual drawing lesson for a long time.

An apple is not only delicious, you can not only make compote and jam from it, make a filling for a pie, you can draw with it. How? Dipping the halves in thick paint.

The drawn compote can be "rolled up" in jars and "put" on the shelves in the closet.

wk-ufa.ru
To make it convenient to hold the stamp, put it on a skewer or on a fork. So the child will not get dirty, it will be more convenient for him to remove the fruit from a sheet of paper without shifting or smearing the image.

v.img.com.ua
The bow can not only bring tears to those who cut it, but also act as a brush. Think with your child what the prints look like?

v.img.com.ua
The lucky clover is the print of the pepper! An interesting solution, however.

Beautiful "flower" prints are left by Beijing cabbage and celery.

cdn.imgbb.ru
Hard foods, such as potatoes, are a versatile material for cutting all kinds of shaped stamps. While mom is peeling potatoes for soup, the baby is drawing with the same potato! Great!

Drawing with stamps will help you learn letters and numbers!
Drawing with stamps from vegetables and fruits is a fascinating and very useful activity. It develops imagination, relieves stress, teaches children to be careful.
Dear readers! Tell us, have you tried drawing with children with edible “brushes”? What stamps and what did you use?
Still lifes with vegetables were loved by many world-famous artists. Their canvases still adorn the walls of famous museums. Drawing a still life with vegetables is not at all as difficult as it might seem at first.
For the image of various vegetables, you will need watercolor or simple colored pencils, paper, an eraser, a mechanical pencil and a black gel pen.

Drawing a still life with a variety of vegetables can be divided into several stages:
1. Draw the outlines of vegetables. To make the composition successful, try to have one vegetable slightly overlapping the other;

2. Draw each vegetable more carefully. They can be drawn both from nature and from a photograph, or simply from memory. Vegetables are not distinguished by their intricate structure, therefore, excessive detail is not required when drawing them;


5. Start coloring the pepper with a yellow pencil without painting over the highlight on it. Those places where various irregularities pass, paint over with orange and red-brown shades;

6. Finish coloring the pepper, deepening the shades with red-brown and brown pencils;


8. Shade the radish located behind the pepper in pink;


11. Finish coloring the first cucumber and color the second, also using green, yellow and brown pencils;

12. Color the bulb with brown crayons. Leave the highlight unpainted;
Drawing with vegetables is completely ready. A similar still life can be painted with paints.
In this lesson we will show you the phased drawing of fruit. Here you can learn how to draw such fruits as: apple, pear, orange, lemon, strawberry, and also watermelon. Our lesson will consist of seven step-by-step tips with which you can easily cope with this drawing.
Well, let's start drawing!
Stage 1. First we need to draw the main lines, which will make it easier for us to draw fruits in the future. We call these lines auxiliary lines and we draw them in the following way: Please note that our lines have a different color. In place of the blue lines, we will have those fruits that are in the foreground (these are fruits such as strawberries, apples, oranges and lemons), and in place of the green lines we will have fruits located in the background (these are pieces of watermelon and pear)
 |
Stage 2. Already at the second stage, we begin to draw our fruits. We begin to do this by drawing an apple and its slices, as well as a small strawberry. Do not forget to also draw a shadow from an apple and its slices. We draw these fruits in this way:

Stage 3. Let's move on to drawing the next picture. And the next drawing we will have is an orange with pieces lying next to it. We draw an orange as shown in the figure below. There is nothing difficult in this, you can handle it.

Stage 4. Well, at the fourth stage, we will draw a sour lemon, which lies next to an orange. The lemon is whole, unlike an orange and an apple, that is, pieces are not cut off from it.

Stage 5. The next step in our step-by-step drawing is to draw the fruits that are in the background. In the background we have two pieces of juicy watermelon and a sweet pear. We look at the picture, and using the auxiliary lines, draw these fruits.

Stage 6. Our drawing is ready with you. Gently erase all auxiliary lines with an eraser, we will not need them anymore.

Stage 7. And at the last stage, we will decorate our fruits in juicy, bright colors. Please note that when coloring fruits, you need to color some areas darker and others lighter. This is necessary in order to make our picture more realistic.
 |


