Many people find inspiration in drawing. Some want to become professional artists, but for others it's just a hobby. This article will show you how to draw a portrait with a pencil step by step for beginners. Why do people draw portraits at all? Some people just really like the person they want to draw. Others are interested in trying themselves. The third wants to impress. But it's all about adults.
But many children want to congratulate their mother on the holiday or just to please her. They come up with the idea to draw her portrait with a pencil. After all, such a gift will be pleasant, remembered for a long time and will take its place in the house. Not all guys go to art school, but I want to the drawing was done correctly and pleased with its beauty. Therefore, a lesson will be told here on how to gradually depict a person's face on paper. And since you can draw anyone, even if it’s your mother, even your favorite actress, this lesson will come in handy for a variety of people.
Even beginners should do well and quickly learn the technique of portraiture. And all because they really like the chosen object for drawing and the children want to please someone. This is the best motivation.
How to start painting a portrait? First steps
 To learn how to draw a portrait, you need to move from simple to complex. The human head in the figure has only three angles: full face, profile and half turn. For starters, it’s worth trying to learn how to correctly depict a person’s face from the side. After that, it will become much easier to write it in full face.
It is worth remembering that the faces of men and women are slightly different. When drawing a portrait of a man, you should use more hard, clear lines. In the portrait of a woman, they should be abandoned, preferring softer, smoother and more feminine ones.
First you need to draw the frame of the future portrait with a pencil. Display the shape of the head, the approximate distance between the chin and the back of the head, the distance between the eyes. At the same time, one should not forget about scale, proportions and other face measurements. Pencil strokes must be made thin and light so that they can be corrected at any time.
After it turned out to draw the basis of the future portrait, you should start depicting facial features. To avoid a distorted image, you need to constantly check the drawing and model.
As soon as the different parts of the face are marked in stages, it is necessary to highlight those parts that protrude, namely forehead, cheekbones, chin. In general, you should pay attention to the features of a person’s face and try to convey them. Be it the thickness of the lips, the height of the forehead, or the location of the eyes.
The hairstyle should be given special attention, because it is a component of the image, style and perception of a person. You need to draw it with long strokes, darkening the hair at the roots, thereby giving them volume.
 To complete the drawing, you need to erase the extra wireframe lines and start working on the details. Skin, hair, shadows and light. All this should be conveyed in the drawing with a pencil. Pencil strokes will help with this, which become lighter or darker when pressed. The background must be drawn dark strokes, pressing on the pencil. You need to do this so that the person stands out and is in the foreground. You should pay attention to the individual characteristics, zest of a person and convey them on paper.
Portrait painters have golden rules for drawing a face, called a reference:
- eye line - a segment in the middle between the top of the head and the chin;
- the line of the nose runs between the eyebrows and to the chin;
- the segment between the nose and lips is divided into three parts: on the lower line of the upper part and there will be the beginning of the lips;
- the head should also be divided into three equal parts, the top one will mark the hairline, the middle one - the eyebrows, and the bottom one - the nose.
How to draw eyes?
Drawing eyes should be given special attention, as they are a mirror of the soul and are very important when depicting a person. Where to start:
- draw two ovals;
- inside them are two more - the iris and the pupil;
- draw eyelashes, not with straight sticks, but arched from the eyelid to the eyebrows, thicker at the corners and short at the beginning;
- hatch so that the edges of the iris are darkened, and glare is indicated on the pupil.
Pencil portrait


Drawing lessons on the Internet
In the modern world, even if a person has not studied drawing in an art studio and is a completely novice artist, not everything is lost for him. After all, in the age of the Internet, many artists are completely free of charge. post drawing lessons online. Step-by-step photos depicting each step, training videos. All this will help to master the skill and learn how to draw beautiful portraits. One has only to find the appropriate video or blog, and then even beginners will start to get beautiful pictures.
No matter how interesting and useful the article is, not everyone is able to perceive what is written with ease, it will be easier for many to see it than to read and try to understand it on their own. Drawing from the tutorial will be quite simple and exciting.
It is worth remembering that a real artist is one who cannot imagine his life without drawing and holds a pencil in his hands every day!
In addition to the fact that drawing portraits is a great hobby that can keep memories of dear and close people in the life of an artist, it is also a form of income. Indeed, talented craftsmen significantly increase their income by doing what they love and honing their skills.
A step by step guide to drawing portraits.
- If you want to learn how to draw portraits, but have not come across this type of art before, start with yourself. More precisely, start drawing yourself. We're talking about a self-portrait. This is what Van Gogh did - he painted his portraits. In order for you to be able to see the details of your face, pay enough attention to the lighting. For right-handers, for example, the light source should be placed on the left side and slightly above the artist.
- Create the first drawing on a 1:1 scale. To do this, make sure that the canvas (or other material on which you will paint) is larger than your head so that it can fit completely.

- Try not to turn your head too much, using eye movements when drawing. By the way, you can start drawing from one of the eyes. Study it carefully, draw and move on, measuring the proportionality of all the details.

- Having chosen the least difficult way in the question of how to draw a portrait (that is, a self-portrait), you still need to pay attention to details. For example, when drawing an eye, you should pay attention to all the small wrinkles, the density of the eyelashes, the shape. You will have to be objective, although it is not always easy.

- When drawing the second eye, do not mindlessly copy the previous element. In the biological world, complete symmetry is a rarity. See how your right eye differs from your left, and try to convey these differences in the drawing.

- After the basic unit - the eye - is drawn, use its dimensions to maintain the correct proportions. With this unit of measurement, you can qualitatively measure the distance between the eyes, the distance from the visible edge of the face.

- Pay attention to the height and shape of your eyebrows. Often they are what make a person recognizable, so try to convey them objectively.

- Hold a mirror behind your easel so that you can lift your eyes slightly to see the original at any given time. Try not to make unnecessary movements so as not to lose the original angle of the head. Even a slight inconsistency can confuse a novice artist.

- To maintain symmetry, draw a vertical auxiliary line dividing the space between the eyes in half. You will be guided by this line when drawing the nose and lips. But remember that the world does not have to be perfect, and if in real life your nose protrudes to the left of the center line, you should convey this feature on paper.

- Match the unit of measurement "eye width" with the distance between the bottom of the nose and the inside of the eye. Transfer the resulting correspondence to paper. Next, in the same way, measure the distance to the upper lip and draw the size and shape of the lips. In the case of correctly designed proportions, you will already at this stage get a high level of portrait likeness.

- Next, you need to determine and draw the shape and height of the cheekbones and ears. This is not easy, because it is these parts of the human face that are unique and not easily amenable to the brush of a novice master. But if you succeed, then you are undoubtedly ready for subsequent difficulties.

- Marking the chin and jaw the first time is also not for everyone. In addition to the fact that professional drawing of a protruding bone is not an easy task in itself, people tend to idealize their appearance. Not everyone can recognize the excessive squareness of their jaw or the bulge of their chin. However, artists see beauty differently than ordinary people - just in these imperfections that distinguish people from each other.

- Start drawing hair. In your first self-portrait, pay attention not to the details, but to the general similarity: the height, density and shape of the hairstyle. Don't waste time drawing individual strands. At this stage, we do not have such a goal.

- Now pay attention to the play of chiaroscuro. Proceed to darken the desired areas, as well as lightening where necessary. So you make the drawing voluminous and natural. Start working with the darkest areas (the iris of the eyes) and then move in descending order, along the palette - from dark to lighter.
- Try to pay enough attention to the location of the light spots in order to achieve the greatest naturalness of the picture. Notice even small and seemingly insignificant details.
- Using lightening and darkening areas, mark the bones of the skull under the skin so that the person depicted in the portrait is obviously created from flesh and blood, and not from marmalade and ostrich feathers (if you are painting a self-portrait in the classical style, of course).

- Shade one of the wings of the nose and try to convey the shape of your organ of touch as correctly as possible. With all its features: size, shape and possible imperfections.
- Also work out the shadows in the nasolabial septum and on the cheekbones-chin. Do not focus too much on the shadows under the lower lip. If you overdo it, you risk distorting the correct understanding of the portrait.

- The final touches are light spots and shadows in the neck area. Here is your first self-portrait and ready.

What you have read above will help you develop basic skills and come to a common understanding of what is important to pay attention to when drawing a portrait. It takes practice, lots of practice, to perfect what you've just learned. And each portrait will get better and better.
Depicting a person on a piece of paper will help you easily draw friends and acquaintances. This art is not as difficult to learn as it seems at first glance, because everyone made their first sketches in childhood, the main thing is to hone your skills. Before the invention of photography, many people drew portraits, so the main thing to learn is to remember these skills.
How to learn to draw portraits with a pencil? This question is asked by many novice artists, it's very simple, you don't need to graduate from art institutes, but simply become a student of our drawing studio.
With us you can quickly learn the skills of drawing a portrait. Our specialists work according to the author's program, which allows you to hone your skills in practice, because this is the main thing in learning to draw with a pencil. We accept people of all ages and it is not necessary to have professional skills, the main desire is to learn how to draw, and we will help you make your dream come true.
How to draw portraits with a pencil?
In order to start learning to draw a portrait correctly, you must first choose a special paper that is suitable for sketching with a pencil. It has a porous structure and strokes fit better on it. And it is worth picking up a soft pencil, if it is hard, then traces will remain on the paper after removing an unnecessary stroke. In our studio you can learn the art of drawing at a professional level, and you will be provided with all the necessary tools and equipment for work.
To begin with, it is worth familiarizing yourself with the proportions of the human head. If you immediately look at the face, it seems that the eyes are located at the top of the head, but this is not at all the case, they are located in the middle, and the feeling of incorrect placement creates congestion with other details. In order to correctly depict all the elements, it is necessary to draw several vertical and horizontal lines on a blank sheet of paper. The horizontal line will be the eyes, and the vertical nose.
Step by step learning to draw a portrait
To begin with, you need to pay special attention to the shapes of the parts of the face that you depict. After all, each person has his own individual characteristics, the eyes can be round or elongated, and the nose can be of different shapes. The main thing is the elaboration of details, because the portrait should look like a certain person. Then you need to work in stages and learn to draw the following elements:
- Eyes - to depict them, you need to draw three lines. In the central part there will be pupils. You must first sketch the eyeball and eyes and do not hatch. After the image of the pupil, the eyelids and existing wrinkles are drawn. At the final stage, eyebrows are drawn;
- Lips - also drawn in three lines. To make it easier, you need to start with the lower lip, then proceed to the upper part. It is divided in half by a hollow. Using the addition of shadows, you can make folds and bulges;
- Nose - they begin to draw it above the upper lip. Artists depict it in the form of a tick. And from this checkmark, draw several large arcs on both sides.
 After drawing all these details and sketches, the main difficult work is done. In the final stage, shadows are superimposed on the drawing. This is a rather important stage, which should be given great attention, because it is they who enliven the face. Particular attention is paid to the eyes, because it is worth refreshing the look, it will greatly decorate the portrait. The final step will be drawing the oval of the face along with the shadows.
The main benefits of studying at Matita's drawing studio
If you have a desire, learn to draw portraits with a pencil, but you don’t have any skills and experience at all, this is not a problem. We can quickly teach you all the subtleties and details, and soon your family and friends will admire your portraits. Many people ask the question, why is it better to study in a drawing studio, and not on your own using a video lesson? Because when you come to our studio, you get a number of the following benefits:

After completing the course, you will be issued a certificate that confirms the knowledge you have gained. To try your hand, you can sign up for the first free lesson.
As you know, the image of people is one of the most difficult areas in art. In order to beautifully draw the figure of a man, woman or child, a novice artist needs to have not only certain professional skills, but also knowledge of anatomy, as well as be able to observe proportions. A portrait created with a simple pencil is one of the most romantic gifts you can make with your own hands. Surely each of us, at least in our dreams, thought about how to draw a portrait from a photograph. Do not be ashamed of your inexperience, try to draw with a pencil, because even those portrait painters who are taking their first steps in creativity can do it.
Beginning of work
Before you start drawing a portrait, you should study the photograph, what position the head of the depicted person occupies, how it is rotated relative to the vertical and horizontal. Be sure to pay due attention to the proportions (size, as well as the relative position) of the eyes, nose, ears and mouth. Accurate observance of proportions when applying the first strokes is an important guarantee of the similarity of the final image with the face in the photograph. Familiarize yourself with the average proportions of a human face shown in the figure, and then compare them with the original image in the photograph. If they diverge a little, there is nothing to worry about, since it is precisely in deviations from the standard that the individuality of a living person captured with a camera lies.
For more detailed information about the structural features of the human skull, which may be needed when depicting a portrait, you can always refer to the anatomical atlas. Apply with light lines the general outline of the oval of the face, hair, lips, nose, eyes and eyebrows.

After that, you can begin to analyze the planes of the face. At this stage, the height of the nose should be marked with a plane. In order to better see the volume, it can be shaded. This should be done with all areas of the future portrait that are in the shade. Next, we denote the plane of the lips, the cheekbone, located closer to us, as well as the plane of the eyes, which connects to the eyebrows. At this stage of creating a portrait, it is quite easy to outline the geometric features inherent in the face of the depicted person, without even drawing it with smooth lines.

Performing face detailing
Peel off the top layer of the pencil using a nag eraser to make the previously drawn lines almost invisible. After that, we proceed to drawing all the features of the face. We round them in order to give the portrait the maximum resemblance to the photograph.

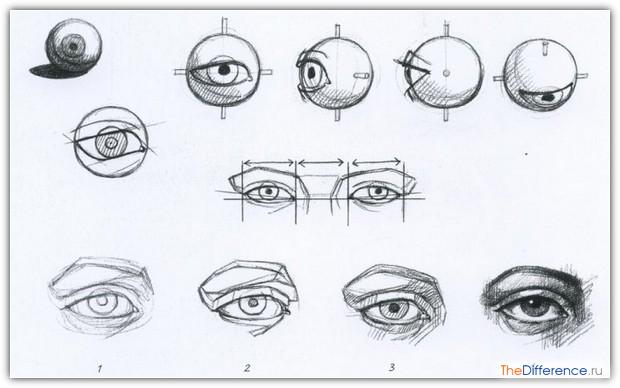
It is no secret that the eyes are often called the mirror of the human soul - they are very expressive. Therefore, there is no need to prove the importance of accurately conveying their location and shape. In order for the eyes drawn on paper to look more alive, the sclera (the so-called white part of the eye) does not need to be depicted as snow-white, since in fact its color changes under the influence of its own shadow and the shadow that the eyelid casts on it. Apply highlights to the lower eyelid and inner corner of the eye.

The figure below shows the sphericity of the eye, as well as how the eyelids rest on the eyes. Here, a novice artist can also get acquainted with the sequence of depicting eyes in a portrait, starting with highlighting and shading areas (2 and 3) and ending with highlights and shadows. It should be noted that women and men of different age categories have different eyes. For example, women tend to have longer, thicker eyelashes and thinner and more defined eyebrows than men.
The mouth in its expressiveness is not too inferior to the eyes. It is the lips that are the place of transition of the mucous membrane to the skin. This is the reason for their characteristic pink color. When depicting lips in a portrait, it should be remembered that they are the most mobile element on the face, capable of taking one form or another. The upper lip is usually thinner than the lower lip.

Many, when drawing a portrait from a photograph, are faced with the problem of depicting a nose that looks completely different from different points of view. The main task is to be able to convey the main contrast of shadow and light on the nose, so that the drawing does not turn out to be overloaded with unnecessary elements. Usually, but not in all cases, the maximum light falls on the tip of the nose and the bridge of the nose, and the thickest shadow falls on the base of the nostrils (figure).

As for the ears, their shape varies greatly in different people, but does not have pronounced features in the representatives of the stronger and fairer sex. Despite the fact that in photographs the ears are often hidden by hair, professional artists recommend not to neglect them, in particular their most expressive and precise position on the sides of the head. The length of the ear in adults is approximately equal to the length of the nose (see figure). In children, the ears are proportionately slightly larger.

Hatching, working out halftones as important stages in drawing a portrait
Upon completion of work on the detailing of the face, we proceed to the beginning of hatching. First, you should erase all the extra lines that are on the portrait, since after the start of laying the tone, there will no longer be an opportunity to do this with sufficient accuracy. There are no specific hatching rules - everyone does what is more convenient for him. Professional artists advise starting hatching from the darkest parts of the portrait. In the future, it will be possible to build on them, so as not to darken clothes, eyes, skin too much.

When giving a tone to the skin of the face, clothes and hair, you should not use a nag (unless, of course, you accidentally put a stain on the future portrait). If you are right-handed, then intensive shading of halftones should begin from the upper left corner of the sheet, in order to avoid smearing what has already been depicted. Accordingly, the left-hander needs to do everything mirrored. At this stage, a slight study of the background is allowed.
Highlighting and darkening - the last stages of working on a portrait from a photograph
At the end of the hatching, if you did everything right, you will get an almost finished portrait, which, however, will not look voluminous. To correct this flaw, it is necessary to highlight some places on the face, such as the tip of the nose, the brow ridges, the upper part of the cheekbones, the sclera of the eyes, the lower lip and sometimes the chin. Using the nags, the artist can draw the small folds that are present on the lips and wrinkles, as a result of which the portrait will become more alive. Lightening of hair should be performed in places of the largest fractures of the forms. In this case, they will appear shiny and more realistic.

After highlighting, we proceed to the final stage - darkening those areas where you need to demonstrate the space. Such places can be the ears, the edge of the hair, the background, the folds that are on the hair. After that, the portrait will be almost ready. However, in any case, you will have unnecessary strokes, stains from fingers stained with a pencil. Therefore, you should take the nag in your hands for the last time and eliminate everything that visually seems superfluous to you.

After reading this article, you should not take it as a ready-made guide to how to draw a portrait of a person from a photograph. Indeed, even with the maximum similarity of the resulting portrait with a photograph, we always have a place for creativity. You are not at all obliged, when redrawing, to copy exactly everything that you do not want to see in the portrait. Before you is a blank slate, ready for the realization of all ideas. As you know, photography is not always successful in all criteria. Well, the artist, working on a portrait, can think up, correct and get as a result what turned out to be beyond the power, due to the specifics of the creative process, to the photographer.
In order to fully learn how to draw portraits with a pencil, you need to learn the basics of drawing and human proportions, as well as devote enough time to practice.
If you are new to drawing, then you should not immediately “throw into the pool with your head” and try to master the entire portrait as a whole. First you need to fill your hand in the performance of individual parts: eyes, nose, mouth, as well as ears and neck. You can learn how to draw all these elements in separate lessons on our website.
Step-by-step description of a portrait of a girl in pencil.
Stage one.
Starting to draw a portrait with a pencil, take a good look at the person being portrayed, determine the shape of the face and cheekbones, trace the slope of the lips and determine which one is wider, how the outer and inner corners of the eyes are located relative to each other. Then we draw an oval suitable in shape to a particular person.
Stage two.
We divide our oval into four parts. To do this, we draw a vertical and horizontal line strictly in the middle. Next, we divide the resulting horizontal parts of the lines in half again, marking them with small serifs. We divide the lower part of the vertical line into five equal parts. Remember that these lines are of an auxiliary nature and when our portrait of a girl with a pencil is almost ready, they will need to be erased, so do not put too much pressure on the pencil when drawing them.

Stage three.
We place the center of each eyeball directly above the dividing points of the parts of the horizontal line. We draw the line of the base of the nose at the second serif from the top of the lower part of the vertical axis, and the line of the mouth - in the region of the second serif from below.

Stage four.
We depict the line of the upper eyelid and draw the lips. It should be remembered that the distance between the eyes is equal to the length of one eye. The earlobes should be at the same level with the demolition. Sketch lines mark the outline of the hair.

Stage five.
We proceed to a more detailed drawing of a portrait of a person with a pencil in stages. We depict the upper border of the upper eyelid and the visible part of the lower eyelid. Add a few eyelashes on each upper eyelid. We draw the lines of the eyebrows and the bridge of the nose.

Stage six.
To add volume to our portrait with a simple pencil, we stroke the lips and hair, highlighting dark and light places, adding shadows.

Thus, by drawing several faces, you will see that they differ from each other. Continue to draw a portrait with a pencil in stages until you achieve the maximum similarity.


