A presentation is a great way to make your presentation more understandable and interesting to the public. Now presentations are created mainly in the PowerPoint program, which comes with Microsoft's office suite. In this article, you can get acquainted with a small step-by-step instruction on how to create presentations in Microsoft PowerPoint. The article will be relevant for PowerPoint 2007, 2010, 2013 and 2016.
Step 1. Launch PowerPoint.
To start creating a presentation, simply launch PowerPoint. This can be done using a desktop shortcut.
If there is no shortcut for PowerPoint on your desktop, you can launch the program by searching the Start menu. To do this, open the Start menu and search for "PowerPoint".
Step number 2. We choose the design of the future presentation.
After PowerPoint is launched, you can immediately start creating a presentation. It is best to start with design, for this go to the "Design" tab. On this tab, you will see a large list of ready-made presentation designs. Choose one of the available options.

To the right of the list of pre-made designs, there are Colors, Fonts, Effects, and Background Styles buttons. With these buttons, you can adjust the selected design to your requirements. You can change the color and font of the text, the background color of the presentation, and add additional effects.

If ready-made designs are not enough for you, then you can search the Internet for other templates for PowerPoint presentations.
Step #3. Create slides.
After choosing a design, you can start creating slides for your future presentation. This is done using the "Create Slide" button, which is located on the "Home" tab. Click the down arrow below the Create Slide button to open a menu of available slides.

In the menu that opens, you will see several types of slides. These are the Title Slide, the Title and Object slide, the Section Title slide, the Two Objects slide, and so on. Choose the type of slide that suits you and click on it with the mouse. For example, we will create a title and object slide. This will result in a new slide with a title at the top of the slide and an empty box at the bottom.
Step number 4. Filling in the created slides.
After creating a slide, you can fill it with information. To get started, you can change the title of the slide, to do this, double-click on the inscription "Slide Title" and enter another text.
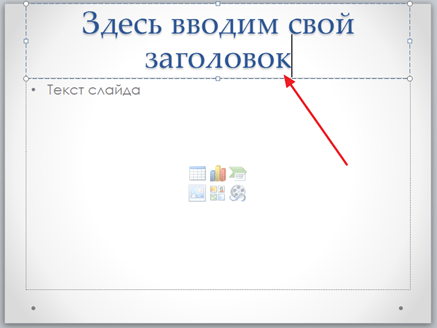
After the title is entered, you can fill in the empty field under the title. If there should be text under the heading, then simply click on the empty field and enter the desired text.

If there should be some other information under the heading, for example, a video or a picture, then for this you need to use the buttons that are located in the middle of this field. There are six buttons available for inserting tables, charts, SmartArt, photos, pictures from your PowerPoint library, and videos.
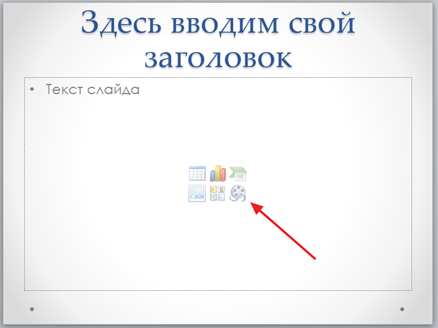
When creating presentations in PowerPoint, photos are most often inserted, so we will consider this option. In order to insert a photo from a file, you need to click on the button with the image of the photo. After that, a window for selecting a photo will appear. Select the desired photo and click on the "Insert" button.
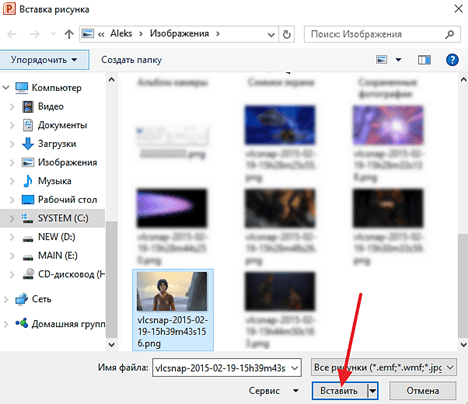
The photo of your choice will then appear below the title of the slide.
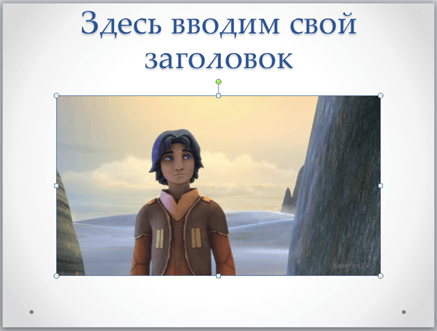
Thus, you have created a PowerPoint presentation from one slide. To add another slide, return to the Home tab, click the New Slide button again, and add another slide to your presentation. After that, you can fill in another slide with information. Repeat this procedure until the presentation is ready.
Step #5: Preview your presentation.
In order to evaluate the created presentation, go to the "Slide Show" tab and click on the "From Beginning" button there. After that, the presentation will open in full screen, and you can see how it will look in its finished form.

You can also click on the "From Current Slide" button. In this case, the playback of the presentation will not start from the beginning, but from the frame where you stopped while working with the presentation.
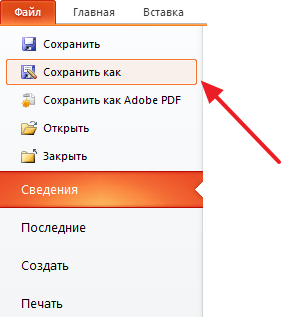
Step #6: Save the presentation.
After the presentation is created, it must be saved. To do this, open the "File" menu and select the "Save As" option.
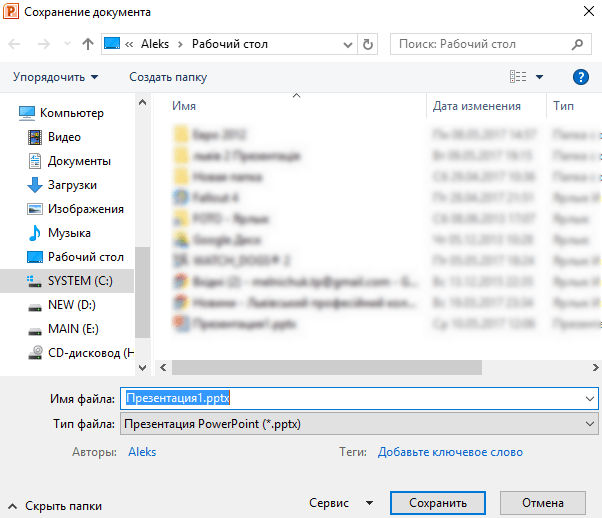
As a result, a window for saving the file will open. In this window, you need to select a folder and click on the "Save" button. This will give you a PowerPoint presentation file in .pptx format, which you can then open and continue creating your presentation.
If your presentation is already ready to be shown, then you need to additionally save it in a different format. To do this, you need to use the “File - Save As” menu in the same way, but before saving, change the format to “PowerPoint Demonstration”.
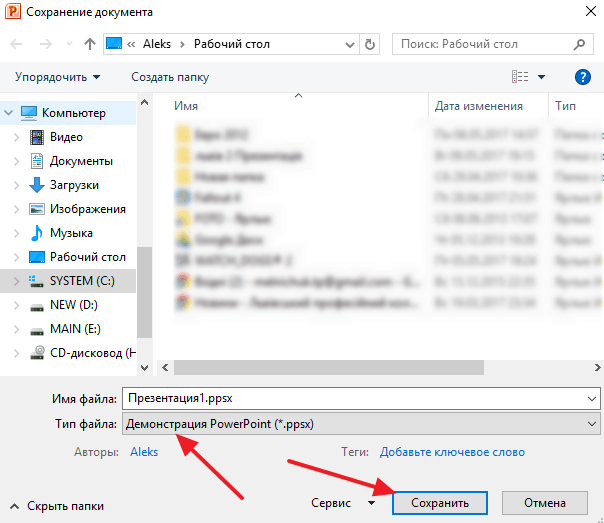
After such saving, you will receive a file in PPSX format. The advantage of this format is that the presentation starts playing immediately after opening it, while the interface of the PowerPoint program does not even appear. But, files in PPSX format cannot be edited, so the presentation must be saved in both PPTX and PPSX formats.
To be able to correctly present your work is a high art. That is why it is so important to know the intricacies of creating a presentation on a computer. But if you have never met this “beast” before, we will tell you in detail and show you how to make a presentation in Word (as well as in powerpoint) with step-by-step instructions.
What kind of presentation can you make yourself?
In the office suite (namely Microsoft Power Point), which most likely all students have already mastered, you can make a very decent presentation - from several sheets (slides), with sound effects, with graphs and diagrams.
But before starting work, you will have to stock up on the most necessary things - without which no presentation will work:
- high-quality text - it is better to write it yourself, taking into account the characteristics of the audience in front of which you will make your presentation. A little humor (the main thing is not to overdo it) and beautiful design - and the presentation will be held with a bang!
- high-quality pictures, graphs, charts, diagrams - it is best to use personal photos or drawings. But if there are none, feel free to use high resolution stock images. If you don't know which program is better for making drawings for a presentation on a computer, use graph - it does a great job of drawing graphs. If all this is too difficult for you - ok: take a piece of paper and a pen, draw yourself, take pictures and insert into the presentation as a drawing!
- video (if necessary). If you do not know how to shoot high-quality videos, then it is better not to use them at all. In addition to filming, you also need to be able to process the footage well. However, long live youtube, where you can find a lot of everything useful and already filmed by someone.
And of course, the most important thing you need to make a presentation in powerpoint is a plan! No matter how beautifully your own presentation appears in your thoughts, without a plan and a logical sequence of thoughts, it will be just a set of text, pictures and graphs. Think carefully about your target audience, as well as the time that you will need to meet.
An invaluable tutorial on how to make a presentation in powerpoint

Here you can create and delete slides, swap them if necessary, set titles for them.
If you're unhappy with the presentation view you've set, play around with your slide layouts. Just click on the slide with the right mouse button on the slide itself. Actions will appear on the left, where select the "layout\..." setting 
Now it's time to work on the appearance of the presentation in powerpoint. You can select a theme by opening themes - find the "Design" button in the toolbar and select "Themes" there. 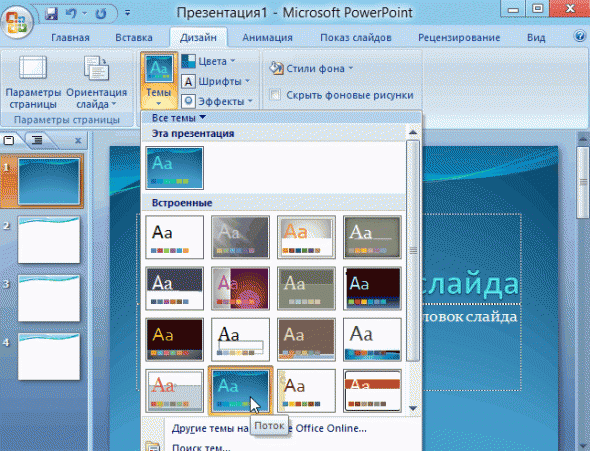
By the way! For our readers there is now a 10% discount on
See how the presentation changed immediately? Now let's move on to the content of the slides.

After you have selected the desired type of chart, the program will open a window for you in which you will need to enter the main indicators for display in the presentation. Here's what it will look like: 
It’s also easy to work with tables - in the tools, select “Insert / Tables”, immediately select the required number of rows and columns (everything is like in a Word) and fill in to your health! 


We agree to the condition of the program that while viewing the slide, the video will play automatically and that's it.
You can also play with different types of animation, framing and other "chips", but we are considering the basic creation, so some other time.
- Direct Presentation Presentation. To start viewing your presentation, just launch it and press F5. You can also start the presentation, click "Slide Show" and select "Start show again."

So you have created the simplest, but quite nice presentation that will help you achieve the desired effect. If you don’t have the opportunity (well, say, a computer) or time to do it yourself in Power Point, you can always ask for help from!
In recent years, schools have begun to offer students to make presentations on various topics. But unfortunately, the teachers themselves often have no idea what a presentation is, how to do it and why it is needed. And it's not that it's fashionable or, as some suggest, teachers have computers, and in their childish excitement they just want to make a presentation. No. The fact is that they were told to do this by the Ministry of Education. However, educators, apparently, have not been taught to do it right. Therefore, in most cases, we get tasteless and messy slides in design, which can hardly be called a draft.
What is a presentation and what it is not
Presentation is the practice of showing and explaining material to an audience or learner.
In other words, this is a way to more easily and visually tell any material to the audience. It also assumes that you are most likely to do it in front of an audience, i.e. perform.
To make a good presentation, you need to understand what it consists of.

Any presentation can be divided into two components:
- The first one is text to be spoken.
Please note that this main part your presentation. After all, you must convey the whole meaning orally. - The second one, more minor part is slide set, which helps to convey the essence of your speech more clearly.
But few people pay attention to the secondary importance of the slides. As a result, a lot of errors are accumulated that turn the presentation into a boring and tedious bubbling under changing, unrelated slides. Just a set of these errors is what the presentation should not be.

Let's take a closer look at the mistakes. The most conspicuous mistake is the speaker turning his back on the audience. Such behavior is extremely unforgivable, because there is such a commandment in the theater: "do not turn your back on the audience." The essence of this phrase is that people like to look in the face, and the back often does not represent anything interesting. As a result, attention disappears, and the report becomes uninteresting.
The reason for turning your back may be ignorance of your text. Therefore, the speaker strives to put as much text as possible on the slide and read it from there. In this case, a legitimate question arises: Why do we need a speaker if we can read everything ourselves?

Therefore, it is important to understand that slides are primarily not for you (not for the speaker), but for the audience. That is, you must explain the material, looking the viewer in the eye, so that the feeling of an ordinary conversation appears. After all, his people are much easier and easier to understand and remember.
It is also desirable to know the text in such a way that only occasionally glance at the paper or not look at it at all. And for this you need to read the speech aloud many times.
Speech during the speech should be pronounced clearly, clearly, loudly enough and without stammering.
Presentation preparation
Summing up the intermediate result, we can say that all the secret of the presentation is that you need to prepare a report and make explanatory slides for it.
Now let's look at the preparation for the performance in more detail.
Text
Writing a speech is not an easy job; this must be done consistently and thoughtfully.
- First you need to collect material on the chosen topic. The data must be valid, i.e. reliable sources.
- The next step will be to study what was found with an extract of the main and interesting points in a draft.
- Drawing up a plan can help you write your final speech faster and easier, because at this stage the text gets structure and you can see where the end of the story should be.
- The last stage is the creation of a text based on materials and extracts, but not using the "copy-pasted" method. The above method is bad because it can result in a stylistically heterogeneous text, which in the end you yourself do not understand in places. The second argument against there will be the fact that someone else's text is more difficult to learn.
note that the text should be simple and understandable, but it should not be brought to a completely colloquial.
After compiling Speech should be made slides that help to understand the content of your report. And at this stage, it is quite possible that you will have to make changes to the text.
Slides
Some errors also appear during slide creation.
- For each new slide, the student puts a different slide change effect. This is good when you need to show your friends a large number of photos. But when explaining the material only diverts attention from content, and eventually the report becomes uninteresting.
- Also, excessive animation distracts attention, as constantly moving objects do not allow viewers to focus.
- You can use different backgrounds for each slide only in rare cases when it is really justified. In general, it is recommended to use a different background only on the first (title) slide.
- Rampant variegation and variegation is also a mistake. If you really want to use several colors, then choose one of the ready-made palettes on the site
If until now you have been searching for and selecting children's presentations, then this guide will allow you to become their author.
Let's start from scratch. And you will see that making presentations is interesting and not difficult at all. Make presentations about your family, how your child is growing, his favorite toys. It is great if he becomes an assistant and consultant.
One of the programs that allows you to make presentations is the MS PowerPoint program, which is part of the Microsoft Office package.
The basis of the presentation video is the so-called slides. The slides contain text, illustrations, video clips, sound. Slides can be viewed automatically or set in sequence.
So, let's begin.
Let's try to create a small interactive (that is, responsive to user actions) educational video for a preschooler.
Let this be a speech development presentation.
To begin with, let's define the topic, the age of the children on whom the work is focused.
If the presentation is educational, then it should include learning tasks.
Without thinking through the tasks, you may encounter the fact that your presentation will seem too difficult for a child, or vice versa, easy, and therefore uninteresting.
For example, let's take a teaching presentation on the development of speech for children of the middle group (4 - 5 years old) on the lexical topic "Furniture".
The next step is directly related to our tasks: we are looking for pictures of furniture. We need images of furniture both in a single quantity and in large quantities. You will also need images of children's furniture.
Attention! When searching for illustrations on the Internet, do not forget that each picture has an author! If you plan to use your presentation for more than just home viewing, it is important to obtain the author's permission for publication.
The preparatory phase has been completed. Open the PowerPoint program. When you start the program, a new presentation is created. On the working field, we see a slide form: on the left is a menu of slides participating in the presentation, on the right is a list.
On the right in the list we find the icon - "New presentation" and click on it with the mouse.

Now let's save the presentation file. Let there be nothing in it yet, but it will be calmer. To do this, go to the "File" menu and select "Save As...".
Select a save location, give it a name, and click the "Save" button.

Let's get to the presentation itself.
On the right menu “Content Layouts”, click on a blank white sheet and write the title of the presentation on the first slide. To do this, we will use the WordArt collection. At your request, you can make (change) the font color, size, text direction, etc.

In order to put text on the page, we enter the top menu "Insert" and select the item "Inscription". Or find the icon on the bottom toolbar.

We click on the page in the place where we want to see the signature, and type the necessary text. All text blocks are placed within frames. Grabbing the green dot allows you to rotate the selected object. Corner handles help you resize. If the object is a text block, then its size can be changed by clicking on the "Increase font size" or "Decrease font size" buttons on the toolbar.

Let the slides in our presentation somehow open during the demonstration. It is very easy to do this. Go to the Slide Show menu, select Change Slide.

The settings menu appears on the right. Now we find the effect "Corners left - down". "How this effect looks like can be viewed by clicking on the buttons at the bottom right: "view" or "Slide show".

Click on the "Apply to all slides" button.
Now you can press the "F5" key on your keyboard to test the page.
If the check was successful, then proceed to the creation of pages. Insert the next slide. To do this, right-click under the image of the second slide in the list on the left and press the "Enter" key.
We begin to place pictures on the pages of the presentation.
On the top panel "Insert" select "Picture" - "From File".

We find the directory with our prepared images and select the desired file with a mouse click. After that, click on the "Insert" button.

The picture appeared on the page. Pretty small, isn't it? It needs to be enlarged. This is easy to do by grabbing any corner mark and stretching the drawing to the required size.
From the WordArt collection, we will select the desired font and write the text, adjust the size. Let the child see the object and the word that denotes it.

We fill all the slides with pictures and inscriptions.
In our example, these are images of furniture. First, the child uses nouns in the nominative case, singular and plural.
(In order for the child to focus on the learning task, I used the same pictures. One sofa - many of the same sofas. Through copying and reducing the size, you can quickly solve the problem).
According to our idea, the child must combine the specific concepts into a generic one - “furniture”.
The last slide of the presentation is an encouragement. This is the result of our work on the topic. I picked up the original children's sofas and in the middle wrote the word "well done!"
Now, in order for everything to move, change and switch, we need to make an animation.
In the top panel, open "Slide Show" - "animation settings"

If we want to draw the child's attention to the text, we can make the effects of blinking, increasing the size, swinging, etc.
Let's highlight the question "What is it?" right-click and click on the "Add Effect" function. 3 types of actions will appear. Select "Selection" - "short-term extension".
The beginning of the effect is “after the previous one”. Speed - "Medium".
What happened?
A picture with a picture of a table opens and the inscription “what is this?” flashes.

Now, under the image of the table, the inscription "table" should appear.
Open the tab on the right "Add effect", select "Input" - "fading".

By default, this effect is set to start on mouse click. We don't need this. Let's do it - "After the previous one", set the average speed of the action.
In the same "Animation Settings" panel, at the bottom right, there are "View" and "Slide Show" functions. You can see the result of our work.

The next task will be more technically difficult.
We work with grammatical forms: "One table, but many tables."
First, on the slide, the child sees the word “one” and a picture of the table appears, then under it the inscription “table”, then in the middle - the union “a”, on top - the word “many”, under it - the picture “tables” and below the inscription “tables” .
We set up the effects of the "entrance" in the sequence we need.

Making a game "Guess what's gone?" to work out the change of a noun in the genitive case.
The child remembers all pieces of furniture. (4-5 objects), on the bottom slide one object disappears, then an inscription appears and only after it - the object itself.
So that this action is not very fast, and the child has time to think, we will delay the appearance of a guess.
To do this, select the word "sofa", then on the right on the "animation settings" tab we will find this object and right-click on it. Let's choose "time".

In the window that opens, set the delay time to 2 seconds.

Now we need this word to disappear, and a picture appears in its place - a guess.
On the right, in the Animation Settings, add the effect “exit” - “disappearance” - “after the previous one”.

We will do the same with other objects in the next similar game exercise.
The last slide is an encouragement. I chose the rotation of the word "well done". If you don't like the effect, by clicking on it in the list of effects, you will be able to change it.

So, we have done a pretty painstaking job: set up animation in each slide of our presentation.
Now let's think about how sweets will replace each other. (By default slides change on click).
We would like the child to sit and watch the presentation, and the slides would change automatically.
On the top panel, open the tab "Slide Show" - "Change Slide".

Uncheck the option "On click" and check "automatically after" 3 seconds.
And click on the button "Apply to all" presentation slides.
Let's check how it works, whether the child will be able to complete all the tasks. Once again, click on the lower right button "Slide Show".
If you need to set a different slide change time, then you will need to do this for each slide separately.

The work has come to an end.
The child sees the word encouragement and hears applause.
Where to get them?
In the same place on the right in the settings for changing slides. Open the "Sound" tab and select "Applause".

If there is something more original in your music library, then we select “another sound” and put it from your folder into the presentation.
Attention! The sound must be in WAV format! When forwarding your presentation, this sound file must be attached to the folder with the presentation.
Let's save the results of our work.
We can review what we have done at any time. To do this, press the "F5" key on the keyboard. It starts playing the presentation video. In order to exit playback, double-click the left mouse button on a free field.
You can watch the finished presentation again here: http://u-mama.ru/files/mebel.ppt
I think that once you start making presentations on your own, it will be hard to stop.
Of course, the possibilities of MS PowerPoint for creating presentations are extensive. You can study the program using the "scientific poke" method, since the program does not represent anything super complicated. And you can buy specialized literature and become an ace in making presentations.
Creative success, interesting ideas! Good luck!
You will need
- 1. Program for creating presentations (in our case, Microsoft PowerPoint)
- 2. Illustrations on your topic as supporting materials for the presentation.
Instruction
Any is a mixture of images, music, and text forming a single whole. Most often, two main components are enough - and a signature to it. Information supported by a visual image is easier to perceive and is fixed in memory. So, we create a document in PowerPoint.
A blank document will appear in front of you, where there will be fields for subtitle and heading, in which you can enter text. The PowerPoint interface is similar to Microsoft Word, and it's not for nothing that they come in the same package. You can drag an image here directly from your desktop. Once added to a slide, you can resize it and position it wherever you like.
When working on a presentation for a lesson, pay attention to the background of the slides. You can change its color, or insert any . But if this is not a disclosure of the topic, it is not worth it. In most cases, a meaningless background only interferes with the perception of information.
Every time you decide to use various design elements, think - what is it for? If you don't have an answer to this question, leave it as it is. Mindless animations and design elements are not needed if they harm the visibility of the presentation.
Place only the minimum amount of text on the slide. Too much information on a slide will make it hard to focus on the main points of your presentation.
Don't be afraid of empty space. The slide should not be filled with information from top to bottom. Free space is an elegant tool for placing accents. Therefore, creating presentation for the lesson, remember - empty spaces will only emphasize elements with information.
note
Do not use "paper" documents in slides. When your presentation is projected onto a screen, it will be completely unreadable.
Helpful advice
An alternative to Microsoft PowerPoint can be the free OpenOffice Impress program, or an online service for creating presentations - docs.google.com.
Sources:
- How to make a class presentation
Modern education has long been unthinkable without the use of the Internet. But besides the fact that the Internet helps to find the necessary material and high-quality graphic design, the global network is replete with all sorts of bright entertainment.
Instruction
To do for computer, being a lover of interactive games and chats, you will need a huge willpower. Before starting work, promise yourself that you will not visit such cereals as virtual shooters and social networks.
Even if you keep your word and look for educational information, then, having no interest and desire for this activity, you will write one at best in half a day of searching. Provide yourself with a solid motivation to quickly and efficiently complete your homework.
To make this process more fun, imagine that you are a scout who has gained access to secret materials, or the hero of your favorite game, who will receive a bonus after completing a mission. This method can help parents of younger students who, in view of the psychological characteristics of their development, are still prone to gaming activities.
Make a clear work plan. For example, if you are making a presentation on the topic of historical monuments, then organize your activities as follows: - find a historical reference about an architectural monument; - find its image at the time of construction (this can be either a photograph or , ); - select the most important and and photos, insert them into the presentation; - work out the following historical periods, gradually adding slides to the presentation; - set up presentation effects (animation, duration, slide show interval).
If your homework includes four or more stages, be sure to take breaks for yourself. This will help you stay productive and alert.
The time of day also plays a role in the execution of computer. The most favorable for this activity is the first half of the day, because. in the evening, the spine begins to tire, the eyes get tired, attention is scattered. Therefore, do not postpone difficult tasks for the second half of the day.
Related videos
To successfully edit a computer presentation, you must use the program in which it was created. In some situations, similar software that supports the format of the original presentation is also suitable.

You will need
- - powerpoint;
- - Impress;
- - Fraps.
Instruction
Please note that for editing presentations, it is better to use the program in which they were created. This method helps prevent errors related to file type incompatibility.
Install the required software. Run it and open the presentation file. To do this, use the File menu or press the keyboard shortcut Ctrl and O (Power Point and Impress).
Wait a while until it is fully loaded into the working window of the program. Choose how you want to add a new picture. First, create an additional working window. To do this, right-click between adjacent images and select "Create Slide".
After the new window appears, click on the "Add Image" icon. Select the folder where the desired file is located. Double click on it with the left mouse button. Repeat this procedure again to add another pattern.
The disadvantage of this method is that you will have to reconfigure the audio track playback settings. If this option does not suit you, add drawing to an existing slide.
Select the desired item in the left column. Wait for the detailed slide parameters to be displayed in the right window of the program. Click the "Add Image" button and repeat the algorithm described in the previous steps.


