Feather painting
Feel like real contemporary artists by creating an amazing canvas. It will be light and airy, as it is created from feathers.
Here is what you will need to make such interior paintings:
- feathers;
- paint in cans;
- frame;
- big bead;
- glue;
- sheet of cardboard.

Then, on another surface, you need to paint the feathers using spray paint.

As you can see, shades of the same color look great. Therefore, you can take dark and light blue paint. Glue the feathers first outside the circle, and then make the rows closer to the center.

When this entire surface is filled, glue a large bead in the middle.

After the glue dries, you can frame the finished work and hang it in the bedroom or in the living room or present it to your loved one as a souvenir.

This picture in the interior looks great, like the following.
paper painting
Soaring butterflies will certainly cheer you up.

To create such beauty, you do not need a lot of materials. You will only need:
- colored paper in pink and white shades;
- a sheet of foam or expanded polystyrene;
- glue;
- whatman;
- scissors.

- Cut strips of the desired width from pink colored paper. The distance between the sides should be what you want to see the wingspan of this insect.
- Attach the butterfly to the beginning of the paper strip, fold the tape several times so that the insect has enough space on the square allotted to it. Outline the butterfly and cut along the contours. You will get not one, but several insects at once.
- In the same way, folding the paper sheets into a stack of squares, cut out the rest of the butterflies. Use dark pink, pink and light pink paper for this.
- With the help of double-sided tape, it is necessary to glue a sheet of polystyrene foam or polystyrene foam with whatman paper. Draw the outline of the future figure on it using a washable marker or chalk. Start gluing butterflies, filling this figure with them. When the work is completed, you can use it for its intended purpose.
Also, as in the photo shown, make the left outline of the drawing fuzzy, as if these are soaring butterflies that are gradually landing here.
Such works look especially beautiful in sunlight. You can not glue the foam, but tint it using a sponge and paint. Then glue the butterflies using double-sided tape.

You can create interior paintings by making cardboard frames with your own hands. And so that butterflies are visible on the canvas, draw their outlines on a sheet of cardboard and cut them out with a clerical knife. But the bottom of the base should be a more contrasting color so that the butterflies can be clearly seen.

You can leave them as white or paint them.
Do this fun activity with your kids. After all, they can also create original paintings with you. Each butterfly can be painted and glued to the canvas.

To make a wall panel, use heart-shaped figurines. For the following work, you don’t even need a frame, but you only need:
- double-sided cardboard;
- scissors;
- fishing line;
- bar;
- dye;
- awl.
You should have several rows of hearts. Paint the block and tie the top pieces of the lines to it.
Now you can hang such a beautiful panel above the bed in the bedroom or on the wall in another room.

The creative impulse should not be held back by the absence of some material, such as paper. If you don't have it, use read newspapers. Cut out hearts from them and glue them to the paper base, make a frame for work.

If you still have ceiling tiles, this material will make wonderful interior paintings.

For these, you will need the remnants of colored paper. By adopting the template presented above or creating your own, you will make such a cheerful panel.
Pictures from buttons and corks
The following design decisions will be prompted by waste material. After all, wine corks are usually thrown away, and a lot of interesting things can be made from them. Here is a work created on the basis of this material.

For the first picture, you need to cut each cork in half, and if you have a lot of such material, then use whole elements. On the base, first apply the contour of the future masterpiece, and then fill it with blanks. If you want the picture to take on a rainbow tone, then pre-paint them.
To get such beautiful interior paintings, you can only use:
- bottle caps;
- rope;
- awl.
The next picture does not need a frame. You simply stick rows of corks on the main surface and you can attach a postcard here to congratulate your loved one.
If you have accumulated a lot of unnecessary buttons in your household, then you can also make interior paintings from them.

For the next one, they will use:
- buttons in shades of green and brown;
- glue;
- wooden board;
- pencil.
The following will also decorate the interior.

You can lay out the first letter of the name of a loved one with buttons, stick them on the base and hand the masterpiece to him. The motive can be very different. Make the outlines of an animal or an anchor out of buttons, such works will also certainly be appreciated.
You can confess your love in the most unexpected way. Paint the wooden surface, when it dries, glue the pink heart-shaped buttons here. Seeing such a sign of attention, your dear person will certainly be delighted.

Paintings in the interior can be very different. If you want to capture the dark time of the day, then pre-paint the background with brown paint. It doesn't have to be straight. Spread the paint with a sponge, then it will turn out so mysterious.

A black marker will help to highlight the contours of the branches and trunk, and a rainbow crown can be made from buttons of various colors.
If you prefer light colors, when you take the white base, draw the trunk here with a marker or brown pencil. You can give free rein to your creative imagination and lay out this part of the tree using threads of this color. Glue the buttons, which will turn into multi-colored leaves.

Nature itself will help to draw interior pictures. Check out the following cool ways to create them.
Method for printing interior paintings
It is enough to dip a chamomile or other flower into the paint, and it will make a wonderful printing tool. You will lean the plant against a white sheet of paper and create original drawings.

Lemon can be used not only for its intended purpose. Dip half of this fruit in paint and print on paper.

Such artistic therapy will certainly cheer you up. You can use a wide variety of fruits and vegetables to create interior paintings. If you have an ear of corn, then cut off a fragment of the desired length from it, prick it on both sides on forks or other sharp objects and print to your health.

If fruits and vegetables are not available or you do not want to use them to create paintings, then you can take a balloon.
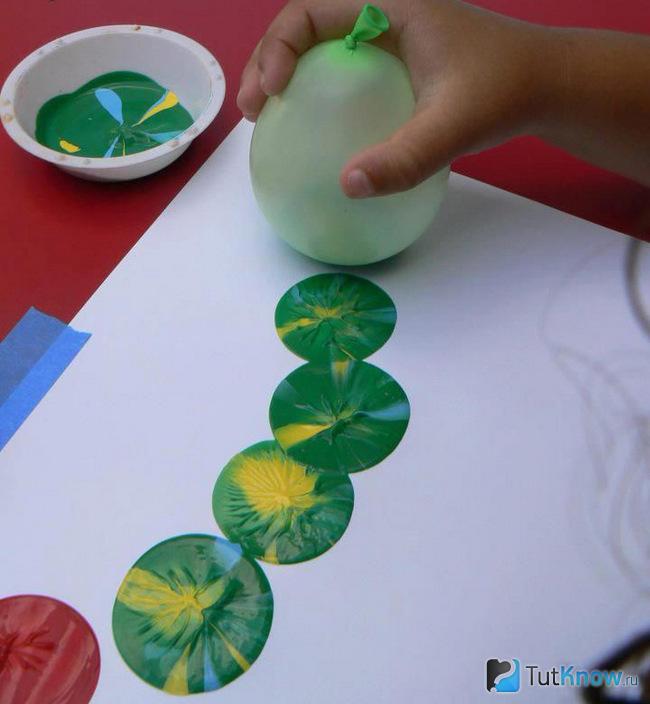
Pour paint into a bowl. And if you want the prints to be more interesting, then add paint and other shades here. Dip the ball into this mass, then lift it up and print patterns on a piece of paper that you yourself will come up with.
If you want to draw your favorite teddy bear, but you can't, then you can make a print. In order not to spoil the toy, take water-washable paint. Dip the bear here and attach it to a sheet of contrasting paper.

If there are no such consumables, then you can even use your own palm. Dip it in a bowl of paint and lean it against the paper base.
If you want to make a picture for memory, then invite all family members to do similar manipulations. In this case, the largest palm should be printed first, and then the next ones are arranged in decreasing order. Use different colors of ink so that each print is clearly visible.

It remains to see a few more ways that will allow you to create interior paintings. To make such masterpieces, you will need very little time.
Interior paintings on the wall in 15 minutes - master class
That is how long it will take to create the next masterpiece.
Also for the interior painting you will need:
- boards;
- dye;
- brush;
- glue;
- Pictures.
You will create the next canvas as quickly. Such works will appeal to lovers of glamour.
A step-by-step master class, detailed photos will help you quickly understand an interesting idea. First you need to prepare:
- simple pencil;
- scotch;
- glue;
- sequins.
If you don't have glitter, then you can grind up a broken Christmas ball. To do this, it is covered with a cloth and gently knocked on top with a hammer.
Remove the tape after the glue has dried. Where there was adhesive tape, you need to go through the paint using a brush. After a while, the work can be glued to the wall using double-sided tape.
If you liked these interior paintings, then create the next one almost in the same way.
For this you will need to take:
- picture;
- self-adhesive letters;
- white acrylic paint.
If you have even less time, then you can make a panel in the same minimalist traditions as Malevich's black square.

To do this, a white sheet of cardboard must be covered with black paint using a coarse brush. It remains to hang your masterpiece on the wall and wait for the approving responses of home and visiting guests.
Even the remnants of the fabric will give interesting ideas.

Wrap rectangles and squares previously cut out of cardboard with such flaps. Fold back the fabric and pin here. Make a loop, hang your masterpiece with it or double-sided tape. You can create interior paintings so that you get a whole exhibition or make one or two. It all depends on the amount of free time and the availability of material.
If you have small shreds left, then you can make such a voluminous flower.

According to the template, cut out the petals for it. Slightly bending the edge of each, glue to the prepared surface. It can be a sheet of foam or cardboard with interlining wrapped in fabric. First create the outer circle of the petals, then the next, staggering them. Moving towards the center, complete your work. In the middle, the petals are slightly smaller and look up.
If there is a braid left from the needlework, it can also be put into action. See what kind of paintings in the interior you can create with it.

To do this, cut these tapes into strips of the same size and glue the end and beginning of each. Then you need to pull the resulting circles to the center from 4 sides, and you will get four-petal flowers. You can also quickly make a panel from packages of cupcakes and cookies. Glue these paper molds to the prepared surface, see how delicate and airy the picture is.

By applying a template of leaves to paper, you can cut such blanks of the same size quite quickly.

It remains to glue them next to the paper branches and frame the finished work.
Here are some interesting works of art you can create in minutes from the available material. If you want to see how others make interior paintings, then your desire will be fulfilled right now.
Indulge yourself in pleasure and see how you can make a picture, the surface of which will resemble marble:
Do you have an empty wall in your house with nothing to hang on? Scarlet cushions on the sofa look lonely and require another bright accent? Just take a canvas and draw a suitable picture!
We live in an era of victorious abstract art, when one would like to say about every second gallery work that even a child can draw it. So why not put aside your fears and forget about realistic art for a while to create your own little masterpiece? Drawing is fun, besides, it is simply impossible to draw an abstract picture badly or incorrectly! All you need is a canvas, paints, courage, a few hours of free time and perhaps a nice group of collaborators to create a unique work of art that is perfect for your interior. This is much more interesting than just buying a poster at IKEA! If you agree with us, we offer you a selection of the best techniques and workshops to create your own painting.
gold and concrete
The most-most favorite color of everyone who undertakes to make a stylish picture with their own hands is gold. You just need to add a little leaf foil or just paint to any, even plain, background. Gold looks good and not too defiant with an uneven gray concrete color.
Photo: Jennifer Flanniganart / etsy.com
sound waves
Horizontal uneven lines always resemble some kind of graphics or visualization of sound waves, in general, something important, and therefore it is interesting to look at them. To dilute the dull monochrome of the image, you can, as the author of this master class, add a little (or a lot!) Gold.

Geology
Have you noticed how beautiful cuts of stones are? This is a drawing with a history, a story about changes in climate, relief, and wildlife. You can create your own beautiful rock pattern: just take a vertical canvas and apply horizontal stripes of different widths and different colors on it. Invite the children to draw with you - let them come up with a story of a fictional world in which such a beautiful cut could appear.

Photo: BrennaGiessen / etsy.com
Peas
Peas are a magical pattern: you can draw it on everything, and it will turn out beautifully. You don't even have to have a brush handy - just make a stamp out of a wine cork or the bottom of a glass. If you take a thicker paint (as in this case), the pattern of the prints will resemble the pattern of corals!

colored peas
If you want something more complicated, then make a print with a colored ornament. In this master class, in order for the peas to be even, they are cut out with a special hole punch, and then glued onto the canvas.

Blot
One way to create an abstract drawing is to step back as much as possible and let the paint do the work for you. For example, pour a large blot and then tilt the canvas so that the paint runs picturesquely over it. Such a picture can be made together with the child, you do not even need a brush for this.

Photo: CelineZiangArt / etsy.com
Stencil
Checked: any abstract spots look cooler if their edges are very even. Such a contrast effect can be obtained by painting through a stencil, or by pre-reserving part of the canvas with masking tape, or by applying white borders with a stencil later, as in this master class.

Scribble
Make squiggles of any color on a canvas of any color, inspired by famous works, or relying only on your own inspiration - there are no borders and laws, doodle art is a very democratic direction! You can, like blogger Michel, create many layers, achieving complex textures, or you can paint with pure color on white. The main thing is to relax your hand and not forget that this is pampering, and you can always paint over an unsuccessful option.

Color swatches
Paintings with careless horizontal lines look like they are a sample of colors from the table of a Pantone employee or a fashion makeup artist's palette. The secret to success here, as blogger Julia demonstrates, is to leave enough white space and apply the paint in one stroke. Colors can be anything.

ombre
Gradient, or ombre, is a very simple and very beautiful effect. You don't even need a master class to repeat it. Two paints - basic and white, brush or roller, five minutes of your time, and the picture is ready. A great solution if your bright apartment has a bright accessory that needs color support.

Vanguard
There is nothing easier than to make a print in avant-garde style. Draw straight lines with scotch tape like in this tutorial and use bright paint straight from the can. The only advice - do not be too lazy to make a few sketches in advance.

Stamps
The most budgetary paintings do not even require the purchase of brushes: just take the first object that comes to hand and use it as a stamp. You will be surprised what a stylish thing you can draw with an ordinary glass!

Impressionism
And the last idea of the painting for today is an impressionistic canvas painted in large strokes. Artist Ashley Sturgill shows you how to paint a vibrant painting with gold accents.

Get inspired and experiment, and we will help you with this!
Not every person decides to hang beautiful pictures in their own kitchen. And this despite the fact that designers highly recommend decorating the kitchen with their own hands. After all, they will be able to bring something new and unusual to this room. Do-it-yourself paintings for the kitchen are considered a new direction in the transformation of premises.
If you want to decorate the kitchen with paintings, then, first of all, you need inspiration. But how to find it?
The search for new ideas for inspiration should be drawn from everywhere. Do not discard even those that initially seem too simple and banal. They may end up being exactly what you need.
Also accumulate vivid impressions. Find a nice box and put in it all those curious things that you hope to decorate your kitchen with later.
Realize your abilities in new genres for you. To create something interesting, you need to try new ideas.
Coffee and condiments for paintings for the kitchen
Making a canvas with your own hands is quite simple. To do this, you only need certain tools and materials:
- various cereals;
- cardboard;
- glue;
- beans;
- Bay leaf;
- coffee beans;
- dense fabric;
- cinnamon bark.


Making a canvas for a painting
First you need to prepare the cardboard. From it you will need to cut a rectangle or square. It depends on how you want to see the picture.
After that, the resulting blank is circled over the fabric, an allowance of five centimeters is made and cut out.
Next, you need to attach cardboard to the fabric, cut off the corners of the fabric and glue it to the cardboard. To prevent the fabric from spreading, its corners will need to be glued with special care. Do-it-yourself burlap is pulled onto cardboard very tightly.

Drawing a picture for a picture
If you did everything written above with your own hands, then you should have got a canvas. Now you need to make a drawing by spreading coffee grains and cereals on the canvas. What will be the picture for the kitchen depends solely on personal imagination. The material can be laid out both freely and tightly.
After you have designed the pattern, you need to glue all the elements of the picture. You can use ordinary glue, but it is best to find a silicone gun with your own hands, since with its help gluing is much faster.
On this, the process of making this picture can be considered complete.
Paintings from cereals and seeds (video)
Cutlery crafts for the kitchen
In this case, we will not talk about standard pictures for cuisine, and more about panels.
Pictures from buttons and plates
The more buttons, the better. They will be the basis for the paintings. They will need to be sewn onto a dense fabric. After that, they are inserted into the frame and glued with glue. Interesting plates are hung in the center and on the sides, painted with acrylic paints. The masterpiece is ready!
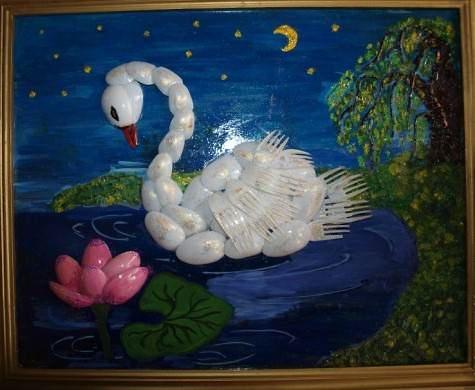
Pictures from spoons and forks
Forks with metal spoons can also be sewn to a dense fabric. They will need to be painted with enamel, after which you will get a beautiful still life.
Their plastic materials can make more interesting pictures for the kitchen. Plastic forks and spoons are easy to paint and can be glued to any surface.


Cross-stitch
With the help of cross stitch, you can achieve incredibly beautiful pictures for the kitchen. Such paintings are considered simply stunning decor for this room. All drawings and pictures can be made from:
- various products;
- colors;
- utensils.
There are many things that you might not have paid attention to before. Now, thanks to the paintings, it will be possible to feel all their beauty and charm. In order to make such a picture with your own hands, The following materials and tools are needed:
- fabric (canva is best);
- scissors in the amount of two pieces (large and small);
- threads (preferably floss);
- marker for marking;
- special warmed needle;
- hoop (suitable for various shapes, sizes and from any materials).
All these materials are most often included in a common set for embroidery.
improvised materials
Mosaic
Mosaic opens up a lot of space for creative ideas for the kitchen. You can make pictures in the form of a mosaic from the following materials:
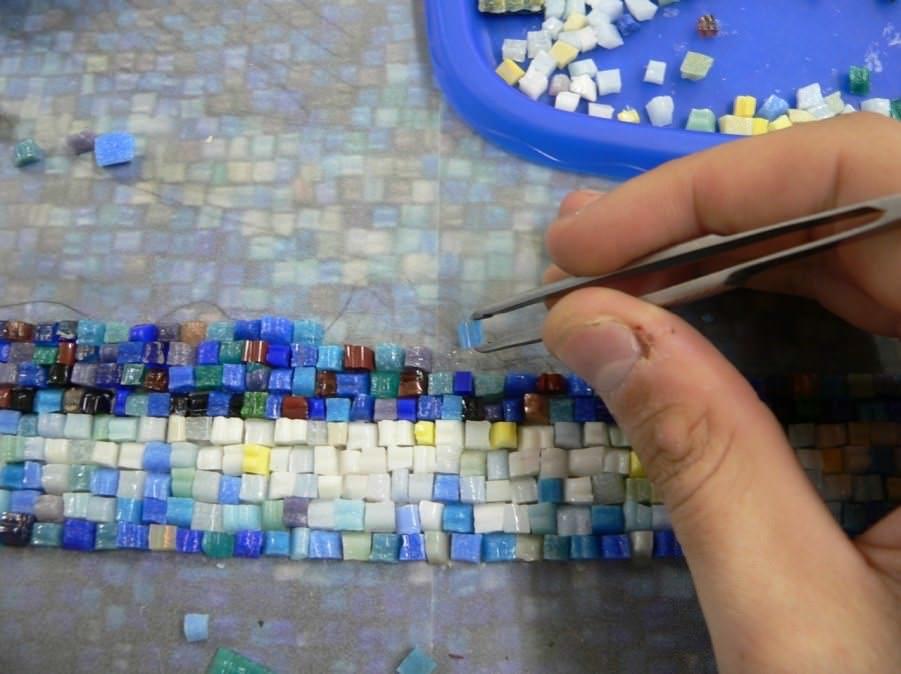
- glass;
- eggshell;
- broken tiles;
- rhinestone
Using the instructions below, you can easily mosaic picture:
- cardboard of the required size is taken as the basis;
- glue is applied to it;
- put all the necessary elements on it;
- to fix small details, the product is varnished.
installations
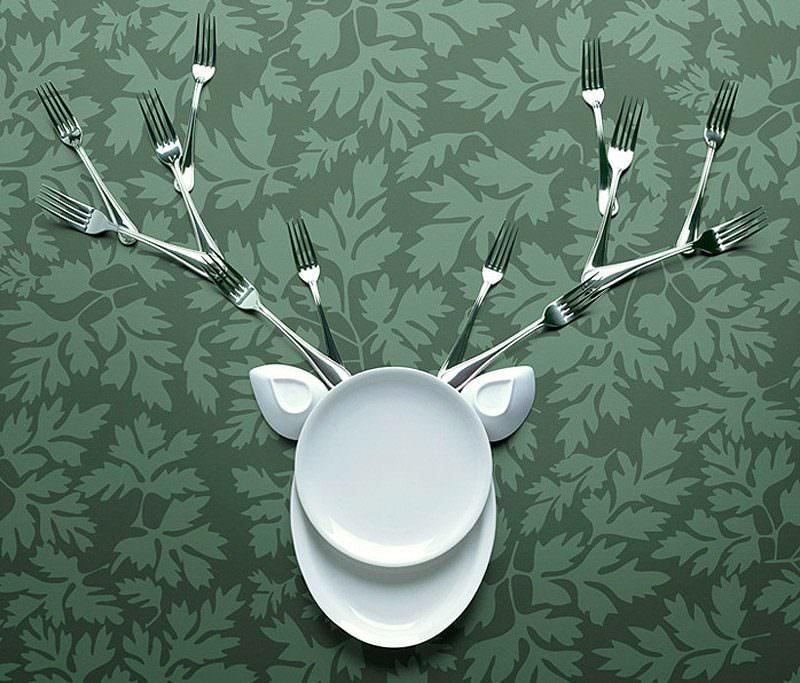
In the manufacture of paintings with your own hands in the kitchen, you can use completely non-standard methods. With the help of ordinary household items, the most incredible pictures are created. For example, thanks to ordinary knives and other items, you can create an incredible composition. Therefore, for this materials such as:
- A4 photo frame;
- glue;
- ruler;
- pencil;
- scissors;
- cutlery in the form of a knife and other cutlery;
- pieces of fabric.
DIY flower painting
The essence of this picture is the collection of dried flowers. Making it is completely easy. Such flowers can be bought at any specialized store.
We take the basis, the flowers are glued to the glue. With the help of pencils and felt-tip pens, leaves and petals are drawn. If desired, you can even glue dried grass.

Leather painting for the kitchen
In this case, both suede and real leather are suitable. Its pieces are combined with paints, fabric and other materials. Most importantly, with any such combination, the picture will look amazing.
paper painting
Unfortunately, this picture will not last long. But very beautiful. You can do both origami and quilling. Basically, such masterpieces are made by children, to whom the manufacturing process brings a lot of pleasure.
Paper painting (video)
Decorating with posters
Posters are large images that can convey someone's image or some idea. Black-and-white posters are considered the progenitor of posters.
Exists several types of posters:
- depicted on canvas;
- printed on canvas imitating paper;
- printed on photo paper
Making them for the kitchen is quite easy. It is enough to find the desired image.

Styrofoam painting for the kitchen
A lot of foam blocks remain after buying various household appliances. Many people throw it away, and do it completely in vain. After all, if you approach the matter creatively, then from it you can make a kind of picture for the kitchen.
Initially, you need to prepare an image. It will need to be glued to the surface of the foam. The sides of the block are also pasted over with paper of the desired color. To hang the resulting picture in the kitchen, it will be enough to attach a small loop to the back of it.
Master class on making a frame for a picture (video)
Conclusion
You read in this article about the main types of paintings that you can make yourself. As you can see, there is nothing complicated in their creation. So feel free to start experimenting!
Paintings for the kitchen (photo)


The modern market for decor and decorative elements is replete with its diversity. Made from the simplest and most affordable materials, craftsmen sell them on various resources. On their own, everyone can make absolutely any detail in order to emphasize the individuality of their home.
And paintings are no exception. You just need to show imagination and be patient. Well, if there is not enough inspiration, it can be gleaned from photo paintings with your own hands in literature or on the net.

Beginning of work
Start creating a canvas with inspiration. No need to copy the work of other masters. We advise you to focus and think about how you can emphasize the mood and dignity of your home. Write down all your ideas in a separate notebook. Consider a place for a future masterpiece.


You also need to decide what style you will work in. Based on it, prepare consumables. It could be:
- any fabric, skin patches, as well as ribbons, lace, and so on;
- dried flowers, shells;
- paints and canvas;
- paper, all kinds of clippings, photographs;
- buttons.

In your work, you can use children's drawings and a lot of things that at first glance seem like rubbish. Review your “wealth” from time to time, and at some point you will feel that you are ready to create an exclusive canvas. After all, the best ideas for paintings for decor with your own hands come spontaneously.

Paints
The use of paints is the easiest way to solve the problem. What kind of picture you can make with your own hands depends solely on your imagination.

In the arsenal, you can use both ordinary watercolors and gouache, acrylic or oil. The basis can be either ordinary paper or a professional canvas or board treated with a primer.

Using a stencil
If you have paints that are sprayable, you can create a unique masterpiece with a stencil. We advise you to take the highest density cardboard for the base. Suitable and good quality plywood. The background and pattern should be contrasting: a combination of a silver or golden background with a color pattern will be interesting.

And, it is worth noting that dry herbs and leaves can serve as interesting templates for creating paintings.

How to make a modular painting?
A painting is called modular, where a single composition is enclosed in several canvases. They can be the same or asymmetrical. In such paintings, there can be anything, from landscape to abstraction.


It will not be difficult to choose from what you can make a modular picture at home. Pick an image that you like. It needs to be enlarged in format and divided into parts (that is, cut). The printed paper or fabric is then fixed to a suitable substrate.


If you decide to paint a picture yourself, you should do it on a prepared canvas. In the case of using paper as the basis, we recommend using acrylic or a waterproof marker to write a masterpiece.

The modular picture will look good in any room. The main thing is that the theme matches.

Printing photos
Professional printers in photo workshops can print your chosen image on fabric, ceramic dishes and paper of any density and quality.

It is worth noting that in many, and in our, in particular, instructions on how to make a beautiful picture with your own hands, it is noted that the image should have a semantic load. For example, if you are working on a product for the kitchen, a still life would be appropriate.

You can make a modular combination from large format posters.


Using a scanner and printer, you can easily create a collage of your baby's drawings. Add a photo of the young artist as well, and you will have a wonderful poster.

It remains only to place it in a frame that will match the general mood of the children's room. Old and new family photos combined in one poster will be a good decoration for a bedroom or living room.

fabric paintings
In master classes in the manufacture of paintings, there are often works from patches, ribbons, braid and lace. Works from such material are real masterpieces that belong to the patchwork style.

The most common technique for this direction is the application, the accommodation is the kitchen and the children's room.

Of the materials often used are those that hold their shape well. A combination of various textures and patterns, as well as decoration with cords and buttons and other accessories is allowed.


Button fabrics
Original decor items can be created from buttons by sewing them on or planting them on glue. Often, images of leaves on trees are made from buttons. They can also animate any outline. In the modern market, you can pick up accessories of various colors, shapes and from various materials.

Button paintings are ideally written in the interior of any room.


Please note that buttons can decorate the frame of the picture. In this way, you emphasize the exclusivity of the product.

Leather. Quilling. And much more
Now you can often find voluminous canvases. In this case, leather, cardboard, pasta, coffee and all kinds of cereals are used. Works are performed not only in the application technique. Now quilling and decoupage are gaining popularity.

And finally, it is important to note the following. To prevent your work from becoming unusable in a short time, cover it with a transparent moisture-resistant varnish. For a more lasting effect, repeat the procedure 2-3 more times after the first layer dries.

Photo of paintings with your own hands


Handmade paintings will perfectly complement any design of a living space. Still, because who can feel and emphasize the mood of the house better than its owners? Executed in a variety of techniques, such details will make even a standard design special, transform an uncomplicated kitchen or hall, inspire bright emotions and bring comfort.
Abstraction
Do you have a lone chair in a rich lemon color in your room? Support the accent with a concise picture painted by yourself!
We are witnessing the triumph of abstractionism, and in most galleries we meet canvases that seem to have come out from under the brush of either a child or a dolphin. So if the difference is insignificant, why not try to write your own creation? Drawing classes bring incredible pleasure, and the result simply cannot be bad or wrong!
A simple and elegant option is a gradient image. You don't need instructions to play it. Allocate a few minutes of your time, stock up on a roller or brush, two paints (main and white) - a few movements, and a bright accessory is ready.
Draw broken horizontal stripes, they will resemble visualized sound waves or complex graphics, and therefore it will always be interesting to examine them. Golden foil or paint will help dilute the severity of the lines. You can leave empty spaces, and strokes should be done in one motion. It is best to combine gold with a white background, as well as contrasting rough materials - concrete or brick.
In general, images can be anything. It is not necessary to draw something intricate - even children's blots, circles and triangles, diamonds and waves, when choosing the right colors, will become real poetry.


Wood paintings
Natural materials are at the peak of popularity. Small wood pictures or huge panels will complete the actual modern interiors in loft, modern, eco, country, rustic styles.
As a base, use thin dried boards made of natural wood or light panels, for example, from plywood. Decorate the bars with stencils, garlands, crystals, paint or give them a fancy configuration.
To bring into the house the atmosphere of a fresh forest will help panels of wood saw cuts. Draw a sketch and get to work. It is best to select elements of different textures and sizes - this will add naturalness to the composition. Sand the sides that will adhere to the base and fix the bars, and leave the front parts embossed. Fix the finished result with glue and varnish for brightness and better preservation.


string art
Carnations and threads - at first glance, not the most romantic and cute items, but they can be used to make very cute crafts. The composition of this non-standard tandem will become the original decor of the room. You are unlikely to find such a picture from someone else - after all, you made it yourself.
Consider creating a product with the inscription "OK". Of the basic materials for its manufacture, you will need: a light wooden board or plywood 50x50 cm; White paint; roller or brush; sketch; small cloves; threads for knitting or embroidery of different shades, close to each other; duct tape; pencil.
If the wood background is uneven, then sand it with sandpaper. Apply paint in long strokes twice. You can vary the sketch yourself or find it on the Internet and print it, group the sheets with a ribbon. Cut off the edges with scissors. Place the stencil on a dry board and secure with adhesive tape. Drive carnations into places with dot marks, starting from the top edge. The important point is that they should be approximately at the same height level and create parallel straight lines. Carefully remove the template and remaining pieces of paper.
It's time to start weaving. To understand where to start and where to lead the thread, refer to the sketch. Tie the silhouette of the letters with black thread. Wrap the first carnation twice and make a knot, and cut off its tip. Each thread will be located in the middle of the nails. Pull the thread and continue to outline the image, making one turn around each nail.
When you have finished with the letters, take the thread away from the last carnation and wrap the other nails around with it. The point is that there is no clear order of the nails here, choose the path of the thread randomly. When one color ends, take another, but close in tone shade. Finally, fill in the void inside the letter "O" and fix the finished composition on the wall.


Pictures from wallpaper
Many beautiful, intricately patterned wallpapers are so expensive that it's easier to glue banknotes instead. We won’t go that far, but using wallpaper as a spot decor is a completely rational compromise. Moreover, beautiful patterns in large numbers can ripple, but we will carefully bypass these potential troubles.
So, patterned wallpaper itself is a finished canvas, so it is enough to place them inside spectacular frames. It is good if the pattern and individual colors overlap with other interior details. Hunt for sales of leftover wallpaper, anyway, one roll will be enough. Moreover, several types of this material can be purchased to create modular compositions.


Pictures from buttons
Ordinary buttons are a very convenient material for creativity. With their help, original crafts are created by sewing or attaching with glue. This technology is universal and suitable for creating unusual paintings.
With fittings, you can “outline” the silhouette of a letter, tree, butterfly, elephant, owl, or any other object that you think of. In a sewing paraphernalia store, pick up buttons in different configurations and colors, and at home lay them out on a template and fix them on a prepared basis. Cheerful works will be a wonderful and somewhat ironic addition to the design of the kitchen, living room or nursery.


Textile
Another extremely easy idea for a quick painting is to take an interesting scarf or piece of fabric with a suitable pattern and wrap it around a wood board. Textiles are fastened with flat buttons or small studs.
Dense fabrics such as flannel or felt can be cut into intricate pieces. Combine different textures, use thematic details - lace and braid, buttons.
Needlework will look best in the kitchen or nursery, as well as country-style rooms, which are characterized by cozy simplicity. Calm motifs are suitable for the bedroom.


stencils
Using stencils, you can easily apply images to any surface. Thick cardboard or plywood is best suited as a base. To make the background look harmonious, to fill it, you need to use a shade that contrasts with the color of the picture. Clear gold or silver patterns on a white background look very original.
Compositions applied with paint can be monophonic and multi-colored. As a stencil, you can take flowers and leaves, a lace napkin. Also use sticky stencils, they will add volume to your picture.
Prepare the base and, if desired, fill the background with paint. After that, holding the stencil, carefully paint over the empty areas.
When the paint is dry, remove the pattern or move it and apply the next pattern using this or another pattern.


Photo printing, framed quotes
The most realistic picture is, of course, a photograph. To make the photos look intricate, arrange them in a spacious passe-partout and hang them in the manner of an exhibition in a fashion gallery. Such an installation will be a great addition to a long hallway.
Another way to hang your shots is to create a structure of mounts and cords. Instead of frames, use stationery clips.
You probably know that photos can be huge. Contact the nearest printing house or photo studio and print out photos of your child, the sea coast, rare black and white photographs or a photo of an ordinary light bulb, in grayscale it will look very stylish.
At the peak of popularity are ironic and motivating quotes. Print several of your favorite sayings at once in an up-to-date elongated font and place them in laconic contrasting frames “for solidity”. Framing will give additional significance to each word.


Eco paintings
In modern design, eco-style occupies one of the first positions in demand. Naturel is made from both live and dried plants. Vertical gardening systems, panels of succulents and stabilized moss will help to revive the interior.
To dry the leaves and flowers, use an iron, press or oven. In summer, you can even dry the parts in the open air. If you want to get a voluminous herbarium, apply express drying, so the vegetation will retain its natural forms. Place the most impressive exhibits one at a time. Iron the sheets between layers of interlining and clamp between two glasses. The decor will look like it is suspended in the air. The beauty of the herbarium is that it is easy to make yourself and update over time.
By the way, real masterpieces can be laid out from dry and fresh objects of botany research. It is not always possible to fix them so that they look as grandiose as you intended, and therefore it is best to try to do something simpler or take a picture of the application and print it. For inspiration, we have selected several pictures of the works of the creative family tandem Vika and Brooke, who lay out unusually beautiful floral portraits from flowers and stems - by the way, without a drop of glue, and therefore they only fix their work on cameras for calendars and other souvenirs.


