Helpful Hints
To decorate a Christmas tree or a house, it is not necessary to buy a lot of toys and decorations.
If you have colored paper, cardboard, glue, and a few extra simple supplies, you can create a ton of Christmas crafts.
Here are just a small part of paper crafts for the new year:
On our website you will also find:
What can be made of paper for the New Year: tube decoration

You will need:
2 sheets of cardstock in different colors or 2 sheets of scrapbooking paper
Scissors
PVA glue
Ring with chain attachment (optional)
1. From one sheet of cardboard, cut out 14 squares with a side of about 2.5 cm.
2. From the second sheet of cardboard, cut out 14 squares with a side of about 3 cm.

3. Start folding the opposite ends of the squares as shown in the image - one end on top of the other. In the place where the ends overlap each other, add a little glue.


4. Cut out a circle with a diameter of 5 cm from any sheet of cardboard. Mark its center.

5. Apply glue to the circle and start gluing the prepared tubes - first large tubes, and then small ones - they are glued on top of the large tubes.

* Try to glue the tube evenly to the tube.
* You may not need all the prepared tubes for crafting - this is normal.


* Glue a few rhinestones to the craft as additional decorations (this is not necessary).
6. Add a ribbon - it can be glued or threaded into a ring attached to the decoration.
DIY paper cones

You will need:
Colored paper or cardboard
Ruler and pencil
Scissors
PVA glue or pins
Styrofoam ball
* If you did not find a foam ball, then it can be replaced with a crumpled sheet of paper in the form of a ball, wrapped with a thread that secures the shape.
1. Cut out strips 2.5 cm thick from paper or cardboard.

2. Cut each strip across into small pieces 2.5 cm wide - you will get several squares.
3. Fold each square as shown in the image - make an arrow by bending the opposite ends.

4. Prepare the ball and start gluing (or pinning) paper blanks to it as shown in the image. Do everything in layers - first the bottom row, then move up, creating new rows.

5. Glue a ribbon to the top of the head so that the tree can be hung on the tree, and you can also add some artificial leaves as a decoration.
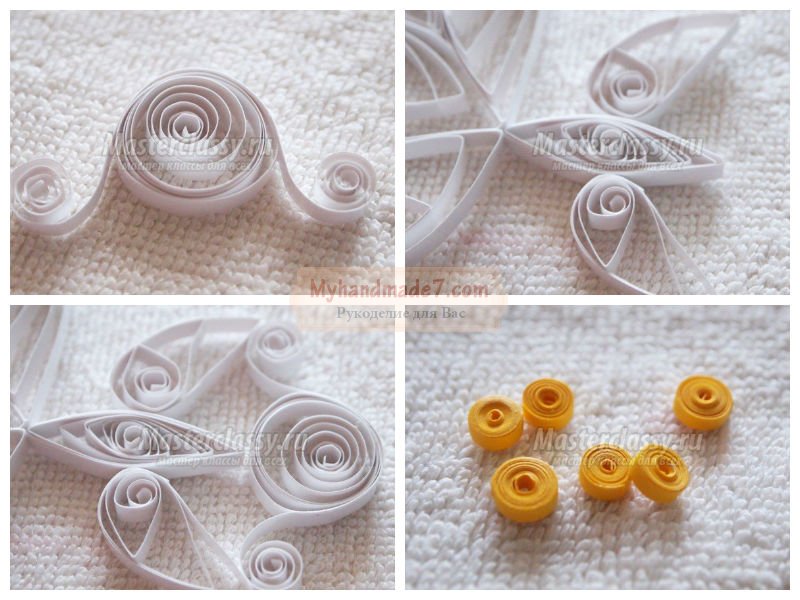
New Year paper crafts in quilling style

You will need:
Pages from old magazines or newspapers
PVA glue
Baking tins (optional)
Thread or braid and bead.
1. Cut out strips 4-5 cm wide from paper.
2. Fold each strip in half lengthwise. Unfold the strip and bend again, but this time each side to the center, and then the entire strip in half again (see image).
2. Prepare the glue and start twisting the strips into circles, adding a little glue so that they do not come apart.


3. Take another paper strip and bend it as in step 2. Prepare a baking dish (in this example, it is in the shape of a star) and put a paper strip into it, carefully laying it out inside the mold.
4. Now start laying out the twisted paper circles inside the molds. Apply glue to them so that all the circles are connected to each other and to the strip inside the mold.


4. When the glue dries, remove the blank from the mold. You can add more glue to make the workpiece even stronger.
5. Pass the thread or braid through the craft and add a bead for beauty. Tie a knot.
* For such crafts, you can use different molds, a heart, for example.
Wall decoration made of colored paper for the New Year

You will need:
10 paper plates
20 sheets of green paper
stapler
Double sided tape
Scissors
Cardboard decorations (can be cut from old postcards or drawn and cut)
White braid (optional).

1. Cut out large squares from green paper - one square from one sheet. The square should fit inside the paper plate. If necessary, reduce its size.
2. Fold each paper square like an accordion, and then in half.
3. Fasten the ends of the accordion folded in half to get a semicircle.
4. Repeat steps 1-3 with other paper.
5. Connect the two semicircles together with double-sided tape or a stapler to form a circle.
6. Using double-sided tape, attach the circle to the middle of the paper plate. Glue double-sided tape or apply glue to the back of the plate so that you can stick it to a wall or other surface (you can stick it to plywood, a wooden tablet, cardboard and then put it on a shelf or hang it on the wall).
7. Make 10 similar blanks.
8. Start making Christmas tree decorations. Cut out paper Christmas decorations and glue them together to form a circle. After making several circles (3-4 pieces), they can be glued to the plates, like Christmas decorations.
* You can add a white braid to the top of the Christmas tree, on which the Christmas tree supposedly hangs on the wall.
Christmas decorations made of paper: 3D paper droplet

INwe will need:
colored paper
Pencil
Scissors
1. Draw a large droplet on cardboard and cut it out.
2. Use the drop template to create a few more - place a cardboard drop on paper, trace and cut out.

3. Put a few drops into one stack, fold the stack in half and cut out a circle in the middle (see image).
4. Start gluing the sides of each drop to end up with one voluminous drop. In this example, it took 16 drops to make one voluminous, but more can be done.
* You can add thread or ribbon to hang the decoration on the Christmas tree.

Christmas paper toys: cone balls

You will need:
Paper (can be old magazines)
Scissors
Thread and needle
Double sided tape or glue.
1. Cut paper circles of the same diameter (choose any size)
2. Make a cut along the radius in each circle.

3. Make two cones from each circle - twist the paper from one and the other end (from the notch) to the middle, and fix the workpiece with glue or tape (see image).
4. Also make two cones from each of the remaining circles.

5. Prepare a thread with a needle and thread them through each blank so that in the end a ball is obtained from 10 blanks. Tie a knot.

6. Add string or ribbon to hang the toy on the Christmas tree.

How to make Christmas lanterns out of paper

You will need:
Stationery knife
Pencil and ruler
Thick colored or decorative paper
Needle and thread

1. Prepare a sheet of paper, fold it in half and cut it into two rectangles.
2. Lay one rectangle on a flat surface that can be cut. Using a clerical knife, make several transverse cuts from one end of the paper to the other - the distance between the cuts is the same, and they should lag about 1.5-2 cm from the edges.


* You may need to first mark where the cuts will be. Use a pencil and ruler.
3. Roll the paper into a tube as shown in the image. Secure the ends with tape.
4. Take a needle and thread and start threading them alternately over and under the strips that formed after the cuts.
5. When you have wrapped the entire workpiece with thread, tighten it and tie a knot.

The holidays are already very close, but you really want to create a fabulous atmosphere at home, you can't do without a Christmas tree, so let's learn how to make New Year paper toys. The fact is that it is very inexpensive, but at the same time a good material. You will see that you can create absolutely incredible paper crafts.
What I love about paper art is that it can be processed in all sorts of ways, using different techniques, and the end result is always pleasing. First let's try make a Christmas toy out of paper in origami technique. Such homemade decorations look very interesting and bright on the Christmas tree, that's all we need in our work: bright double-sided paper, glitter glue or paint, rope or thin ribbon, beads or other decorative elements, scissors, stationery glue, simple pencil, ruler. The craft will consist of several flowers, shaped like a poinsettia (Christmas star). Accordingly, one flower consists of five petals.
To make one basic element - a petal, you need a square with a side of 9 cm, if you want to make a large craft, then the size of the square can be taken larger. So, we turn the square diagonally, then bend the corners to the middle. We unfold the folded corners along the fold line, divide in half. Thus, a shamrock is obtained. We lay the corners of the leaves inward so that a straight line is obtained from the inside. We glue the resulting sidewalls of the outer petal, fix it with a paper clip until it dries completely.

When you have collected a sufficient number of origami parts, proceed to the assembly of the flower. We take five petals, glue them together with the curved side to the center of the flower. Five of these flowers are enough for crafts, but you can increase the number until you get a ball. We cover the inside of the petals with glitter glue, you can glue rhinestones or beads. With each other, the flowers are easiest to fasten with a stapler. In the middle of the composition we fix a rope or ribbon for hanging. With such voluminous origami crafts, you can decorate not only the Christmas tree, but also the room, or assemble an elegant garland from them.

I would also like to talk about how to create a delicate, fragile, but very cute fairy using the quilling technique. Such a beauty can not only be hung on a Christmas tree, you can also decorate a greeting card with her. To make it, you will need quite a bit: a set of quilling tools, glue, white and gold paper.

First you need to prepare all the details from which we will assemble the fairy. We start with the manufacture of rolls, from everything you will need three pieces, a diameter of about three cm. We wind a tight roll with a tool, then remove it, loosen it a little, fix the edge of the tape with a drop of glue. Then we form three parts from them in the form of a droplet. Now we make three more small free rolls, about one and a half cm in diameter, we form drops from two, and a leaf from one.

In a similar way, we make two more small droplets from centimeter circles. One dense roll will be needed in order to make a fairy head, 1.5 cm in diameter. We glue three large droplets, form the hem of the dress with each other along the sharp side, and glue the smallest droplets at the bottom into the gaps. After that, we glue the little body to the hem, this is the figure of a leaf.

From the pieces of tape we form two small curls - this will be the fairy's hairstyle, glue them on both sides of the roll. We glue the two remaining drops on the sides of the body, with sharp ends to the top - these will be the handles. Then glue on the head. From the golden stripes we twist six identical small rolls of half a centimeter. We fasten them along the bottom of the hem and on the curls of the hairstyle for decoration. It remains only to tie a thread, and then send the magic fairy to the Christmas tree.
New Year paper toys quickly
I want to consider several options for how you can create New Year paper toys quickly. For example, simple, but very cheerful flowers. Even a child can handle the manufacture of such an ornament, all you need is double-sided thick colored paper, scissors, a stapler and glue. One leaf is enough for one flower. Production will take only a few minutes, we cut the sheet across into strips two cm wide. We collect the strips, using a stapler we sew them strictly in the middle. Now we turn all the halves of the strip in turn into petals, grease the edge with glue, attach it to the inside of the strip. The result is an openwork round flower, we attach a rope to one of the petals, the decoration for the Christmas tree is ready!

In a similar way, mono arrange a ball, only cardboard or even an old postcard is more suitable here. So, we cut a piece of cardboard or a postcard into strips no more than a centimeter wide, just keep in mind that if you decide to make a ball from a photo or postcard, the strips will need to be stacked on top of each other in order to save the image.

We put the segments in an even pile, make holes at the edges with a hole punch, insert an ordinary pushpin into them, bend the tip from the inside to fix the strips. We bend the strips into an arc, only carefully so that creases do not appear. Now straighten the resulting ball and fasten the ribbon. You see, in order to make a beautiful toy, it is not at all necessary to resort to intricate models or spend a lot of time.
Now let's see how we can create New Year paper toys for children, because they also want to join the decoration of the main New Year's beauty - the Christmas tree. Try to make a fluffy corrugated ball together in your child. First, prepare everything you need: Bright-colored corrugated paper, scissors, a stapler, glue, a simple pencil, a ruler, a small piece of wire, a blank - a ball (you can take a cheap Chinese ball without decor or make it yourself from papier-mâché or foam). In fact, we will glue the ball - the base with small fluffy corrugated flowers.

To make flowers, we take a corrugation, cut off a piece 5-6 cm wide, the entire length of the roll. We fold the segment with an accordion, draw a circle with a diameter of about 3 mm on the corrugation. We cut it out with scissors, using a stapler we connect all the layers in the middle. We lift the edges of the corrugation with our fingers to fluff the flower. The number of such blanks depends on the size of the ball you have chosen, keep in mind that the denser they are placed on the surface of the ball, the more fluffy and beautiful the craft will turn out. You will need a wire if you took a papier-mâché or polystyrene ball, we bend a loop for a thread from it. Paste the entire ball with corrugated blanks, leaving no gaps, wait until the glue dries, it is better to dry the ball in a suspended state. If desired, you can sprinkle the finished product with glitter varnish on top for a decorative effect. What other toys can be made, see ours.

Children's Christmas paper toys are very cute with their immediate beauty, let's look at another option that is suitable for kids. We will need all the same tools as before, except for this color cardboard. First, draw figurines templates, it can be any animals, circles, hearts, Christmas trees, snowmen, in general, any shapes. We circle the templates along the contours on colored cardboard, cut them out, if you have curly scissors, use them. In each blank, we make a hole for the rope with a hole punch.

Now we make makhrushkas of their corrugations in almost the same way as in the previous version, the only thing is that the diameter can be made larger. For one blank you need two terry parts. We glue corrugated flowers on both sides on each cardboard blank, then lift the corrugated layers to fluff the flower. In animals with colored felt-tip pens, we draw a nose, mouth, eyes. We pass the rope through the hole, you can decorate the Christmas tree. You will find many interesting ideas for children's Christmas toys.

Beautiful Christmas paper toys
Very beautiful Christmas paper toys just make it in the form of all kinds of balls. And if you experiment with gluing options, each homemade product will turn out to be unique. All you need is old magazines or postcards, scissors, colorless glue, glitter or an old broken glass toy as decoration. Everything is very simple, the main thing here is accuracy, we cut out a sufficient number of circles of the same diameter, the larger the circle, the larger the ball will be. And now let's try to glue the decorations in different ways: take 10 circles, fold them in half with the right side inward, now we alternately start gluing the blanks to each other, leaving the sector in the middle without glue, make sure that the edges match exactly, otherwise the craft will turn out skewed. Wait until the glue is completely dry, then slightly push the non-glued sectors with your fingers, apply a thin layer of glue over the entire surface, fill in glitter or glass chips from the toy, be careful when working with the latter, do this with all sectors. As a result, the craft remotely resembles balls from labor lessons at school, but you must admit that it looks much more spectacular and elegant.

Another option is to glue the balls on three sides, it is better to take bright dense postcards, draw an isosceles triangle from the inside inside each ball, bend the edges on its sides, there are options from 8 circles or more per craft. We glue the balls along the bent edges, do not forget to glue a string for hanging into one of the seams. It is fashionable to decorate the finished craft with sparkles, rhinestones or any other decorative elements.
Balls made of musical roses just look charming. To create it, you will need a base-ball, a music book, a glue gun, scissors. We disassemble the notebook, cut it into strips noticeably two cm wide, fold it in two, fold the spiral rosette, glue the edges so that the rose does not fall apart. We attach a rope to the ball, after which we begin to tightly attach roses to it with a gun. From above, the finished product can be varnished with sparkles or left in its original form.

Even from paper as a decoration, very beautiful garlands are obtained, there are many options, from the simplest in the form of multi-colored links, to complex origami elements. We will consider several options, for the manufacture of the "Snake" we will take two strips of corrugated paper of different colors, three cm wide. We stretch both strips, apply a little glue to the edge, glue the strips perpendicular to each other. Now we begin to alternately shift the strips to the cross, we make the folds exactly so that when folded we get a square, so we go to the end of the tape, fix the edge again with glue, when you straighten the craft, you get a voluminous multi-colored garland. The next option is very simple, but looks like real tinsel. We take a roll of corrugations, cut off an even strip 4-5 cm wide along the entire length, fold strictly in half, now cut the double edge with scissors into a thin fringe in steps of a couple of mm, leave about 5-7 mm in the middle uncut, so we go along the entire tape. After the work with scissors is over, stretching a little, we begin to twist the tape into a spiral, it is very easy to do this with corrugation.

We straighten the fringe - the garland is ready, such a garland of several multi-colored stripes looks even more impressive. We just cut off two or three corrugated ribbons of the same thickness, fold them on top of each other, bend in half, then follow the previous scheme, such a garland will be more fluffy and brighter. Finally, consider another option from the corrugations. We cut off a long strip about 7-8 cm wide, fold it in half in length. Here you will also need a needle with a thin nylon thread. We string the corrugation on the needle strictly in the middle of the tape. We sew the needle forward with a step of about 1 cm. The paper should be gathered on a thread. The craft will look even more interesting if you take two corrugated ribbons of different colors, put them together and string them. As you can see, there is nothing complicated, I hope that our master class was useful to you and helped you find out how to make christmas toys out of paper. I advise you, also, to look at our master class "". Merry creativity to you!
To feel the holiday even more, many decorate their cozy homes with various crafts that can be easily made by hand. One of these options is New Year's paper toys, the templates for cutting which can be printed on a printer. DIY toys made from materials found in every home can be hung on a Christmas tree, or you can create original compositions from these works on windows and walls. If you are not lazy, you can even make a beautiful garland for the New Year from such New Year's toys.
Paper toys Ded Moroz and Snegurochka
Not a single New Year is complete without the long-awaited Santa Claus and the Snow Maiden, who have long become one of the most important attributes of a magical holiday. If you make miniature paper toys with your own hands, they will look great on a window or windowsill, and larger figures can decorate a room and walls.
These figures of Santa Claus and the Snow Maiden can turn out to be so patterned, and if you attach a thread to them from above, they will turn into Christmas paper toys and take pride of place on the festive tree.

All that is needed for work is to print out the stencils of the figures, and only then, using scissors or a cutter, cut the toy along the marked lines.
From paper, Santa Claus and Snow Maiden templates can be as follows:


Paper Christmas balls
Christmas tree spinner made of paper
You can decorate your Christmas tree with a paper toy, which you need not only to cut out, but also to assemble all the details into a single composition.

For work you will need:
Two sheets of paper in different colors;
Ruler;
Pencil;
Scissors;
two beads;
Thread and needle.

The process of making a toy:
1. Cut out strips from each color of paper, 10 centimeters long and 1 centimeter wide.
2. Next, you need to draw two circles with a diameter of 2 centimeters and cut them out.
3. Thread the thread through the bead, then thread the thread through the eye of the needle, as shown in the photo.

4. First you need to string a circle on a thread, and then start stringing stripes, alternating colors.

5. From the other end of the thread, you must also string the parts of the toy in the same order. Finish the work by stringing a paper circle and another bead.


Reading time ≈ 9 minutes
With the advent of the winter holidays, it is time to prepare the main symbol of the New Year holidays - the Christmas tree. You can make Christmas tree decorations with your own hands from paper for the New Year 2020 step by step according to the instructions with a photo or use them to translate your own ideas. The article outlines the available ways to decorate the Christmas tree.
paper balls
Ball-shaped Christmas toys are considered the most common way to decorate a Christmas tree. They are easy to make and have many variations.
Sphere from circles
To make such a ball, you will need 21 blanks of paper in the form of a circle of the same size, glue, scissors, thread.

Step-by-step instructions for creating a Christmas tree toy:

Advice! To make the New Year's toy look interesting, use wrapping paper with a beautiful pattern. For a triangle template, you should take thick paper or thin cardboard.
Simple Christmas tree ball
Homemade decorations are fun to make with kids. For a joint lesson, simple New Year's paper decorations are well suited. To make a volumetric ball, you will need several identical blanks in the shape of a circle, but not less than four. The size of the sphere depends on the diameter.

New Year's Eve is done step by step according to the following scheme:
- Using a stencil or template, circles are marked on paper. It is recommended to use paper of different colors and patterns.
- The circles are folded in half with the right side inward.
- The blanks are glued together in half.
- Before installing the last circle, a thread is glued in the center of the sphere. The loop should protrude outward and be easily attached to the branch of the Christmas tree.
- The last blank circle is glued to the first, connecting the structure into a single ball.
- The product is leveled, given the desired shape and dried well.

Note! The more blanks are used to create the ball, the more interesting the final version looks.
According to the same scheme, toys are made in the form of a Christmas tree, stars and other objects. The main rule is that the blanks must be symmetrical.
Spheres from stripes
An easy and quick way to make a DIY Christmas toy is to use paper strips. To create jewelry, you will need a sheet of paper with any pattern, glue, thin wire and beads for fixing.

Step-by-step instructions for making Christmas balls:

Note! The diameter of the toy depends on the length of the blanks. To create balls of a certain size, a mathematical formula is used to calculate the circumference.
Christmas paper lanterns

This Christmas decoration is easy to make with your own hands, working with children. For the simplest flashlight, you will need several strips of colored paper of the same width but different lengths.
- The shortest strip is cut in a single copy, the rest are paired. The length can be increased arbitrarily, but at least 3 cm is recommended.
- The blanks are laid out on the table. In the center - the shortest, on the sides - paired stripes, going to increase.
- The ends of the strips on one side are aligned and fixed with a stapler. This is the bottom of the flashlight.
- The upper part is assembled in a similar way. The ends of the strips are aligned along the length of the shortest workpiece.
- A through hole is made with an awl. A thread is threaded into it and fixed so that the structure does not fall apart. The end of the thread is tied into a loop to hang the toy on a tree.

Paper lantern from a sheet of paper
To make the second type of New Year's lantern, you need a sheet of A4 paper. It is preferable if it is colored paper or with a pattern. Then the decoration will be bright and unusual. You will also need scissors, glue or tape, a pencil for work.

- We cut off a short strip 1-2 cm wide from the sheet. It is used to hang the toy on a tree branch.
- The remaining paper is folded in half and the fold line is smoothed out. The workpiece is not unrolled.
- A strip 1.5 cm wide is marked along the edge. The rest of the sheet is drawn with longitudinal lines. The distance between the lines is from 1 cm.
- Scissors make cuts from the fold to the edge of the sheet along the drawn lines, without going beyond the mark at the edge.
- Unfold the structure and glue the top, bottom and middle.
- A paper strip handle cut off at the very beginning of work is glued to the upper part. With it, you can hang a lantern on the Christmas tree.

Note! Paper decorations are decorative and flammable. Do not use them near open flame sources (for example, candles).
Chinese style lantern
For such decoration, you need to prepare a template. The blanks will differ depending on the type and shape of the New Year's toy.

To implement this idea with your own hands from paper, Christmas toys for the New Year 2020 are assembled step by step according to the instructions with the photo:


Important! The main difficulty of such toys lies in the drawings. It is difficult to apply them exactly on paper by hand. You need to print on a printer or use a pre-prepared template.
volumetric star
The five-pointed star is found everywhere in Russian culture. On Christmas trees, it often decorates the top, but it can be used in other places. To make a simple but effective toy for the New Year, you will need five sheets of paper, glue and scissors.


Note! If the decoration is the top of the tree, then the lower part is not completely sealed. Leave a small space for stringing on top. For a hanging toy, all seams can be removed, and the loop can be fixed with an awl at the upper beam.
Teardrop Jewelry
Using the method of gluing the halves, it is possible to get beautiful voluminous Christmas decorations. If the template has a symmetrical shape, then you can use it to decorate the Christmas tree.

- A drawing of a workpiece in the form of a drop is applied to a sheet of paper. The more details used, the more voluminous the result will be.
- Drops are cut out of colored paper, folded in half and the middle is removed along the line. Similar actions are carried out with the rest of the details.
- Apply glue to one of the halves and connect to the opposite part.
- Gluing continues until all parts are connected into one toy.
- A loop is made from the thread, glued to the top of the New Year's decoration or laid in the middle.

Note! To obtain the volume from the example, 16 parts are enough. It can be adjusted by adding or removing the number of blanks.
Paper snowflake hedgehog
To make such New Year's toys with your own hands from paper, you will need several round blanks. The more details used, the more magnificent the result will be.

- 8 cut lines are marked on the workpiece from the edge of the circle to the center. You don't need to cut to the end. In the middle, leave space for connecting parts.
- Each of the cut sides is twisted into a cone with a pen or pencil and glued to fix.
- Similar actions are performed with all blanks.
- So that when connecting the parts, the knot of the thread does not pierce the paper, a piece of soft rubber is attached to the end.
- A thread is threaded through the center of each workpiece with a needle. When tightening the parts, the spikes of the paper hedgehog straighten in different directions.
- The tie is held in place with a second piece of soft rubber on the opposite side. The end of the thread is tied into a loop for hanging the toy on a tree branch.

Fairy lights
This type of decoration is suitable not only for the New Year tree, but also for the room. Paper garlands are easy to make. Can be done even with small children.

To create the simplest, you need multi-colored paper, cut into strips. First, glue the first link of the chain into a ring and wait until it dries. The next link is also connected by a ring, capturing the previous element. The result is a chain of paper links.
Note! In order not to wait until the glue dries, use a stapler. Staples instantly connect parts of one link and are practically invisible from the side.
To get a more effective result, you should complicate the work. The thread of the garland is decorated with any elements - stars, geometric shapes, volumetric details, animal figures. There is a special place for the symbol of the Chinese New Year - the White Rat.

With the help of instructions and photos, it is very easy to make paper Christmas toys step by step with your own hands and implement your ideas for the New Year 2020. If you liked the information, do not forget to leave feedback in the comments and share this material on social networks.


