
In this drawing lesson, I have prepared the material so that the key principles of drawing a human head are visible. To learn how to draw a portrait, you need to understand the shape of the head, and this is possible by simplifying and generalizing unnecessary details. For this purpose, I used a schematic representation of the head called "stumping", an academic drawing of the skull, a step-by-step drawing of a human head, and additional schematic drawings to understand the features of the anatomical structure.
1. Volumetric form. Simplification and generalization.
At the initial stage of learning to draw, people most often see the contours of the object instead of its volume. This is how beginners draw a portrait: they draw the contours of the eyes, nose ... But a person’s head, eyes, nose, lips - they all have volume, these are not just contours. In addition, they have a rather complex shape. Therefore, at the beginning of training, one must be able to generalize the secondary and be aware of the volume of each form.
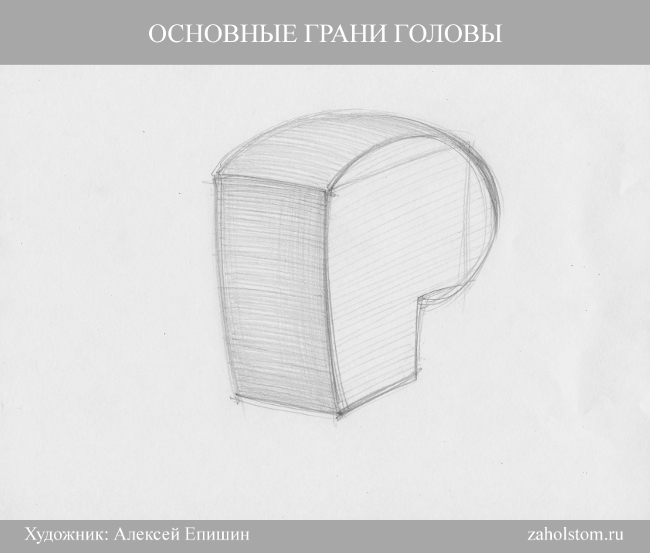
First, let's try to draw a person's face with a protruding nose and forehead, presented in the form of rectangular geometric shapes.

2. The skull is the basis of the shape of the head.
There is one important lesson to be learned next. All the main curves and contours of the face are formed from the bulges and curves of the skull. After all, it is the skull that is the basis on which the shape of the head in the portrait is built. Try to trace this relationship by comparing the shape of the skull with the pattern of the head. This is a very important point in learning.
Since the skull has a complex shape, it will not be easy to understand this relationship right away. Therefore, at first we will draw a skull in a generalized way.
The skull consists of two main sections: brain and facial.

In addition, the shape of the skull can be conditionally represented as a cube. The skull has a frontal side, two side, occipital and so-called cranial vault or roof.
After conditional, generalized drawings, I cite as an example an educational academic drawing of a skull. With many details, you can see the frontal, occipital, lateral sides and arch in it. You can also see how the details are grouped into two main sections - brain and facial.

It should also be noted that the widest part of the skull is closer to the back of the head. It is clearly visible in the figure below.

For those who are learning to draw a portrait, the following anatomical names for the various parts of the skull may come in handy:

- brow ridges;
- frontal bone;
- parietal bone;
- occipital bone;
- temporal bone;
- zygomatic process;
- cheekbone;
- maxillary bone;
- mandibular bone;
- nasal bone;
- eye socket or eye socket.
3. Orubovka is the key to understanding the shape of the human head.
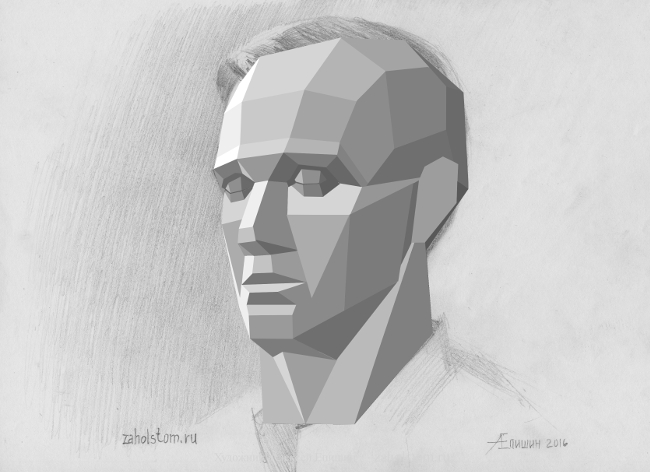
In addition to the skull, the shape of the head and face is influenced by muscles, cartilage, fatty deposits, etc. In order not to get confused in the details, chopping will help to understand the anatomical structure. Trimming is a conditional image of a human head, consisting of faces. With the help of such planes, the volume of the entire head is formed. Thanks to these faces, the main curves of the skull and the main muscle groups of the face are clearly visible. In any portrait, in any person, the shape of the head is built on the basis of these trimming edges. Of course, each person has his own facial features, his own proportions, but the key points in the construction of the head correspond to the trimming. Therefore, in drawing a portrait, the artist always keeps these key facets in mind.
Try to trace the main cutting planes in the drawing of the skull and in the tonal drawing of the head, made in pencil.


4. Formation of volume by means of chiaroscuro on the frontal, lateral and upper sides of the head.
In order for the drawing of the head to be voluminous, it must be worked out with hatching. Hatching creates the desired tone. By changing the tone (lighter-darker) we see volume and shape. According to the law of chiaroscuro, light is distributed on the surface of the form in the following sequence: highlight, light, penumbra, shadow, reflex, falling shadow. If you draw a ball or similar simple geometric shapes, then everything is much simpler. But how to show chiaroscuro in the tonal pattern of a human head? In the portrait, chiaroscuro is also laid out by hatching, as in the drawing of the ball. But with the difference that the artist must trace the light and shadow on each individual fragment of the face in particular and on the entire head as a whole. That is, you need to show light, partial shade, shadow - on the nose, on the forehead, on the eye sockets, on the lips, chin, etc. But besides this, light and shadow must be shown on the whole head as a whole, that is, on its main large faces or sides. For example, one side of the head may be darker than the other. This is an important point when creating head volume in a portrait.
For a better understanding of this topic, I cite as an example visual diagrams and drawings of plaster trimming, a human skull and head. In them you can clearly see the frontal, lateral and upper facets of the head. The diagrams and pencil drawings are drawn up in such a way that they can be used to gradually trace the main facets of the head, which will help novice artists to see the chiaroscuro on the surface of the head as a whole.


5. Cerebral and facial sections of the head.
Above, I already gave a schematic drawing in which the brain and facial sections of the skull were visible. But, how to practically see these areas in drawing a portrait? A number of figures and diagrams below can help with this. Here you can trace the border between the front and brain parts of the head in the usual pencil drawing, plaster cutting and a training drawing of the skull.

6. Step by step tonal pencil drawing.
After studying the main anatomical features of the structure of the head, you can proceed to a phased pencil drawing. Here you need to learn such a sequence. First we draw in general. Then we complicate the drawing by adding details.
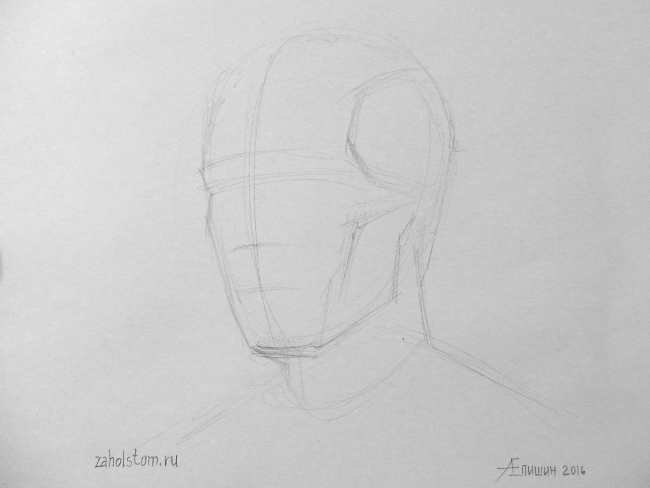
A) Since the shape of the head resembles the shape of an egg, at the beginning we draw the corresponding figure with a line.

b) After that, we perform the construction of a drawing of the head. We draw an axis of symmetry that will run along the middle of the head. This is very important because the axis will allow you to compare the left and right sides, which will help to avoid errors and bumps. Next, we outline the levels at which the eyebrows, eyes, nose, lips are located. We outline them with light lines. I wrote about how to determine these levels in the lesson.

V) In the next step, you can outline the eye sockets, eyes, nose, lips, as well as the zygomatic bone, frontal lobes, major muscle groups and folds on the face.
A month ago, I recruited a small group of students, whom I entrusted with a difficult but rewarding task - preparing for a portrait.
As you know, we adhere to the classical school of drawing, so our first serious work was the drawing of the stump. A stump is a plaster head, as if "cut down", that is, not molded in full accordance with the human anatomy, but made of planes, which adds a certain complexity to it, but at the same time, as they say? "Hard to learn, easy to fight!"
There are many tasks that a high-quality drawing of this tutorial solves, and most importantly, they need to be solved with all seriousness, here a lie at the level of "I see it this way" will not work at all, because any viewer will notice any of the errors, from portrait dissimilarity, which is called The artists "didn't get into character" before violating perspective.
I specifically went to the search engine now to find examples of drawings by different people. See for yourself: they depict completely different people! The reason is simple. Students are considered physically ready to draw a person if they have completed a course of academic drawing, starting with simple still lifes and staging geometric bodies, to plaster rosettes and capitals. All this was with us.
And yet we, too, despite many years of training of some students, faced the same problem. My instinct told me - even before the task of arranging the head in the sheet, to offer to draw a sketch. In other words, for the first time to meet and "feel" with a pencil. The result upset me: no one "found" the nature of the stump. This meant that you can let them compose, and they will do it, they are literate, give them knowledge of proportions according to the ancient canon, and they will also put them on a sheet, you can talk about shaping planes, and they, yes, they are able to build, there is confirmation of this - drawings by the artist. But the most important thing that is needed in a portrait, the character, will remain "behind the scenes". And this would be an unacceptable gap in the curriculum, so we agreed to dedicate one more lesson to “probing”, and the results satisfied me to a greater extent, although not completely. The head was recognizable, but it was different for everyone. We chose the standard way of studying for our school - short sketches according to my method.
Here I digress and make a small digression from the topic, because this question is asked to me, they are interested in it, and it is necessary to answer it somewhere and sometime. So, what is the goal to set for yourself when drawing sketches. I, Olga Rubtsova, will answer without hesitation: the most important thing is to capture the character. The sleight of hand necessary for the artist is important here. Then anatomy, then literacy, and even design later, if you want to become an artist... Not an architect, not a designer, but a draftsman, the embodiment of an image, thought, fantasy... You need to learn how to extract from your own inner world the most important thing that you are worried about what you want to share. And that's what artists are for. True, my husband, a sketching teacher, thinks otherwise. He makes sketches with an emphasis on dynamics, teaches to recognize flows, spots, in a word, this work is more intellectual than I suggest, and it is aimed rather at the development of logic and a proportional eye. Of course, you can combine two types of sketches, and you can even find your own tasks and make sketches in your own way, for your own purpose, but one thing is important - quantity turns into quality, otherwise we are no longer drawing a sketch. It already smells of a sketch, a sketch, anything, but not a fleeting breath of the breeze ...
So, we started working with a head with sketches. For our Artist, these were average sketches in terms of the number of minutes, 5 minutes each. Four years ago, we began to reduce the time and the result was not long in coming: from one to three minutes, such pictures come out.
And so, yesterday was the third day with chopping. I asked to bring stretched tablets and was morally ready to once again tell in detail about the canons of construction, about the features of the model, about reference points and ... let go for a swim ... But my guys asked me to give them one more day to study the head.
Do you know why I love an adult student? Because he knows how to be responsible. You don’t need a stick, you don’t need to persuade and look for an approach. Severity is also necessary, but it turns into criticism and a desire not to deviate from the principle. And I have one principle - let there be few students, because I demand a lot, because it is difficult, but they will have the maximum chance of success, in other words, they will be able to learn how to draw on their own ...
And here are pictures from the scene.
Start. Psychological preparation is already in the sharpening of the pencil. It should be sharp, obedient, flexible :). Do you recognize the box in the frame? :)) Half of it is already filled with shavings! This is a good indicator, it's an indicator of labor!
The head is waiting. Like any nature with which you have to work, it must be carefully thought out, thought through, probed, pro... You have to guess about it :), because everyone knows that we can only see one side of the moon, which means that if nature not a child, not an animal, not a free bird - use, draw, draw mentally and for real, many, many!
This time Sasha sat down, it was next to the door, but soon he moved to his favorite place - next to the study closet)). You see how curious the watercolor jars are, and for sure the samples of drawings from the books want to jump out and take a closer look at Sasha's work ... Sasha, can you show me?
Isn't it already similar? In a week we will start building on a large sheet. The main goal has been achieved - we met with the head, although, of course, it's too early to switch to "you" :)). Educational environment... Everyone is serious... In the first picture, on the left - Elena Nikolaevna. She is a beginner and is still drawing a top hat. In our groups, it is possible to solve different problems in the same lesson, since the approach is individual. This means that we are waiting for students of any level, and they will be able to work at their stage of training as a slave with those who are a little ahead, in this I even see some kind of incentive to grow, develop, catch up ...
By the way, behind the students are two cabinets filled with props :). ABOUT! This is my special pride! Probably, I should somehow write a story about how I collected it, how interesting it is in terms of topics ... In general, here are three photos on the site with a small particle of our collection of jugs and antique kitchen utensils :).
So... Yeah, Sasha went to the door again and sat down next to Alsou. This is right. You need to look at nature from different angles, you need to sketch it in different ways, perhaps it will turn out to become related ...
And this is what we got at the end of the lesson:
In my opinion, already quite recognizable comrade!
Reporting from the scene will continue with the next stage of drawing and with the next success, stay in touch, write, come meet and learn :). And by the way, it's still not too late to join the head painting group!
P.S. I apologize to those who missed the frame. However, you are not particularly eager :))
When I was in art college, we were taught to see and understand form from general volumes, gradually narrowing attention to smaller details. Learning this approach to drawing and understanding the shape of surrounding objects will help
Head cutting as a method of drawing
The method is based on the idea of simplifying any complex form to the level of primitive geometric forms, and the subsequent tonal analysis of these forms in space.
This method teaches the artist to look at the form of any object more consciously, constantly analyzing spatial characteristics such as depth, sharpness, saturation.
And if there is a basis for understanding how this or that object of the environment (real or fictional) that we want to draw is built, then in our illustrations we can consciously manipulate these indicators creating more voluminous and interesting pictures.
I will tell you how to do this today, at least I will try to push all the self-taught people in the right direction on the path of artistic self-education.
"Artist's View"
Before moving on to theory, I want to focus your attention on this. How the artist looks at the objects around us. The artist analyzes any object as a 3D scanner. He looks, as it were, through the object and sees it as "transparent." Not literally, of course. It's just that if the object being studied is transparent, then an understanding of how this object looks in space from all sides immediately comes.
understanding the general form of an object and knowing such a law of aerial perspective as “closer is more saturated, further is more muffled”, any object can be depicted correctly in terms of the volume of the form.
Pruning. Starting with simple shapes
For example, consider a simple cube. The fact that the cube has faces, I think everyone understands and does not require additional comments.
Let's imagine the image of a cube in the form of a wireframe (transparent) where all its faces are visible. draw all lines of the same thickness. The result is a flat drawing.
now let's remember the concept of aerial perspective "closer is more saturated, farther is more muted" and apply this rule to the drawing of our cube. Lines that are closer to the viewer's eye, we will make thicker, and lines that are farther, will be thinner.

on the diagram (fig.2) with a red circle, I highlighted the closest point, it will be the most saturated with us. further downward, the gaze gradually glides along the faces of the cube, the thickness of which should decrease. With red lines I show the movement of the eyes.
We turn to the construction of more complex objects. Head trimming
when the task is to “build” a complex object in a drawing, it is extremely important to determine the point which, according to the artist’s intention, should be located closest to the viewer. - this will be the starting point, which will be the most contrasting and saturated in our drawing. Further, when building a form, we should never forget about this point, and all subsequent lines should be more muted in tone and not so saturated.

without knowing these basics, one can observe drawings where the artist depicts an ear in a portrait, for example, with more contrast than a nose. But we already know that this cannot be according to the laws of aerial perspective, since the ear is further from the viewer than the nose

in art schools, in order to train future artists and teach them to feel how the saturation of one or another “knot” in a drawing changes, they use a plaster model - head cutting, simplified to planar forms, hence the name “cutting”. , it is easier to understand and track how this or that point is located in relation to the line of sight of the artist.

understanding of these fundamentals is basic and opens up unlimited possibilities for the artist to experiment in drawing with form and space.
If you omit these basics and do not try to disassemble the form, then the drawing will be “flat” and not expressive.
Learning to "correctly" look at the objects of the environment
to consolidate this skill of spatial vision of the shape of objects, I recommend regularly practicing creating simple sketches of people around you
The main goal of quick sketches will be to create a linear drawing in which the shape of an object in space should be clearly traced. Always keep in mind the rule of aerial perspective "closer - richer, farther - softer"

on the example of these sketches, it is clearly seen that the artist emphasized the area located closest, most contrastingly. This is especially true in the far right sketch. Notice the knee is richer in tone than the head. But not in reverse.
For professional artists, the spatial perception of form is already sewn on a subconscious level, and the process of work looks easy and natural. But behind this "lightness" are years of practice of "conscious" drawing and constant detailed analysis of the form.
When I was an art student, my drawing teacher constantly demanded to "study" and "build" any form we draw. Understand how it looks from all sides, and not just from the side where the viewer's eye falls
How knowledge about the spatial construction of a form helps in creating cartoon pictures.
How will pruning help?
A cartoon illustration is still based on a line drawing. According to the linear drawing, I recommend that you separately study the lesson "" I explained in detail the methods for creating a linear drawing in the context of working on a cartoon character.
So, without the basics that are outlined above, it will be extremely difficult to create an expressive linear drawing. In working on the line, we reduce everything to our formula “closer - richer, further - softer”, or if we talk about the line, then the rule can be formulated as follows: “in objects that we want to highlight and emphasize, the line should be thicker, everything that we consider insignificant for perception, there we make the line thinner "
Ideally, of course, you should draw from nature. But, unfortunately, few people have plaster heads, arms, legs and skulls at home. And when you draw at a computer, it’s even more difficult to draw from nature, since you can’t drag the computer with you to the right room, where it’s light and there is a still life.)
Therefore, you often have to fill your hand by drawing from photographs. So that drawing does not turn into a mindless copying process, you need to draw with analysis.
Here is the original photo (taken from the Internet):
Before starting work, it is necessary to study and analyze the source.
"Minimum program":
1. Shape and lighting are analyzed. We pay attention to which faces look at the light, and which ones are turned away from the light.
Lighting comes from above. Therefore, the upper part and the protruding parts are the lightest. Then there is a gradation from light to penumbra, then a shadow and a reflex on the lower part of the jaw - again a slight gradation to a lighter one. So go the general forms. At the same time, there are parts that are more turned away from the light, and therefore darker. (eye sockets, cheekbones, chin)
The cranium itself, despite the fact that it is a stump, is similar in shape to a ball. The edges of the head are rounded, which affects the non-uniform illumination of both the upper faces and the sides.
In the photograph, this gradation is not so visible, because. photography "eats" at least half of the tones compared to nature, but, nevertheless, it is present. In the drawing, this gradation can and even should be made more explicit.
It may seem that the sides (head + cheekbone) are a cast form. Actually, it is not. The edges of the cheekbones and the edges of the stump skull itself are actually different edges. I'm attaching a side view file so you can see what it looks like.

2. Proportions are analyzed.
The main part of the skull conditionally fits into a square. In this case, the entire skull is divided into three approximately equal parts. The third part is occupied by the jaw.
After we have analyzed the general shape, lighting and proportions, we begin the layout and construction.
Preliminary layout and primary constructions.

Subsequent constructions, which are repelled from the primary ones.

During construction, it is important not to forget to check the left and right sides for symmetry.
After the constructions, the volume is worked out.
First, I outline the overall volume and lighting, similar in principle to a ball.

Then I pay attention to the protruding parts and to the parts that are turned away from the light.

I move from the general to the particular. I leave the highlights for later.
Construction lines can be transferred to the top layer so as not to lose proportions during development. At the same time, layers with constructions should be made translucent so that they do not greatly interfere with the set of tone. Or you can remove them altogether if they interfere (they often interfere with me, so I rarely use them).
Start each new stage on a new layer so that, in case of failure, this layer can be removed without regrets. =)
Then there are the final steps where I refine the lighting details and add contrast. Construction lines are no longer needed, they can be made invisible, deleted or left with constructions layer with a density of about 5 percent, so that they slightly delimit the faces from each other, and then finish painting on top of them.

The last stage goes to the final.

Hope it was interesting.
Thank you for your attention. =)
As a rule, the construction of the head begins with more generalized forms, this method of construction is called CUTTING. Many well-known masters began their masterpieces with this construction method. I think you will be interested to know how it's done. So let's get started.
Depicted head "cutting".
1) First we need to determine where our head will be on a piece of paper (A3 or A2 format). To do this, we outline the overall dimensions by measuring the ratio of the width and height of the depicted object. It is best to leave more space on the front side.

2) Next, we outline the total volume of the head, determine the angle, the location of the front part in your perspective.
3) divide the face into proportional parts of the face (in this perspective, the middle line of the eyes is located in the middle), outline the tip of the nose, the bridge of the nose, the superciliary arches, the middle line of the mouth, and the chin.

4) Find the tilt of the head itself, and the lines of the front parts in perspective (there is a reduction)
What is closer to us, it seems more, what is further - less, that is, it is reduced.

5) Let's find at what angle the nose, build an axial one for the front part. We start by building the nose.

It all depends on our perspective, if we are below the depicted object, we see the lower edge of the nose, if to the right of the object - the right side of the nose, and the frontal, in perspective. (As in our case. Here are examples of building a nose by chopping.

6) in the same way we will build other parts of the face:
Eyes

Lips and chin

The whole face and head should be built along the edges. And as a result we get this:

WORK ON HATCHING
1) Determine from which side the light falls.

In our case, top right.
In this case, the edges on which the direct light hits are the lightest, on which the gliding light is a little darker, the darkest edges are turned away from the light. you should not forget about reflexes, but they are not brighter than light. If you are drawing a gibbs head (as in my case) don't forget about the materiality of the gibs. Border contrasts should be enhanced, and reflexes and light should be made brighter.
In the end, this is what happens:


P.S. Thanks to everyone who liked my lesson, I tried. I will be glad to see your robots. And good luck in your endeavors and talents. If you have questions about the lesson. I will listen and help in any way I can. Sorry for the image quality (taken on a mobile phone). The author of the first trimming is Art_Yana. Source


