Tree Drawing Technique
in senior and preparatory groups.
Senior group
The tasks of the senior teacher are: develop in children, observation, imagination, initiative, independence; to cultivate an aesthetic attitude to the environment, to teach children to describe an object, his form, highlighting the most significant era features, compare objects in shape and color; convey the relative sizes of objects, form spatial imagination; to learn to draw from winter chalk and from memory, to achieve an expressive solution to the composition.
The teacher should introduce children to works of arts and crafts, folk crafts; teach them to distinguish, name and select colors (red, yellow, green, blue, orange, purple, black, white), distinguish between shades (blue, pink, light green and ar.) and neutral colors (gray, gray-blue oh .
Children should be able to display proportionally in the figure oe the ratio of two or three objects, arranging them according to the scheme: below - those that are on the ground, above - those that are in
air, in the sky; create a plot of five or six items.
Teaching children of the older group is aimed at improving visual skills and developing the ability to create expressive images using various means of image.
The learning objectives are as follows:
- to teach the correct transfer of the form of the object, its features, the relative size and position of the parts;
- to teach the transfer of simple movements in the drawing;
- develop and improve the sense of color; technical skills in working with a pencil (hatching methods) and paints (brush techniques); teach drawing techniques with colored crayons, charcoal, watercolors.
Children must use watercolors and a brush correctly, holding it obliquely, turning it on a plane; must be able to depict a person in a frontal static position and in motion, depict birds and animals both statically and in motion.
Children love to draw autumn.
In autumn, children should pay attention to the golden leaves of trees. At this age, they already know about different types of trees. And can draw them. Explain that the thickness of the barrel can be conveyed by gradually increasing the pressure on pile brushes, and a very thick trunk is drawn by building strokes. Each tree has a vertically directed trunk, thick and thin branches, on which leaves form a crown. These signs are also transmitted by children of the older group. Suggest children depict trees of certain species, placing them at some distance from each other. Suitable topics for children of the older group are “Forest in autumn”, “Autumn park”, “Apple orchard in autumn *.
Working on the theme “Apple Orchard in Autumn *”, children should know that apple trees are different - low and high, young and old, sprawling with a thick trunk and slender With thin branches pointing upwards. Fruits can be green, yellow, red. Particular attention should be paid to the placement of images of trees on the sheet.
The program material in the II quarter becomes more complicated. Children should reproduce in their drawings pictures of winter nature, snow-covered houses and trees, winter games and entertainment, draw objects that are more complex in shape and structure. The best paper for drawing on the theme “Trees covered with snow” is blue. The teacher shows how to apply white paint (snow) on tree branches with the tip of a brush.
Spruce drawing.
We draw on paper tinted in two stripes, with brown and green paint. We give 3 brushes: wide for the trunk, medium thickness for branches and thin for needles.
Explanation:
We do not indicate where the spruce grows, we immediately draw the trunk. I take a wide brush and draw a straight line with brown paint at the end with pressure, from the top point I draw the same line next to it several times to get a beautiful, straight trunk. Now with a medium brush I paint branches. The technique is the same as in the middle group. Above 2 small ones up, the rest are long to the sides. On the branches of the spruce there are “paws” - small branches, I will draw them under the large ones (show). Now with green paint with a thin brush we draw needles.
We decorate the New Year tree with a garland and draw a stand under it. In this group we give an image of firs near and far. Please note that branches are not drawn separately with brown paint here, but sprawling paws are immediately drawn with green paint.

Drawing trees of different species
We will draw varieties of trees. Pay special attention to the fact that if the children of the older group, even after repeated observations, draw poorly, then transfer this work to the preparatory group, since this material is very difficult for children.
Pine
If children have mastered the technique of drawing fir trees well, you can teach them how to draw pine trees.
We draw on paper tinted in two stripes, gouache, palette. We give 3 brushes: wide for the trunk, medium thickness for branches, thin for needles.
Explanation:
The pine has a beautiful, even trunk of a light brown, golden color, because the pine loves the light and the sun very much. We create such a color on the palette. The trunk drawing technique is the same as spruce. We pay attention to the branches, they grow to the sides of the trunk, alternately on one side and the other, the branches are short at the top, longer downwards. There were also branches below, but there was not enough light and sun for everyone, and they broke off, leaving only small knots. The needles of the pine are emerald, long and fluffy. With a thin brush we make strokes long from the branch in different directions.

Birch
We draw on paper tinted in two stripes, white and black paint. We give 2 brushes: wide and medium thickness.
Explanation:
The birch has a beautiful trunk - I draw the trunk with a wide brush with white paint, just as we painted the trunk of other trees. The birch has black specks on the trunk, we will draw them later when the white paint dries. Birch is called curly. Its branches are beautiful, elastic, bent down. I take a medium brush and with black paint draw thick branches from the trunk on one side and the other, starting from the top. And from thick branches thin ones, like garlands, go down. The birch trunk has dried up, now we will decorate it with black dots. Remember, when we examined it, we noted that the bottom of the trunk is very black, there are fewer dots on top.
We draw a birch at different times of the year: snowy in winter and green in spring (we draw the contour of the crown in a wet way and dotted leaves).

Apple tree
We draw on paper tinted in two stripes, gouache, palette. We give 2 brushes: wide and medium thickness.
Explanation:
With a wide brush with dark brown paint I draw a trunk. The drawing technique is the same. Now I will draw a crown with a medium thickness brush. The crown of an apple tree looks like a bowl. Large branches grow from the bowl up to the sun, and small ones grow on them. Because the apple tree has such a crown, it is called spreading. I paint the leaves of the apple tree by priming, the end of the brush looks up.
You can also give the theme “Apple tree in bloom” - with pink paint we draw curl flowers, we do not draw leaves.
Drawing varieties of trees in the older group can only be given if the children have high technical skills. In case of difficulties in the older group, it is better to leave the drawing of a tree according to the method of the middle group and give the drawing of a birch, the rest is taught in the preparatory group.
It is good to give to draw from nature branches of trees and shrubs with leaves or flowers (willow, mimosa, spruce, poplar)
Drawing such objects is more difficult than objects that have regular geometric shapes with a symmetrical construction. The complex structure of a plant, in which the leaves are attached in bunches, the branches have many branches, the children of the older group will not be able to convey, but they can see and draw some leaves raised up, while others are lowered.
This task is carried out starting from the first quarter, for example, in the image of various trees. Each tree has a vertically directed trunk, thick and thin branches, on which leaves form a crown. These signs are also transmitted by children of the older group. In the preparatory group, they are taught to see and draw trees of different species, where all these common features are somewhat peculiar: in a Christmas tree, the trunk gradually narrows upwards and ends with a thin sharp top, while in deciduous trees it also narrows, but branches out at the top and ends with many small branches; in a birch, thick branches go up, and thin long ones hang down, and in a linden, thin branches are parallel to the ground.
Preparatory group.
The tasks of training in the preparatory group are the following:
- to teach the image of the structure, size, proportions, characteristic features of objects from nature and by representation;
- to teach to convey the richness of forms and colors, to create expressive images;
-develop compositional skills (location of an object on a sheet depending on the nature of the shape and size of the object);
- develop a sense of color (the ability to convey different shades of the same color);
- develop technical skills (the ability to mix paints to obtain different colors and their shades;
- apply strokes with a pencil or brush strokes according to the shape of the object).
Children of six years old have a fairly well developed analytical thinking. They can distinguish both general features inherent in objects of the same type, and individual features that distinguish one object from another.
This task is carried out starting from the first quarter, for example, in the image of various trees. Kindergarten children should know that to draw a tree, you first need to draw thin lines indicating the basic shape and size, draw the direction and shape of the branches, and then draw the exact outline of the tree. Then foliage and small details are added, after which the drawing is painted. Each tree has a vertically directed trunk, thick and thin branches, on which leaves form a crown. These signs are also transmitted by children of the older group. In the preparatory group, they are taught to see and draw trees of different species, where all these common features are somewhat peculiar: in a Christmas tree, the trunk gradually narrows upwards and ends with a thin sharp top, while in deciduous trees it also narrows, but branches out at the top and ends with many small branches; in a birch, thick branches go up, and thin long ones hang down, and in a linden, thin branches are parallel to the ground.
There are trees bent, with forked trunks, young and old. The ability to see this diversity and convey it in a drawing develops in children the ability to create expressive images of nature.
The same diversity in the transfer of the features of the subject is fixed in the themes of the image of vegetables, fruits, etc. For this, children in the first quarter get acquainted with obtaining shades of color and composing new colors.
The ability to convey the characteristic features of the structure and shape of objects preschoolers master when drawing from nature a variety of objects, initially simple in shape and structure: branches of a Christmas tree and pine, fish, birds, dolls. Twigs with leaves, flowers, berries, toys and various other small items can be used as nature in the preparatory group. The close location of nature often attracts the child's attention to it: he compares it with a drawing.
In addition, the value of such an "individual" nature is that it allows you to focus on its characteristic features. The teacher selects a homogeneous nature with slight variations: on one branch - 3 branches, on the other - 2, on one - all the leaves look up, and on the other - in different directions. Children's attention is drawn to this difference when explaining the task and analyzing nature; they are invited to draw their branch so that they can recognize it later. At the end of the lesson, an interesting analysis of the search for a drawing of nature or according to the nature of a drawing can be carried out. Here the attention of children to all details increases.
Drawing nature helps to develop a sense of composition in the transfer of space. Children very quickly master the ability to place objects in a large space near and far when drawing from nature of the surrounding nature. For example, they examine with the teacher from the window the space between two trees: close to the children is a lawn, behind it is a river, then a field, and where the sky seems to converge with the earth, a narrow strip of forest is visible where it is even impossible to make out individual trees . Children begin to draw by moving from nearby to distant objects, starting from the bottom edge of the sheet. It becomes clear to them what drawing on a wide space means. The void between earth and sky disappears.
The expressiveness of the picture largely depends on the selected vertical or horizontal position of the sheet of paper. In order to successfully cope with this choice, the child must very carefully analyze the object in various turns, note the features of its structure.
In the preparatory group, children begin to draw with a preliminary sketch, in which the main parts are outlined first, and then the details are refined. The use of a sketch makes the child carefully analyze nature, highlight the main thing in it, coordinate the details, and plan his work.
fir tree drawing
We draw on tinted paper, gouache, a palette - on it we will create different shades of green. We give 3 brushes: wide for the trunk, medium thickness for branches, thin for needles.
Explanation:
The drawing technique does not change. Drawing as in the senior group. Only when depicting needles, we pay attention to the fact that the upper branches are young, elastic and the greenery on them is bright, down the needles on the branches are old, dark in color. 
Drawing trees of different species.
Drawing trees in a landscape is different from drawing trees in general. Since the structure of any tree is quite complex (many branches and twigs, and even more leaves.). then it is impossible to draw this mass separately, especially if the tree is located in the background. Here, when drawing, we proceed from the following rule: being far from the tree, we see only its general shape, without details. Each tree, not similar to the shape of other trees, and you need to depict

We draw on tinted paper in two stripes, gouache, palette. We give 3 brushes: wide for the trunk, medium thickness and hard.
Explanation:
The oak is called a giant, its trunk is very thick, I will draw it with a wide brush with brown paint like this - I will draw a central line and I will “build up” the trunk from one side and the other. The trunk is thick, the oak is mighty, it stands firmly on the ground - the roots are visible. I draw branches with a medium brush with brown paint. The branches are bent from time to time, old, thick. The oak does not have such a crown as other trees. At the top, the branches are curved and curved thick branches also depart from the trunk. Small curved branches extend from thick branches, I draw them with the tip of a brush. The greenery of the oak is transparent, carved, I will paint it with a hard glue brush “poking”.

Pine
In this group, you can give a drawing of a pine tree with colored pencils, but for children it is very difficult. Also, children learn to draw a young pine tree.
We draw on paper tinted in two stripes, a palette. We give 2 brushes: wide for the trunk and medium thickness for the needles.
Explanation:
With a wide brush with light brown paint I draw a short trunk. The technique is the same as when drawing firs. We pay special attention to the branches. I draw 2 small ones at the top, and then from the trunk I draw 2 branches up to the sun and from here 2 down. Now I draw needles with a medium brush, the upper branches are young - the needles on them are light, bright, the lower ones are older - the needles are dark.
In this group, you can show how to draw a crown without branches - with a contour.
Also at this age, children are happy to draw various fabulous trees.

The image of a person is the most difficult in the development of the fine arts of preschool children, which, gradually becoming more complex, takes its place in children's drawings throughout preschool childhood.
Children who have poorly developed attention, visual memory, are lost. Basically, in the drawings of kids, people stand, helplessly spreading their arms, legs apart. And only talented, gifted children can convey movement.
Everything is natural and very nice for a certain period, but there must be development! I was convinced by experience and I believe that drawing a person should be introduced into work with children as early as possible. Small children are not yet afraid to make a mistake, they like everything, and drawing a person in children's drawings occupies one of the most preferred places in their fine arts. But the quantity and quality of the image of people directly depends on how a child (especially of older preschool age) knows how to do it.
In order for the child to be able to convey what was conceived in the drawing, he must possess visual and technical skills. Often a child, dissatisfied with the fact that his image is not done up to the mark, can simply refuse to draw human figures. Experience shows that due to difficulties in depicting a person, children try to avoid depicting the image of a person in independent creative activity. Based on this, it is necessary to teach children how to draw a person, showing a variety of ways of depicting. And for the teacher, the first task should be to teach children to depict a person in accordance with his age capabilities and individual abilities.
Children begin to try their hand at graphic representation of the human figure soon after the age of three. At this time, they use several basic strokes with which they can depict a person: mom, dad or another family member. The drawing of the figure is carried out by the child according to the same pattern: “Stick, stick, cucumber, here comes the little man!” The conclusion suggests itself: for there to be development, systematic, systematic training is necessary.
Teaching preschool children to depict a person is a complex and painstaking process that requires the teacher to be able to take into account a number of requirements in their work and create the necessary conditions for children's creativity. Pedagogical guidance should be aimed not only at teaching the art of portraying a portrait, but also at developing perception and imagination. In other words, it is necessary to teach children to see and perceive, to gradually lead to the understanding that their image can express different content, and the management of the process should be directed, first of all, to the development of aesthetic perception, to the figurative reflection of their impressions in the drawing by certain visual means. It is necessary to find such pedagogical techniques that can arouse interest in drawing a person, emotions, imagination of children, activate the process of drawing, arouse a desire to evaluate a drawing, find elements of expressiveness in it.
A child in the world around him does not catch everything that his eyes see, therefore, in the classroom for the formation of the ability to portray a person, it is necessary to teach children to be observant in order to more fully and truthfully convey the characteristic features and features of the depicted person.
In the process of educational work in this direction, children develop an understanding of the created image, the beauty and expressiveness of the portrait drawing.
In addition to all that has been said, the child’s free and creative image of the world of people will not only allow him to experience the joy of creativity, the joy of creating expressive images, but, finally, will help him more easily enter into real relationships with the world of people around him, that is, provide one of the ways to implement the process. socialization of the child - preschooler. The drawings of older preschoolers show their interest in both social problems and the life history of their people.
It is also important that children of older preschool age will soon go to school, and practice shows that it will be quite difficult for a first-grader who does not know how to portray a person to create “live”, bright works, for which the teacher will put a positive mark, which in turn is the main motive for a child - a first grader.
Middle group.
Children, look at each other. See how the top lip is different in shape from the bottom? There are two waves on the upper lip, and one on the lower lip (draw lips). We draw ears, hair.
In the preparatory group, we introduce children to the structure of man. Consider the structure of the human figure and the proportional ratio of parts. The figure shows that any part of the body, usually the head (its height), is taken as a scale unit when determining proportions. The height of the entire human figure is 7-8 scale units (including the head). The dimensions of the length of the body and head together are approximately equal to the length of the legs. The arms are one unit longer than the body (reaching the middle of the thigh). The arm to the elbow is longer than the forearm; the elbow is at the level of the waist (about half the body). The width of the figure at the shoulders is approximately two units. The legs at the knees are divided into two equal parts.
Consider one of the ways to draw a person in motion. The theme is skiing. One way to draw is to draw with ovals. We draw an oval - the body to the waist, an oval - the pelvic part. Then we will draw ovals - legs to the knee, from the knee - ovals, ovals - feet. Then we will draw the arms, first finding the place of the shoulder. We draw hands in the same way: an oval to the elbow, an oval after the elbow. The elbow is at waist level, the palm is oval. And finally, the head. We find a place for the neck and draw the head. Then we collect the drawing with a smooth line and dress it. After we have drawn a pencil sketch, we erase the auxiliary lines with an elastic band. Let's get started with color.
In the middle group, children learn to draw a "matryoshka". The head is depicted, with an extended sundress towards the bottom. "Snow Maiden" - head, extended fur coat to the bottom, hands from the shoulder. By the end of the year, the image becomes more complicated, you can add a “raised hand” movement.
In the older group, children are invited to draw in more detail. You can offer a scheme for drawing from geometric shapes, a scheme for drawing a head.
Invite the children to consider a doll or a child in beautiful clothes. Clarify by asking the children the shape of the dress, head, arms, legs, their location and size. Proportions of the face: the head has an oval shape. To depict the face, the head is divided by transverse lines into three parts: from the top to the superciliary arches, from the superciliary arches to the tip of the nose, and from the end of the nose to the end of the chin. The teacher draws an oval of the face on the board, marks the auxiliary lines, explaining that they ate noticeable, shows how the eyes are drawn, the distance between the eyes is small, no more than one eye, inside the eye there is a colored circle and a small pupil. Asks what is above the eyes (eyebrows). He further explains that a person's nose is the same color as the face, so only the tip of the nose needs to be drawn. You can draw the tip of the nose with a short dash or depict the nostrils. From the tip of the nose to the end of the face, the lips are in the middle.
Children begin to draw with a cone-shaped torso.
The first theme: "Girl in a long fur coat."
This topic is divided into two sessions.
1 lesson
Gouache - blue and flesh-colored (pink), wide brush.
Explanation:
I take a brush and paint the girl's head with pink paint - it is round. Now with blue paint I will draw a long fur coat for a girl. I step back a little from my head and draw a triangle. The fur coat has sleeves, like spruce branches, I paint with one stroke of the brush down. The girl has a hat on her head. To draw eyes, lips, nose, you can give a pencil or felt-tip pen. You can also draw the educator himself: "Let's revive your girl."
2 lesson
If the children did well, then we give white paint and offer to draw the edge of the fur coat and hat. If it didn’t work out well enough, you can invite all or some of the children to draw a girlfriend for the girl. “We have already drawn a girl in a long fur coat, let's draw a girlfriend for her so that she is not bored.”
Lesson 3 - "Bear"
To make it easier for children to draw a naked doll in the next lesson, we first give a drawing of a bear.
Gouache - brown, black, 2 brushes: wide and medium thickness.
Explanation:
I take a brush and with brown paint I draw bears with a round head. To get an oval body for the bear, I will draw 2 circles - one under the other and then connect them, we get an oval - the body of the bear. On the head I will draw small ears. Now I will draw oval paws - 2 at the top and 2 at the bottom (demonstration). When the paint dries, draw eyes and a nose with black paint.
Lesson 4 - "Doll-Need"
Gouache - yellow, red, black. 2 brushes: wide and medium thickness.
Explanation:
We draw in the same way as a bear, but we immediately draw the body as an oval. Oval arms and legs. Instead of ears, draw hair. We draw panties. When the paint dries, we revive the doll - draw eyes, nose, mouth.
Lesson 5 - "Doll in a red dress"
Gouache - yellow, red, black. 2 brushes: wide and medium thickness.
Explanation:
We draw in the same way as a doll - naked, but we dress in a dress (triangle).
Senior and preparatory groups
Simple pencil.
We draw a person according to the scheme.
Explanation:
To make it easier for you to learn how to draw a person, I will teach you to draw a diagram first, and then from it - a little man. A person has a round head - draw a circle. Short neck - draw a vertical line. Now I draw a horizontal line - this is the line of the shoulders, it is the width of the head. Now I will draw a longer vertical line - this is the line of the body, it is equal to the size of two heads. Below I will draw a line of the hips, it is equal to the line of the shoulders. On the torso I will mark the waist line, it is equal to half the line of the shoulders. Now from the shoulders I will draw a line of arms obliquely to the line of the hips. From the line of the hips we draw the lines of the legs, they are longer than the torso.
Several lessons are devoted to drawing diagrams until it is mastered by all children, since this is the basis of the basics.
"Man on the Move"
Simple pencil.
Explanation:
At the first lesson, we draw the same scheme as usual, but we mark the fold points on the arms and legs. Then we show how to draw a diagram to convey the movement. To convey movement, you can use a child to show the direction of the lines of the arms and legs.
"Man on the move". Of course, it’s not easy to draw a person in motion, if there was only one way to draw, because we are all so different and our perception of the surrounding reality is also different for all of us. Fortunately, there are several ways to draw and everyone can choose the most suitable for themselves. Today we will talk about three ways to depict the figure of a moving person.
The first schematic drawing is traditional drawing, where we draw the body of a person, in straight lines, and then "dress" in clothes.
1) 2)
2) 
The second way is drawing with ovals. With this method, we convey the proportions of the human body using ovals of different sizes.


The third way is drawing with arcs, where we can depict the figure of a person with the help of arcs, long and short, inverted in different directions.


For all methods, without exception, an elementary idea of \u200b\u200bthe proportions of the human body is required, which we will later study on the multimedia slide.
Explanation:
And so, we take the first sheet of paper and outline with a pencil, a barely noticeable line, the size of our man. Then, with the help of lines, we depict the human skeleton, taking into account its proportions and the inclination of the torso, head, as well as the position of the arms and legs. Having drawn a diagram, we “dress” a person in clothes. A schematic representation is traditionally and well known to everyone, therefore it does not cause difficulties.
To master the method of drawing with ovals, take a blank sheet.
The entire drawing of a person consists of seven ovals the size of his head. That is, the full height of a person will be equal to seven circles, in one of which you will draw the head and neck. With the help of such a scheme, the proportions of the picture will be exactly observed. The main thing is to draw the ovals the same. Let's try to make a drawing of a standing person and make markings as on the slide, namely for the head with neck, shoulders and collarbone, chest, abdomen, legs and arms. Apply all these parts of the body to the previously prepared scheme, separately. First, on a drawing of a person, you need to draw an oval for the head, then an oval for the shoulders and circles for the joints. Next, draw two ovals stacked on top of each other, the higher oval should be larger than the lower oval, this will be the chest and stomach of a person. Then you need to draw an oval for the hips, and then two ovals attached to the hips, these are the knees of the person. In the next step, draw the legs and outlines for the arms, as shown in my drawing. Now it remains to draw only the general shape of the human body and get the outline of a standing person. This is a very simple method, but it is very effective for those who have never drawn a person and helps to keep the exact proportions in the drawing. It will not be difficult for you to draw the general shape of the human body. Just circle all these ovals and circles with a pencil. The line can be very approximate, because the person in the picture is in clothes. delete all extra contour lines and draw the clothes for the person
paper and draw the coordinate axis, very thin lines. Departing from the horizontal axis up and down equal segments, we mark the growth of a person with dots (both halves of the same size). Now we divide the lower part into two halves, these are the knees of a person. The upper part is also divided into two halves, this line separates the chest from the body.
Method three , arc drawing. We take a blank sheet and try to draw, for example, a figure skater. We put a point just above the middle of the sheet (neck), draw two lines down from it, the arcs are wide at the beginning, but gradually tapering down, the lines are parallel. Then we draw two arcs up, according to the same principle (hand), see the direction of the lines on the slide. We draw two arcs in the same way parallel to the bottom lines, but a little more curved and a little shorter (the second leg is in perspective). From the point from which we started the drawing, we outline an oval (head), it remains to work out small details, hands, skates, hair, dress. Middle-aged children can easily cope with this pattern, it is so simple.
So in practice, we have mastered three types of images of a person in motion, if you wish and for investment in drawing, you can use all the skills and techniques of drawing in one image.
There is a wide variety of trees in nature, as well as a wide variety of animals or birds. All this huge set is classified according to different criteria. But for the artist, the features of the appearance of the tree are important. And in order to learn how to draw it, you need to observe the shape of the trunk, the shape of the branches, leaves, the shape of the entire crown of the tree. After all, each breed has its own characteristics. Therefore, we will discuss these features in 6 types of trees - maple, birch, pine, spruce, willow and oak (but I recommend reading at the beginning).
Maple.
- The trunk of a maple can bend and branch, from which it acquires a sinuous shape.
- The bark is dark in color, generally similar to the bark of most trees.
- The top of the crown of this tree is rounded, but may also have an irregular shape.
- The maple leaf is known to have a pointed star-like shape. Large masses of maple leaves create a "prickly" texture of the crown surface.
- When shading the crown, you can also use longitudinal strokes, but in order to show the nature of maple foliage, it is better to add a “clumsy” or “prickly” texture stroke to the drawing, similar to maple leaves (I wrote about the texture of hatching). The same principle should be followed in painting, painting the canvas with such strokes that would create the illusion of foliage. Considering that leaves and branches are combined into separate groups, the texture of hatching and painterly stroke should be varied.
Birch

- Birch comes in many varieties. In the middle lane, the trunk of birches, as a rule, is straight and “slender”. In other areas, the birch trunk can form a "slingshot", bifurcating at the root.
- The birch crown often has an elongated shape, directed upwards. However, there are also birch trees with a spreading, squat crown.
- Birch bark is white on the surface. But it has dark "strokes", which are essentially cracks through which a dark inner layer is visible. The closer to the ground, the more often these "touches" appear on the bark. "Black dashes" are on the trunk at the base of the branches, i.e., in those parts of the trunk where the branches grow from. They can have a triangular and rectilinear shape.
- Small birch branches are so thin and flexible that they hang down, rushing down. The leaves growing on these branches form vertically directed rows. The branches leaning towards the ground are bent, giving the appearance of birches a special thrill and lightness.
- In a pencil drawing or painting, the graceful character of birch trees can be conveyed by longitudinal vertical hatching or appropriate strokes of paint. The movements of the pencil or the movements of the brush may repeat the movement of the branches described above.
Pine

- Pine trunk straight. However, there are pines with a trunk curving at the top, which have a "stocky" character. Often there are ship pines in which the crown is located at the top of the tree, and the trunk is straight and tall.
- The bark of this tree has a reddish color, which, as it approaches the ground, becomes much darker, turning into a gray-brown. In the middle of the trunk, the pine bark resembles a flaky, scaly structure. Closer to the ground, it coarsens and forms a dense cracking layer.
- The crown of young pines has a triangular, conical shape. But the crown of mature trees will already be more rounded.
- The branches of perennial old pines can be winding and gnarled. As a rule, pine branches are not strongly directed upwards. To a greater extent, they are directed away from the trunk.
- Pine needles are longer than spruce needles. Therefore, they create a feeling of a fluffy crown, which must be displayed by graphic means, or by pictorial techniques, if this is not a drawing, but a painting. It is necessary to use a texture stroke or appropriate strokes in painting. Each branch has light and shadow, so the artist needs to think about how to draw the volume of individual branches in the total mass of the crown.

- Spruce and pine have much in common, but they are different trees, with their own characteristics. For example, if the trunk of a spruce is as straight as that of a pine, then the nature of the branches will already differ from the nature of the pine branches. The branches of the spruce are slightly curved upwards. In the lower tiers, the old branches are lowered down and resemble “paws”.
- Spruce needles are shorter than pine needles, so the overall texture of the crown of this tree will differ from pine.
- The crown of spruce is shaped like a triangle or a cone and consists of tiers.
- When an artist paints a landscape, he paints trees in volume. To do this, you need to trace how the entire tree is illuminated and how individual branches or tiers of branches are illuminated. For example, going inside the crown, the spruce "paw" plunges into the shade. Outside, it can remain light, as it receives more daylight.
- The color of spruce needles is dark and saturated. Therefore, both individual spruce trees and the spruce forest as a whole will differ in color from other types of trees.

- Willow trees can look different depending on the variety. For example, weeping willow branches are more flexible and plastic than ordinary willow. Because of this, its branches hang down, rushing to the ground.
- The willow is characterized by a constant branching of the trunk, as well as large branches.
- Willow leaves are narrow and oblong. This greatly affects the appearance of the tree. Therefore, this feature must be able to reflect through shading or manner of writing in painting.
- The color of willow foliage is not easy. One side of the leaf is green. And on the other - light, gray-green. Therefore, the overall color of the tree is distinguished by gray-blue hues.
- The oak trunk is powerful. In old trees at the base, it can reach a large diameter. But in dry areas, oaks can be less stocky, looking like slender young oaks.
- The branches and trunk of the oak are sinuous and gnarled.
- The shape of the leaves is wavy. Therefore, the general appearance of the foliage as a whole will be "clumsy-curly".
- The bark is rough and dense.
- The color of the foliage is dark green, saturated.
Here I have considered the features of the appearance of only six varieties of trees. In nature, there are a huge variety of trees and other plants. How to learn to draw, if not all of them, then at least a couple of dozen varieties? To do this, you need to develop observation. If the artist has a “set eye” and good powers of observation, then it doesn’t matter what he will draw. The main thing is to understand nature and notice key points. And what points you need to pay attention to are just discussed in the training material. For those who want to learn how to draw landscapes with trees well, it will also be useful to study the schemes and the technique called (I mentioned it at the beginning of this article).
Hello dear friends!
I am sure that almost all of you are interested in the topic of creating landscapes. Landscapes can be very different, showing beautiful and interesting views of different parts of our planet, in many of them you come into contact with the task of depicting trees. How to draw a living, beautiful and natural tree is the topic of our today's lesson.
Trees are not difficult to draw, only sometimes they come out somehow too drawn or flat.
Basic Mistakes
The main mistakes in drawing trees are:
Lack of volume
The lack of volume in the drawing (in color or black and white) is achieved by using paints of different tone and intensity. Even on a cloudy day, some part of the crown and trunk will be more shaded, and some less. In the thick of foliage, the colors are always darker. Think of a tree as a ball (crown) and a cylinder (trunk) to understand how shadows form on this complex shape.
Municipal budgetary preschool educational institution "Kindergarten of combined type No. 67"
Engels municipal district of the Saratov region
"Step by step drawing trees with children"
art studio
2017
Before you start drawing trees step by step with children, carefully consider these natural objects, find common features. What is characteristic of any (or almost any) tree? Of course, it is a powerful and straight barrel. The bottom of the trunk is thick, but the closer to the top, the thinner it becomes. Branches extend from the trunk in all directions. Usually the main branches are directed upwards. Branches are long at the base and short towards the top. Smaller branches extend from large skeletal branches in different directions, even smaller ones from them, etc. It is these small branches that form the crown of trees. The "skeleton" of the tree is ready. You can depict winter trees in this way - without foliage, only twigs.
Step-by-step drawing of trees with children is a generalized scheme for drawing a tree.
We will dress the "skeleton" of the tree in leaves. You can draw them with dots, creating a mass of foliage from individual dots (tree A). When painting foliage, it is better to take several shades of green and even yellow for a summer tree. And for autumn - yellow, red, orange and green colors.
But it is even easier for children to depict some plane of an irregular shape close to an oval (tree B). This method is interesting to use when drawing with young children, or depicting trees in a landscape. In this case, first draw only the trunk and thick skeletal branches, and add small branches after you paint over the green area.
Foliage drawing options - step by step drawing trees with children
This is a tree in general. But, of course, different types of trees will be very different. And, first of all, in our drawing it will be the difference in the trunks. A thick and powerful oak-hero, a slender weeping birch with drooping branches, a mountain ash or a pine - compare the trunks of these trees with children.
Trunks of various trees.
To introduce children to various types of trees will help youeducational game "Trees, leaves and fruits"
A very simple tree - step by step drawing with children from 4 years old.
This is really a very easy way to draw a tree. Of course, its species affiliation is unlikely to be determined. It is only clear that this tree is deciduous. Here we depict with children only a trunk and several large branches. Foliage - oval. You can paint such a drawing not only with pencils and paints, but even with felt-tip pens.
A simple deciduous tree is a step-by-step drawing scheme with children from 4 years old.
Although such a drawing of a tree is very simple and generalized, it provides a fairly rich ground for creativity. See what trees you can draw based on our picture.
Options for decorating the crown of a tree.
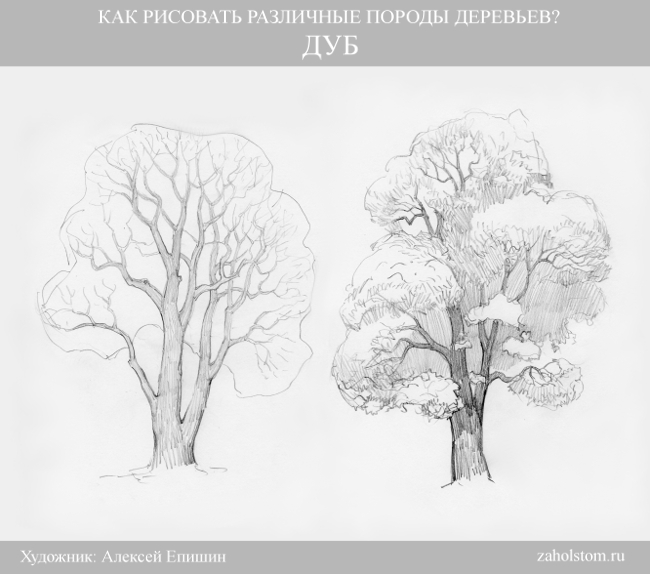
Oak - step-by-step drawing of trees with children from 6 years old.
Such an oak tree looks like a simple tree that we drew above. However, much more detail has been added here. This is a hollow, and the texture of the bark, and branches of a complex shape. It's not scary if your kid lowers something and simplifies the drawing. If his oak tree turns out to be powerful and stocky, then the artistic goal will be achieved!
Oak - a scheme for the phased drawing of a tree with children from 6 years old.
Birch - phased drawing of trees with children from 8 years old.
Drawing such a tree for children is quite a difficult task. This image is already close to a realistic image, replete with details and complex lines. Therefore, this work is not suitable for preschoolers. Yes, and younger students, most likely, will simplify this drawing. Pay attention to the position of the birch branches - they lean down.
Birch - a scheme for the phased drawing of a tree with children from 8 years old.
Pine - phased drawing of trees with children from 6 years old.
We move from deciduous trees to conifers. Remind the children that pine is an evergreen tree. Therefore, it doesn’t matter if you draw it in a winter or summer setting - the crown will always be the same. Pine is drawn according to the same principle as deciduous trees, but green spots-needles must be clearly “tied” to the branches. And the “bare” part of the trunk of this tree is much larger than that of hardwoods.
Pine - a scheme for the phased drawing of a tree with children from 6 years old.
Christmas tree - step-by-step drawing of trees with children from 4 years old.
There are many ways to draw the second well-known coniferous tree, a Christmas tree. Here we present only one - a realistic coniferous tree for quite adult children.
Christmas tree - a diagram of the phased drawing of a tree with children from 6 years old.
Palm tree - phased drawing of trees with children from 7 years old.
Before that, we gave schemes for drawing trees that grow everywhere in our country. Now let's look at an exotic palm tree. A fairly simple and decorative tree for drawing with children is a palm tree. The name "palm" comes from the Latin word "palma", which means "palm". Such associations were born, obviously, from palm leaves spread out like fingers.
We present two options for drawing this tree. The first is more "cartoonish", the second is more realistic. In terms of complexity, both drawings are approximately the same. They can be recommended for working with children from 7-8 years old.
Palm No. 1 - a diagram of a phased drawing of a tree with children from 7 years old.
Palm No. 2 - a diagram of the phased drawing of a tree with children from 7 years old.
An unconventional technique for drawing with plastic cards. Master - class on drawing trees for children of the senior - preparatory group of the preschool educational institution.
Title of the work: "Birches".
Kirillova Irina NikolaevnaEducator MKDOU "Kindergarten No. 4" Chamomile ".
Description: this master class will be useful for kindergarten teachers, teachers of additional education, creative people and caring parents.
Purpose: interior decoration, gift, for exhibition decoration.
Target: introduce children to the non-traditional technique of drawing with plastic cards.
Tasks:
Learn to draw birch trees in a new way of depicting with a plastic card.
Improve your practical gouache skills
Develop curiosity, observation.
To evoke positive emotions from the work done.
Cultivate a sense of beauty, the ability to notice the beauty of native nature
Materials: watercolor paper, gouache, hard brushes, plastic cards, napkins, water, plates for diluting paint.
Preliminary work: viewing illustrations, reproductions of paintings by landscape painters, reading fiction, conversations, observations.
I want to ask the birch
Without breaking the autumn silence.
Why, when all the storms subside,
Are you sad with me?
You are smart, the emblem of Russia!
Bright yellow, autumn outfit,
Inspires both feelings and strength,
And the eyes look with rapture!
S. Mostovoy
The birch is thin and tender
She put on a white dress
And the sun's autumn light
Dyed the braids yellow.
Dressed like this every year
I welcome the arrival of autumn.
Painting "Rays of Light" by I. Kuzmin.

Progress:
1. Prepare the workplace, all the materials needed for work.

2. Dilute black paint in plates. With the narrow side of the card, pick up paint, holding the card as in the photo. You can draw with the wide side if the card is not cut. The main thing is that it is convenient for children.

3. With a narrow side, draw lines from top to bottom or vice versa, as it suits you. Trunks of future birches are obtained.


4. Draw strokes with the narrow side of the map, from the drawn lines to the middle. Hold the card at an angle. Do not pick up paint.


These are the slender birch trunks we got.

5. We start painting the crowns of trees with a dry hard brush, using the poke method.

6. We draw tree branches, and draw thin branches in the crown of trees.

7. Draw the bottom - the ground around the trees. We take brown, light and dark yellow paints and draw grass with a dry brush method.


If you have a sunny day, then you can depict the shadows falling from the trees.

Here we have such slender birch trees.


Dear colleagues, I will be glad if you like the presented technique and share your impressions of the result with me.
Thank you for your attention!


