Now we will look at how to draw a Christmas tree in three versions with a pencil in stages.
First, try to draw this Christmas tree, if it is difficult at the bottom there are two easy options.
Draw the rest, erase the auxiliary triangle.

We draw a part of the trunk and a bucket (pot) where the tree stands.

We have a New Year's tree, so we need to decorate it with a garland and New Year's toys.

Coloring.

Below are 2 simple options.


The Christmas tree is beautiful and glowing with lights. We love dressing her up for the New Year so much. We hang beautiful garlands on it, New Year's toys, we set a star at the very top. And below, when we woke up after the New Year, many, many gifts await us under the tree. The New Year tree is a symbol of the New Year and an essential attribute that stands in every house, apartment, family. Christmas trees stand at home, natural and artificial. For the New Year holiday, the tree should be smart, so they dress it up with the whole family, because it is big. A natural Christmas tree smells good and freshens the air at home. We also buy small branches of the Christmas tree and decorate them. When drawing a Christmas tree, the main thing is to correctly set its center and draw lines from it to the side to the left and right, showing its branches. Then we show the fluffiness with wavy lines from below and again spread towards the line, and so on. Then you need to show the tree trunk below and draw a lot of toys. That's all you've got. Have you been thinking all day: “How to draw a Christmas tree?” See many more drawing lessons about the New Year.
The New Year is coming soon, and before you decorate a Christmas tree at home, learn how to draw it with a pencil and paints.
“A Christmas tree was born in the forest, it grew in the forest ...” - who did not sing this wonderful New Year's song in childhood? For the New Year, everyone: both children and adults, want a holiday and New Year's miracles.
One of these miracles can be drawing a Christmas tree, although if you can draw, then you can do it without prompts. But if you are not so hot what an artist, or you want to have fun, in a New Year's way, spend time with your child, then such a drawing lesson, which is offered here, is just for you. So, draw a Christmas tree
How to draw a Christmas tree in stages easily and beautifully with a pencil for beginners and children?
There are several options to start drawing a Christmas tree.
For example, the first option:
- A sketch is made - a large triangle and a square at the bottom, where the Christmas tree stands will be.
- After that, the paws of the Christmas tree emerge from the triangle, because the New Year's beauty should be fluffy. You can make them in three rows.
- Now you need to paint on a few branches in the foreground of the Christmas tree, so it will look more voluminous.
- It's time to draw toys, cones, balls, sweets and garlands on the Christmas tree, that is, to decorate the Christmas tree.
Another option:
- Start again with a sketch. This time, all you need is a vertical line, which will mean the trunk of the tree, and again the base is a square.
- An asterisk is drawn at the top point of the line, this is the star at the top of the Christmas tree.
- Further, relative to the vertical line, several rows of triangles with denticles are drawn.
- The last stage - decorations on the Christmas tree - balls, stockings, garlands, lights.

The most simple option:
- Just draw a triangle on a small square at the base.
- With the help of teeth on the sides of the triangle and on its area, the appearance of the volume and splendor of the Christmas tree is created.
- At the last stage, you can move on to drawing decorations on the Christmas tree.
- If you paint such a Christmas tree, make colorful toys on it and make the lanterns shine, then it will look very festive!

 A simple drawing of a Christmas tree: stage 1.
 A simple drawing of a Christmas tree: stage 2.
 A simple drawing of a Christmas tree.
 VIDEO: HOW easy to draw a Christmas tree with a pencil?
How to draw a Christmas tree in stages easily and beautifully with paints?
In addition to pencil drawings, the Christmas tree can be immediately painted with paints.
But still, it is better to start such a drawing with a pencil sketch of a triangle on a stand-leg.
After that, the fluffiness of the Christmas tree is painted on with a brush and paints.
IMPORTANT: Before proceeding to the next stage of painting, you need to make sure that the previous layer of paint is already dry.
At the last stage, with different touches of the brush, New Year's decorations are drawn on the Christmas tree, and under it are gift boxes of different sizes.

 Drawing a Christmas tree with paints: stage 1.
 Drawing a Christmas tree with paints: stage 2.
 Drawing a Christmas tree with paints: stage 3.
 Drawing a Christmas tree with paints: stage 4.
  Christmas tree drawing with paints.
 You can also try drawing a Christmas tree by drawing circles around the line of symmetry with a brush. You will get an original Christmas tree, which is also decorated, as far as imagination is enough.

IMPORTANT: You can also draw a Christmas tree, leaving it in nature, as if it were decorated right in the forest or in the yard. To do this, in addition to the Christmas tree itself, you need to draw a background for it. The background can be snow-covered snowdrifts or air drawn with light, thin colors. At different times of the day, the air will have different shades - from blue to pinkish-purple.
VIDEO: We draw a Christmas tree. How to draw a Christmas tree for kids?
Drawings of a Christmas tree with a pencil and paints for children to sketch
Drawing a Christmas tree in different ways, the child will practice before dressing up a real forest beauty. The holiday decor options are endless!
Drawing a Christmas tree and Santa Claus is the most New Year's theme of children's drawings. You can draw a Christmas tree in different ways, the main thing is to correctly draw the proportions of the branches of the Christmas tree and needles, needles. The Christmas tree should be "slender" and beautiful with "fluffy" and dense needles. It is not difficult to draw a Christmas tree, but in order for the Christmas tree to be even and beautiful, I offer my own version of the lesson " How to draw a Christmas tree"with a pencil, as usual in stages. At the last stage, the drawing is easy to color with colored pencils.
To draw a beautiful Christmas tree, you must decorate the top of the crown with an asterisk and draw a lot of bright toys on the branches. In order to create the mood of the upcoming holiday - the New Year, in the picture with the Christmas tree, draw Santa Claus and the Snow Maiden next to it. There are tutorials on the site.
1. Christmas tree drawing. General outline

The drawing of the Christmas tree will be the correct shape if you first draw a general outline in the form of such a simple geometric figure. The shape of the Christmas tree will be even and neat if you draw a dividing line exactly in the center, which will serve as the trunk of the Christmas tree and at the same time a guide for the entire drawing. To create a volume of spruce branches in the drawing, it is necessary to draw an angle protruding towards the viewer at the bottom of the contour.
2. Approximate contours of needles and branches

Since the tree is all covered with needles, it is not necessary to draw branches for it. But still, in order to christmas tree drawing was beautiful and correct, you need to make a simple markup that will allow you to break the drawing into sections of the intended branches.
3. Spruce branches in detail

The real Christmas tree that will stand in your home is not exactly like this drawing of a spruce. But the main thing for us is to draw a beautiful and symmetrical Christmas tree, and then decorate it with toys and draw a suitable interior. Therefore, we will draw a Christmas tree schematically, making symmetrical sharp edges of branches on both sides of the Christmas tree. From the center line of the trunk, draw the sharp edges of the branches, thanks to this, the Christmas tree in your drawing will be fluffy and beautiful.
4. Detailing the Christmas tree pattern

Fill in with arbitrary strokes the remaining gaps between the edges and the middle of the Christmas tree. Try to make them symmetrical on both sides. Do not press hard on the pencil, because we are planning to color the Christmas tree at the last stage with colored pencils.
5. Finish drawing the Christmas tree

At this stage, you need to make the drawing of the Christmas tree more "clear". With a sharp and hard pencil, draw as many main contour lines as possible. To make the tree look beautiful, try to draw symmetrical branches on both sides. Now we can say that the drawing of the Christmas tree is completely finished. It remains only to decorate it with New Year's toys and an asterisk on top of the crown.
6. Decorations for the Christmas tree

What's a Christmas tree without decorations! Of course, you need to draw a lot of bright toys and, most importantly, color the needles with a green pencil. Next to the Christmas tree, you can draw boxes with gifts and, if necessary, the interior surrounding it, including the Snow Maiden and Santa Claus. If you need to draw Santa Claus and Snow Maiden, deer and other forest animals, then on our website you will find such lessons.
The drawing of the Snow Maiden is made on a graphics tablet in stages. You can use this lesson to draw a Snow Maiden with a regular pencil.
On New Year's Eve, many children want to draw Santa Claus and a Christmas tree. A drawing of Santa Claus and the Snow Maiden will be needed both for the New Year's wall newspaper and for the original, "handmade" greeting card.
If you need to draw a New Year's card with a picture of a Christmas tree and Santa Claus, then a reindeer may well complement such a drawing.
Drawing a brown bear requires some preparation, practice in drawing animals. You need to be able to reflect the character of a ferocious and dangerous beast in the drawing. Of course, if you are drawing a children's illustration for a New Year's card with a Christmas tree and Santa Claus, then the bear should have a good-natured look.
It's not easy to draw a kitten. Firstly, the kittens are small, and secondly, they are very mobile. Drawing will take a lot of time, and it is impossible to make a kitten sit still for even a minute.
If you need to draw a Christmas tree in the forest, you can draw several forest "inhabitants" near the tree, such as a fox.
All children love to make snowmen in winter. Try to draw a snowman, fixing your impressions on a piece of paper.
Spruce? It is very difficult to find a person who has never painted this tree in his life. But if you do not know how it is done, our article will teach you this simple matter.
Spruce - a symbol of the holiday!
Spruce - this is which everyone associates with the holiday, the New Year! This evergreen coniferous beauty for children becomes a real green fairy, delighting them on the morning of January 1 with gifts hidden under the branches. Does your child ask you to draw a Christmas tree? Or maybe you need to make some composition with her for a children's party or a matinee in the garden?
We will be happy to provide you with some simple master classes that will teach you how to draw a fir tree step by step.
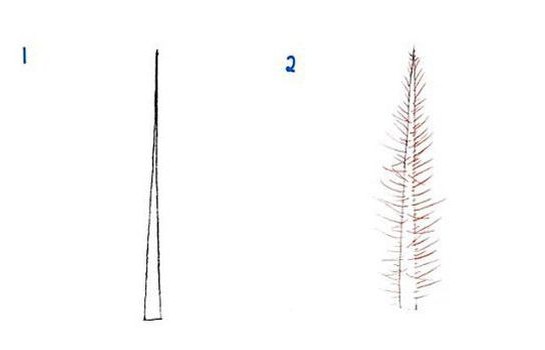
Method number 1: top to bottom
The first method, which we will consider in our article, will be based on drawing a tree from its top. Learn to draw such a spruce. And then it will not be difficult for you to create a whole forest on a piece of paper!
So, how to draw a fir tree, starting from its top? Everything is very simple!

Method number 2: from the bottom up
The first way of depicting spruce is not bad, but, you see, it is much more convenient to draw from the bottom up, and not vice versa. This makes it much easier to adjust and plan the height of the tree.
How to draw a fir tree from bottom to top? Now let's show!

Method #3: Easy!
How to draw a fir tree in the simplest and most unpretentious way? We know it and will definitely share it with you. With this method, even a small child can draw a Christmas tree.
How to draw a spruce branch
But what if you don’t need the whole tree, but need, for example, only one of its branches? Well, we'll tell you about that too. Arm yourself with pencil and paper, let's get started!

The drawing is ready!
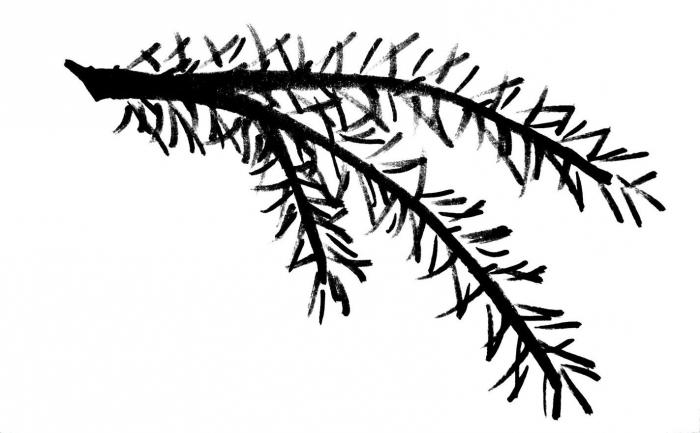
Now you know how to draw a spruce branch yourself. You can even teach it to your child, for example.
Using the methods described above, you can draw a branch of a coniferous tree or the spruce itself with a pencil, felt-tip pens and even paints. The tool in this case does not really matter. Draw, create yourself and with your children.
Master class: "Drawing a spruce in watercolor technique"
Author: Knis Anna Nikolaevna, senior teacher.
Place of employment: MBDOU "Kindergarten No. 3 "Smile", Kalach-on-Don.
Description of work: I bring to your attention a master class: "Drawing a spruce in watercolor technique" for children 5-7 years old. The material can be useful to educators, children and their parents, teachers of additional education, teachers.
Purpose: The drawing will serve as a good gift, you can use it for interior decoration.
Target: Drawing spruce in watercolor technique.
Tasks:
- To teach children to draw a spruce tree, achieving an expressive transmission of needles (drawing with the end of a brush);
- Improve skills and techniques of working with watercolors.
- To cultivate accuracy during work;
Spruce

Spruce is a graceful, slender tree. It is impossible not to admire its crown, which has the shape of a regular narrow cone. This cone is especially pronounced when the trees grow freely, not constrained. The long lower branches lean slightly towards the ground, as if unable to bear the heavy load of needles. The top of the tree is always sharp, it never dulls even when the tree is old. The crowns of fir trees look like the tips of giant pikes aimed at the sky.
Spruce is a symbol of courage, courage (to the point of insolence, recklessness), high spirits, fidelity, immortality, longevity, arrogance, royal dignity. In ancient Greece, spruce was considered the tree of hope. The Christmas tree symbolizes the beginning of the annual cycle and life in general. The fir cone is a symbol of the fire of life, the beginning, the restoration of health. Spruce is an amazing plant: it can be used to treat various diseases in its entirety. Cones, needles, branches and buds have unique beneficial properties. Essential compounds boast bactericidal and antiviral properties. As an aromatherapy, spruce essential oil is used for diseases of the upper respiratory tract, as well as to increase immunity and prevent acute respiratory infections. In addition, spruce oil can eliminate overexertion and nervousness, enhance the protective properties of the skin and improve the overall tone of the human body. Being indoors, in a short time, essential compounds of spruce neutralize harmful microorganisms, filling the house with oxygen and a healing microclimate and weakening electromagnetic radiation from household appliances.
Spruce is widely used in the national economy. Its wood is used in large quantities, for example, for the manufacture of paper. In our age of rapid progress of civilization, the need for paper is exceptionally great and a huge amount of it is needed. Statisticians have calculated: in one year in all countries of the world they produce so much paper that if one whole sheet of ordinary thickness is made from it, it will have fantastic dimensions - you can “wrap” the entire globe in it, like a head of cheese! Spruce accounts for the majority of world paper production.
Materials and tools:
- watercolor paints;
- brushes No. 12, No. 2, protein;
- paper for drawing;
- a simple pencil, an eraser;
- watercolor paints, non-spill;
- frame for decoration.

Stages of work:
We take a simple pencil and drawing paper, which we place vertically. Let's start drawing a spruce from the trunk. Its trunk is straight and thin.

We will draw branches in three tiers. We draw the first tier from below with straight lines emanating from one point on the trunk, as in the figure.

We draw the second and third tiers in the same way as the first, shortening the lines of each tier.


Adding a horizon line.

With a wide brush, paint over the sky with blue watercolor.

We paint over the ground with light green watercolor.

Brown watercolor draw the trunk of a spruce.

We draw branches in dark green watercolor.

With the end of a thin brush and dark green watercolor, draw needles on each branch. The thicker the needles, the more magnificent the spruce we get.


For splendor, add small branches to the branches.

We draw the needles.

We draw young needles on the tips of the branches with light green watercolor.

With black watercolor we add a shadow on the trunk.

We paint over the grass in the foreground with dark green watercolor.

The spruce drawing is ready. Let's put it in a frame.

Spruce
Norway spruce - haughty from afar,
near a cozy house...
Here we will rain and wait.
Y. Nasimovich.


