The human body has many parts. As we have already discussed with you here on the site, it is not so easy to draw the body and its individual parts correctly. To do this, you need to learn and know the basics of anatomy and physiology. Very often, children draw parts of the body and the figures themselves in a very simplified way, one might say, in an amateurish way. Here we want to teach you how to draw the elements of the human body correctly, primarily from an anatomical point of view. Arm yourself with a pencil and eraser, take an album and start the lesson. Following our tips, you will gradually learn the basics of this wisdom.
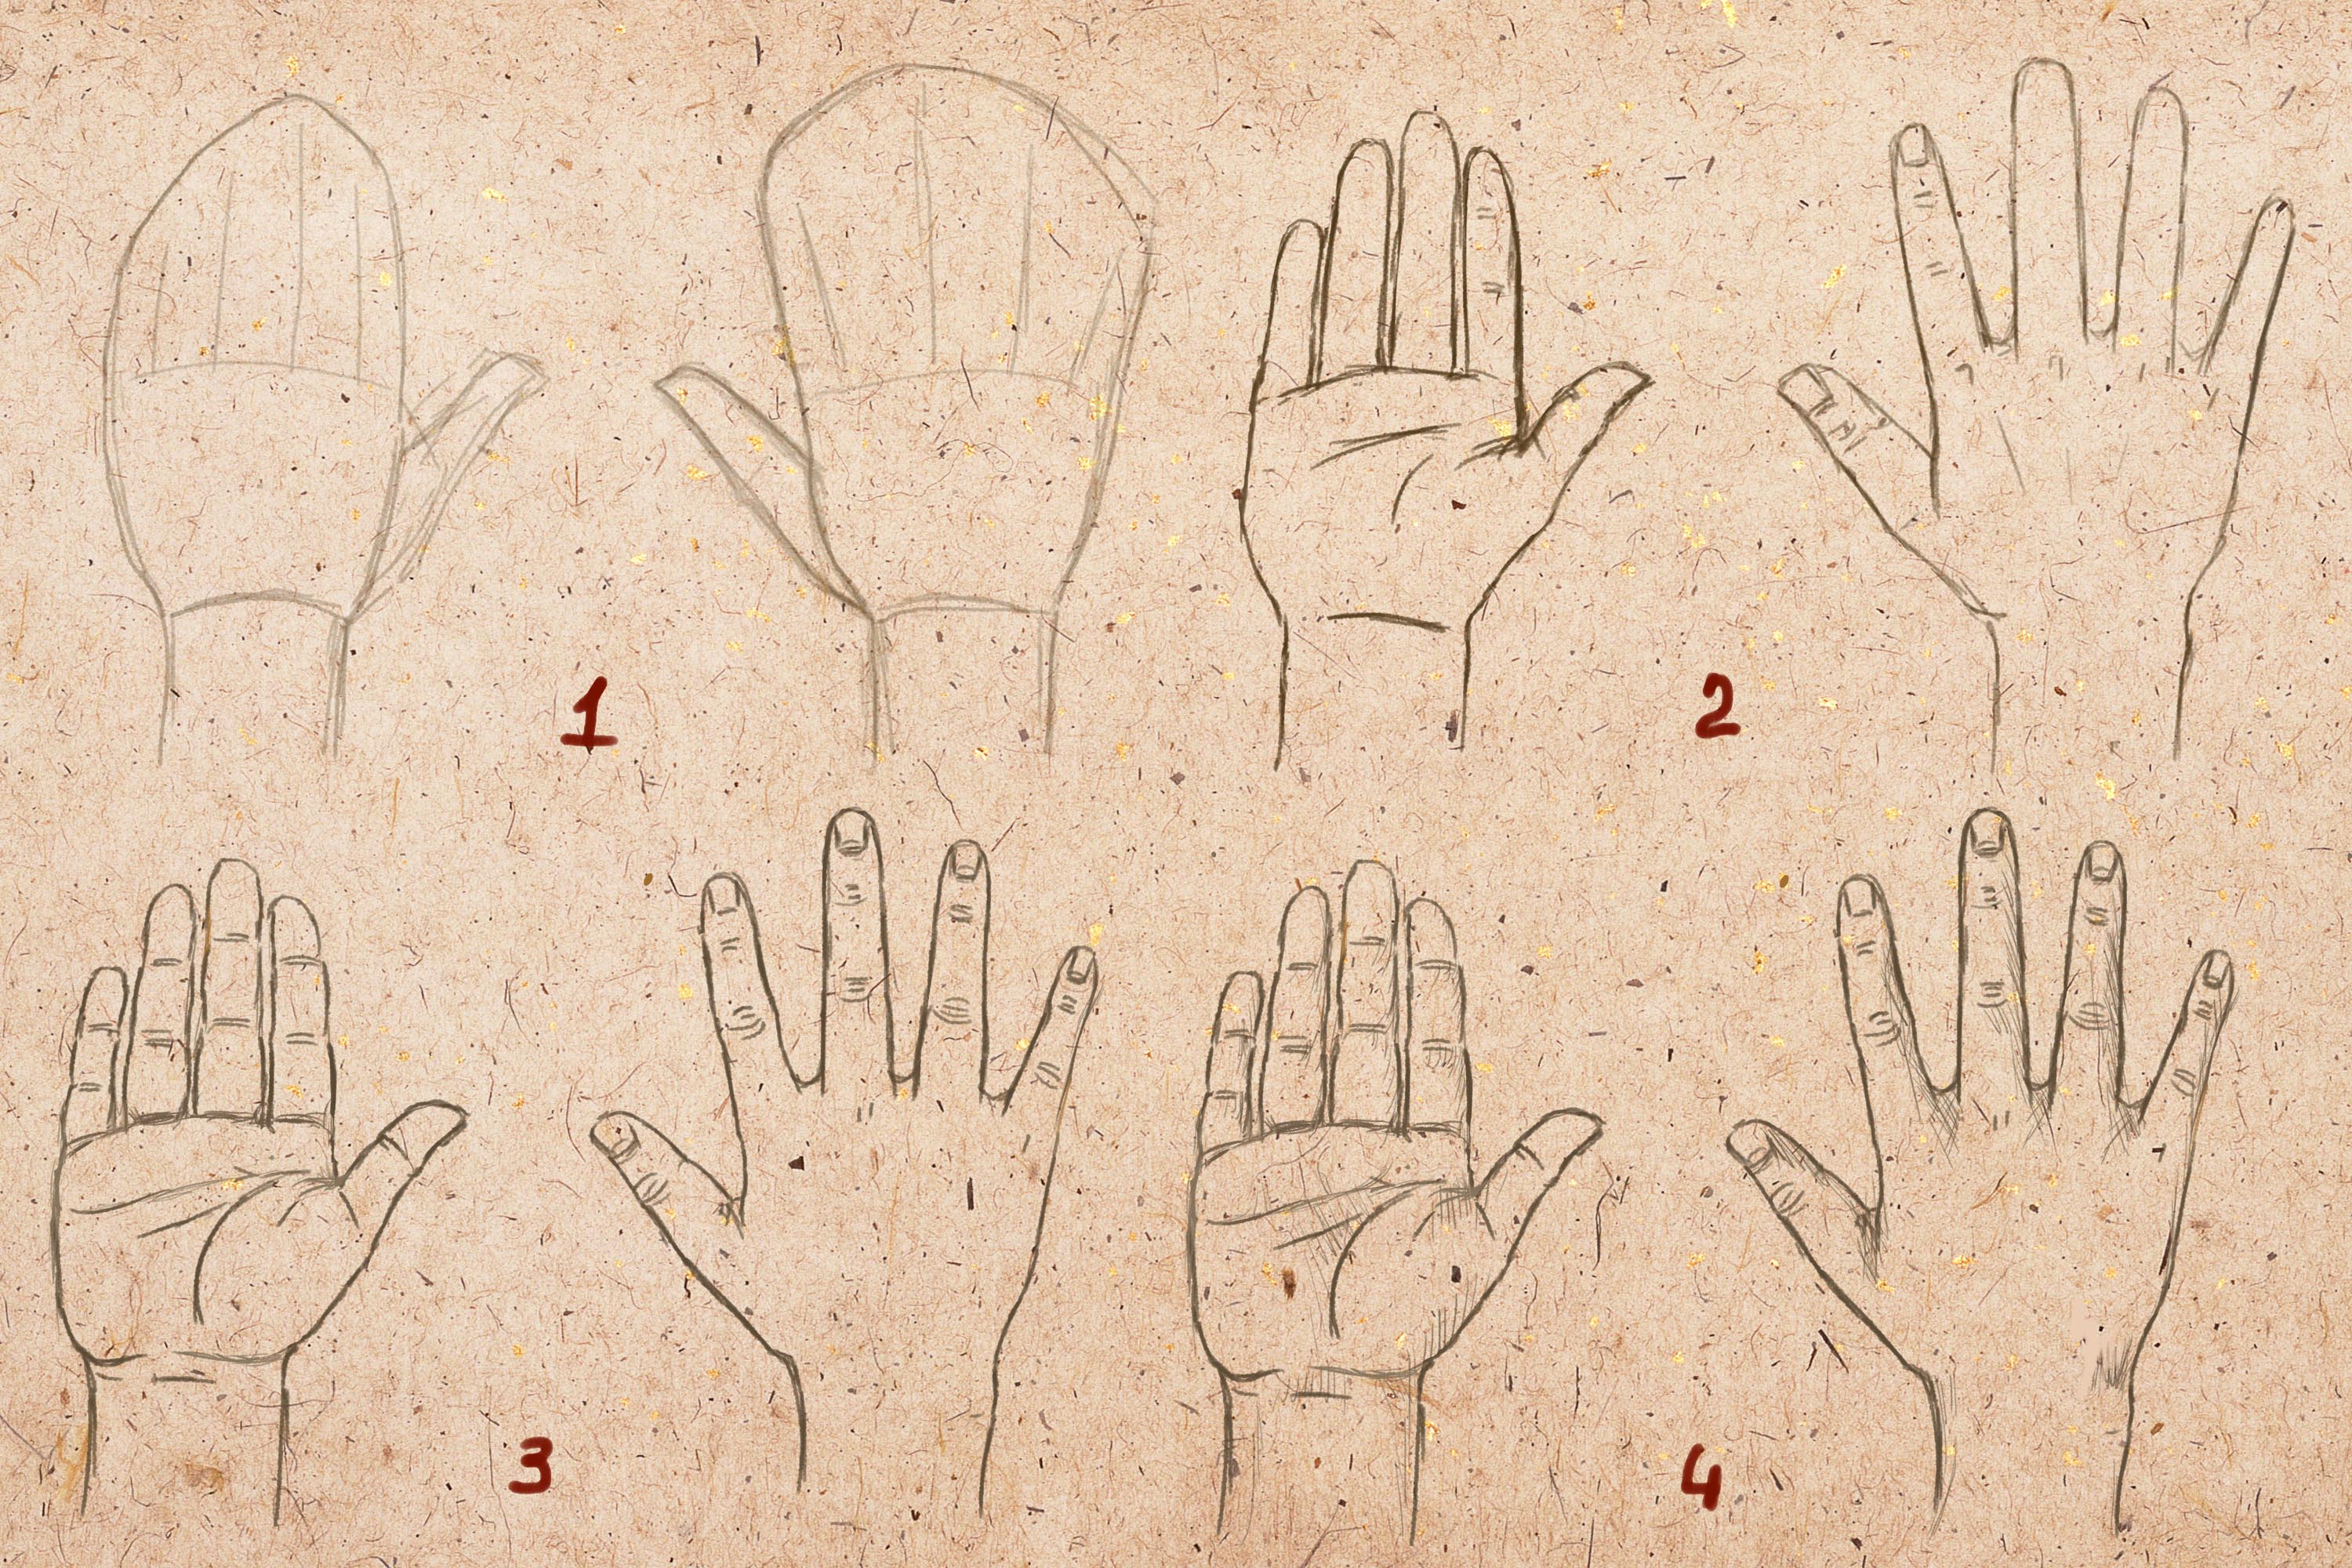
Stage 1. Draw the caracas lines of the human hand. First we will teach you how to draw a human hand from the elbow to the fingertips. We build a straight line .. On the upper part we mark a point from which we draw five segments, from which, in turn, we draw five more segments connected at an angle to the first ones. This is the basis of the future hand. Then, along the main straight line, we begin to outline the line of the elbow and the forearm of the arm (this is the part of the arm from the hand to the elbow). The forearm widens from the elbow bend, then becomes thinner and passes into the hand (expanded part). After that, we begin to draw the fingers. First the little finger, then the ring finger. We draw them along those lines from point 1 of the same stage.

Stage 2. Now we draw the middle and index fingers of the brush. Along the auxiliary lines we give contours to the phalanges of the fingers. The hand is slightly bent, as if a person wants to take or hold something. Then we will finish the last, thumb. And further. On the fingers and palms, we will show bumps on the skin, depressions and tubercles, skin folds.


Stage 4. Now let's try to draw a separate human hand. We build additional initial wireframe lines like this. Select a point on a sheet of paper. From it we take three features in different directions. At the end of the third line we put a point, and from it we draw segments connected to each other. It is like a skeleton of future fingers. We outline the hand itself with smooth lines around these straight lines to the finger zone. The brush is bent down. Then. Let's draw the thumb. First, we will show its thickened part, then the phalanges of the finger itself and the line of connection with the index finger. Then we draw the index finger and middle finger of the hand, outlining the skeletal lines of the starting point of this drawing.

Stage 5. We finish the ring finger and little finger. They are barely visible because of the front toes. We show the folds on the skin, tubercles, bulges and bumps on the brush. Then we delete all the sketch lines and leave only the necessary ones. We colorize the hand, shading some areas (the play of light and shadows). We hope you learned this lesson well and you managed to draw the hands of a person.

It is necessary to develop and bring to perfection any skill, even having a talent from birth, you need to constantly develop and hone it.
That absolutely everyone can learn to draw, and we hope that you have already begun to implement our tips. Today we want to touch on another “sore” topic for novice artists, namely, drawing such complex body parts as hands, feet and, of course, eyes. As a rule, these parts of the body are always the most difficult to draw and that is why it is worth giving them a little more of your time and attention when you learn to draw.
How to draw hands
A few basic rules:
1. It is necessary to practice drawing the palm in different positions. The same principle works here as everywhere else - Practice, practice and more practice.
2. Children's palms are thicker than fingers.
3. The female palm is thinner and more elegant.
4. To make the palm more masculine, add some angularity to it.
5. On the palms of older people, we put more emphasis on the knuckles and draw more wrinkled skin.
To begin with, we need to understand a little the anatomy of the palm. Take a close look at your hands. Your main goal is not to remember what is called, what part of the brush, study the proportions and shapes. Please note that the phalanges of the fingers are not in the same line, and the fingers cannot be perfectly even and are always tilted to one side.

The index, middle, ring and little fingers are quite closely related and cannot be far apart, while the thumb has a fairly wide range of motion.
Try tracing your hand and filling in the outline with details. This will help you get a little better idea of what the palm should look like in the drawing.

Before you start drawing a hand, first of all, you should outline its overall size and the points where the ends of the fingers will be located. Only after that the sketch is divided into several parts.
When drawing hands, there are generally accepted proportions. For example, the length of the palm is equal to the length of the index finger multiplied by 2. The index finger is equal to the ring finger, sometimes the ring finger can be slightly longer than the index finger. The little finger reaches the top phalanx of the ring finger.

The nail should occupy half of the phalanx. Women's nails are drawn more rounded, while men's nails are more square.
If you find it difficult to draw fingers, imagine that the phalanges are cylinders connected to each other.
Don't forget to add shadows to make the hand more realistic.

Starting to draw, first try simpler options, for example, an open or unfolded palm. Gradually complicate the task, for example, by drawing a hand folded into a fist.
How to draw feet

As in the first case, before drawing, you must carefully study the anatomy of the foot.
The structure of the hands and feet are somewhat similar to each other, however, the proportions will differ.
The length of the foot is usually equal to the length of the head of the person you are drawing. The foot consists of two parts - the heel and metatarsus (the part that is connected to the fingers). The top of the foot rises to the top. The bone that is outside is always lower than the inside. The lower part of the foot has a curve, it is not drawn flat. The thumb is always drawn parallel to the ground, and all the others will be lowered to the ground.

Another note, if you draw the foot from above, then the toes will be longer than in the drawing of the foot from below.
The lower part of the nail is at half of the upper joint, the width of the nail is longer than its height. The thumb is the width of two second fingers.
How to draw eyes

If your goal, of course, is the ability to draw portraits, then the eyes will have to devote a lot of time. Look - what first of all needs to be conveyed by drawing eyes.
The first step is to draw the shape of the eye. In the future, when drawing portraits, this step will have to be given quite a lot of time, since an incorrectly shown shape will ruin your entire drawing.
After that outline the cornea. Immediately apply highlights to the pupil. Don't miss any of the little things you see. The iris of the eye should not be completely round. From below and from above it is cut off by a century. The iris that falls under the upper eyelid will always be slightly darker. The rest of the darkening and highlights will depend on your desire or on who you are drawing.
Darken the whites of the eyes. On the edge of the shadow should be somewhat darker.
Eyelashes are drawn as the final step. They are thicker at the base than at the end. Note that the eyelashes are slightly reflected in the eyes.

Finally, we remind you once again that the main thing is practice. Start simple and gradually bring your skill to perfection, gradually complicating your tasks.
Draw and be inspired with us.
The main photo is taken from the website.
Drawing hands is actually very difficult. There is an anecdote that lives to this day among the walls of art institutions, which tells about an artist who, in order not to be ashamed, painted his hands in his pockets and his feet in the grass. Hands are also a three-dimensional form, and it is the volume that needs to be conveyed. But this is not the worst. The hardest part is getting the proportions right. Already in second place is the transfer of movement, anatomical features. I do not diminish the importance of knowledge of anatomy, it should be. But if the proportions are not observed from the very beginning, further work will not bring a positive result. For example, a sitter is sitting in front of you. His hands are in the right position, in a certain angle. So you need to correctly catch the position of the hand in foreshortening. And for this, look for proportions. The slightest inaccuracy and the "correct" picture will not work. And you notice this inaccuracy already halfway to the completion of the work, sadly.
I'll try to explain in a different way. To get started, you should probably look at the following figure:

It is not necessary to know what bone is called. It is enough to understand that the hand is not an amorphous material, not an inflated ball - these are bones covered with muscles, ligaments, skin. Remember the proportional ratios of the parts of the skeleton of the hand.
When you draw from life, your hand will most likely be in perspective, which will complicate your task. It will be necessary to transfer the proportions of the "picture" itself, taking into account the proportions of the hands.
You need to start drawing a hand not individually, but as a total volume. You outline the volume along with all the fingers and only then "break" into sections, eventually highlighting each finger.

If you take a ball in the palm of your hand, it will take its shape. It will be easier to understand if you do it yourself. Of course, the hand can take different positions, and its shape will change. But the basics must always be taken into account. This is how Bummes painted:


After outlining the form and all the details, you can come to the transfer of chiaroscuro. We first determine (in general) a light spot and a dark one and put a soft stroke on the shadow. And then we do everything according to the principle, as described on the page.


Here are the works of artist Andrew Loomis. The structure is shown very well, all volumes are perfectly transferred. You can directly take and copy, taking into account all proportional relationships. It is very well shown that the basis of the structure of the palm is a ball. See how the fist is drawn. Start by transferring the main proportional ratios, height and width, main masses. When you outline this in the sheet, proceed to the construction of the main volumes. Lastly, mark the nails, sometimes just a light pencil mark is enough.
After that, you can proceed to the transfer of chiaroscuro, which will help to convey the volume. Note that here chiaroscuro performs an additional function. It is applied with light hints, specifying the volumes and shape.
Below are his drawings of children's hands. The hands of babies, they differ from the hands of adults in that the palm is more weighty and fleshy in relation to the fingers. The joints are almost invisible on plump arms. From this there may be problems with misunderstanding - the baby's hands can turn out to be "cotton". Already somewhat understanding the structure of an adult hand, you need to move on to draw the hands of babies. Schematically, a baby's hand can be inscribed in a rectangle close to a square, or even in a square.
The hands of older children. Small differences begin to appear between the boy's hand and the girl's hand. The boy's hand is bigger and stronger. Better visible muscles and joints. A distinctive feature of the girl's hands is that they are thicker, narrower, not muscular, fingers are thinner, nails are narrower. Worse visible joints and muscles. In drawing children's hands, tendons are not transmitted. They are still practically unexpressed.


Women's hands have noticeable distinctive features from men's. Like everything in a woman - a face, a figure, so are the hands themselves. They are drawn more delicate, with light rounded surfaces, more elegant. For greater elegance of a female pen, the middle finger should be about half the length of the palm, oval nails also add grace. Joints are easily transmitted, can be transmitted by a hint, small dimples, like in infant children's hands.
Hands are difficult to draw, especially from an angle. Many artists believe that the indicator of a master is precisely the ability to draw hands. And this is achieved only with practice and diligent work. It won't work right away.
If you do not take into account the face of a person, then most of all the emotions of a person are conveyed by the position of his hands. The hands and fingers are very plastic and perfectly reflect the emotional state of a person. In this lesson we will draw a human hand with a pencil in stages, from simple to complex.
If you are learning how to draw a person, a portrait or a figure correctly, you definitely need to know how to draw a hand, correctly and naturally, and this requires some knowledge and a little practice.
Proportions
In order to learn how to draw hands, first of all, you need to learn proportions and be able to apply your anatomical knowledge in practice. This is not as difficult as it might seem at first glance. By remembering just a few simple rules, you will increase your drawing skills several times, and your hand drawings, miraculously, will become plausible and natural.
General ratios
An interesting fact is that the hand is a bit like a shoulder blade, which consists of two parts of the metacarpus and fingers.
The length of the fingers is equal to the length of the pastern.
This ratio must be observed. The drawing of a hand can be started from a schematic designation of its shape, and a line to show the line separating the brush into two equal parts.
How to draw glass: how to make a glass vase
The length of the entire brush can be quite different. There are people with short and long fingers and, accordingly, a square or elongated hand.
Fingers
Movable and flexible fingers are made up of joints. The bones of the metacarpus are the largest and longest, the joints of the fingers are attached to them. Each subsequent phalanx is smaller and thinner than the previous one. 
The hands of our hands are arranged according to the principle of the golden ratio, because women's hands so attract the views of surrounding men. The proportions of the phalanges are in the ratio of 2/3 of the length of the previous phalanx.
The picture below shows the first phalanx in red, the second in orange, and the third in yellow. 
All fingers except the thumb consist of four joints: three phalanges and one joint in the metacarpus. Thumb set aside, slightly turned in relation to the rest of the fingers and consists of three joints. Its length usually reaches the middle of the first phalanx of the index finger.
How to draw beautiful eyes

Length little finger almost reaches the bend of the last phalanx of the ring finger. This is shown in the illustration above.
Directions
If you carefully observe the hands of different people, you will find another common feature that you also need to consider in your sketches. If we outline the brush on top with one line, we get small semicircle, the top of which is the middle finger.
Pay attention to the inside and outside of the palm. If we draw a conditional line at the base of the fingers, we will also see a small arc that goes from the index finger and goes down to the little finger.
In the illustration below, this is indicated by red arrows. You can draw a hand, starting from a mitten, which is shown in the corner in brown, immediately outlining all directions.

The pads and folds on the inside of the palm also have one common direction, they seem to descend from index finger to little finger.
Fist
Some more information about the directions that will help you more quickly and correctly depict the brush. Let's say you need to depict a brush clenched into a fist. Evenly bent fingers again form a kind of arc, with general direction "down to the little finger".
How to draw hair

Pay attention to the upper part of the illustration - a small hand drawn in brown. Here is a diagram showing how the the width of the fingers in each subsequent phalanx, keep this in mind and do not forget to show in your work. Compare the lengths of the red, orange and green segments.
A fold forms on the outer side of the hand clenched into a fist, under the little finger, it is underlined by a small green arc in the illustration above. By marking it, you will be able to create a more realistic image of a hand holding something or making a fist, etc.
Important Details
The picture below shows what the skeleton of the hand looks like. The joints at the junction are slightly wider and thicker. We need to understand this in order to know how to draw a hand realistically. This is especially true for the hands of the elderly and thin people. In place of the bends, the finger will be slightly thicker, along the length of the phalanx - a little thinner. 
Pay attention to how to draw a curved hand in profile. Look at the junction of the metacarpus joint and the first phalanx of the finger. In the picture above, the red line shows where the first phalanx is attached to the metacarpus joints. This is the beginning of the finger, it can be identified by the joint protruding upward - the knuckle. The green line indicates the place where there are membranes between, they are often mistaken for the beginning of the first phalanx.
Draw a human nose
If we look at the hand in profile, we will see that the outer side is quite flat, only the knuckles protrude. The inner one, on the contrary, is soft, there is a protruding pad under each phalanx. There are two "pads" under the first phalanx, one under the joint is especially large and stands out well for everyone.
We draw a hand in stages
Before drawing the hand, decide on the position of the forearm and wrist. To start, let's take the simplest example, use your brush as a nature, and do not redraw the picture below.
Human balance in motion
In general, drawing hands is a skill that needs to be constantly developed and improved. The hands are very plastic and can acquire hundreds of different positions and angles.
Difficult angles
Interesting angles in which the fingers are in different positions are more difficult to depict. There are several ways to help avoid mistakes.
One of the most effective and most commonly used ways of depicting a hand from a non-standard perspective is to indicate the position of each finger: 
Sometimes the line does not cope with the task and you have to use auxiliary shapes, cylinders or parallelepipeds to indicate the position of the phalanges:

In order to give the brush some kind of intricate position, first try it on yourself, how comfortable, natural and generally possible it is. The hand, fingers and each joint are interconnected, changing the position of one element of this design, the rest often change their position.
Next in line is the study of hands and arms. Today we will look at the basic structure of the hand, as well as where to start. hand drawing practice.
The structure of the arms and hands
The bone of the upper arm is called shoulder bone. Bones forearms consist of the ulna and radius. The bones of the upper part and forearm are connected by the elbow joint as a hinge.
Both ends of the ulna are directly visible under the skin at the elbow and at the outer edge of the wrist. The radius, which joins the humerus also at the elbow joint, can rotate around the ulna for almost 360 degrees. This rotation does not depend on the elbow joint or wrist, but occurs within the forearm itself.
Major muscles of the shoulder are biceps on the front surface and triceps on the back. They control the bend of the arm at the elbow.

Wrist controls all movements except rotation - that is, back and forth and from side to side. It is made up of eight small bones, known as the bones of the wrist, arranged in two transverse rows.
brushes consist of metacarpal bones and phalanges. On the back of the hand, bone and muscle structures are located just under the skin. And on the palm there is a thick layer of protective fabric that acts as a padding.

How to draw hands?
There are entire books on the subject. hand drawing. Despite the fact that the hands are made up of a large number of small bones with accompanying muscles, ligaments, and tendons, human hands are remarkably flexible and versatile.
The best way to start learning is make drawings of your hands using a mirror. To learn how to draw hands well, you will have to do a lot of research from life.


Imagine palm like a flat square shape with a curved outer edge from which four fingers emerge, and form a thumb from a flexible wedge-shaped shape that emerges from one side of the palm.

Practical task
Hands are hard to draw. Start your practice of drawing hands by redrawing sketches of arms and hands in various positions, and then move on to drawing from nature. Make sketches of male, female, children's hands and the hands of old people. The more sketches, the better.
The following materials were used in the article:
- Ron Tiner "Figure Drawing without a model";
- Loomis E. Nude. Drawing guide.


