Apple engineers told us what settings to make so that the iPhone camera takes great photos. This instruction will help owners of American products improve their photography skills and they will be able to take not only selfies, but also something more. The material presented below is, of course, familiar to experienced users, but beginners simply need to read the further presentation of the material.
How to take a good photo on iPhone
- Keep the camera still
- Use HDR mode
- Choosing good lighting
- Correct Focus
- Burst shooting
Most smartphone owners still don’t know how to set up dynamic extended range and exposure control. They can't record video while shooting objects at the same time, and also choose the best time to use the flash, so below are some tips from the developers to help you properly set up your iPhone camera for the best shooting.
To photograph a subject that is backlit, you should select the HDR function and activate it to optimally focus on more pronounced highlights and shadows. Next, you will need to collect the rays into the focus of the camera by holding your finger on the selected area of the screen. Then you need to touch the screen again and balance to lower the shutter speed. Now everything is ready for shooting.

Advice! If you want to get a great shot that both you and other people will like, then do burst shooting, this way you will get more options for one photo and there will definitely be one that is the best!
For large vertical images, you need to switch the camera. After that, turn on the “landscape” mode and switch to panoramic mode. And the last thing to do is to smoothly move the photography tool from bottom to top.

To photograph the external outline of an object (silhouette) with the sunset for the background, you need to focus the photographic device by lightly touching the screen. Next, you need to slide your finger across the display to reduce the exposure time.
If there is enough lighting for shooting, you need to turn off the flash and focus the lens in the above manner and adjust the shutter speed. To obtain a very good quality black and white image, you will need to set the initial contrast of the background, as well as the selected subject.
Most users use the standard application " Camera» to take photos on your iPhone or iPad. A simple and convenient tool has an unloaded interface, quick access from the lock screen and high speed. However, some useful features were somewhat hidden by the developers.
In contact with
Quickly launch the camera from the lock screen
 What many people like about the standard Camera app on iOS is the ability to quickly launch it from the device’s lock screen. All you have to do is swipe (gesture) from right to left, and the shooting application will immediately open. Everything takes just one second. Not a single frame will be missed!
Using a Grid
Going to system Settings → Camera You can activate the grid mode, in which the image received through the viewfinder is divided into three parts horizontally and vertically by lines. Thanks to this, you can use the principle of composition.

Due to this, it will be easier for the photographer to compose the frame using the simplified golden ratio rule. Important parts of the composition should be located along these lines or at their intersection - points of strength. This technique will allow you to obtain images saturated with energy.

Useless headset

Did you know that when connected to an iPhone or iPad, it can perform some of the functions of the iOS camera? By pressing any volume key you will get a new photo or start recording a video.
Volume buttons as shutter button

Not all touch device users like to take photos by pressing their finger on the display. On the iPhone, just press any volume button and you will immediately get a new photo. It is especially convenient to use this technique when taking selfies with the main camera.
Focus Lock

To quickly lock focus anywhere, you need to make a long tap on the display. The exposure will be locked and “ Exposure/Focus Lock". Clicking on it once will return the focus to automatic mode. Apple has integrated a burst shooting feature into the Camera app. To activate it, just hold down the virtual shutter, after which the smartphone will start taking pictures at a speed of 10 frames per second. Then all that remains is to select the most successful images. This feature is ideal for shooting dynamic subjects.
Tips that will make your photos cooler and more diverse.
It would seem that absolutely everything is known about the iPhone camera. But today we’ll talk about non-obvious tricks that will help significantly diversify boring, same-type selfies and photos with standard angles, filters and processing.
Note: A little madness in life is another reason to smile.
1. Stockings and tights
This advice may seem completely crazy, but it really works. Hundreds of apps on the App Store offer a wide range of filters, highlights, and textures. But why have them if you have regular nylon stockings at hand?
What to do: Pull the nylon fabric over the smartphone camera (the tighter, the less noticeable the effect will be), after folding it in half. The photo will have a characteristic blur effect, and if there is a side light source (light bulb or sun rays), a characteristic flare will appear. Experiment with the color of nylon and get cool photos.
2. Panoramic twins

A very unobvious trick that allows you to perform the mode panoramas. As a result of simple manipulations, you can get several prints of the same object on one photo without using any graphic editors.
What to do: In the application Camera select mode Panorama. Place your subject and begin shooting by smoothly moving your iPhone along the displayed level line. As soon as the object is beyond footage, fix your hands and ask your opponent to move the object (move himself) to a new position.
Please note that while moving the subject should not be included in the shooting frame, and the new position is not to get into the lens until it continues. During the entire process of “changing positions”, acting as a photographer, try to remain motionless.
Advice: To change the panorama shooting direction, tap on the displayed arrow on the iPhone screen.
3. Credit card tripod

If you happen to have a couple of credit cards or business cards made of thick cardboard on hand, you can easily build an impromptu tripod.
What to do: Make the cuts as shown in the diagram. Insert scraps of card into the cuts made along lines “A” to securely fix the structure of two platforms.
4. Macro photography

The iPhone's focusing at close distances does not show its best side and it is hardly worth talking about any macro photography. A miniature lens will help significantly improve the situation.
What to do: You can find a similar lens in an old keychain laser pointer and breathe new life into it. Use a lady's hairpin, fixing the lens in her antennae and attaching it to the smartphone with a piece of tape. The “macro lens” is ready!
Advice: If you have a broken lens or set of lenses at your disposal, don’t be lazy to experiment. Place them on your iPhone's viewfinder, move them, find the best points and get original photos.
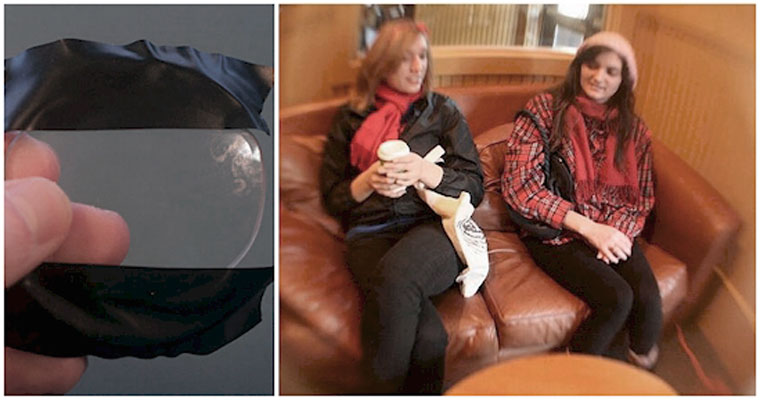
5. Super macro photography

No, you really don't know your iPhone's camera capabilities. The photo below is from a regular SD card. No crop or digital zoom. The photo is presented in original scale:
And all this thanks to a drop of water.

What to do: Using any available means, form a convex drop on the iPhone camera. Be extremely careful, because any liquid is the worst enemy of electronics. Bring your subject close to your smartphone (it will be extremely difficult to do the opposite). The result is a stunningly detailed photo.
6. “Correct” white balance

If the conditions that nature presented on a particular day seem frankly unimportant to you for a good photo, the “grayness” and cold color of the photo can be easily corrected with sunglasses.
What to do: Simply hold your sunglasses lens up to your smartphone's lens and release the shutter.
7. HDR Helper

Until recently, the main problem of mobile photography remained too poor dynamic range. With the advent of the HDR function, which involves combining several images with different exposure values, the problem is a thing of the past.
What to do: Want to capture clear skies, bright sun and green trees in one photo? Be sure to turn on HDR mode. We strongly recommend that you leave the original photo as well. To do this, go to Settings – Photo & Camera and turn on the slider Leave the original.
8. Fisheye effect
The great news is that you have everything you need to take fisheye photography with your iPhone.
What to do: Flip the glasses upside down against the camera lens convex side. Find the point where the distortion is greatest (usually closer to the edge of the lens).
9. Set of filters from covers

Any document in a “European binding” is crowned with a colored transparent plastic cover. And it can be an excellent filter for obtaining original photos using a smartphone.
What to do: Make several blanks from covers of different colors. Make a round hole in each and put it on a carabiner. Now you have not only a set of filters, but also a good keychain.
10. Steadicam from a table lamp

The main problem for bloggers is the lack of additional hands to ensure stable shooting and a good picture. A simple and budget-friendly way out of the situation lies on the surface - a table lamp.
What to do: A lamp “from the IKEA set” is ideal, but if you really want, you can easily adapt a car holder to the place where the lamp used to be and in any other place. Using items for other purposes is not always a bad idea.
11. Headset as a shutter release

A non-obvious feature of the regular Apple Earpods headset is its use as a remote shutter button.
What to do: Connect the headset to your iPhone. To shoot, press the volume key “+”.
12. Underwater photography

Underwater photography with an iPhone without a special case or accessories seems crazy. In reality, everything is much simpler. We will need a glass jar or plastic bottle with the neck cut off and an EarPods headset.
What to do: Connect the headset to your iPhone (you already know from Tip 11 that it can be used as a shutter button). Place your smartphone in the jar and carefully submerge the jar in the water (avoiding any water, of course). Wait for a successful shot and click on volume up key. [FDS]
Try, experiment and your iPhone camera will open up from a completely new side!
![]()
As you know, one of the advantages of the iPhone over its competitors is the presence of a camera capable of creating very high-quality images. It is not surprising that more and more owners of this smartphone refuse to carry an additional digital camera with them.
At the same time, the iPhone camera has some secrets, knowing which you can improve the quality of your pictures and expand your capabilities.
High-speed photography can be very useful, for example, when you are photographing a child at play. In this case, the device creates a whole series of images in a row, from which you can then select the best one. For high-speed shooting, you just need to press and hold the camera shutter button on the screen. The maximum number of frames captured in rapid-fire mode can reach 25. However, speed and quality largely depend on the device itself; on the iPhone 5s this procedure will happen much better than on the iPhone 4s.
The on-screen camera grid is designed to enhance convenience. Thanks to it, it is easier to orient the device, this is a way to create the correct composition of the frame and avoid a blocked horizon. To enable the grid, go to “Settings” → “Photo & Camera” and turn on the “Grid” option there.
In some cases, HDR mode can significantly improve the quality of a photo by increasing its saturation and changing the brightness of individual fragments. It turns on and off directly from the camera window by clicking on the “HDR” button at the top of the screen. In this case, during the shooting process, two frames are created at once - the original and HDR. We subsequently select the best one from them.

The option to create two pictures at once can be disabled via “Settings” → “Photos and Camera” using the “Keep original” switch. However, it is better not to do this, since the HDR mode does not always guarantee an increase in quality; in some cases it is better to do without it.
You should also remember that high-speed shooting does not support HDR mode. Even if it was turned on, the smartphone will take pictures in normal mode. It is possible that in the future, after the appearance of faster processors, the situation will change.
Autofocus on the iPhone camera works quickly and confidently. But even he is capable of making mistakes. And if this happens, then simply tap your finger on the screen on the object you want to focus on.
If you don’t just touch the screen, but hold your finger for a while, the exposure and focus will be fixed. In some cases, this can help in creating creative shots.
Another action you can do with your fingers on the screen is digital zoom. This action is performed in the same way as enlarging a web page in a browser. Just touch the screen with two fingers and spread them apart.
The wired headset included with the device can be used as a remote control. In this case, instead of pressing the shutter button on the screen, you can use the volume buttons on the headset. Continuous shooting in this case is also impossible.

Interestingly, the headset allows you to take photos from a preview of the Camera app, available in the multitasking panel, which opens after you double-click the Home button. But this is more of a curious feature than a truly useful feature. Except that you can save a little time, because there is no need to switch to the application itself.
The user has access to a selection of 8 photo filters, thanks to which you can obtain very unusual results and create creative photographs without resorting to subsequent processing of the finished photo.
Filters are available by clicking in the lower right corner of the screen. It also serves to disable the filter - just select the “Not selected” mode. Filters do not interfere with high-speed shooting and allow you to use the HDR mode.
The capabilities of the iPhone camera can be significantly expanded if you purchase special accessories. Today on sale you can find additional equipment such as tripods and lenses specially made for various models of Apple smartphones.

Tripods will help avoid the appearance of the so-called. “movements”, while lenses will expand the capabilities of the camera. So, on sale you can find models for macro photography, fisheye and others. Of course, even with lenses, the iPhone won't be able to challenge DSLR cameras. But these devices are of a completely different class. The majority, even very demanding users, will be quite satisfied with the results.
The most common mistake that many novice users make is being overly enthusiastic about the flash. More often than not, it doesn’t improve the shot, but rather hopelessly ruins it. It should only be used when it is really needed. For example, in the absence of normal lighting, when there is still no hope of getting a more or less high-quality photo.
It's no secret that the iPhone has an incredibly powerful camera with very high image quality. That's why many people buy this particular smartphone, willingly paying a larger amount than if they were buying another smartphone. But don’t think that you will get good pictures solely because your phone has a high-quality camera. First, you will need to learn how to photograph, know the basic theory of photography in order to take good pictures. And secondly, you will need special applications that will make your camera more powerful and your photo editing capabilities even wider.
Camera+
This application is the first on the list of everyone who wants to take photos using their smartphone. It offers you much more functionality than the standard option, and also gives you the ability to immediately edit the photo you take and share it with friends. And it only costs one dollar, so you should definitely get it. The features it offers you actually cost a lot more - and will definitely bring you more than just a dollar's worth of enjoyment.
360 Panorama
Another one-dollar app that lets you take incredible panoramic photos. It is very rare to see a high-quality panorama because people use standard tools instead of an inexpensive but very good application.
GridLens
This application is entirely focused on expanding the functionality of the camera - you can take pictures with frames, divide the taken picture into several elements, or take several pictures in a row with one click. All of these features will give you a much more immersive camera experience - and more impressive results.
Hipstamatic
This application contains a huge number of different filters, lenses and other devices with which you can give an ordinary photo an unforgettable look.
Retro Camera Plus
The advantage of this application is not only that it is absolutely free (although this is also very nice), but rather its interesting functionality. With its help, you can give your photo a retro style, and you can stylize it in different directions.
Snapseed

This app costs as much as five dollars, but before you dismiss it outright, you should consider purchasing it. After all, it will offer you simply incredible functionality, which significantly exceeds what is offered to you in Camera+, which was discussed earlier.
Mattebox
This app costs $4, so you could say it's a little pricey for the features it offers. But still, the features there are very good and allow you to take wonderful pictures, so the choice is yours.

Naturally, if you share your photos online, you know about Instagram - it’s a social network where you can post your photos, watch and rate other people’s photos. You can also edit photos using the mobile app.
Camera Awesome
With this application, you can make your photos clearer, more competent, convey the composition correctly, and so on. Not very impressive functionality, but this app is free, so you should try it.
8mm Vintage Camera
All previous applications were for photography, and only a few touched on video shooting a little. This application is completely dedicated to video shooting - it gives you the opportunity to shoot videos in various styles, including retro ones.
Labelbox
This application contains a large collection of interesting and colorful labels that you can attach to your photos. This will allow you to make them more individual and meaningful.
Actioncam
With this application, you can group pictures into one photo, and you can do this with frames that were taken within one second.
Phototreats
Another extensive and interesting collection of filters that can turn your photo into something new, bright and much more interesting. As always, filters can change a lot in photography if used skillfully and wisely, so don't miss this app.
Fusioncam
And, of course, don’t forget about this application, which can turn your serious iPhone camera into a children’s camera - with all the filters and features offered.


