
A house is an architectural structure, so when drawing it in stages, you first need to build a general drawing of the house, and only then start "building" and adding other parts of the house to the picture. When drawing a house, you cannot do without a ruler, and, of course, a pencil. The house should look symmetrical, so you need to accurately measure the height, width, etc. using a ruler.
The house can be depicted in different ways, for example, make a roof of tiles, draw double doors, or add a fireplace chimney lined with bricks. Draw these "little things" according to your desire, but any house must have a foundation, walls, a roof and doors with windows. If you follow these rules, then the lesson how to draw a house it will be very easy for you.
1. General drawing of the house

To create a drawing of a house, first draw a rectangle. Measure more than half of the space inside it and draw a vertical line at this point. She will divide the house into two parts, an entrance hall and a living room. The purpose of this lesson is to learn how to see the proportions of the house, my drawing does not have to be copied, you can choose a different layout of the house for your drawing.
2. Contours of the roof and doors

Inside the left half of the house, draw, in the middle of the roof line, the point of its top. From the end of the right line, draw a horizontal line all the way to the end of the house itself, this will separate the roof from the walls. On the right side of the picture, draw a rectangle for the future door.
3. How to draw windows

You see that by drawing a house in stages, with the help of a ruler, everything turns out quickly and evenly. And as soon as you draw the windows and the foundation, the picture of the house will be almost ready. At the bottom of the picture, draw a line for the foundation, it must be in any house. Circle the contours of the roof with additional parallel lines. In the living room, draw two rectangles for the windows.
4. Adding More Details to the Drawing of the House

Now you need to slightly "cut" the roof on both sides, making a slight slope for it. The roofs of houses are rarely straight, builders are always trying to give it an interesting, unusual shape. "Cut" the roof with oblique lines in two places. Circle the windows and the door with additional lines along the contour. At the bottom of the house, add another plane for its bottom. Near the dividing vertical line, draw a rectangle with a small other rectangle at the top, this shape will serve as a chimney. Draw a line connecting the roof to the wall on the left side under the roof.
5. How to draw a house. The final stage

Make parallel lines on the front of the roof with a pencil to create the effect of laid out boards. Draw jumpers in the windows. Draw a doorway from two halves. At the bottom of the entrance, draw a threshold. "Make" the foundation of brick, dividing the general contour into cells. The roof also needs to be decorated. It is best to draw the details of the tiles for this. It takes a little effort, but house drawing will be more beautiful. The chimney will also be made of brick.
Video of drawing a country house in 3D perspective.
6. Color picture of the house
When drawing a house, one cannot do without the surrounding landscape, consisting of trees, grass, blue sky, bright yellow of the sun, domestic animals, people, etc. Be sure to color the picture of the house at your discretion with colored pencils or paints.
Drawing a house, a castle is a good lesson for learning to draw. With an ordinary simple pencil, you will gradually learn how to draw the proportions of the building, create a perspective for the landscape surrounding the house, learn how to add volume to the walls with the help of shadows and lines.
The tree quite often becomes the object of children's drawings. After all, what is the drawing of a house without trees. But a tree is not as easy to draw as it seems, so it is better for novice artists to draw a tree in stages and at first with a simple pencil.
It is beautiful when trees grow near the house, flower beds are broken. When drawing a house, be sure to draw flowers nearby.
First of all, a few tips on drawing technique. Some people have a habit of drawing broken lines, and sometimes tracing them. Try to learn how to draw lines in one motion, don't be afraid to make a mistake.
A beloved cat at home on the couch, a cat in boots from a favorite fairy tale or a beloved cat often become characters in children's drawings. In addition, such pictures can be a good decoration for a child's room. But in order to draw a cat correctly, let's learn a little.
St. Bernard is a bad guard at home, but a reliable friend. He will not diligently bark at a stranger who has come into the house, but he will save a person covered with a snow avalanche. In this lesson, we will learn how to draw a St. Bernard dog step by step with a pencil.
Everyone wants to have their own shelter in order to hide from this world there. I will tell you how to draw a house with a pencil. Perhaps in the future you will be able to build your own cozy shelter. The house is a permanent abode of people and all the good things they have acquired in the form of a TV, unlimited Internet and a cat. Carefully protected by the owner, insulated for the winter and serves as a venue for cultural events. On the territory of Rashka, most often it is a communal apartment in Khrushchev, less often - an apartment in the center of Moscow or Bobruisk. In places remote from civilization, this can be a two-story barn with a leaking roof. Brings a loss in the form of constant renovations and communal tribute, needs expensive armored doors to protect property and add beauty to the exterior. Grants protection from acid rain and petty brawl hurricanes, as well as from Gypsies, Avon agents, and Jehovah's Witnesses. Specific type of houses:
- Madhouse (synonyms: psychiatric hospital, psychiatric hospital, Kashchenko) - The habitat of creative and talented people. Equipped with equipment for experimenting on people healing and healing of the soul. Settlement by special invitations.
- The White house . A pumped version of the usual madhouse for the elite of this world. Led by the Black Lord, he spreads democracy throughout the world, absolutely free, preference is given to countries with oil and dangerous terrorists.
- Dom-2 is almost the same as a madhouse, only there patients are also paid money.
Now let's create a project for your home.
How to draw a house with a pencil step by step
Step one. We draw a small standard house, as it looks in the village, with a triangular roof.  Step two. Let's level the building a bit, add some formal bushes around and tweak the edges of the roof.
 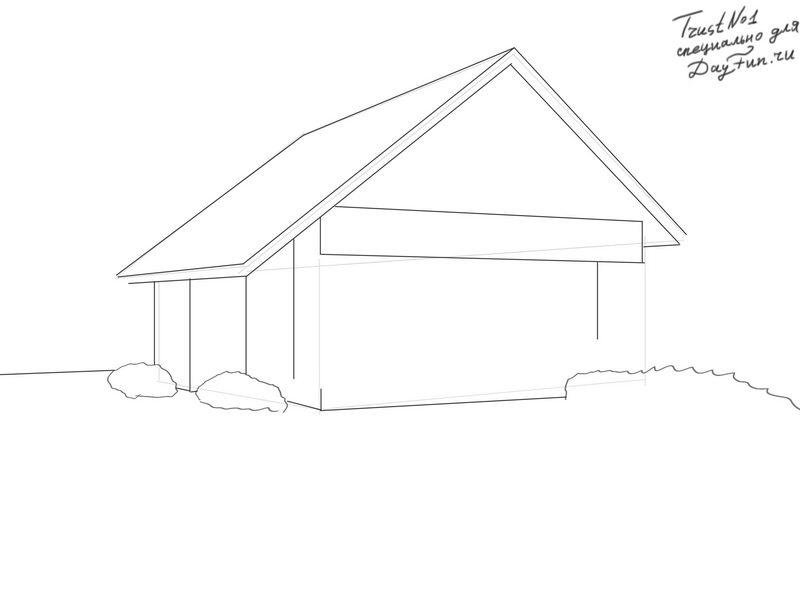 Step three. Let's add a design to this hut, a beautiful porch and a facade ornament.
  Step four. Now let's draw a few windows in front on both floors, as well as a few from the side. Still need some trees in the background and a path to the entrance.
  This is how my house will look, and what kind of house would you like to build? Draw and attach your work below this article. It will be useful for you to know more.
Every year, the construction industry is improving, offering people more and more comfortable and beautiful houses and apartments for housing. If you just think about how houses have changed in one century, you can visualize by closing your eyes how much things can change after some more time. You can argue on this topic ad infinitum. However, not everyone can express their thoughts on paper. Therefore, in today's article, we decided to push our readers to creativity, demonstrating how the house of the future, a pencil drawing, can be original and unique. The photo below suggests ideas that can be used to create a dream home, well, or as a model for sketching.
How to draw a house of the future pencil drawing?
To draw the house of the future with a pencil, you must prepare in advance all the tools for drawing a drawing. In addition to a simple pencil with a hard lead, you need to have several A4 white sheets, an eraser, colored pencils, paints or felt-tip pens on hand to color the finished work. Also, artists recommend to think over the house of the future in their understanding in advance. For example, will it look like a royal castle, a spaceship, a geometric figure or a flower.
Do not forget about the facade of the house. It can have a panoramic view, unusual windows in the form of geometric polygonal shapes, and even the absence of doors.


House of the future - pencil drawing in the photo
Below are more than 20 options for houses that differ in appearance and internal content in the cut. Each model is unique and inimitable in its own way, has its own characteristics and unusual details.
If we compare each dwelling with each other, one cannot but note the discrepancy in form, material, parameters, and even the details necessary for a comfortable life. We are talking about windows, the front door, the foundation of the house and even the external facade. After all, the decision on the landscape of the adjacent territory is up to the owner alone.


Think over all the details of the house of the future, visually presenting every detail. This will help to depict the dwelling in a short time without resorting to help.
Make sure that all the attributes for drawing are at hand.
Use your dream home idea without copying from the finished layout.
As suitable for any paints, pencils and felt-tip pens.
Without artistic skills, it is better not to take on complex work. It is better to make a choice in favor of single-story, uncomplicated living quarters, painted in one color.
Drawn houses of the future by children, pencil drawings in the photo:


I offer you step-by-step instructions on how to draw a quick Japanese-style landscape using the double stroke technique, any surface on which it is convenient to draw. In the case of decorating some thing, it will be necessary to prepare the surface in an appropriate way. For the quality of the photo, please forgive me - I shot it on the phone, and not the best)
So we need:
- The work surface on which we will apply the drawing. In this case, this is a simple sheet of blue pastel paper, but, as I already wrote, the surface can be any suitable one.
- Acrylic paints, preferably not too thick, with good color density, paints of the FolkArt (Plaid) series work well.
- Synthetic brushes - flat, round, fan and thin for drawing details and clarifying points. The numbers of brushes should be selected in proportion to the thing with which we are working. For example, for a miniature box and a wall panel measuring 2x3 m, completely different brushes will be required.
- If you're working on hard surfaces like wood or primed glass, it's a good idea to use a top coat, any will do.
So let's go.
1. We outline the surface of the water and the horizon line, brush movements are desirable parallel to the edge of the sheet, otherwise, as photographers say, the horizon will be littered.
2. Using the classic “double stroke” technique, we outline the coast line, starting from the background and ending with the front. For those who have forgotten, the main technique of the “double stroke” technique is that two contrasting paints are drawn on a flat brush from both sides, after which several smearing movements are made across the palette to smooth out the sharp transition from one paint to another.

3. With soft movements of the round brush, outline the silhouette of the tree trunk. A combination of several shades of the same color and lines of different widths will look very good.

4. With the help of a hard fan brush, we outline the crown with sharp stroking movements, immediately estimating how much volume it occupies and what shape it will be.


5. Using a thin brush, draw thinner branches, refine the outline of the tree crown.


6. Add details and finishing touches - the moon, glare on the water, reflections, the reflection of the moon in the crown, grass, birds, butterflies, meditating buddhas - whatever we want :)


