
On this page of the site, I suggest you learn how to draw a person in full height with a simple pencil step by step. The most difficult thing for a person is to draw a face, so only real artists who have been trained to draw for several years can draw a portrait correctly and accurately. Our drawing lessons are intended mainly for children, so the eyes and other facial features in the drawing of a person are drawn schematically, without careful drawing of details. There are additional lessons on how to learn how to draw a portrait of a person with a pencil, draw eyes and even how to draw a person's lips on the site.
First of all, a few tips how to draw a person right with a pencil. Some people have a habit of drawing broken lines and then tracing them. Try to learn how to draw lines in one motion, don't be afraid to make a mistake. While drawing a person, especially in motion, you should see the whole future image, the contours of the proposed lines, and you just have to draw them on paper.
And yet, in the visual arts, the most important thing is not the accuracy of the proportions and lines of a person’s drawing, but the image of the main, most important in the image of a person. The mood of a person, his character, the expression of his eyes, some other features that characterize him.
You can draw a person in different ways

Now let's find out a few basic steps on how to draw a human figure in full growth. Often, when drawing a person, the proportions of his figure are distorted. The arms and legs are drawn too short or too long, the head is too big, etc. In order to avoid this, it is convenient to break the entire drawing of a person in full growth into separate sections. The figure of a person, together with the head, can be conditionally divided into seven parts, equal to seven circles of the head along with the neck. We will not use this scheme in this lesson, we will draw a person in a different way, but you can additionally use this markup to make the drawing of a person proportional.
1. How to draw a person, initial contours

So, let's start drawing a person by drawing a quadrilateral with side proportions of 3:4. In the center of this figure, draw a long straight line, slightly longer than the longitudinal side of the drawn quadrilateral. Draw an oval shoulder line at the top. And since we will have a person in summer clothes, draw the outline of future clothes, t-shirts, at the bottom of the rectangle.
2. Marking the parts of the human body in full growth

let's continue drawing of a man and make markings using circles for the head with neck, shoulders and collarbone, knees. First you need to draw an oval for the head, then an oval for the shoulders and circles for the knees. This is not difficult to do even for a child, and it is not at all necessary to draw geometrically accurate circle shapes, except for the outline of the head. Draw the head and neck as accurately as possible.
You have probably noticed that many of the lines in the figure are drawn rather carelessly. I deliberately do not try to draw them beautifully, since these contours will have to be removed from the drawing in the future, and they serve only as temporary guidelines for further steps.
3. We begin to draw the general outline of the figure

Moving on to the next step, at first it will seem to you that it is not clear what now needs to be drawn for our person. But look closely, you only need to draw two circles for the elbows and feet and two more sinuous lines on the sides of the human torso and connect them to the contours of the knees.
4. Draw the arms and legs

According to the circles for the shoulders and elbows in the figure, draw the arms. The hands in my drawing are not drawn entirely, but if you want, you can draw the palms. Maybe in the hands of a person there will be some object. It is also not difficult to draw the legs, the only thing to pay attention to is how the feet are drawn. The toes of the shoes are deployed in different sides. At this step, be sure to check the proportions of the arms, legs and torso of the person. In the next step, it will be more difficult to correct errors.
5. Remove unnecessary contours and the person will "come to life"

First, carefully erase all the old contour lines, if you touch some line with an eraser, then restore it. This step is the most interesting and simple, because you don’t need to draw anything, and the person will “appear” like a photograph in a developer. Only three simple details still need to be drawn. This is the neckline and sleeves of the T-shirt, and the bottom line of the trousers.
6. Draw the face and clothes

Now, based on the contours, you need to draw the clothes, and the main thing is to draw in detail the face and head of the person. You can find a lesson on how to draw a portrait of a person on the site. When drawing clothes, do not forget, for greater realism of the drawing, draw folds on it. Be sure to make shadows on clothes, in the direction of the light source. If the light falls on the left, then you need to draw a shadow on the right.
7. Finish drawing the person

This drawing of a full-length person is very approximate and is more designed to study the location of the proportions of the figure of a person standing in full growth. To learn more how to draw a person, you can see other lessons. For example, how to draw human eyes and others.
draw a person or an animal will always be easier to learn on your own or teach a child if you complete the drawing in stages. The main thing is to correctly make a preliminary marking of the position of the head, shoulders, arms, legs. And then step by step add more and more details of the image to the picture.
Human face drawings, portraits are the most complex view visual arts. Learning to accurately draw a person, even with a simple pencil, requires not only time for learning, but also talent. The complexity of drawing a person lies in the ability to convey emotional condition a person, his facial expressions, the depth of his gaze, etc. But it is quite possible to learn a simple technique for drawing a person on your own, especially if you draw a person in stages.
The lesson "How to draw a ballerina" is designed for those who already know how to draw a person well. Drawing a picture of a ballerina is especially difficult, because in the drawing you need to convey the grace and elegance of the dance, the beauty of the body and human movements.
Let's try to draw a hockey player in motion step by step, with a stick and a puck. You may even be able to draw your favorite hockey player or goalkeeper.
Eyes are the basis of anime style drawings. All pictures of girls drawn in anime style are distinguished by huge eyes - black, blue, green, but always huge and expressive. Eyes are the most important and complex element of any human drawing.
The eyes are the most attractive part of a person's face. And since this element takes more attention, it must be drawn correctly. In this lesson we will learn how to draw a person's eyes with a pencil in stages.
In order to draw Spider-Man, you must first learn how to draw a human figure. Drawing Spider-Man in motion is very difficult, because you need to convey the dynamics of human movements in the drawing and be sure to accurately draw all the proportions human body.
Just like Spider-Man, drawing Iron Man is difficult. But if you do exactly preliminary contours, then drawing Iron Man will be easier and easier. To make the drawing look bright and spectacular, it is necessary to color it with colored pencils.
Hello dear friends!
Today we will continue the topic of drawing a human figure, and in this lesson we will study proportions. In this lesson we will learn how to learn how to draw a person in stages with a pencil in full growth. In order for the following information to be really useful for you, I propose to prepare a sheet of paper and a pencil and immediately draw with me.
First of all, it is necessary to clarify: we will consider, and also learn how to build and draw a figure tall man with ideal academic proportions. The figures of most people have their own characteristics, sometimes very far from the reference, nevertheless, they are all interesting and beautiful in their own way. In order to learn how to correctly display in the figure characteristics the figures of each person individually, first you need to remember the ratios and proportions in their ideal version.
If you've never drawn full body people before, start simple:
- First, try to build some proportional skeletons so that the arms, legs, palms, pelvis, knees and other parts are in place.
- Then put on the human body on these frames, it is possible in a very simplified version, without muscle relief. You can dress your character in simple clothes.
- From such a skeleton, you can make a man or a woman, a full or thin person, he will have everything in place. Train!
- If everything works out well, try to show the muscles of the arms, legs, torso.
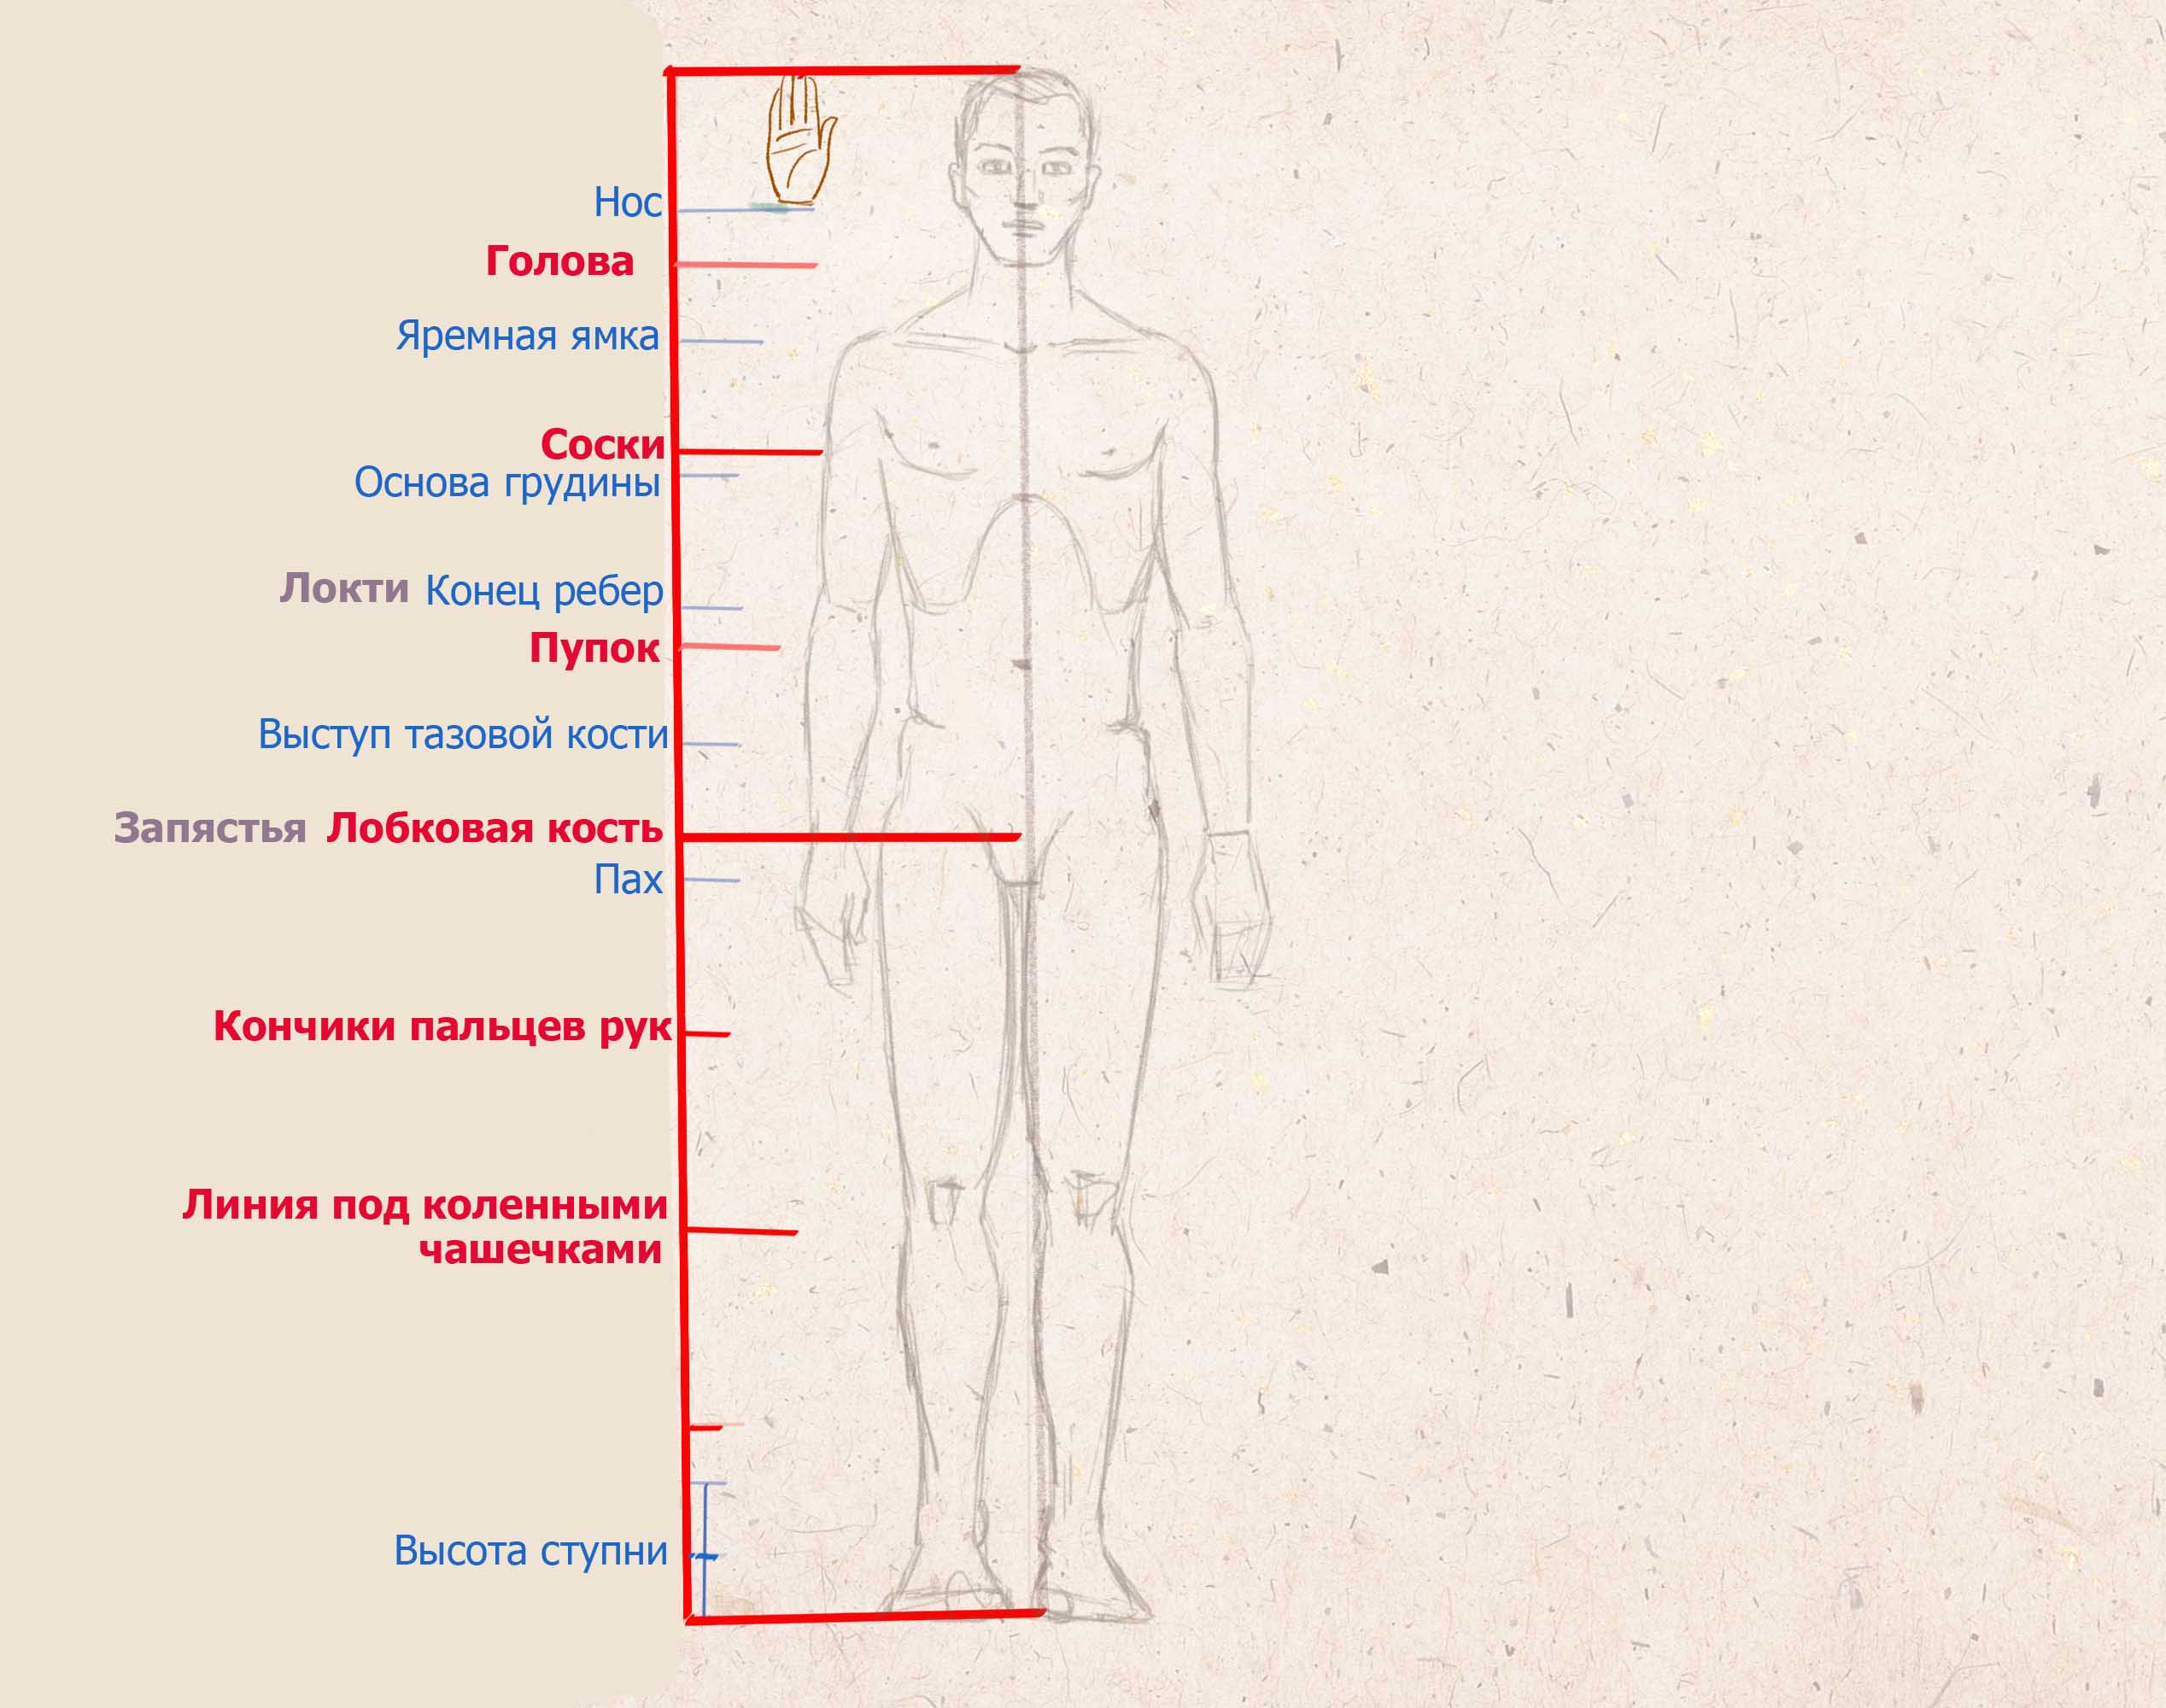
The height from the top of the head to the line of the nose is equal to the size of the palm. This is a very important measurement, mark it for yourself, it will come in handy more than once today.
Torso and pelvis
In order to find important key points of the chest and pelvis, we need to mark the size of the height of the palm somewhere in the corner of the picture, now we especially need it.

Hands
In order to correctly draw a human figure, it is important to understand the proportions of the arms, elbows, forearms, collarbones and hands.

These are guidelines that almost always coincide with everyone.
Scheme
If it's too difficult to cope with these measurements and proportions, try printing this image with ready-made markup, and practice drawing a person according to this scheme.
I hope this makes things easier and helps you.
Video
In this lesson, we figured out the basic proportions of the human body and after some training you will be able to draw a full-length human figure without preliminary marking, marking only the main landmarks.
In this lesson, we will look at how to draw a full-length person for beginners in stages with a pencil using the example of a girl.
Let's take a model. In all the textbooks on drawing anatomy for artists, naked forms are shown, this is in order to study the full anatomy of a person, there is nothing so shameful in this. If you decide to learn how to draw a person, then you will definitely have to work with naked bodies, make sketches of bodies from nature or have videos of models, get ready. Since there are many children on the site, we will take a model in a swimsuit.
To start drawing, you need to know the proportions of a person, there are average proportions that were also brought out in antiquity. The unit of measurement is the length of the head and the height of the body is 7-8 heads. But in fact, people are very different and each time it is very uncomfortable to calculate the proportions, so you have to “fill” your eyes when drawing a body from a photo, or from a living person. Let's not get into it yet, since there are separate lessons, whole lectures on human anatomy, I will give links below.
Let's just try to draw a human body, in this case a girl. I measured the height of the head and laid down 7 of the same segments. She is almost 8 heads tall. Pay attention to where the shoulders, chest, elbows, waist, pubis, end of the arms, knees, feet are.
To draw the case of a girl, imagine her skeleton, by the way, the skeleton will also need to be studied, but not in great detail, at least the main details. And depict it simply with lines that would show the pose in which the girl is standing. At the beginning, while you are learning, always try to portray this simple form body. It may seem to you that this is nonsense, but at this stage we already have to trace the basic proportions, it may be that your arms end above the pelvis or your legs are very short, or a long torso is not correct.
1. Draw the head with an oval, horizontal line we show the location of the eyes, and the vertical one shows the middle of the head. Measure the length of the head with a ruler and set aside 7 more such segments down. Now focusing on the drawing, draw the so-called skeleton of the body. The width of the shoulders is equal to the width of two heads, in men - three.
2. Now draw in a simplified way chest, pelvic area, and , circles show flexible joints.
3. Erase the original lines and make the very light lines you drew in step 2, just go over them with the eraser. Now we draw the collarbone, neck, shoulders, chest, connect the lines of the chest and the ace on the sides, draw the lines of the legs and arms. Try to repeat all the bends, they are formed by the muscles. Those. to learn how to draw the human body you need to know the anatomy, skeleton and location of muscles, and how muscles and bones behave when different movements, poses.

4. We erase lines unnecessary to us, we draw a swimsuit. This is how you can correctly draw a human body for beginners with the help of such simple constructions.

Let's try to practice some more, just take a different pose, in the middle.

Click on the image to view the photo in more detail
So, we also start with building simple lines and shapes, pay due attention to this point, take your time. At first, you can bring the pencil to the screen and look at the direction, the slope of the lines, and then approximately also draw on paper. The distance from the toe to the pubis (pubic bone) and from it to the top of the head should be approximately the same, different deviations are allowed, because. people are different, but there should not be strong contrasts. We draw.

Now we are trying to convey the shape of the body, again I repeat, in order to understand why such bends occur, you must study the human anatomy, both bones and muscles can act.

In this article, Learn It offers to learn how to draw a person in full length with a pencil in stages. The most difficult thing in the image of a person is his face. A real portrait can only be made by real artists who have been studying this art for many years. This drawing lesson is intended for beginners, which is why the facial features of a person are drawn schematically, without drawing details.
Let's give you some tips first. Some people have a habit of drawing broken lines and then tracing them. Such people should try to draw lines in one motion and should not be afraid that they will make a mistake. When you depict a person on paper, especially if he is in motion, then you must fully see the future image, the contours of all lines. And yet, the most important thing is not the accuracy of the lines and proportions of the picture, but the image of the most important, the main thing in the image. It is necessary to convey the character of a person, his mood, the expression of his eyes and other features that characterize him.
You can draw a person in stages with a pencil in different ways
 Now let's find out a couple of basic steps. Often when you draw a person, you can see the distortion of his figure. The legs and arms are drawn long or too short, the body is too big, etc. To avoid this, it is necessary to break the whole drawing into sections.
The whole person can be divided into 7 parts. But we do not describe this technique in this article, we will use a different method, but you can try to make such markup so that the person comes out proportional.


What is the tiny pocket on jeans for?

15 shocking plastic surgery that ended badly
Initial contours

So, let's start by drawing a quadrilateral with side proportions three to four.
Draw a straight line in the center, slightly longer than the longitudinal side of the rectangle. From above draw an oval line for the shoulders. And in the lower part of the quadrangle is the outline of the clothes.

We continue to portray a person. We make markings using the circles of the knees, collarbone, shoulders, neck and head. First draw an oval for the head, then an oval for the shoulders, and then circles for the knees.
What happens when a dog licks its face

20 Signs You've Found Your Perfect Guy

Benefits of Drinking Coffee
Even a child can do this, do not forget that it is not necessary to follow the exact geometric shapes circles, except for the head. The neck and head should be drawn as accurately as possible.
You can see that most of the lines are drawn rather carelessly. We deliberately did not try to draw them carefully, because we will remove these contours in the future, and they serve only as temporary guidelines.
We begin to draw the outline of the human figure

At first, you will not understand what is required of you. But you need to take a closer look, you only need to draw two circles for the feet and elbows and 2 more lines on the sides of the torso, and then connect them to the contours of the knees.
Depicting hands and feet

On the circles for the elbows and shoulders, which we already have, draw the arms. The hands in this photo are not fully shown, but you can finish the palms. Or you want to have some object in your hands, this is your personal choice. Now let's move on to the legs, the only thing worth paying attention to is the feet. Socks are deployed in different directions. At this stage, it is necessary to check the proportions of the torso, legs and arms. If you do not do this, then it will be difficult to correct errors in the following steps.
We remove unnecessary contours and the person “comes to life”

To begin with, with an eraser, carefully remove all unnecessary lines, if you touched some line you need, immediately restore it. This step is the simplest and most interesting, since nothing needs to be drawn, and the person seems to “come to life”. It remains to draw 3 simple details. This is the bottom line of the trousers, the line of the sleeves of the T-shirt and the neckline.
We complete the drawing of a person. Face and clothes
Now draw the clothes along the contours and it is important to depict the head and face as detailed as possible. When drawing clothes, do not forget that for greater realism, folds should be visible on it. Be sure to create shadows on the clothes, in the direction of the light, if the light falls on the right, then you need to draw a shadow on the left.
This drawing of a person is approximate and is designed more to study its proportions. In this process, it is important to make a preliminary marking of the position of the legs, arms, shoulders and head. And then step by step add the rest of the details. Learn It hopes this article has helped you.
Video lessons
Let's draw a person lying on his side on a pillow. We will do this in several steps.
- First, let's designate the horizontal axis on which the person lies (bed, floor, beach, etc.). On it we draw the contour of the pillow. Let's draw the horizontal axes-outlines of the body - the head, torso, arms (the lower arm is bent under the head), the legs of a lying person.

- Let's draw the outline of the head and outline the general figure of the body. For me it will be a lying man. His upper leg is bent, so we draw it a little shorter than the lower leg.

- Let's remove all auxiliary lines, including those that cannot be visible to us (overlapped by the figure of a person). And we proceed to the most interesting thing - we draw the face of a lying person. He will sleep with me and see pleasant dreams - I draw eyebrows, closed eyes, nose and smiling mouth. We draw hair - they can be disheveled in a dream J I expand the contour of the pillow - it is clearly too small for me.

- Let's draw the hands (I know this is one of the most difficult parts human body, but surely you will do better than me). Right hand placed under the head, folds diverge from it along the pillow. Let's draw the feet.

- There is nothing left at all - let's finish the body of a lying person - for some reason he sleeps in my clothes for me. But this is his personal business. J The folds of the clothes will add realism to the image.

Drawing of a lying person is ready!


