What is the most remarkable in autumn? Of course, autumn leaves! In autumn, the leaves are not green, as in summer, but bright, multi-colored. Leaves on trees, bushes, fallen and lying on the roads, on the paths, on the grass... Yellow, red, orange... At this time of the year, even if you are not a photographer or an artist, you just want to pick up a camera or a brush with paints to capture this wonderful time of the year in all its glory.
Autumn drawings. Draw autumn
Method 1.
Under a sheet of plain paper for printers, place the sheet with the veins up, then shade it with wax crayon, located flat. You will see how a leaf pattern with all the smallest veins appears on paper.

To add some magic, you just need to take a white crayon and run it over white paper, and then let the child paint over the sheet with paint using a sponge. see link>>>>

By the way, there is interesting way coloring with colored corrugated paper. You must first draw the leaves on paper in the same way with white wax crayon. After that, tear the corrugated paper of autumn colors (red, yellow, orange, brown) into small pieces and, wetting each piece well in water, stick them on the drawing. Make sure that there are no two pieces of paper of the same color next to each other. Let the paper dry a little (but not completely!), Then remove it from the drawing. You will get a wonderful multi-colored background. Leave the work to dry completely, then put it under the press.

Method 2.
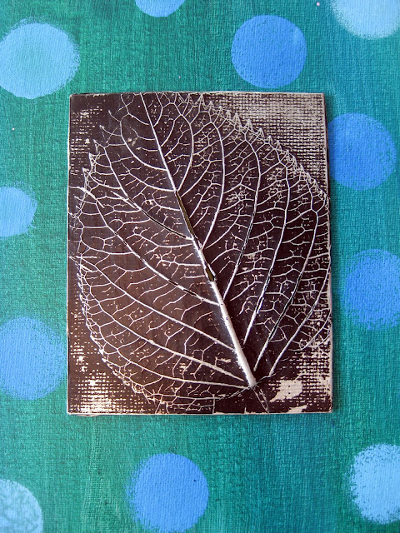
An interesting autumn craft will turn out if you put a leaf under a thin foil. In this case, the foil should be placed with the shiny side up. After that, you need to gently smooth the foil with your fingertips so that the pattern shows through. Next, you need to cover it with a layer of black paint (it can be gouache, ink, tempera). When the paint is dry, rub the painting very gently with a steel dishcloth. At the same time, the protruding veins of the leaf will shine, and in the recesses it will remain dark paint. Now you can stick the resulting relief on a sheet of colored cardboard.

Autumn leaves. How to draw autumn
Method 3.
A very simple and at the same time effective technique is to print leaves on paper, on which paint is previously applied. Any paint can be used, only it must be applied to the side of the leaves where the veins appear.

Link >>>>
Here are the imprints of rowan leaves. And any kid can draw rowan berries - they are made using cotton swab with red paint.

Link >>>>
Beautiful autumn drawing it will turn out if you print the leaves with white paint on a sheet of dark-colored cardboard. When the paint dries, it is necessary to color the leaves with colored pencils. It will turn out beautifully if some leaves are left white.


The background can be left as is, or made colored by painting with paints with a sponge. In this case, it is necessary to leave a small unpainted space around the leaves.


If you decide to make the background colored, then the leaves themselves can be left white.

How to draw autumn leaves. Autumn crafts
Method 4.
To give volume to your drawings, you can use the following interesting technique. You will need thin wrapping paper or white crepe paper.

1. Tear it into pieces of irregular shape and stick it on a thick sheet of paper with PVA glue. Try to get more "folds", "wrinkles" at the same time, they will subsequently give the picture texture, volume.
2. When the glue dries, use http://www.dltk-holidays.com/fall/images/bfallwreath.gif " target="_blank">stencil , draw and cut out three maple leaves from this paper (large, medium and small).
3. Paint them with colors in autumn colors, then stick them on a sheet of black cardboard.
More detailed instructions with photos see the link>>>>
DIY autumn crafts


Method 6.
Another original autumn drawing, made in warm and cold colors. The leaves themselves are drawn in warm colors (yellow, red, orange), the background - in cold colors (green, blue, purple). You will need a compass to do this job.

1. Draw some leaves different shapes on the paper.
2. Now, using a compass, draw a circle with a small radius in the lower left corner of the sheet of paper. Next, adding about 1 cm, draw circles of larger and larger radius, as far as the compass will allow.
3. Now do the same in the upper right corner.
4. Finally, color autumn leaves felt-tip pens or pencils in warm colors (colors should alternate sequentially), and the background in cold colors.
Maple Leaf. maple leaf drawing
Method 7.
Help your child draw on a piece of paper Maple Leaf. Divide it with veins into sectors. Let the child color each sector of the leaflet with some special pattern.


You can combine two methods.


Autumn crafts for children
Method 8.
Another unusual autumn drawing.

1. Draw leaves of various shapes on paper. They should occupy the entire sheet of paper, but not touch each other. Part of the leaves should start from the borders of the sheet of paper. Draw only the contours of the leaves, without veins.
2. Now with simple pencil and rulers, draw two lines from left to right and two from top to bottom. The lines should cross the leaves, dividing them into sectors.
3. Choose two colors for the background and two colors for the leaves. Color them in the chosen colors in the same way as in the picture.
4. When the paint dries, trace the outlines of the leaves and the drawn lines with a gold marker.
Drawings on the theme of autumn
Method 9.
For the manufacture of this autumn crafts you will need a regular newspaper and paints (including white paint).
1. Draw a maple leaf on a piece of newspaper.

2. Color it with paint and after the paint is dry, cut it out.


3. Take another sheet of newspaper and draw and paint over a large square on it with white paint.

4. Lay your sheet over the paint and wait for it to dry completely.

5. This is what you should end up with!
In the previous lesson, I showed . This lesson will be like an addition to it. Here we will consider how to draw leaves with a pencil step by step. As an example, I will show how to draw a maple leaf. The drawing process is not difficult.
Step one. I start with markup. I draw something that looks like a hieroglyph. Each of these lines represents main network vein.  Step two. Let's draw the contours of the maple leaf itself. Remember that this is still a sketch, so you do not need to put pressure on the pencil. We will erase these lines later.
  Step three. We take a colored pencil. I leave the choice of color to you. I took green, even though it's already autumn, but I like green. We trace the contours and erase the auxiliary lines that I talked about in the previous steps.
  Step four. We take another colored pencil and decorate our sheet as we wish. I got completely green. But you can make any color. In nature, there are many different leaves, so there are no restrictions. The result will be something like this: But this is not the end. This time I decided to show how to draw leaves with a pencil completely, from sketch to coloring, and not just coloring as in the previous lesson about autumn. It turned out very realistic, what do you think?
And I also give you a cheat sheet (or just remind you how they look) the leaves of other trees. I collected the collection myself. My classmate and I walked through the park and picked leaves for ourselves. This is how we have fun:  I also really wanted to draw chestnut leaves, but I did not find a single good copy, they all fell off. Therefore, I give a picture from the network:
  And here is the entire harvest:
  That's probably all. You can also draw other vegetation.
For beginners
How to draw a maple leaf step by step

Patterns of maple leaves can decorate any autumn holiday. And to depict them is quite simple, follow our instructions.
Stage 1
First you need to mark the veins. Draw a vertical line, and from it on both sides 2 more. You should not use a ruler, because in nature there are no perfectly straight lines.

Stage 2
Draw shorter lines between the main veins. Then they will need to be erased, so make them lighter.

Stage 3
Draw the outline of a maple leaf, as shown in the example. Don't try to do everything symmetrically.

Stage 4
At this stage, erase the auxiliary lines, draw the tail and the core. Then draw small veins with short strokes.

Stage 5
Outline the outline and color the resulting image.

Draw a maple leaf with a pencil

You need to start with a simple one, therefore, you must first learn to depict a maple leaf with a simple pencil.
Take a not very greasy pencil and outline the sketch. To do this, draw one long line, which will be the base, and from it 4 more shorter ones.

Then put auxiliary points. Circle the petiole and base with a bold pencil.


Mark the sharp ends, and then the whole silhouette. Draw a jagged outline that converges at the marked points. We remind you that it is not necessary to outline symmetrically.


Take a bold pencil and draw the veins. Erase all unnecessary lines. Here is the pencil drawing.
How to draw a maple leaf for beginners

Even a beginner can easily cope with this drawing. Below is a step by step explanation for beginners.
As usual, start with the main and side veins of the leaf. They will help you determine the angle of inclination and form the correct contour. And the point of intersection of these lines will be the core.


Now sketch out small veins and color as you wish. Here's what happened.

An example of drawing a maple leaf for children
Drawing develops thinking, imagination and motor skills of the child. Invite your baby to sketch a drawing according to the following scheme.
Draw the base first.

Then small veins.

Help your child form a zigzag outline like in the picture below.

Color the picture. Drawing is easy and simple, but it turns out beautiful and bright.
We draw with paints
Drawing with paints is quite difficult, and without skills, you can smudge the outline. Don't be discouraged if you don't succeed the first time.
You need to start drawing with the main veins. Then create the desired silhouette.

Add small veins and petiole.

Take the paint yellow color and color the whole sheet.

Without waiting for the paint to dry, take the paint orange color and with light movements of the brush, paint around the edges and a little in the middle. No need to try to do everything evenly. That's how amazing it turned out!

We hope that you liked our lesson and you succeeded beautiful drawing maple leaf.
Video tutorials on drawing maple leaves
Autumn is truly magic time. What colors it does not give to trees! It is impossible to take your eyes off this riot of flowers. And so you want to capture a piece of the outgoing beauty for a long time! You can take pictures of landscapes. And you can transfer this golden witchcraft to paper.
The best option is to resort to such a simple way how to draw autumn leaves with a pencil, paint, and hang the picture on the wall. This way you will be able to keep a warm mood in the house, even when the weather is raging outside. Finding a master class on how to draw autumn leaves step by step and learning how to do it is not a difficult task. To do this, you will need a little time, patience, inspiration and, of course, desire.
Sheet drawing scheme
In order to understand how to draw autumn leaves, you just need to disassemble the structure of the leaf to the skeleton. That is, to learn how to draw lines - the basis of the future image.
First draw a straight line vertical line- it is necessary to draw two more from it, approximately at an angle of 45 degrees, directed upwards. These lines will be shorter. There should be a pair of them. How much on each side depends on the size of the sheet.
Then they are connected in a straight line or arcs. It remains to finish the leg and decorate.
This is a simplified version of the leaf. To make it more like a real one, you need to add a couple more of the same to the segments that go obliquely. After that, we carry out the procedure, as with the previous primitive drawing - we connect the edges of the lines to each other in pairs.
it brief digression on how to draw autumn leaves step by step. If further coloring is planned, then you do not need to press hard on the pencil so that it does not later show through the paint.
Drawing autumn leaves in color
For many, the answer to the question of how to draw autumn leaves with a pencil remains a mystery and a time-consuming process. Few people can convey colors the way they look in nature. The reason for this is ignorance, inability or a banal lack of courage to pick up a pencil and try to transfer the surrounding beauty to the sheet.
To draw a colored leaf, you need to select the following colors:
- red;
- yellow;
- Orange;
- brown;
- pink;
- green;
- and color-station wagon - black.
We paint over the sheet yellow pencil while not pressing hard. near our skeleton, a couple of centimeters wider, apply orange. Slightly orange-red. We do the same manipulations with the edges of the leaf.
Then the unpainted middle (yellow remaining background) is partially supplemented with green.

To figure out how to beautifully draw autumn leaves, you need to take into account a few nuances. A simple pencil must be wiped as it is painted over so that it does not spoil general form. The edges of the colors should merge smoothly, be almost invisible. To do this, you need to start drawing with the lightest shade, and then apply darker and darker on top.
The strokes should be directed in one direction so that the drawing does not look unnatural.
unusual leaves
And who said that leaves are a classic of the genre? Drawing an autumn leaf can turn into a crafting process contemporary art. Simply put, we go beyond the classics and create the avant-garde.
We draw the backbone and rim of the leaflet, but we don’t decorate it, as we used to do, but we divide the leaf into sections and draw our own ornament in each. It is important that the pattern does not repeat in each section, or that the zones repeat evenly so that our composition looks organic.

The question of how to draw autumn leaves is solved elementarily: the presence of imagination and the ability to hold a pencil. genius phrase: "I am a painter. That's how I see it!" - saved more than one abstractionist from the danger of being thrown by rotten tomatoes. Therefore, boldly create!
drawing autumn leaves
Autumn leaves are easy to draw. It is enough to apply on the resulting skeleton color scheme, which is inherent How to do it - described above. But there are a few subtleties.
In order to learn how to draw autumn leaves, you need to remember the magic word - variety. Do not be afraid to "splash paint from a glass."
A warm palette should not limit the canvas. Cold tones will help to make the image contrasting, bright. We apply them as a background. Then the picture will be colorful and heterogeneous.
We draw leaves. Help for the lazy
It also happens that hands are not sharpened for a magical device - a pencil. Do not despair! Like leaves, fantasy tells.
We are not upset, but we are going for a walk in the fall to collect a herbarium. We lay out the leaves at home, choose the most beautiful and liked ones and draw around the contour. We decorate the resulting drawing with warm colors, as we please.

An equally interesting way is to compose a composition of leaves, leaving empty contours instead.
For this we need:
- several different leaves;
- a set of paints;
- a glass of water;
- Toothbrush.
We lay out two or three leaves on white paper. We apply a little paint on a wet brush. Spray the paint onto the sheet with a brush. Then lay out the next layer and repeat this simple manipulation. When you get bored (the herbarium runs out or you just think that it’s already enough), just remove the leaves, insert the resulting drawing into the frame.
A little trick: lay out the leaves better in the form of a bouquet to avoid chaos.
leaf print
There is nothing easier and more entertaining than teaching a child how to draw autumn leaves. Rather, we are talking not really about the drawing. Leaf prints are suitable for creative activities with the smallest artists.
We will need several different leaves and paints. Gouache is ideal for this. As well as White list, a board on which we will apply a drawing.
background for future picture decorate light color or several. For the background, it is better to take watercolor, as it spreads well. When mixing several colors, such paint forms smooth transitions.

We are waiting for the background to dry. At this time, we apply a thick layer of paint on one side of the sheet and apply it to the paper until the sheet is dry. We repeat the same procedure several times, alternately decorating the leaves in different colors.
In order for the leaves to stand out more, the outline can be circled with a black felt-tip pen. You can also apply veins of a leaf or decorate it with an ornament.
metal leaf
An original picture can be created by using dark paint, sheet and foil.
We apply foil to the sheet and carefully smooth it until the contour and veins are transferred to the foil. Then apply a thick layer of dark paint. Black and dark blue colors look especially beautiful in combination with silver foil.

After the paint dries, carefully draw a metal scraper over the drawing until the streaks are cleared of paint. Carefully take out the sheet from under the foil, glue it to the cardboard in size.
Drawing leaves in watercolor
There is nothing easier than learning how to paint autumn leaves in watercolor.
We draw the same contour as for the drawing should be as light and transparent as possible. Well, if by the time you start working with watercolors you have already filled your hand and understood how to draw autumn leaves with a pencil.
We paint over the sheet with yellow paint. Then we shade with different colors - just like we did with the only difference is that you have to wait each time for the previous layer of paint to dry. Otherwise, there is a risk of getting an ugly blot without transitions.
Unusual ways of drawing
There are many ways to draw an autumn leaf (a leaf with a pencil too). Therefore, for many it is not difficult to complete such a picture.
You can not be limited in drawing tools and use cotton buds instead of the usual brush or pencil. The contour of the leaf is filled with dots of different colors. We apply a darker shade to those places where the pencil outline is located. The background can be left white or painted over with strokes, strokes. It is not recommended to make a bitmap in the background, as the leaves will merge with it (exception: if it is cold shades, and the main pattern is warm, and vice versa).

An interesting composition is obtained when a wax candle is used instead of a simple pencil. Then, when the paint is applied, a white, unpainted space remains in place of the contour.
In order to learn how to draw, it is not necessary to have the talent of a great artist. Courage, imagination and the desire to create will allow you to create unique drawings quickly and always remain original.
Summary: Autumn crafts for children with their own hands. Autumn drawings. How to draw autumn. Autumn leaves. Drawings autumn trees. Paintings on the theme of autumn.
What is the most remarkable in autumn? Of course, autumn leaves! In autumn, the leaves are not green, as in summer, but bright, multi-colored. Leaves on trees, bushes, fallen and lying on the roads, on the paths, on the grass... Yellow, red, orange... At this time of the year, even if you are not a photographer or an artist, you just want to pick up a camera or a brush with paints to capture this wonderful time of the year in all its glory. We will help you with this. In the second part of the article "Autumn crafts for kids: how to draw autumn" we will teach you how to draw autumn leaves in different ways.
Autumn drawings. Draw autumn
Under a sheet of plain paper for printers, place the sheet with the veins up, then shade it with wax crayon, located flat. You will see how a leaf pattern with all the smallest veins appears on paper.

To add some magic, you just need to take a white crayon and run it over white paper, and then let the child paint over the sheet with paint using a sponge. See link >>>>

By the way, there is an interesting way of coloring with colored corrugated paper. You must first draw the leaves on paper in the same way with white wax crayon. After that, tear the corrugated paper of autumn colors (red, yellow, orange, brown) into small pieces and, wetting each piece well in water, stick them on the drawing. Make sure that there are no two pieces of paper of the same color next to each other. Let the paper dry a little (but not completely!), Then remove it from the drawing. You will get a wonderful multi-colored background. Leave the work to dry completely, then put it under the press.


An interesting autumn craft will turn out if you put a leaf under a thin foil. In this case, the foil should be placed with the shiny side up. After that, you need to gently smooth the foil with your fingertips so that the pattern shows through. Next, you need to cover it with a layer of black paint (it can be gouache, ink, tempera). When the paint is dry, rub the painting very gently with a steel dishcloth. At the same time, the protruding veins of the leaf will shine, and dark paint will remain in the recesses. Now you can stick the resulting relief on a sheet of colored cardboard.
Autumn leaves. How to draw autumn
A very simple and at the same time effective technique is to print leaves on paper, on which paint is previously applied. Any paint can be used, only it must be applied to the side of the leaves where the veins appear.

Here are the imprints of rowan leaves. And any kid can draw rowan berries - they are made with a cotton swab with red paint.

A beautiful autumn drawing will turn out if you print the leaves with white paint on a sheet of dark-colored cardboard. When the paint dries, it is necessary to color the leaves with colored pencils. It will turn out beautifully if some leaves are left white.


The background can be left as is, or made colored by painting with paints with a sponge. In this case, it is necessary to leave a small unpainted space around the leaves.


If you decide to make the background colored, then the leaves themselves can be left white.

How to draw autumn leaves. Autumn crafts
To give volume to your drawings, you can use the following interesting technique. You will need thin wrapping paper or white crepe paper.

1. Tear it into pieces of irregular shape and stick it on a thick sheet of paper with PVA glue. Try to get more "folds", "wrinkles" at the same time, they will subsequently give the picture texture, volume.
2. When the glue dries, using a stencil, draw and cut out three maple leaves from this paper (large, medium and small).
3. Paint them with colors in autumn colors, then stick them on a sheet of black cardboard.
For more detailed instructions with photos, see the link >>>>
DIY autumn crafts


Another original autumn drawing, made in warm and cold colors. The leaves themselves are drawn in warm colors (yellow, red, orange), the background - in cold colors (green, blue, purple). You will need a compass to do this job.

1. Draw several leaves of different shapes on paper. 2. Now, using a compass, draw a circle with a small radius in the lower left corner of the sheet of paper. Next, adding about 1 cm, draw circles of larger and larger radius, as far as the compass will allow. 3. Now do the same in the upper right corner. 4. Finally, color the autumn leaves with felt-tip pens or pencils in warm colors (the colors should alternate sequentially), and the background in cold colors.
Maple Leaf. maple leaf drawing
Help your child draw a maple leaf on a piece of paper. Divide it with veins into sectors. Let the child color each sector of the leaflet with some special pattern.


You can combine two methods.


Autumn crafts for kids
Another unusual autumn drawing.

1. Draw leaves of various shapes on paper. They should occupy the entire sheet of paper, but not touch each other. Part of the leaves should start from the borders of the sheet of paper. Draw only the contours of the leaves, without veins. 2. Now, using a simple pencil and a ruler, draw two lines from left to right and two from top to bottom. The lines should cross the leaves, dividing them into sectors. 3. Choose two colors for the background and two colors for the leaves. Color them in the chosen colors in the same way as in the picture. 4. When the paint dries, trace the outlines of the leaves and the drawn lines with a gold marker.
Drawings on the theme of autumn
To make this autumn craft, you will need a regular newspaper and paints (including white paint).
1. Draw a maple leaf on a piece of newspaper.

2. Color it with paint and after the paint is dry, cut it out.


3. Take another sheet of newspaper and draw and paint over a large square on it with white paint.

4. Lay your sheet over the paint and wait for it to dry completely.

5. This is what you should end up with!

DIY autumn crafts
Method 10.

Autumn drawings. Draw autumn
Method 11.
In the article " Easter cards with our own hands" we talked about interesting technique drawing using wax crayons. See link >>>>
In this way, you can draw autumn leaves.

And here, in a similar way, autumn leaves are painted with paints.


Finishing our overview article on the topic "How to draw autumn leaves", we will tell you about two more ways.
Autumn crafts for kids
Method 12.
Lay out the leaves on paper, then use an old toothbrush or flower sprayer to spray the paint. In order not to stain everything around, you can do the above procedure in the bath.


How to draw autumn leaves
Method 13.
And finally - stamps of leaves with a roll from under toilet paper. In this way, it is very cool to make gift wrapping with children.


Material prepared: Anna Ponomarenko


