In which we learned basic drawing skills at home. However, there was such a large flow useful information that I decided to make this a full-fledged lesson. This allowed me to include one more additional object for drawing - a luxurious cottage with a multi-pitched roof as a practice task. You will learn how to draw more complex houses.
1. Draw a simple house from the previous 12 lesson.

2. Using the SW direction for the reference line, draw a ground line for the left section of the house.

3. Keep your eyes on the SW guide line. Now draw a line in the SW direction to form the top of the wall.

4. Draw vertical line the near side of the house and the lower left edge in the direction NW.

5. The line you just drew is now the NW guide. Use it to draw the top of the wall.

6. Draw a vertical line for the far wall. Place an anchor point in the middle of the bottom edge of the wall.

7. Draw a vertical reference line from this point to define the peak of the roof.

8. Draw the top of the roof, making sure the near edges are noticeably larger than the far ones. Complete the roof with a line in the NE direction. Erase all excess.

9. Using the lines already drawn in the NW and NE directions as a guide, easily sketch reference lines tiles. Add a door, windows and a garage. Once again, make sure that each line of these parts corresponds to the directions NW, NE, SW and SE.

10. Complete your new house! How wonderful, but we have to add some noise - a moving truck will arrive shortly and we haven't installed the new pavement yet. Apply shadows and shading. The darkest one is under the roof. The pavement and roads are built strictly following the guide lines! I believe in you! This is a very difficult element, but you have to manage on your own. You can also sketch some trees and bushes and (why not?) let's redraw our Mailbox from lesson 12.

LESSON 13: PRACTICE
Before you start drawing this yourself, which I think you will succeed in short time, I want you to redraw this building three times. "What?" You exclaim in shock and horror. Yes, just redraw. This is necessary in order to understand how many lines, angles, curves and shapes fit together to create an image. This is great practice!
Take a look at the drawings and match their unique style with yours. Each of you does the same lesson, but you all get different results. Everyone has their own unique style, vision of the world around them and understanding of the lesson.


What You'll Be Creating
Freehand drawing from imagination is cool, but not everything can be drawn with free, intuitive hand movement. artificial objects such as vehicles and buildings are created according to certain rules, and these rules limit our freedom. You can't draw a building by guessing the lines - you have to follow the rules, and those rules are defined by perspective.
In this tutorial I will show you how to draw a house step by step using angled perspective. I will try to explain the whole process to you, not just tell you what to do.
What will you need
You can use any photo of the house you like, for example, a picture of your own house. We won't be copying the original image, but we need some basis to know what we're trying to draw. Therefore, the perspective of the house does not have to be perfect - we will create our own look!
You can draw with any tool, but it's better to use some software for drawing - perspective does not require fine skill, therefore, for this purpose, you can successfully use the mouse. If you prefer to draw in a traditional style, then make sure you use a large piece of paper, much larger than the intended drawing size. And don't forget to use a long ruler!
1. Start Drawing Perspective
Step 1
Start from the horizon line. When there is something above these lines, you look up. When there is something below this line, then you lower your gaze.
Step 2
We want both sides of the house to be visible: the right side and the front side. They have a common value: this is their height. IN angled perspective, the height is standard value, which stays perfectly vertical, so we don't need to add any vanishing points for it.
However, it is also important Where we place this height. The center of the horizon line is also the center of perspective. If you place an angled line in the center of the perspective, both sides will be equally visible. If you place it more to the left, then the view of the facade will be wider due to the second side. And that's what we need!
The shorter the height in relation to the horizon, the less critical the distortion.Step 3
perspective turns parallel lines into converging lines. Where do they converge? Well, it's up to you. The more side view you want to see, the farther it should be vanishing point.
Step 4
Draw the other edge of the facade between both lines. Imagine how long the façade would be without perspective, then shorten it to match the angle between the left edge and the ground - 90 degrees would give the full length, and the smaller the angle, the shorter it should be.
Due to the remote vanishing point and the relative height of the façade, our angle is wide enough to allow almost full length.Step 5
Now you can connect both edges to create full surface front wall. Keep in mind that these two lines are parallel in reality! Everything that is parallel to them will tend to this vanishing point.
Step 6
It's time for the other side. There is a very simple rule here: the more one side is visible, the less visible the other. Therefore, we need to position the vanishing point closer.
Step 7
Once again imagine the full length of this side, and then shorten it to match the angle.
The angle is quite sharp, so we need to shorten the side a lot.Step 8
Close the side shape with two additional lines. Again, these lines are parallel, and anything parallel to them will go in the same direction.
Step 9
Now that we know how to use vanishing points, I'll show you a drawing up close to make the details more visible.
Perspective distorts proportions, so we need to place our guide lines very carefully. It is best to use special universal algorithms to divide the area into equal parts. Let's split the facade in half and one third - the porch seems to be about one third of the length, so it will be convenient for us.
The standard length makes it easier to draw in perspective, so let's simplify the proportions for our purpose.First connect the corners of the facade.
Step 10
The diagonals of a rectangle show you its center even in perspective. So we will divide it into two parts. The middle line must be vertical.
Step 11
Once we have the middle lines, we can use them to create thirds:
Keep the guide lines visible so you can use them later, but don't interfere with the final lines of the drawing.
Step 12
The length of the other side seems to be five window openings, so it will be most convenient for us to divide it into five parts. There is also an algorithm for this:
Again, these guide lines should be barely visible.
2. Add Windows and Doors in Perspective
Step 1
We need more guide lines to properly place the elements on the wall. Since this is a building, you can expect the elements to follow a certain proportion. Once we define it, we can use it in our drawing.
Look at the height of the segments above windows, below windows, and at the bottom of the wall. Mark them on the corner edge.
Step 2
Draw parallel lines through these points. Do you remember what parallel means here?
Step 3
The easiest way is to divide the segments in half and a third, so let's assume that the window with all its contours is one ninth of the length of the facade. Divide every third part by a third to create guide lines for this.
Step 4
The door does not have such obvious proportions, so we need to create them ourselves. Connect two dots...
And draw a vertical line through the intersection of the guide lines.
Step 5
We now have enough guide lines to outline the windows and door.
Step 6
The actual windows start a little deeper inside the outline. How can we guess their width? Okay, let's create it! Symmetrical "X" lines are very easy to draw...
And they neatly cross our upper guide line.
3. Draw the Roof in Perspective
Step 1
The roof of the house in my photo is not simple, but this should not be an obstacle for you! Every roof is subject to the same rules, and some just need some extra work to apply those rules to them.
Determine the highest point of the roof. You have to think in 3D - you can't just stretch one wall vertically and put that point there. This point must be related to both walls at the same time!
The height of the roof is arbitrary, but make sure you make it proportional to your overall vision.Step 2
My roof has a “horse” on top. Its width will be a good reference point, but first we need to define it. Again, in order to add any dimension to our drawing in perspective, we must build on what has already been drawn. For example, draw two diagonals across a third of the side of the window (we can be sure they are symmetrical)...
And draw a line through the point where they intersect with the lowest horizontal guide line.
Step 3
To draw the height of these lines, we need to place them at the same level as the middle line. Project multiple lines with guide lines to find the right spot.
Step 4
We know where this hobby begins, but we still don't know where it ends. Additional guide lines are needed to find this point. Don't forget to keep the proportions based on the base look!
Step 5
Now you can easily draw the outline of the skate.
Step 6
Before we draw the rest of the roof, we need to understand what exactly we want to draw. From the side, the roof looks like a triangle, and we already have the top of this triangle, so we must follow this rhythm.
If we extend the top of the wall towards this line, then we will find the length of the roof (by measuring the distance from the wall to the edge).
Now our task is to create some easily repeating guide lines. It doesn't matter where they are, as they create the proportion that is needed every time they are used.
Apply these guide lines to the drawing in perspective.
Step 7
To find the actual length of the roof, we need to project it onto the ground.
Step 8
We have the length, but we also need the exact location of the corners. They are now easy to find!
Step 9
These points are useless to us since they are on the ground, but it will not be difficult to project them to their desired level.
Step 10
Finally, connect the dots!
4. How to Draw a Complex Roof in Perspective
Our house has its own walls and roof, so it's technically done. But it's boring and it doesn't look like the original image at all! Next, we will make it more interesting, but keep in mind that we may encounter more high level difficulties. I also assume that you understand the methods we used on this moment, so I may not explain each step in such detail.
Step 1
The elements on the roof are placed in a non-random way, and we need to find out. Let's create some repeating guide lines in advance: divide the side of the middle block into eight parts.
Step 2
The roof of the porch starts at the horizontal center, but not exactly at the center of the roof. Find the exact points you want to use for guide lines and then project them onto your drawing.
Always pay attention to the location of the elements inside the walls.Step 3
The porch roof appears to be parallel with the rest of the roof. We can easily mark it in the side view drawing, but how can we find it in perspective?
As always, we need to create repeating guide lines that will point to our desired result...
And project them onto the drawing.
Step 4
We know how long the roof is on the side, but we also need to find its width (which, according to the original photo, is slightly longer than the middle third of the front wall). These guide lines should work.
Step 5
Now we need to intersect the guide lines from both values to find the corners of the roof. The illustration below may seem confusing because we are so close to the horizon that the guide lines are nearly horizontal.
Step 6
Now we have everything we need to outline the outline of the small roof!
Step 7
The protruding skylights will be quite tricky to draw, so feel free to skip them if you feel like you can't.
First, let's add some guide lines to the roof to better see its surface. We don't have vanishing points for them, so just repeat their algorithm.
Step 8
We need more guide lines in this inner roof block. Divide it into quarters.
Step 9
We need to know enough to place the bottom of the window.
Step 10
The window has a triangular roof, so we need to mark it as well. It's pretty easy if we stay at the same level of depth, right?
Step 11
Now we need to project the outline of the window into place on the roof. I told you it would be difficult!
Step 12
The roof of this window is protruding, so we need to project it forward. We are going to use the front wall as reference point to make it easier to draw.
Make the entire outline of the window stand out to make measurements easier.
Step 13
The roof has a certain thickness and angle, so they are not easy to design. Use a trick to create them: find guide lines on the outline of the window that automatically create the outline of this roof. It doesn't have to be perfect, let it be close enough.
Step 14
Create another window using the same steps, or draw guide lines along the lines already drawn.
Step 15
We know exactly where the roof starts, so we can easily draw their peaks.
Step 16
The sides of these windows are located inside the roof, but they are also covered by it. The curvature of the roof can be measured, but there is no need to be precise here - just remember that each line going down should be slightly offset forward (as its back is gradually hidden by the roof).
5. How to Draw a Porch with Steps in Perspective
Step 1
The porch has symmetrical sides, but we only have a guide line on one of them. Let's create the same on the left side.
Step 2
Use these guide lines to outline the small wall.
Step 3
These walls will be as long as the roof above them, but not as wide. Use an additional guide line to exclude part of the roof from the width of the porch area.
Step 4
Now you can give these walls all sides.
Step 5
Divide the inside of the wall by a third - this should be enough to create four steps.
Step 6
The first step is fairly flat, so mark it first before adding more steps. Its height can be arbitrary.
Step 7
Divide two thirds into 16 parts - four heights and four lengths of each step.
Step 8
Draw the outline of the steps following the guide lines.
Step 9
Now you have enough guide lines to draw the stairs.
Step 10
The porch wall has a raised part, so we need to draw it as well. It should be easy to measure it with what we already have.
Step 11
There are pillars supporting the roof that rise from the bottom of the wall. I'm going to take the easy route and make them as wide as the wall and steps.
Step 12
Monika Zagrobelna
I "m a Polish artist with a long experience in doing useless, but creative things. Since I realized how bad I was after all these years, I decided to take fate into my own hands and actually study things in order to draw them properly. My tutorials are the result of thorough studies - I hope they help you as they helped me!
Today, our children are mastering creative activities, as soon as they begin to walk confidently. First, we buy them colored pencils, felt-tip pens, and so on. But when it comes time to learn the letters and the first awkward attempts to write them, the ability to draw an outline becomes as important as knowing and recognizing colors.
In order for the child to understand what contours are, you need to teach him to draw with a simple pencil. For example, the favorite plot of children is a village house. Such a concept as perspective can be omitted, if they grow up, they will figure it out. They can color their "creation" at any time, but first they need to create together contour image. This article will talk about how to use a pencil step by step.
So how to draw wooden house? You will need pencils, paper, an eraser and your patience.
Draw walls and roof
The drawing must begin with the contour of elementary geometric shapes. The first step is to draw a square, to which we will "attach" the walls and roof. Draw a triangle on top of it. What it will be, isosceles or another, it is not so important. And already at this first stage, the child recognizes the house, the same one that he has seen many times.
perspective
And now we will create something similar to perspective. We continue to teach the child that, with a pencil in stages. We take the second step - we “attach” another square next to the first. But from above we draw not a triangle, as in the previous case, but a parallelogram. The child may not understand the meaning of this artistic "effect". You will need to clearly explain how to draw vertical lines and connect them to get a "side" view. Believe me, children grasp such nuances very quickly. There remains a window, which is square in shape. In addition to the fact that you are drawing, you can also have a very informative and informative conversation about squares, triangles and rectangles, which will be very well remembered.

Creating volume
With a pencil in stages and keep, at least for a while, the attention of the child? At the third stage, we begin to ennoble our house. We draw doors that have the shape of a rectangle. On the roof we will have a chimney. Because the young artist asked about how to draw a wooden house, we will paint one wall with a window with stripes imitating boards. Thanks to this, we get the illusion of volume.

We imitate roof tiles
Now, at the fourth stage, we give the initiative into the hands of the child. Let him draw the tiles himself. How the roof will look, in "fish scales" or in "squares", it no longer matters. The main thing is to carefully "fit" the pattern without going beyond the boundaries of the contour. The dormer window above the front door is also an important element, it is oval.

Draw a fence and bushes
You should think about how to draw a house with a pencil in stages in advance, paying attention to the development of the child's imagination. To do this, you will have to apply all your own Creative skills. Your house is almost ready! Now, at the fifth stage, it remains only to ennoble the area around it. We draw a fence and bushes behind the house.
Everyone wants to have their own shelter in order to hide from this world there. I will tell you how to draw a house with a pencil. Perhaps in the future you will be able to build your own cozy shelter. The house is a permanent abode of people and all the good things they have acquired in the form of a TV, unlimited Internet and a cat. Carefully protected by the owner, insulated for the winter and serves as a venue for cultural events. On the territory of Rashka, most often it is a communal apartment in Khrushchev, less often - an apartment in the center of Moscow or Bobruisk. In places remote from civilization, this can be a two-story barn with a leaking roof. Brings a loss in the form of constant renovations and communal tribute, needs expensive armored doors to protect property and add beauty appearance. Grants protection from acid rain and petty brawl hurricanes, as well as from Gypsies, Avon agents, and Jehovah's Witnesses. specific variety houses:
- Madhouse (synonyms: psychiatric hospital, mental hospital, Kashchenko) — Habitat for creative and talented people. Equipped with equipment for experimenting on people healing and healing of the soul. Settlement by special invitations.
- The White house . A pumped version of the usual madhouse for the elite of this world. Led by the Black Lord, he spreads democracy throughout the world, absolutely free, preference is given to countries with oil and dangerous terrorists.
- Dom-2 is almost the same as a madhouse, only there patients are also paid money.
Now let's create a project for your home.
How to draw a house with a pencil step by step
Step one. We draw a small standard house, as it looks in the village, with a triangular roof.  Step two. Let's level the building a bit, add some formal bushes around and tweak the edges of the roof.
 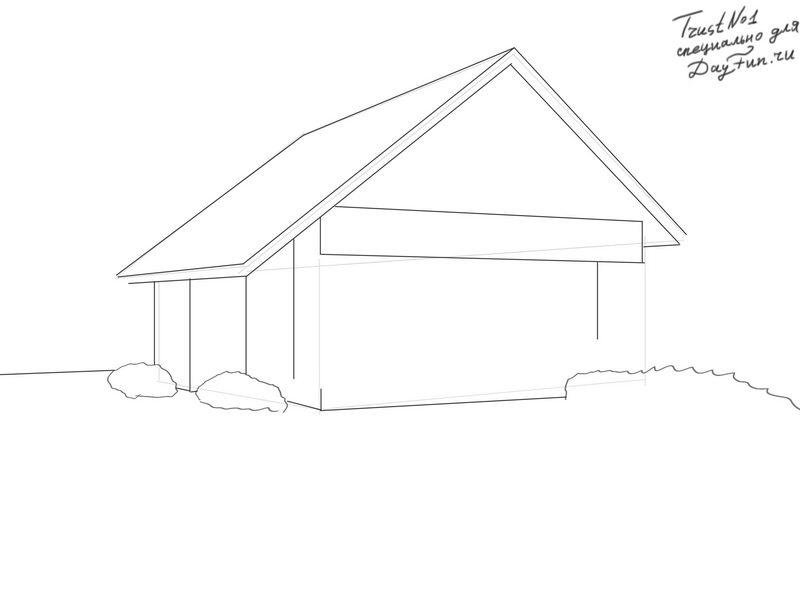 Step three. Let's add a design to this hut, a beautiful porch and a facade ornament.
  Step four. Now let's draw a few windows in front on both floors, as well as a few from the side. Still need some trees in the background and a path to the entrance.
  This is how my house will look, and what kind of house would you like to build? Draw and attach your work below this article. It will be useful for you to know more.
A phased drawing of a house with colored pencils should have each element even and beautiful, so we will certainly use a ruler in the image. By hand, you can draw bushes around the house and a small window in the attic.
Necessary materials:
- a set of colored pencils;
- regular pencil;
- black marker;
- eraser;
- ruler;
- paper.
Drawing steps:
1. First you need to draw a vertical line on a piece of paper. It will be the center of the drawing. Then we draw the roof of the house. Outwardly, it will resemble a trapezoid. The top horizontal line will be shorter than the bottom. For convenience and simplicity, you can use a ruler.

2. In the middle of the picture, add the top of the triangle. In the future, it will be an attic room with a small window.

3. Draw on the sides of the roof in one line. Then connect to the main contour of the roof by drawing another short line at the bottom.

4. Then, you can draw an attic room with a window. To do this, first draw a part of the square and then add another layer to our small roof.

5. In the middle of the square, draw a small and pretty window. It can be of any shape. We chose a round window. It is unusual in shape and it is probably interesting to sit behind it and look out from the attic room.

6. Add another roof at the bottom horizontal line and connect to the main circuit. Let's finish the main part of the house - the walls. They will hold the roof. Draw this part of the house in the form of a square.

7. Required item in every house - Entrance door. Before her image, we will draw a small rise in the form of a step to make it easier to enter the house.

8. Finishing with right side big window. You definitely need to draw a frame. Let's add window partitions.

9. Draw another step under the door step. Let's draw green bushes around the house.

10. We remove all unnecessary lines with an eraser and start tracing our drawing. It is better to do it under the ruler.

11. First of all, we will decorate the roof of the house. Take a yellow pencil for this purpose.

12. For realism in the windows, you can draw highlights with blue and cyan pencils.

13. Decorate the walls of the house in the lower part and in the attic with a brown pencil. The steps under the door will be the same color.

14. Add color to the window frame and front door with a red pencil.

15. With green pencils of two shades, we will decorate the greenery near the house.

That's it! See you soon!


If you find an error, please highlight a piece of text and click Ctrl+Enter.


