Drawing human face is one of the most difficult tasks to complete. It is very difficult to keep all proportions correctly. But using simple rules Almost anyone can draw a human face.
Before you start working on a portrait, it is recommended to prepare everything you need:
Paper;
- eraser;
- a simple pencil.

When everything you need is ready, you can start drawing:
1. Draw a vertical line on a sheet of paper, dividing it into two equal parts. Then draw the outlines of the head, which in its shape resembles an inverted egg. Note that the widest part of the face is the forehead, not the cheeks;

2. Divide the oval into four equal parts by drawing a horizontal line, as shown in the figure;


4. The width of the segment is equal to the size of one eye. On the second and fourth segment, outline the outlines of the eyes. Mark the place on the face where the tip of the nose will be located. As a rule, the tip of the nose is at a distance equal to one and a half eyes from the center of the oval. The width of the nose below is equal to the length of the eye;


6. Mark the location of the mouth. From the tip of the nose, step back a distance equal to half the length of the eye - this is where the upper lip will begin. The width of the mouth is also equal to half the length of the eye, and the width of the upper lip is about a third of the entire width of the mouth. The corners of the mouth are located under the pupils of the eyes, as shown in the figure;


8. Now you need to check the correctness of the oval of the face. The distance from the bottom line of the mouth to the tip of the chin should be equal to the length of one eye. The distance from the corners of the mouth to the sides of the chin should also be equal to the length of the eye;

9. The distance from the chin to the middle of the eye should be equal to the distance from the top of the head to the middle of the eye. The distance from the chin to the tip of the nose should be equal to the distance from the tip of the nose to the middle of the eye. At the same distance is the end of the forehead and the hairline. In accordance with these parameters, correct the oval of the face and erase the extra pencil lines;

10. Draw the ears. Their upper part is on the same level with upper eyelids, and the lower one is on the same level with the tip of the nose;


13. Draw the pupils. Remember that in bright light the pupils constrict, and in the dark, on the contrary, they expand. Do not forget that there should be a slight glare on the pupil. With light strokes, mark the hair;


15. Light strokes start shading right side faces. In this case, the light falls on the face from the left, which means that the right side of it will be slightly darker than the left. You should not outline any parts of the face with a pencil, it is better to outline their outlines with strokes;


17. Shade the left side of the face less intensively, since it is on it that the light falls. With light strokes, start depicting hair. Remember that hair casts a shadow on the face;
The portrait is complete. If desired, a person's face can be drawn with any paint, as well as with a pen, pastel or colored pencils. When drawing a portrait from nature or from a photograph, remember that each person may have their own anatomical features of the facial structure. For example, he may have close-set eyes. Therefore, when drawing people, in order to achieve external similarity, one must not only follow general rules but also be extremely attentive to details.
How to draw a portrait with a pencil step by step: tips from experienced artists
Do you want to draw a portrait, but something doesn't work for you? Exhaust yourself and tons of paper, but desired result No? Do not rush to despair!
In this article, especially for you, we have collected tips from experienced artists of the Aquamarine drawing school, allowing you to quickly master the technique of drawing a portrait with a pencil.
One of the main secrets of the phased drawing of a portrait with a pencil
One of the main secrets of experienced artists is that they begin to make images from the whole to the particular, that is, gradually moving from simple to complex. While beginners prefer to immediately draw in detail the mouth, nose, eyes and other parts of a person's face.
Thus, our first simple, but very important, advice boils down to the fact that you first need to draw a portrait so that the face you depict has a vague outline, as if the person is in a fog.
At the next stage of work, the imaginary haze will gradually disappear, and facial features will become more and more distinct, we will draw them in detail.
also in initial section our article we will add one more valuable information. It is no secret that a person in a portrait can be depicted from three angles - in profile, full face and half-turn (three-quarters of the face is visible).
From what angle is it better to start work for a beginner portrait painting? Experts of the Aquamarine drawing school advise starting pencil tests from the profile, and then moving on to a half-turn of the face. When such a technique is mastered, it will be possible to take on the most difficult task of depicting a person's face in full face.
At the same time, it has been proven that it is easier to draw a person from a photograph than from life. And here, too, you need to think about your strengths. In order to get an excellent result in the end, and to understand well how to draw a portrait with a pencil in stages, it is wiser to move according to the principle from simple to complex, that is, first learn how to draw a person’s face from a photograph or other image, and only then move on to nature.
Making the basis for a portrait with a pencil
The basis or frame of the portrait is the oval of the head, as well as points showing the location of the nose, eyes, chin, ears, and so on. And at the very beginning of work, such contours need to be marked.
As an example, we suggest considering the portrait of a pretty girl, which is used as an illustration for this article. Let's analyze what her head shape is? Round or ovoid? Or maybe her head is oval with a square chin?
After we analyze the shape of the object's head, draw it on paper. It will be a circle or an oval. Then, on this basis, it is necessary to place points indicating the location of the eyes, mouth, ears, and so on.
If you are drawing a portrait from a photograph, then simply arm yourself with a ruler, and first outline the approximate height and width of the head, and then measure the rest of the face parameters and indicate them with dots on the sketch.
If you are drawing a specific face from nature, then stretch your hand towards the model and visually on a pencil, approximately measure the distances from one point to another, and then transfer the segments to paper proportionally and with the desired scaling.
So, first you will need to note the approximate distance between the crown of the head and the chin, then the width of the face, and then the rest of the points, which already show greater detail of the elements.
From the anatomical features, we will inform you that usually the width of the head is equal to three quarters of its height. This is a standard, from which deviations of 1-2 centimeters are always possible. But the formula is given so that you carefully check the ratio of the sizes you indicated on paper.
For work it is better to use an HB pencil. It is necessary to strive for the outlines of the face at the initial stage to be barely noticeable, light and gentle.
Take your time. We are so created that each person is individual, and you need to capture and correctly reflect the unique features of the face on paper. If you unreasonably left a lot of space for the image of the nose, then in the end it will be swollen like a pig, and if you have little space left on the face under the eyes, then they will also be piggy small. And we don't want to offend anyone.
At each stage, check the basis of the portrait with the original. Notice the features of the face. Maybe it will be a large nose or wide cheekbones, or maybe a small mouth and big eyes. If you want to figure out how to draw a portrait with a pencil in stages, these points are very important.
Stages of drawing a portrait with a pencil.
face reference
The face reference is the golden rule of portraiture. It is in it that the generally accepted proportions are indicated, which subsequently make it possible to accurately depict a particular person.
The standard portrait includes the following points:
The line of the eyes runs exactly in the middle of the line running from the crown of the head to the chin.
The line of the nose goes strictly in the middle of the segment located between the line of the eyebrows and the end of the chin.
The location of the lips should correspond to this proportion. If the line between the nose and chin is divided into three equal parts, then the end of the upper third will serve as the upper border of the lips, and the upper border of the lower third of the segment will be the lower border of the lips. This is the standard, and the rest depends on the individual proportions of the person.
The eyebrow line is defined as follows. Divide the distance from the top of the head to the end of the chin into 3.5 parts. The upper half of the portion is left on the hairline. Behind it, we measure one part and draw a line, which will be the line of the eyebrows. We measure another part from it, and new feature will point us to the bottom point of the nose image.
The width of the lower jaw is calculated as three-quarters of the widest part of the head.

If you are making an image of a face in a half-turn, then look at the illustration presented on how to draw such proportions correctly.

First, an imaginary line divides the head vertically in half. Then it is worth considering that your face is only visible in two quarters. Therefore, the half of the face closest to the artist will account for two thirds of the image, and one third will remain on the rest of the face, which is visible only in half a turn.
Stages of creating a portrait: Chipping head
The chopping head is a human head presented in a simplified form. It is the “stump” that beginning portrait painters study in professional art institutions.
We suggest that you also try to draw the head of the model: only the head, without the rest of the elements of the figure.

At the second stage of the image of the human head, size features should be noted. specific person. In particular, the figure should indicate:
- the relief of the cheekbones, their thickness, flowing and protruding parts;
- the bridge of the nose, the base of the nose, its width and length;
- eyes with distances in width and height;
- lips with dimensions in width and height;
- eyebrow bending, their thickness and direction;
- the chin is triangular, square or otherwise.
Now let's dwell on how to draw the main elements of the face. All this is also naturally included in the process of how to draw a portrait with a pencil in stages.
Step by step face drawing. Eyes
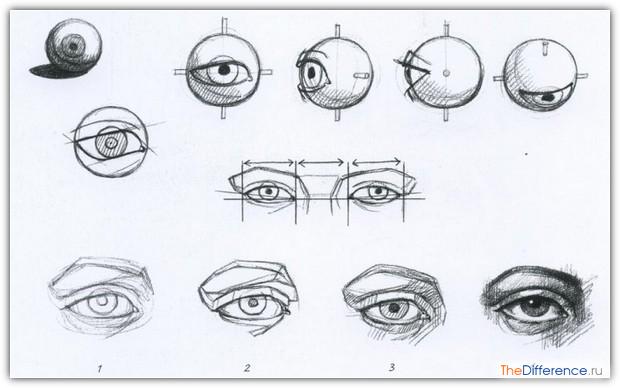
The shape of the eyes is a round sphere, so it is important to emphasize this roundness on a piece of paper. In order for the eye to be spherical in shape, the volume of the white of the eye is given with different shades of intensity.

You can determine the proportions of the eyes for the full face as follows: you need to divide the width of the head into five parts, of which the second part will represent one eye, and the fourth - the other.
If you are drawing a person in a half turn, then first you need to mark the eye socket, located next to the temporal part of the head. Then you need to measure the distance from it to the farthest eye, which will be half the size of the one closest to you. Then on paper you need to indicate the distance between the eyes and outline the contours of the second eye on the sheet.

In the next step, use line segments to show the position of the eyelids. Every eye has an upper and lower eyelid. At the same time, experts do not advise making the lower eyelid too dark, but it will still be a tone darker than the white of the eye. Also look at the presented illustration how to show its thickness.
Step by step face drawing. Nose
The nose takes enough most faces. To correctly portray it, pay attention to the following points:
The location of the wings of the nose can be outlined if you draw down two parallel lines from the inner corners of the eye.
By creating a half-turn face, the line coming from the far eye will be hidden behind the bridge of the nose.

In general, the nose has the shape of a trapezoid, draw it and this will be the base of the nose. Lines highlight the sides of the nose. Place the pencil vertically, parallel to the nose, remember the angle between the side of the nose and a strictly vertical line, reflect it on paper.
Step by step face drawing. Lips
The image of the lips also begins with determining the size and drawing the contours. First, we divide the height of the head into eight parts. The fifth line, if you go from top to bottom, will be the line of the lips.
On this line we draw a cylinder, which, when detailed drawing and should subsequently turn into a mouth with us.

The division into two lips is done as follows. We divide the height of the lips into three parts, of which one upper part falls on the upper lip, and the second two on the lower.
Another one interesting detail from experts: the width of the lips will be equal to the segment, which is the distance between the centers of the pupils of the eyes. But when depicting a person in half a turn, the width of the lips will need to be measured from the photograph and adjusted to the scale of the picture.
There is another way to determine the width of the lips on paper: measure the eye, multiply the resulting value by 1.5 and you will get the size of the lips in width.
Step by step face drawing. Ears
You can determine the location of the ear in the figure as follows: its top will be equal to the bottom line of the eyebrow, and the bottom - the bottom line of the nose. The illustration presented to you clearly shows how you can draw the “correct” ear.

When depicting a face in profile and half a turn, we draw only one ear, the second one is not visible from this angle. Just do not forget to depict the ear in the figure with a slight tilt towards the head, so it will be anatomically more correct.

The angle of inclination is determined by eye or with the help of a pencil, which is applied to the photograph.
Detailing
At the last stage of the process, how to draw a portrait with a pencil in stages, you need to learn how to make a detailed drawing. It consists in drawing all the elements of the face, depicting all its roundness and smooth lines.
To achieve a resemblance to the original photograph or model, you naturally need to be painstaking and attentive. After (or in the process of) drawing, extra contour lines should be deleted.

At the final stage, the shading of the portrait is done.

First, the darkest parts are shaded, and then the turn comes to the lightest ones. Then you need to put lighter spots on some details, for example, make highlights on the pupils, on the tip of the nose and in other areas.

The drawing is ready!
But some portraits can be done without shading. This will be a linear portrait, in which only lines are used as means of representation.
We suggest you see how you can draw a girl's face in this way.


A portrait of a child can be performed according to the scheme proposed below:


With advice from experienced artists on proportions, detailing, and shading, you too will be able to draw successfully. different people in profile, full face and half turn. Draw, train, come to classes at the Aquamarine drawing school and every time you will get better and better!
three-quarter turn
Draw a portrait of a young woman

For everything to work out the way it should, you need to start with the basics. Let's try to figure out how to draw a portrait with a pencil - for this we will draw a portrait of a young woman with large expressive eyes.
First you need to make a blank - it will be a circle divided into 4 equal parts and a small elongated part from the bottom. Approximately in the middle of the lower half of the circle, we outline two ovals - the eyes. It is important that the distance between the eyes is equal to the length of the eye itself, and the distance from the edge of the face to the outer corner of the eyes is half this length. Immediately sketch out the line of the mouth - it will be below the circle, at a distance equal to the width of the eye.

Let's add the upper eyelids and eyebrows. The eyebrow should have a curve. It is best to follow this rule: the beginning of the eyebrow should be at the level of the inner corner of the eye, the end - slightly diagonally from the outer.

And now let's deal with the nose - it will be on the bottom of the circle.

And the mouth is on the same strip just below the circle, which we noted in advance.

When drawing lips, it is important to remember that the lower lip should be slightly fuller than the upper. Also, do not make the lip line perfectly straight - it has a kind of bend. And also outline the basic shape of the ears. The lower part of the ear will be approximately in line with the nose, and the upper part will be in line with the upper eyelid.

Let's work on the eyes in more detail. It is important to remember here that there should be a bright spot on the iris - a highlight, and the upper lash line is slightly more expressive than the lower one.

Let's draw other contours. At this stage, all auxiliary lines are also wiped. You also need to draw the ears - cartilage, lobe, etc.

It remains to depict the hair. In no case should you make them a monolithic block - it looks very unnatural. Separate hairs should be visible, laid with slight carelessness. You can also add a little volume: for this, we very easily stroke the shadow part of the face.
Great, our portrait is completely ready. For more details, you can watch this video:
How to draw a male look - the main nuances

If in the previous section we learned how to draw female portrait step by step, now we will practice creating a male portrait.
Let's start with the eyes. They should be fairly elongated and be at a distance of one more eye from each other:

Then we'll add the eyebrows. You should not make them one solid line - the eyebrows consist of individual hairs, often growing at random.

Let's work with the eyes in more detail: make the lash line more expressive and slightly darken the iris. Leave a little on the iris White spot- glare. You also need to depict the nose: to choose the correct height, set aside a distance from the eyes that is one and a half times greater than the length of the eye.

Now the mouth. It is located just below the nose. As for the width, then you need to focus on the pupils. Mentally lower vertical lines from the pupils down - this distance will be the line of the mouth.

A little shade is what is needed now. Shade the shadow side of the nose and upper lip.

Now we need to outline the oval of the face and ears. Let's not forget that this male portrait- Cheekbones should be clearly defined.

Now hair. You don’t need to make them “one size fits all” - the direction of the hair on the head can be very different. It is best to draw individual hairs, and not try to make the hairstyle a monolithic piece.

And, of course, the head cannot just hang in the air - you need to finish the neck and shoulders.

And then - enhance the shadows. The direction of each new layer of hatching may not coincide with the previous one - do not be afraid of this.

The stubble will add more masculinity, and the glare in the eyes will make the look more alive.
Draw a girl - a guide for beginners

In this section we will learn how to draw a portrait of a young girl. It is absolutely not necessary to be a professional artist for this: now we will figure out how to draw a portrait for beginners.
First of all, let's draw an oval - the general shape of the face.

Then we mark it: we need to draw a vertical axis of symmetry, as well as three horizontal lines - for the eyes, nose and lips. We will also sketch out the basic shape of the ears - in height they will be located approximately between the line of the eyes and nose.

Let's draw the nose in a little more detail - it should be noted its wings, bridge of the nose, front part.

Now the eyes and eyebrows. To do this, you will need two more auxiliary lines located symmetrically on both sides of the main line of the eyes. It is important to remember that the distance between the eyes should be approximately equal to the length of one eye.

Let's add details. It is necessary to draw our girl's hairline, outline the cheekbones, outline the folds near the eyes.

General sketches are done, so you need to carefully wipe all the auxiliary lines and draw the hair. In order for the hairstyle to look natural, do not make all the strands the same, licked - they should lie down a little carelessly, out of order. Earrings can be inserted into the girl's ears.

Now we need to add volume - we shade the shadow parts, strengthen the contours.

We must not forget about the falling shadows: from the hair, from the nose, the shadow on the neck. This is also neatly shaded. The light parts of the hair can be further lightened with an eraser.

We will strengthen the shadow a little more and add light tones on the strands of hair, lower lip, eyes.
Everything, the portrait of the girl is drawn. If you are interested in this lesson, you can additionally watch this video:
Portrait Lesson for Little Artists

Children often like to draw different characters: book or cartoon characters, just abstract people. This lesson will describe in detail how to draw a portrait of a young girl, so that even the most young artist easily cope with this task.
First you need to outline the oval of the face and divide it into 4 parts.

Then - in in general terms set the shape of the eyes, lips, the location of the tip of the nose.

We need to add details: in the eyes we draw the iris, we give a more natural shape to the lips, we draw the nose.

And now we need to bring the oval of the face more strongly, draw the upper and lower cilia, pupils and eyebrows.

And, of course, what girl can do without beautiful long hair.

In order to make the drawing look more alive, you need to apply some shadows. This should be done very easily and carefully.
That's all - the portrait of the girl is ready. For a more complete understanding of the lesson, it will be useful to watch this video:
Portrait of a man - learn to draw together

Drawing portraits is a rather difficult task, requiring attention, accuracy and precise proportions. And with the help of this lesson we will learn how to draw a portrait of a person.
It’s worth starting with the basics - let’s depict the oval of the face and divide it into three parts. Attention - the top point of these three fragments should be just below the top point of the oval itself - there will be a hairline.

In places of separation, three horizontal lines and then two more. One will be just below the center mark, and another one will be just below the bottom. Also, symmetrically to the axis from the second base of the mark (eyebrow line) to the bottom (nose line), two vertical lines must be drawn - blanks for the front of the nose.

On this blank we draw a nose - with a nose bridge, a small hump and wings. We also mark the eyes - they will be on a line located just below the eyebrow line. In width, it must be conditionally divided into 5 parts - the eyes will be in 2 and 4 parts.

You also need to depict the lips - they will be on the line located under the line of the nose. The width of the mouth will be determined by the middle of the eyes - from the middle of the left to the middle of the right. It is important to note that the lower lip should be slightly wider than the upper.

A little more details: in the eyes we draw the iris and pupil, add volume to the eyebrows.

Now we draw the hair along the already marked lines and start working with the ears.

We are working on the cheekbones - they are especially pronounced in a man. Also draw the neck - it will be quite massive.

Everything, at this stage, you can erase all additional lines. By the way, you can also add a shirt collar to the picture.
Portrait of a girl - three-quarter turn

Before that, we painted faces mostly in full face - that is, a person looks directly at us. Portraits in profile are also quite common - when a person is located sideways to the artist. But much more complex and interesting is the three-quarter turn - a cross between full face and profile. Let's try to depict such an option.
At the beginning general forms- an elongated oval expanded upwards and axes of symmetry. Unlike the full-face position, the axles will not divide the oval into almost equal parts - they will follow the line of the oval, leaving a little less space on the side of the turn. So far, we are interested in the lines of the eyebrows and eyes.

Then you can outline the line of hair growth, mouth and begin to draw the nose. As can be seen, its left wing is almost imperceptible, and the left part of the back of the nose is much smaller than the right.

Now the eyes - they are quite large in the girl, with a wide upper eyelid.

Now we draw eyebrows. They are quite thin and widely spaced.

Let's take care of the mouth and chin. The mouth will be small, slightly open. Also at this stage, the lower eyelids will be depicted - they are also wide, which makes it seem that the eyes are a little bulging.

Add strands of flowing long hair.
Everything, now our sketch is ready. We got a real forest nymph - alert, graceful and very beautiful. In order to understand the lesson better, you can watch this video:
Learning to draw a portrait of a teenage girl
The face of an adult is quite noticeably different from the face of a child or teenager in terms of proportions. Therefore, for the full, multifaceted development of you as an artist, it is important to learn how to draw portraits not only of adults, but also of adolescents and children.
First, draw a circle and divide it into 4 equal parts.

On the central line we will make the basic shape for the eyes and eyebrows, and in the lower part - for the nose and mouth. On the sides, at a height from the eyebrows to the nose, there will be ears.

The nose in children is usually quite wide, without a pronounced back.

And the lips are quite plump. As for the width, the line of the mouth should be between the two pupils. For convenience, you can even draw vertical lines down from them. And don't forget about the crease above the upper lip.

Now we will slightly lengthen the oval of the face and start drawing the hair.

Hair should fall in waves, separate large strands. And in these large strands it is necessary to draw individual hairs. Also at this stage, you can erase all auxiliary lines and start working with shadows.

Shading should be easy and very neat. You should remember not only about natural shadows, but also about falling ones.
Everything, now our drawing is completely and completely ready. More nuances and small parts you can watch it on this video:
In addition to the fact that drawing portraits is a great hobby that can keep memories of dear and close people in the life of an artist, it is also a form of income. Indeed, talented craftsmen significantly increase their income by doing what they love and honing their skills.
A step by step guide to drawing portraits.
- If you want to learn how to draw portraits, but have not come across this type of art before, start with yourself. More precisely, start drawing yourself. We're talking about a self-portrait. This is what Van Gogh did - he painted his portraits. In order for you to be able to see the details of your face, pay enough attention to the lighting. For right-handers, for example, the light source should be placed on the left side and slightly above the artist.
- Create the first drawing on a 1:1 scale. To do this, make sure that the canvas (or other material on which you will paint) is larger than your head so that it can fit completely.

- Try not to turn your head too much, using eye movements when drawing. By the way, you can start drawing from one of the eyes. Study it carefully, draw and move on, measuring the proportionality of all the details.

- Choosing a portrait in the question how to draw the least hard way(that is, a self-portrait), you still need to pay attention to detail. For example, when drawing an eye, you should pay attention to all the small wrinkles, the density of the eyelashes, the shape. You will have to be objective, although it is not always easy.

- When drawing the second eye, do not mindlessly copy the previous element. In the biological world, complete symmetry is a rarity. See how your right eye differs from your left, and try to convey these differences in the drawing.

- After the basic unit - the eye - is drawn, use its dimensions to maintain the correct proportions. With this unit of measurement, you can qualitatively measure the distance between the eyes, the distance from the visible edge of the face.

- Pay attention to the height and shape of your eyebrows. Often they are what make a person recognizable, so try to convey them objectively.

- Hold a mirror behind your easel so that you can lift your eyes slightly to see the original at any given time. Try not to make unnecessary movements so as not to lose the original angle of the head. Even a slight inconsistency can confuse a novice artist.

- To maintain symmetry, draw a vertical auxiliary line dividing the space between the eyes in half. You will be guided by this line when drawing the nose and lips. But remember that the world does not have to be perfect, and if in real life your nose protrudes to the left of the center line, this feature should be conveyed on paper.

- Match the unit of measurement "eye width" with the distance between the bottom of the nose and the inside of the eye. Transfer the resulting correspondence to paper. Next, in the same way, measure the distance to the upper lip and draw the size and shape of the lips. In the case of correctly designed proportions, you will already at this stage get high level portrait resemblance.

- Next, you need to determine and draw the shape and height of the cheekbones and ears. This is not easy, because it is these parts of the human face that are unique and not easily amenable to the brush of a novice master. But if you succeed, then you are undoubtedly ready for subsequent difficulties.

- Marking the chin and jaw the first time is also not for everyone. In addition to the fact that professional drawing of a protruding bone is not an easy task in itself, people tend to idealize their appearance. Not everyone can recognize the excessive squareness of their jaw or the bulge of their chin. However, artists see beauty differently than ordinary people- just in these imperfections that distinguish people from each other.

- Start drawing hair. In your first self-portrait, pay attention not to the details, but to the general similarity: the height, density and shape of the hairstyle. Don't waste time drawing individual strands. At this stage, we do not have such a goal.

- Now pay attention to the play of chiaroscuro. Proceed to darken the desired areas, as well as lightening where necessary. So you make the drawing voluminous and natural. Start working with the darkest areas (the iris of the eyes) and then move in descending order, along the palette - from dark to lighter.
- Try to pay enough attention to the location of the light spots in order to achieve the greatest naturalness of the picture. Notice even small and seemingly insignificant details.
- Using lightening and darkening areas, mark the bones of the skull under the skin so that the person depicted in the portrait is obviously created from flesh and blood, and not from marmalade and ostrich feathers (if you are painting a self-portrait in the classical style, of course).

- Shade one of the wings of the nose and try to convey the shape of your organ of touch as correctly as possible. With all its features: size, shape and possible imperfections.
- Also work out the shadows in the nasolabial septum and on the cheekbones-chin. Do not focus too much on the shadows under the lower lip. If you overdo it, you risk distorting the correct understanding of the portrait.

- The final touches are light spots and shadows in the neck area. Here is your first self-portrait and ready.

What you read above will help you develop basic skills and come to common understanding What is important to pay attention to when drawing a portrait. It takes practice, lots of practice, to perfect what you've just learned. And each portrait will get better and better.
As you know, the image of people is one of the most complex directions in art. In order to beautifully draw the figure of a man, woman or child, a novice artist needs to have not only certain professional skills, but also knowledge of anatomy, as well as be able to observe proportions. A portrait created with a simple pencil is one of the most romantic gifts you can make with your own hands. Surely each of us, at least in our dreams, thought about how to draw a portrait from a photograph. Do not be ashamed of your inexperience, try to draw with a pencil, because even those portrait painters who are taking their first steps in creativity can do it.
Beginning of work
Before you start drawing a portrait, you should study the photograph, what position the head of the depicted person occupies, how it is rotated relative to the vertical and horizontal. Be sure to pay due attention to the proportions (size, as well as the relative position) of the eyes, nose, ears and mouth. Accurate observance of proportions when applying the first strokes is an important guarantee of the similarity of the final image with the face in the photograph. Familiarize yourself with the average proportions of a human face shown in the figure, and then compare them with the original image in the photograph. If they diverge a little, there is nothing to worry about, since it is precisely in deviations from the standard that the individuality of a living person captured with a camera lies.
For more detailed information about the features of the structure of the human skull, which may be needed when depicting a portrait, you can always refer to the anatomical atlas. Apply light lines general outline oval of the face, hair, lines of lips, nose, eyes and eyebrows.

After that, you can begin to analyze the planes of the face. At this stage, the height of the nose should be marked with a plane. In order to better see the volume, it can be shaded. This should be done with all areas of the future portrait that are in the shade. Next, we denote the plane of the lips, the cheekbone, located closer to us, as well as the plane of the eyes, which connects to the eyebrows. At this stage of creating a portrait, it is quite easy to outline the geometric features inherent in the face of the depicted person, without even drawing it out. smooth lines.

Performing face detailing
Peel off the top layer of the pencil using a nag eraser to make the previously drawn lines almost invisible. After that, we proceed to drawing all the features of the face. We round them in order to give the portrait the maximum resemblance to the photograph.

It is no secret that the eyes are often called the mirror of the human soul - they are very expressive. Therefore, there is no need to prove the importance of accurately conveying their location and shape. In order for the eyes drawn on paper to look more alive, the sclera (the so-called white part of the eye) does not need to be depicted as snow-white, since in fact its color changes under the influence of its own shadow and the shadow that the eyelid casts on it. Apply highlights to the lower eyelid and inner corner of the eye.

The figure below shows the sphericity of the eye, as well as how the eyelids rest on the eyes. Here, a novice artist can also get acquainted with the sequence of depicting eyes in a portrait, starting with highlighting and shading areas (2 and 3) and ending with highlights and shadows. It should be noted that women and men of different age categories have different eyes. For example, women tend to have longer, thicker eyelashes and thinner and more defined eyebrows than men.
The mouth in its expressiveness is not too inferior to the eyes. It is the lips that are the place of transition of the mucous membrane to the skin. This is the reason for their characteristic pink color. When depicting lips in a portrait, it should be remembered that they are the most mobile element on the face, capable of taking one form or another. Upper lip, as a rule, is thinner than the lower one.

Many, when drawing a portrait from a photograph, are faced with the problem of depicting a nose that looks completely different from different points of view. the main task- be able to convey the main contrast of shadow and light on the nose, so that the drawing does not turn out to be overloaded with unnecessary elements. Usually, but not in all cases, the maximum light falls on the tip of the nose and the bridge of the nose, and the thickest shadow falls on the base of the nostrils (figure).

As for the ears, their shape varies greatly from person to person, but does not have a pronounced pronounced features among the representatives of the strong and fair sex. Despite the fact that in photographs the ears are often hidden by hair, professional artists recommend not to neglect them, in particular, their most expressive and precise position on the sides of the head. The length of the ear in adults is approximately equal to the length of the nose (see figure). In children, the ears are proportionately slightly larger.

Hatching, working out halftones as important stages in drawing a portrait
Upon completion of work on the detailing of the face, we proceed to the beginning of hatching. First, you should erase all the extra lines that are on the portrait, since after the start of laying the tone, there will no longer be an opportunity to do this with sufficient accuracy. There are no specific hatching rules - everyone does what is more convenient for him. Professional Artists it is advised to start hatching from the most dark parts portrait. In the future, it will be possible to build on them, so as not to darken clothes, eyes, skin too much.

When giving a tone to the skin of the face, clothes and hair, you should not use a nag (unless, of course, you accidentally put a stain on the future portrait). If you are right-handed, then intensive shading of halftones should begin from the upper left corner of the sheet, in order to avoid smearing what has already been depicted. Accordingly, the left-hander needs to do everything mirrored. At this stage, a slight study of the background is allowed.
Highlighting and darkening - the last stages of working on a portrait from a photograph
At the end of the hatching, if you did everything right, you will get an almost finished portrait, which, however, will not look voluminous. To correct this flaw, it is necessary to highlight some places on the face, such as the tip of the nose, the brow ridges, the upper part of the cheekbones, the sclera of the eyes, the lower lip and sometimes the chin. Using the nags, the artist can draw the small folds that are present on the lips and wrinkles, as a result of which the portrait will become more alive. Lightening of hair should be performed in places of the largest fractures of the forms. In this case, they will appear shiny and more realistic.

After illumination, proceed to final stage- darkening those areas where you need to demonstrate the space. Such places can be the ears, the edge of the hair, the background, the folds that are on the hair. After that, the portrait will be almost ready. However, in any case, you will have unnecessary strokes, stains from fingers stained with a pencil. Therefore, it should last time pick up a nag and eliminate everything that visually seems superfluous to you.

After reading this article, should not be taken as a ready-made guide to how to draw a portrait of a person from a photograph. Indeed, even with the maximum similarity of the resulting portrait with a photograph, we always have a place for creativity. You are not at all obliged, when redrawing, to copy exactly everything that you do not want to see in the portrait. in front of you Blank sheet ready to implement all your ideas. As you know, photography is not always successful in all criteria. Well, the artist, working on a portrait, can think out, correct and get as a result what turned out to be beyond his strength, due to the specifics creative process, photographer.


