Click Class
Tell VK
Initially, February 23 was still considered a holiday for those men who are associated with the military sphere. Now, this is a holiday for all males, so everyone needs to be congratulated: grandfathers, dads, brothers. And, most importantly, to put a piece of your soul into this congratulation, so I want to come up with something original and solemn.
Of course, more often such cards are made by children, mothers only look after the progress of work. But you can turn it into a masterpiece if you use different techniques and call upon the entire reserve of his accuracy. By the way, there is for this holiday.
I want to inspire you different ideas so that you put aside your affairs and get creative.
In our kindergarten, children are not yet given homework, they try to make thematic congratulations themselves, but sometimes a child asks himself on the weekend to make an application or a postcard. Then you also have to look for ideas that are not difficult to repeat, but also show the child how aesthetically pleasing the result looks.

Of course, most often children remember that they need to make a postcard when they go to bed, and they need to hand it in tomorrow. So let's look at a few easy ideas that, in their implementation, will take no more than half an hour of your joint time.
For example, create a congratulation with a three-dimensional Russian flag. I know that at this age, kids still cannot cut straight along the lines, so you will have to prepare blanks in advance.

Use scissors with uneven edges.
The cardboard is folded in half, the substrate is glued to the front side.
A black stripe is glued diagonally, which will serve as the basis for the flag.
Three stripes of the same size (about 4 cm) are cut separately in the colors of the Russian flag: white, blue, red.
These strips are glued only at the tips, creating a small arch.
If it is difficult for a child to explain how to make such a flag, then use a simplified version.

Take red paper and toothpicks.
Cut a small strip of paper, 3cm x 1cm, and fold it in half.
Make two slits at the edge that didn't become a fold and glue this flag to the toothpick.
It is very easy to repeat the following idea.

You will need two strips of cardboard of the same width, but different lengths. A number is cut from one end. Next, glue both halves at the beginning.
I also liked one idea. The execution turns out to be a very adult and strict design. But it's also done quickly.

We fold the cardboard - the base.
We take a smaller paper and in the middle we cut out a star and a slot for the inscription.
Before gluing the two sides, in the place where the slot is written we write the text.
You can mark this place with a pencil.
How to make voluminous postcards with your own hands to school
Volumetric congratulations always look more original than the usual flat ones. But it also takes more time to create them. They have more details, so these options are more suitable for schoolchildren.
For example, the idea with a boat and an anchor looks very nice.

To do this, you can print a template, cut out the ship, waves and anchor according to internal patterns.

Transfer the drawing to colored paper and carefully repeat the inner lines of the drawing with a clerical knife.

Then bend the cardboard you need in color and place it with the fold up.
We paste paper with a cut out ship on the front side of the cardboard. Cardboard can be taken contrasting.

Paste inside White list paper on which you can write a congratulation.
Interesting options with volumetric images balloons and ships.
For example, a boat is made on this postcard using the origami technique. And on the basis of it the whole composition is created.

Here detailed diagram, in what order you want to collapse the sheet.

Or such an interesting option with a 3D ship.

And I also want to show a sweet version of voluminous congratulations.

I think that our defenders will definitely appreciate this!
Beautiful congratulations from paper for dad on February 23
I also want to congratulate dad in a very unusual way. For example, to give a postcard, which requires very painstaking work.

To create it, you need to take a sheet of cardboard, bend it in half.
Then draw 3 squares, 2.5 * 2.5 cm in size. Inside which you can draw thematic objects: anchor, steering wheel, balloon, plane, ship, watch or star. You can draw yourself, but I will give her a template.
Then carefully cut along the contour with a sharp blade or utility knife.

Inside, paste a congratulation printed on a white sheet.
You can make a card in the form of a shirt with a tie.
They are different, for example, those with a painted tie.

Or with a jacket.

You will see a template for such a postcard a little lower in the corresponding section.

Let's create such an orange, bright postcard ourselves.

To do this, we need double-sided cardboard and one sheet of colored paper.
The sheet is folded in half. On the front side, at the place of the fold, we make an incision at a distance of 3 cm from the edge.
On the back side of the sheet, we completely cut off a line 3 cm wide. So the shirt collar will protrude above the postcard.
Now we also retreat 3 cm from the sides and make horizontal cuts, 3 cm long. We bend their horses inward.

It's time for a tie.
We need a square of double-sided colored paper, 15 * 15 cm in size.
We fold it diagonally.

Then we turn the ends to the resulting fold.


Turn the end up.

Now we turn the end inward, as in the photo.

We bend the edges towards ourselves and push inward with a finger.

Now we reduce the width of the free edge of the tie, tucking the sides.

We glue the received part on a postcard.

Contrasting colors look very nice: black and white.
Also, to achieve greater similarity, take a sheet of velvet paper as a basis.
DIY greeting cards using scrapbooking technique
Very rich and unusual congratulations are obtained, created using the scrapbooking technique.

When many different parts of different textures are used. Everything will do here: wallpaper, twine, buttons, wood. Of course, it is better to choose color scheme which goes well with different colors.

You can generally sew some decoration elements on a sewing machine.

I also like the option of wooden postcards. But due to the fact that not everyone can cut out of it and does not have a special milling machine, let's take this design as a basis. And we will replace the tree with thick cardboard, which is sold in stores for needlework and creativity.

Or such a cool idea.

Because this postcard looks very noble and expensive.
Schemes and templates for postcards for February 23
I have prepared several templates with congratulatory inscriptions. Which you can print and use in your work.
Template for creating a star for this congratulation.

Take a sheet of paper, stick on it two strips for the St. George ribbon.

Then cut out the star pattern.

Tuck its edges with a finger and a ruler. Then, using the same ruler, we bend each ray of the star in half.
You need to start along the line from top to bottom. As in the photo. This will give you 5 lines from each end.

Now with our fingers we make these lines more visible and we begin to glue the star to the workpiece with St. George ribbons.

It remains to cut out only one asterisk and find it on big picture Right place.
Now I want to show options for inscriptions.

This template can be printed on colored paper.

Another congratulations idea.

A set of fonts.


Also a diagram for cutting out an airplane.

Template for unusual postcards. Figures in squares need to be cut.

The scheme of a small postcard.

Template for postcard - jacket. 
Take note of ready-made solutions.
Original applications for Defender of the Fatherland Day
Now applications with congratulations in the origami technique are very popular.
Here is a scheme for creating a congratulations in the form of a shirt.

And here is another very cute hand appliqué idea.

We need two sheets of cardboard.
Trace around your left arm and cut it out.

And fold it in half, then in half again to make a small accordion. We tuck the ends, because we will stick them to the palms.

Now you need to decorate the front side of the application.

We glue the edge of the accordion to one palm, the other edge to the other palm.

The application is quite simple, but it will be very interesting for children to make this.
There are a lot of options for original postcards for men, the main thing is to choose the one that is more suitable for the character of your men.
For example, our dad perceives this holiday purely in the colors of camouflage and a vest, and therefore color background postcards we choose the appropriate.
If you do not want to focus on the military past of the holiday, then you can create such interesting options with stylized features of a man: hat, monocle, mustache or cane.

I want to know your opinion on the whole collection of ideas. Bookmark the article to repeat your favorite illustration with the kids.
tweet
Tell VK
Hi all! On the agenda today are crafts that everyone will soon have to do with their children, because February 23 is such a holiday that is celebrated in every family. Of course, our beloved men should be very tasty to feed a gala dinner, make hot and, of course, salads. But what about gifts, you can’t do without them, so take ideas and implement them.
Even if it is a very small and modest souvenir, it will be made by hand, which will surely win over your dad or grandfather. Therefore, sit back and look, choose, and then get to work).
I remember when I was at school, we made key chains from artificial leather at labor lessons, now you can make them from felt or foamiran.
There is nothing easier than to take a piece of paper and make amusing and funny people out of it. This is me and such a famous technique as origami, such creative work is suitable for older or preparatory group garden, look at this diagram and repeat all the steps. It turned out not something like a rocket, and your dad is sitting in it))).

You can also cut out a cardboard rocket with the children, and then glue the windows, you get a simple application, children of the middle or younger group can handle it.

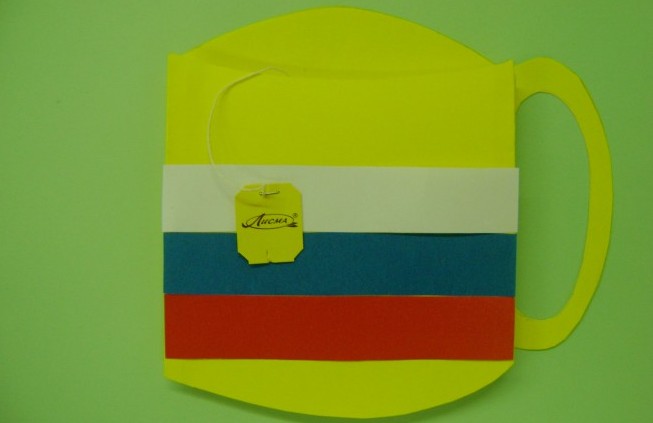
All men love tea and coffee, so why don't we take advantage of it.

But, as a teacher, you will have to make blanks from thick cardboard. Moreover, one part of the mug should be slightly smaller.

Fold in half using the accordion method.

Attach the tea bag tag to the string.

And then decorate by gluing the stripes that symbolize our flag.
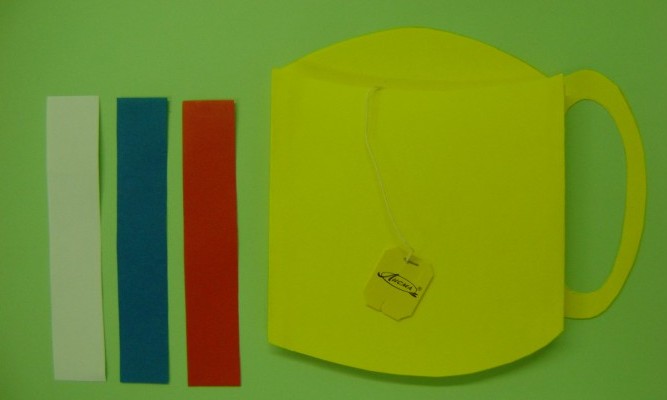
It came out easy and beautiful.
And most importantly, the children liked it and gave them great pleasure.

An interesting option would be a craft in the form of a train.


We make gifts with schoolchildren to dads
Of course, there will be congratulations and wishes on this day, so I suggest that students elementary school make a postcard out of paper using interesting material. For example, you can tastefully decorate a disposable paper plate.


Or create a real masterpiece card from very unusual materials in the style of plasticine.

We will need:
- white paper A4 - 1 pc.
- printed text in the form of poetry
- pencil, ruler, plasticine
- cocktail tubes
- fireworks or sparkles
- PVA glue

Stages of work:
1. Fold a piece of paper white color in half. Draw like this, a vertical line.

2. Then cut along its contour with special decorative scissors.


4. Lay out a flag from plasticine and decorate the numbers.
5. Then cut the tubes of different colors finely and stick them into the plasticine. Glue the salute, and then let the glue dry. Here is such a wonderful postcard, you can say the souvenir turned out, it remains only to put congratulatory wishes.

You can also, if you did not like the previous version, use the art of quilling for high school students.

Crafts from discs, the most ordinary CDs with holiday symbols, look very bright and impressive.

Impressive, simple and quite creative looking.

You can resort to this method, it is more suitable for children from 5-10 years old, you will need glue, paper and scissors. This is the well-known shirt and tie.


You can complicate the task a little and make an origami-style tie.

A popular school children's craft can be a boat made of cardboard and paper.

A photo frame will be an original present, and you need to cut a rim from an ordinary hard box, and then use woolen threads to decorate and ennoble with stars. You can use stickers, rhinestones and scrapbooking materials.

Can grandfathers make a medal from plasticine balls.

Paper soldier master class for the little ones
Plasticine crafts are considered the simplest and easiest. You can find a lot of variations, because the symbols of the upcoming men's holiday will be all kinds of cars and road transport.
In the first place, as always, is the tank, the majority make it, I don’t know why, but it happened by tradition, probably this is one of the symbols of victory.

You can make it exclusively from modeling dough or plasticine, as well as using matchboxes.

There is another option, use all sorts of things like nuts, dowels and other working charms.

The second place is occupied by airplanes.

If you have never done them, then here is a step-by-step instruction for you.

Or build a helicopter, just don't fly away).

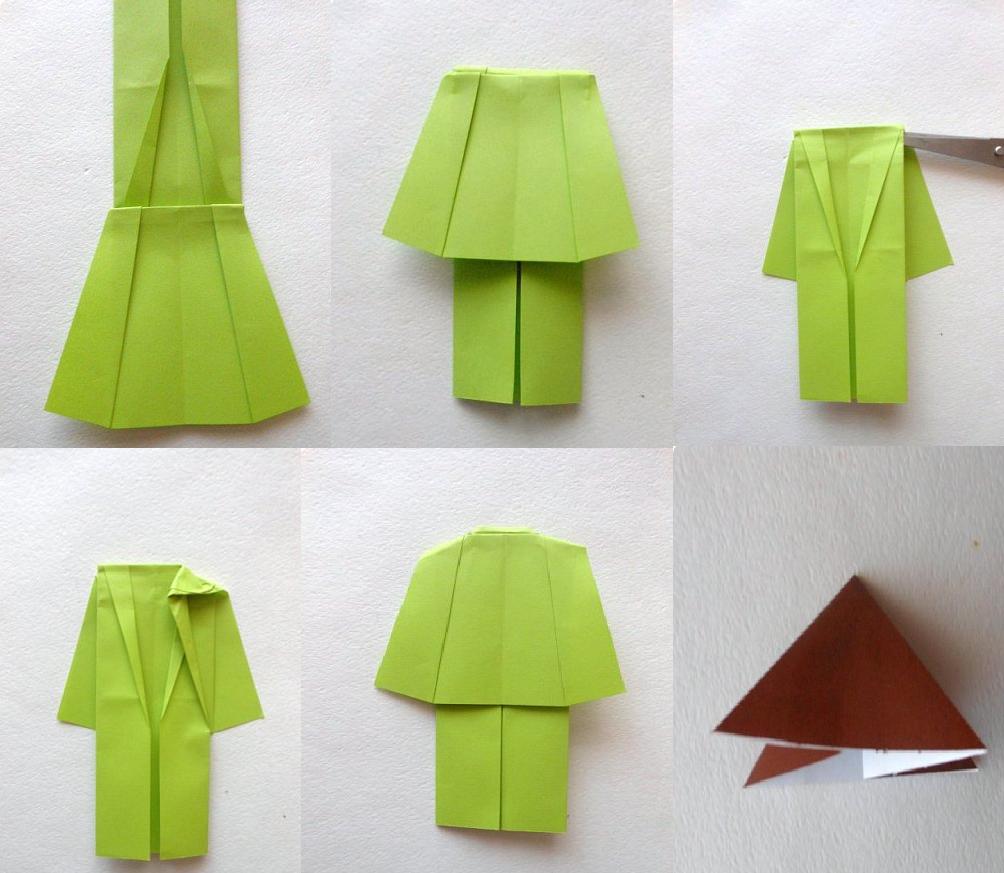
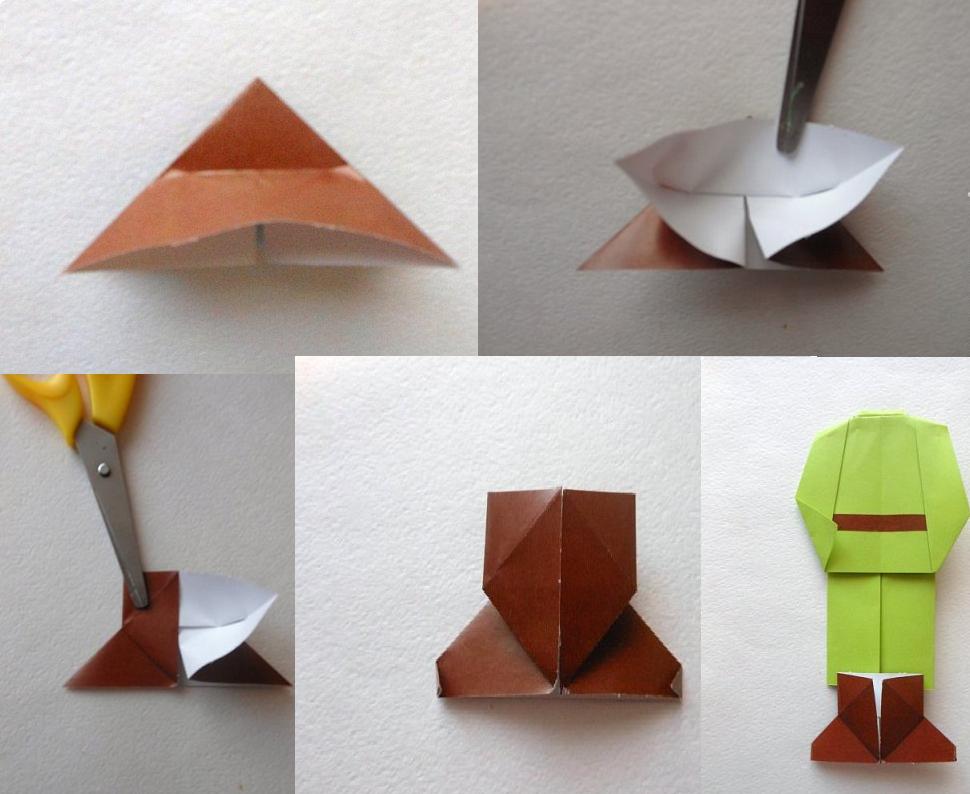
For older children, you can make a gang of soldiers.

Do you want to know the features of their production? Then look beyond step by step steps and repeat all steps for folding and folding the paper.
Here's the set you'll need to get started:

Now, with regards to actions, move from right to left, and then everything will work out for you.


In general, then you can make a wall newspaper and decorate a group or class. Looks fun and funny, doesn't it?

Learning to make gifts for dad on Defenders of the Fatherland Day
The first option that students use is the trimming method, when squares are cut out of corrugated paper, then they are wound on a stick or pencil and glued to a sheet.


Or the real picture, Well, here of course you have to tinker longer.

For younger children, the ball rolling technique is well suited.

Well, the most difficult option is a photo frame, with your own hands from a special material, like ball plasticine.

If your children are still very young, then you can invite them to make such a boat out of a dish sponge and a stick, this is completely for kids).

In addition to everything, you can learn a poem.

Master class of crafts with preschoolers

We will need:
- ice cream sticks - 8 pcs.
- straw for juice - 1 pc.
- PVA glue
- gouache and brush
- scissors
Stages of work:
1. Make a base, so to speak, a rod on which the wings will be held. Take 5 sticks and glue them together with PVA glue.

2. Then glue one stick perpendicularly, but step back a little from the edge, as shown in this picture.

3. After that, glue the pieces of tubes on the sides.

4. Approximately the following should turn out. If you have too, proceed to the next step.

5. At this stage, you need to glue the second one parallel to the first stick, you will get a wing.

6. Make the tail of the plane from another stick, just cut it in half.

7. The most long-awaited moment is the design, take brushes and gouache and paint the body.

8. And here it is such a funny and super-duper airplane. By the way, you still need a propeller, do not forget to glue it together with a button or bead.

Or you can do almost the same thing from clothespins.

I also really liked the option from the usual plastic bottle and tubes.

If you also liked this work, take note of it, here are its steps.

We make toys from different improvised means
In most cases, men like all kinds of equipment, including military ones, so the following can be done from paper napkins and matchboxes, a tank:

Or an ordinary car.

Using sponges for washing dishes, fold a small tank.

Or arrange delicious gift, using a mountain of candy that you can ask your mom.

Or you can make an application.

In general, surprise your loved ones and relatives with something, I gave you ideas for reflection, so think and recreate. Good luck.

If among your friends there are people who are fond of hunting, for example, grandfather, then you can give him such a junk souvenir in the form of deer horns from a plastic bottle and caps.

You can use your Lego constructor and make a stand for pencils and pens, stationery.

From the sleeve toilet paper you can build a racer, take a little man from the designer.

Of course, they also make papier-mâché toys, but it's a bit complicated.

Or here is such a small masterpiece of cotton pads - a postcard.

And this is all I have. I wish you success in everything you have planned, patience and perseverance, as well as inspiration and creative ideas. Until then, see you all!
Sincerely, Ekaterina Mantsurova
Hi all!! Not far off is the men's holiday on February 23. And we have already begun to prepare for it with you. So, we sorted out which original ones can be prepared on this day, and also considered gift options in the form of. Today I want to continue the theme of needlework and see what cards can be made for our dads, grandfathers and brothers.
Of course, most often, our children delight their dads with original souvenirs, so I will have a selection for the guys different ages, both for toddlers and older. It will be useful for adults to read and choose what they can do together with the children.
It's no secret that all postcards are made of paper and cardboard using different techniques, as well as adding materials such as napkins, sparkles, and inscriptions. The result is very good crafts that will please anyone.
Let's take it in order. And to begin with, consider creative work from paper, white and color))

In most cases, the work is done in the form of an application. For younger children preschool age it is necessary to make blanks in advance, which they then, under the guidance of an adult, simply glue. Or, if the guys know how to use scissors, give them a little cut.
See what work can be done here. Decorate the front side with a thematic picture, but on the wrong side, glue a poem or sign a wish with your child.
- A simple application with a boat. Cut out the details and pasted on a colored background.

- A slightly different version with seagulls.

- Prepare planes in advance. Then it remains to glue them together with clouds of equal paper.

- In this form, use cardboard as a base.

- Here, cut out the symbolism from colored paper and carefully stick it on the base.

- Here is a crepe paper helicopter or you can use felt. It also looks very impressive.

- See what funny bottles with a surprise. A wave is easy to make from curly scissors.

- More airplanes, only for bulk crafts, clouds can be made from cotton wool.

- The option is more complicated using the quilling technique and torn paper appliqué.

- And here, print out the background with clouds in advance, stick it on cardboard and first glue a two-color ball on top, then a plain one, but only the middle, wrap the edges.

- You can also include not only gluing, but also drawing.

Well, let's show you how you can make the most popular view crafts for Defender of the Fatherland Day.
We will need: a sheet of cardboard, colored paper, PVA glue, felt-tip pens and paints.

Manufacturing process:
1. First color the template and cut it out. When cutting clouds, keep in mind that one cloud must be cut with scissors in a spiral to the middle (2).
2. Fold a piece of cardboard in half and open it again.

3. So, on right side base, glue a spiral cloud, and after applying glue to the wrong side of a small cloud, close the card and hold it for a while so that the spiral sticks to two sides of the card (4).
4. Open the product. The plane must be glued so that the tail is 1 cm higher than the glued middle of the spiral cloud. Decorate the background as you wish or according to the template.

5. Fold the craft and unfold it again. All is ready!!
Like you can make a gift, only with a typewriter inside. Save and print templates!! I think everything is clear how to make such a product.


We make postcards from colored paper and cardboard at school
- Volumetric postcard with a tank, a rocket and a star. I have already described in detail how to make such a product in an article about. So if you are interested, you can read.

- But such an interesting emblem, it is better to make a star convex.

- Don't forget about maritime theme with bulging sails or waves.


- By the way, very cool. military equipment make in the technique of origami and stick on the base. For example, you can fold a regular or two-pipe.


- But look what a spotted plane made of equal paper rises on a glued base-a cloud of cardboard.

- Well, a beautiful boat with scarlet sails. It is very easy to do: cut the waves in a wave, glue the boat in strips on top of each other, and twist the sails and glue only the edges.

I also found an excellent folding option with wishes inside. Here I share with you the video, everything is told in detail and shown. I really liked the idea, so bright and unusual congratulations it turns out.
Step-by-step process of making a gift for dad from daughter
And it’s over, all dads who have daughters expect special crafts made by their own hands from their princesses.
If you have a daughter, then I suggest that she show the idea of making such an interesting volume postcard, which I found on one site, you will actually see its name on the templates below.

We will need: printed templates, glue or thin double sided tape, voluminous adhesive tape, ribbons of red, blue and white flowers, eyes for toys, white yarn, scissors.
Manufacturing process:
1. First, print out the background and cut out the templates. Depending on the gender, we cut out either a skirt or pants.


2. Tape the shoes and pants to the boy.

3. Stick on the T-shirt and tuck your hand into the slot.

4. Make hair out of yarn and glue it on your forehead.


6. Glue the stars on a bulky double-sided tape and write a wish inside.


I think any child will like to make such a product, and dad will be pleased to receive it. do you agree with me??
How to make a postcard for February 23 from napkins
And if you have accumulated a lot of bright, multi-colored or plain napkins, then this is very useful. Now I'll show you what you can do with them.
First, think over the plot, and then tear the napkins into small pieces and twist, glue them onto the base of the invented product.
- That's what tanks you can create !!

- The background can be painted with paints, it will turn out even brighter.


- Here's the parachute option.

- Or a traditional airplane.

- Or a boat.

Such work is done very easily and simply, and also quickly. So get creative with the kids!! Enjoy great pleasure!!
Postcard in quilling technique "Tank"
And the next option is a win-win, as it is done in just 10 minutes. And you will need a minimum of materials. But the craft, as always, will be incomparable and on topic !!

We will need: colored cardboard, white and colored paper, glue, toothpick, curly scissors or a stapler.
Manufacturing process:
1. Take colored cardboard and fold it in half.

2. These are the blanks you should get.

3. Print out the inscription and cut it out. Also cut out a rectangle from white paper, slightly smaller than cardboard. Decorate the edges with curly scissors or a stapler. Glue on the front side.

4. Take green paper or special quilling paper. We need 7 strips. Two wheels from one strip, two wheels from two glued. Spin the wheels.

5. Glue the finished wheels together, and wrap around the perimeter with a strip and secure.

6. For the cab, glue three strips and twist into an oval, glue the tracks on top.

7. Twist the "eye" out of dark green paper and glue it too.

8. At the toothpick, cut off one sharp edge and wrap it with a thin strip of green, securing it with glue at the end.

9. Connect the cannon to the tank.

10. Glue the tank on a white base, and inside you can sign or stick a congratulation as usual.

Here is what beauty can still be made using this technique:


I just wanted to create with my daughter such wonderful work!!
Master class on making postcards for February 23 for kindergarten and elementary school
Now I offer two more amazing gifts to choose from. The first, unusual and strict, and the second - with a military theme.
Well, are you ready for needlework?! Then let's go!!
- Shirt with a bow

We will need: A4 color cardboard, pastel colored paper, bright colored paper, bow pasta, gouache, thin and thick brushes, glue stick + PVA glue.
Manufacturing process:
1. Take pasta and decorate it with fine brush. Let them dry well.

2. Cut out a 10 x 9 rectangle from colored paper. Fold it in half to make a 5 x 9 rectangle.

3. At one end of the rectangle draw a line 1.5 cm from the edge, and on the other side draw another line 3.5 cm from the fold. You should end up with a small rectangle. Cut it off.


4. Extend the cut by 1 cm. Unfold the sheet and ready lines fold the "collar" of the shirt.

5. Bend the shirt again, draw the sleeves and cut out. Expand the workpiece.


6. Now assemble our product. Take the cardboard and fold it in half, glue colored paper on it. Next, glue on the shirt and bow tie. Glue the remaining pasta as a decoration next to it. Your masterpiece is ready.

By the way, you can also draw buttons and a pocket with a thin brush, for example.
- boat
We will need: colored paper, colored cardboard, a simple pencil, regular and manicure scissors, a ruler, glue - a pencil, compasses or round objects.
Manufacturing process:
1. Take the cardboard, fold it in half. On the front side, use a compass to draw a circle and carefully cut it out.


2. On cardboard Brown draw a boat and cut it out.

3. Now draw waves on white and blue paper, cut it out too.

4. Take the cardboard and cut out a triangle from it. It is desirable that the cardboard be double-sided, if you have a regular one, then cover the non-colored side with colored paper.

5. Stick everything on a cardboard base, but glue the triangle on one side and bend the other. You can complement the composition with clouds or seagulls.

I wonder which postcard you choose?! Write if it's not difficult!!
Video on how to make a postcard for February 23 using scrapbooking technology
Are you familiar with the scrapbooking technique? To be honest, I met her recently. It turns out that this is very amazing and simple technique, and what kind of souvenirs come out of it)) I suggest you see everything with your own eyes, I think you will certainly want to repeat everything.
In fact, there are a lot of varieties of such postcards, hammer in the search and see everything for yourself. If there is no time, then I suggest ideas that I liked.
- Typewriter with a letter

- Star variant

- Numbers and military equipment


- Such a calendar, you can also make it in the form of a magnet

Agree that the products look like a store, it looks very nice.
Funny postcards for Defender of the Fatherland Day with your own hands
Well, in the end small photo a selection for men who are not devoid of a sense of humor. Yes, children need to diversify creativity))
- Fashion shirt or sportsman

- You can use comic characters

- Ideas with photos


- And I really liked this composition, so gentle and romantic. Great idea a gift from his wife for his sailor

I hope I've been helpful and interesting. I wish you all positive, love and miracles!! And be sure to write in the comments if your kids make such gifts ?! Or give the choice to purchased souvenirs?! I still think that it is useful for children to make products themselves and surprise their parents.


