Each of us is surrounded by thousands of people. It would seem that we have learned the proportions and features to the millimeter human body. But here's the paradox draw a person much more difficult than the one you've only ever seen.
Sometimes when you draw someone, you wonder - not a person, but some kind of alien. If you also can’t draw people, as they say, don’t pass by - here you will find a lot of useful and interesting things for yourself.
And the very first thing is this video that will show you how to draw a boy and a girl.
Even ancient artists, when drawing a person, tried to divide his body into equal parts, so that it was easy to correctly recreate the proportions of the figure. After all, knowing the ratio of individual parts of the body with the figure as a whole, you can easily draw a person. At the same time, of course, we must not forget that all people have their own characteristics.
So, drawing a person, as a unit of measurement we take the size of the head.
The height of an adult man or woman is equal to 8 head sizes, the height of a teenager is 7, a student is 6, and an infant is only 4 head sizes.
Proportions of people of different age groups

Before you draw a person, remember a few important nuances:
- hands should end at the middle of the thigh,
- elbows are at waist level,
- knees - strictly in the middle of the leg.
Did you know that the height of a person is equal to the length of the arms extended to the sides, and four head heights fit in the length of the legs?
But what delighted me even more was the size of the human foot. It turns out that its height is equal to the height of the nose, and the length is equal to the length of the forearm.
See how a man and a woman should be correctly drawn in different positions.


And now I will show you how to draw people step by step. I assure you, with a master class from Pustunchik it will be easy and simple.
How to draw a boy
If you need to draw a boy, use the following diagram. And I will tell you how and what parts of the body you need to draw step by step.
1. Draw an oval for the boy's head, then a small neck and a rectangle for the torso.

2. Draw another rectangle from below, divide in half. These are legs. Draw rectangle arms. On the upper large rectangle, make roundings from the neck to the arms - these are the shoulders.

3. Erase extra lines on the shoulders. Draw the neck of the jacket, the seam lines (but not completely) where the sleeves are connected to the main part of the jacket. Draw the fly and folds on the pants in the form of a slingshot. Now draw the boots and hands. For a detailed diagram showing how to draw hands, see on the right.

4. We take up drawing the head. First draw a cross - it will point to the middle of the head and determine the location of the eyes. Two arcs, two dots and one small arc at the bottom of the head are the top of the eyes, the future nose and lips. Ears will be located at the level of the nose and eyes.

5. Draw the eyes, in place of the dots draw small circles - the nostrils. Now move on to the eyebrows and hair.

6. Erase the extra lines and mark the folds on the clothes with light pencil movements. Add details. Congratulations! The drawing of the boy is ready.
How to draw a baby
This drawing is perfect for some comics, and you can also draw it for kindergarten or for a student lower grades. The funny toddler will also be a godsend for the school exhibition of young artists.
1. Draw an oval, mark the eyes with dots, show the baby's nose and mouth with two bent arcs.

2. Mark the corners of the lips, draw the ears and hair.

3. Draw a trapezoid at the bottom of the head - the body of the boy. Do not forget to separate the blouse from the pants with a straight horizontal line, and show the pants with a vertical line.

4. Draw the sleeves.

5. Now draw the child's arms and legs.

6. Separate the fingers with lines. That's all! Little mischievous is ready for pranks :)

Draw girls
Three beauties on one sheet at once. Would you like to have such fashionistas in your album? Then rather draw these charms!
1. Sketch your girlfriends.

2. Think of their hairstyles and draw clothes.

3. Add details: belt, lace sleeves, leggings, handbags and so on.

4. Draw the faces of the girls, make folds on the clothes, highlight the accessories. Add uniqueness to the shoes of each of your friends.

Great job!
Details on how to draw lips, nose, eyes of a girl, you will learn from the next video. I warn you, the master class is not for beginners, so be careful not to miss important details.
We draw the girl's face. Part 1
We draw the girl's face. Part 2
How to draw a guy
Every girl at least once in her life tried to draw the guy of her dreams. It is different for everyone, of course. But for now let's just draw a guy with glasses and a cool T-shirt. Go?
1. Make a template of a person.

2. Using guide lines draw the head and arms.

3. Draw a hairstyle, nose, lips. Give the guy glasses.

4. Outline the contours of the guy's body. Draw the hands. Add shadows with dashed lines. Mark the neck of the T-shirt.

5. Delete unnecessary lines. Make the contours of the man's body clearer.

Here you go! A macho man with a serious look and cool glasses is ready to win hearts!

People who are fond of drawing are very interested in how to learn how to draw a person. It is not surprising, because drawing people in full height Every artist should be able to draw with a pencil. You can learn art in art school, but if there is no time to visit, it will be possible to achieve the goal at home.
It takes time to create a good drawing of a person. Sometimes even a few wrong strokes spoil finished work resulting in wasted time. If you read the step-by-step instructions and listen to the advice, avoid such a fate.
- Get to know the human figure and study proportions. The scheme of the average physique will help in this, which helps to correctly calculate the ratio of body parts.
- The main unit of measurement is the height of the head. To determine the height of a person, multiply the height of the head by eight. You can do it easier by drawing a vertical axis and dividing it into eight parts.
- The first upper segment of the axis is the head, and the fifth mark determines the location of the inguinal region. As for the location of the knee joints, it is calculated by counting two segments from the bottom point.
- Women have narrower shoulders than men. The width of the male shoulders in the figure should correspond to two head heights, in the case of women, multiply the figure by 1.5.
- The quality of the finished drawing depends on how correctly determine the length of the person's arms. The distance from the chin to the nails is slightly less than four measuring units. Change the proportions if necessary. It all depends on the physique of the person you are drawing.
- The outlines of the face are built on a similar principle. Using the standard ratios of the parts of the face as a basis, you can change them, guided by reality.
- Draw a rectangle on a piece of paper and divide it in half using vertical and horizontal lines. Correct location the eye is determined by the horizontal. The distance between the eyes corresponds to the width of the wings of the nose.
- Learn the basics of human anatomy gradually. So that the drawn person has perfect figure, study the location of muscles and joints. Be sure to take into account the bends of the legs and arms, the movement of the muscles that changes the facial expression.
- Correctly constructed outlines of the figure are supplemented with clothes. If the arm is bent, lay fabric folds in the area of the elbow joint.
- Consider the stiffness of the fabric. Soft fabric follows the contours of the body, while dense material creates a relief. Therefore, fashionable suits are drawn differently than T-shirts.
If you want to draw a person beautiful, choose the right angle of the drawing. Don't draw big people, looking at them from below, and slender models are not recommended to be placed against the background of voluminous objects.
Videos training
Be careful with lighting. The shadow should not hide the figure or face, otherwise ensure the picture comic effect. Feet in the shadows give the impression that the human body is floating in the air.
We draw a person in stages with a pencil
Continuing the topic of the article, I will tell you the technique of drawing a person with a pencil. Hardest to draw human face. It is not surprising that only a real artist who has been trained for several years can paint a portrait. Reading the material will not make you a professional. But the article will help to master the basics of drawing and learn the intricacies of art.
Some draw people dotted lines, and then circled. I recommend drawing lines in one motion. Mistakes are inevitable, but don't be afraid. If you intend to depict a moving person, imagine a future image. This will help to correctly draw the contours and lines of the model onto the paper.
I propose step by step technique drawing a human figure in full growth. Many beginners in the drawing process, due to lack of experience, distort the proportions of the body. The result is a large head or short arms. After reading the instructions, you will get good drawings.
- Draw a quadrilateral whose aspect ratio is 3 to 4 . Draw a straight line through the center of the figure, and draw a line of shoulders from above. Since the model will be dressed in summer clothes, add an outline of the clothes at the bottom of the triangle.
- Circles mark parts of the body: knees, shoulders, head and neck . First draw the outlines of the head, then the oval of the shoulders and circles of the knees. It is not necessary that geometric shapes have an exact shape.
- Start drawing the outline . At first glance it will seem that it is difficult. If you look closely, you will realize that you will need two circles for the feet and elbow joints, and two winding lines on each side of the torso.
- Using the existing circles for the elbows and shoulders, draw the arms. . If necessary, depict an object in the hands of a person. Draw the legs in the same way. During this step, make sure that the proportions of the limbs are correct, as correcting errors is problematic.
- To make the figure come to life, remove the extra outlines using the eraser . If during the process you touch an important line, restore it. This step is simple and interesting. It remains to finish a few details, including the bottom line of the trousers, sleeves and the neck of the T-shirt.
- Draw the clothes and detail the head and face . When depicting items of clothing, add folds and shadows. As a result, the finished drawing will turn out realistic.
With the help of step-by-step instructions, learn how to draw a person with a pencil. Watch the training videos below that will help you hone your skills, and your talent and developed fantasy create an artistic masterpiece.
Video instruction
I will add that the quality of the image depends on the correct marking of parts of the human body. Detailing the drawing and adding new elements will not cause difficulties.
How to teach a child to draw a person

Drawing people is not easy, but interesting activity. In order for a child to have a desire to draw a person, parents need to invent a story and offer to portray the main character. This will interest the baby and he will not pay attention to the complexity of the task.
If a child has difficulty choosing a model, he will not refuse to portray a friend. The main thing is that parents come up with a character beautiful story. For example, a friend Tanya went to the village to her grandmother and harvested with her. As a sign of gratitude, the grandmother gave her granddaughter a puppy named Barsik. The girl and the pet had adventures.
- Draw a straight line down the middle . The child may have difficulty, so let him use a ruler. Divide the line into two parts. The result is a belt point.
- Draw a head at the top end of the line. . How correctly the child draws it depends on whether you can convey that the form human head looks like an inverted egg. Next, using ovals, outline the pelvis and torso.
- Divide the bottom of the line in half . Opposite the point are the knees. Using a ruler, outline the upper and lower limbs. If necessary, depict the arms in a bent form.
- Sketch the outline of the dress or skirt . As part of the stage, detail the face of the girl and draw the hair. It is important that the eyes and ears are at the same level. Two horizontal lines will help.
- Draw the legs and feet, respecting the proportions . After drawing the details, take care of the landscape. Draw beds and a basket with a crop harvested with a grandmother.
- Color the drawing . The final stage involves coloring the drawing with colored pencils. Start by tracing your drawing with black ink. Hands, neck and face paint with a light pink pencil. Suitable for lips and cheeks dark shade Pink colour.
- For clothing and scenery, use natural colors . Make the dress blue or blue, the grass green, and the flowers pink. If there is a dog in the picture, make it gray, black or brown.
You have the opportunity to introduce your child to the art of drawing. Perhaps in the future, drawing will become a child's hobby, which will develop into professional activity.
Video tips
In conclusion, I will add that drawing people helps to earn money. Don't think it's unrealistic. I will prove this fact by sharing ways to implement the idea.
Many magazines, textbooks, and books use pictures to help the reader imagine the story. If you can draw people, become an illustrator.
Good money brings drawing portraits. This creative activity practice at home or in public places, including city streets, parks and squares.
Olga Nagornyuk
How to draw a person step by step - for beginners
The image of a person is considered the most complex view drawing. Artists have been learning for years to convey the feelings and moods of people using facial expressions and eye expressions. But we do not set ourselves such goals. We just need to learn how to draw a person without disturbing the proportions of the body and making it as similar to the original as possible.
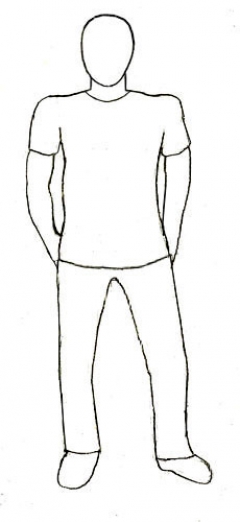
How to draw a person: a man in full growth
When drawing a human figure, it is important to observe correct proportions.
1. We start drawing with a rectangle: we draw a quadrilateral with sides whose ratio is 3:4. Draw a line through its center vertical line, whose length is slightly greater than the height of the quadrilateral, multiplied by two. The arc on top is the contour of the shoulders, the lower curve will become the contour of the clothes.
2. We apply the markup of body parts. Draw an oval at the top - it will act as the outline of the head. Two ovals in the upper corners of the rectangle will outline the position of the shoulders, and the lower ones - the knees. The correct shape of the oval should be observed only in relation to the head. The rest are shown schematically.

3. The next step is drawing the outlines of the body. First, at the level of the middle of the body, draw two circles not too correct form, marking the place of the elbow bends, and then using the same circles, apply the location of the feet. Then, with smooth lines, connect the top of the body with the line of the pelvis and extend it to the circles located in the area of the knees.

4. Let's start drawing the limbs. With the help of smooth lines, draw the arms and legs, guided by the image in the picture. Please note: the feet are turned in different sides.

5. We draw sleeves of a t-shirt, the lower line of trousers and a mouth. After that, gently erase the extra strokes with an eraser and draw the main lines of the drawing.
It is done!
How to draw a person: ballerina
Drawing a slender and graceful ballerina requires some skill, but we will try to describe this process in detail, simplifying your task.
1. Start drawing a dancer with a pack. The oval, slightly pointed on the left and raised on the right, will then become part of the concert dress. Add two adjoining straight lines to it from below, denoting the legs, and at the top - a curved line - the girl's body, an oval - the head and a smooth line at an angle - the arms.

2. Apply the contours of the body. We start with the neck and shoulders, then draw the outlines of the back and waist, then with light strokes we indicate the shape of the legs. The ballerina should be slim, so don't overdo it when drawing her body.

3. Keeping the image of a ballerina in front of your eyes, draw the contours of the legs and arms. Use smooth lines and carefully monitor the size: the dancer should turn out to be thin. Drawing feet will not cause difficulties: the girl is on pointe shoes, which are quite easy to depict.

4. Draw the hands, mark the locations of the eyes, nose and mouth with short strokes and give a more believable shape to the skirt. After that, erase unnecessary lines, leaving the outline of the figure.

5. The most difficult stage is the drawing of facial features. The picture shows one of the most simple ways, allowing you to depict the eyes, nose and lips of a girl. Drawing a dress and hair will not be difficult. Using just two curved lines, you can outline a line of slicked back hair and a bun.

6. Colorize the drawing and apply chiaroscuro. We used a blue pencil, you can use a simple one. The main thing is to scrupulously repeat the strokes applied on our photo.

We hope everything worked out for you.
How to draw a person: girl
1. Let's start drawing the image of the girl with a circle denoting the head and a smaller oval located vertically. Later, he will turn into the torso of a little lady.

2. Apply the location of the chin and eyes with slightly rounded lines. Lines-sticks designate the arms and legs of the girl.

3. At this stage, we draw the contours of the eyes: the upper part of the ovals denoting them should touch the first horizontal line, the lower part should lie on the bottom.

4. Next in line is hair. We depict the bangs with the help of arcuate lines, and draw the hair from behind with cloves, choose the length to the shoulders.

5. We dress the baby in a dress, the role of which is played by a trapezoid, draw a mouth using a small arc, and brushes with feet, the role of which in our case will be played by small ovals.


7. It's time to draw the details. Pupils, eyelashes, eyebrows, ears - depict them, following our drawing. Little fingers on the hands and shoes on the feet complete the picture.

8. Erase the extra strokes, and point the necessary ones well, and at the same time draw additional details: buttons on the dress, a shadow on the cheeks and a small neat nose.

9. Now it remains to color the figure.

Take it, tell your friends!
Read also on our website:
show more
In this article, Learn It offers to learn how to draw a person in full length with a pencil in stages. The most difficult thing in the image of a person is his face. A real portrait can only be made by real artists who have been studying this art for many years. This drawing lesson is intended for beginners, which is why the facial features of a person are drawn schematically, without drawing details.
Let's give you some tips first. Some people have a habit of drawing broken lines and then tracing them. Such people should try to draw lines in one motion and should not be afraid that they will make a mistake. When you depict a person on paper, especially if he is in motion, then you must fully see the future image, the contours of all lines. And yet, the most important thing is not the accuracy of the lines and proportions of the picture, but the image of the most important, the main thing in the image. It is necessary to convey the character of a person, his mood, the expression of his eyes and other features that characterize him.
You can draw a person in stages with a pencil in different ways
 Now let's find out a couple of basic steps. Often when you draw a person, you can see the distortion of his figure. The legs and arms are drawn long or too short, the body is too big, etc. To avoid this, it is necessary to break the whole drawing into sections.
The whole person can be divided into 7 parts. But we do not describe this technique in this article, we will use a different method, but you can try to make such markup so that the person comes out proportional.
Initial contours

So, let's start by drawing a quadrilateral with side proportions three to four.
Draw a straight line in the center, slightly longer than the longitudinal side of the rectangle. From above draw an oval line for the shoulders. And in the lower part of the quadrangle is the outline of the clothes.

We continue to portray a person. We make markings using the circles of the knees, collarbone, shoulders, neck and head. First draw an oval for the head, then an oval for the shoulders, and then circles for the knees.
Even a child can do this, do not forget that it is not necessary to follow the exact geometric shapes circles, except for the head. The neck and head should be drawn as accurately as possible.
You can see that most of the lines are drawn rather carelessly. We deliberately did not try to draw them carefully, because we will remove these contours in the future, and they serve only as temporary guidelines.
We begin to draw the outline of the human figure

At first, you will not understand what is required of you. But you need to take a closer look, you only need to draw two circles for the feet and elbows and 2 more lines on the sides of the torso, and then connect them to the contours of the knees.
Depicting hands and feet

On the circles for the elbows and shoulders, which we already have, draw the arms. The hands in this photo are not fully shown, but you can finish the palms. Or you want to have some object in your hands, this is your personal choice. Now let's move on to the legs, the only thing worth paying attention to is the feet. Socks are deployed in different directions. At this stage, it is necessary to check the proportions of the torso, legs and arms. If you do not do this, then it will be difficult to correct errors in the following steps.
We remove unnecessary contours and the person “comes to life”

To begin with, with an eraser, carefully remove all unnecessary lines, if you touched some line you need, immediately restore it. This step is the simplest and most interesting, since nothing needs to be drawn, and the person seems to “come to life”. It remains to draw 3 simple details. This is the bottom line of the trousers, the line of the sleeves of the T-shirt and the neckline.
We complete the drawing of a person. Face and clothes
Now draw the clothes along the contours and it is important to depict the head and face as detailed as possible. When drawing clothes, do not forget that for greater realism, folds should be visible on it. Be sure to create shadows on the clothes, in the direction of the light, if the light falls on the right, then you need to draw a shadow on the left.
This drawing of a person is approximate and is designed more to study its proportions. In this process, it is important to make a preliminary marking of the position of the legs, arms, shoulders and head. And then step by step add the rest of the details. Learn It hopes this article has helped you.
Video lessons
It will not be difficult for many novice artists to draw flowers, trees, houses. But when it comes time to depict people on paper, they get lost. Because they don't know how to draw a human body correctly. If you don't succeed either, don't even think about giving up. Thanks to several techniques, you can quickly learn this.
They are quite simple. At the same time these helpful tips will help you to complete the necessary task:
- Even if you don't plan to turn your sketches into color illustrations, still use a pencil at the very beginning. He will allow you to correct the drawing at any time.
- Don't push hard. Do all movements only with light strokes. If you make a mistake or want to redraw an element of the picture, you do not have to suffer by erasing thick lines with an elastic band.
- Practice every day. Don't be discouraged if you don't know how to draw a body. Believe in yourself!
- Watch your posture. You cannot give all your attention to the drawing by sitting incorrectly.
- If you're serious about art, study other people's techniques, go to art galleries, buy themed books. Experienced Artists well familiar with how to draw the human body.
- If you are copying from an already finished drawing, do not be afraid to make mistakes. Remember that you don't have to portray the exact same character. It will be much better if it turns out differently.
body proportions
At all times, special attention was paid to the relationship between the figures. Before drawing the body, you need to know its correct proportions. The height of the figure of an adult is 8 of his heads, of a teenager - 7. This part of the student's body can be positioned 5 times in length, the baby - 4. The size of the arms should reach the middle of the thigh, while the elbows should be on the same level with the waist, and the knees should be exactly in the middle of the leg. The length of the legs is 4 heads, and the head, together with the body, is half the height of the entire figure. The fingers of the lowered hand are located in the region of the middle of the thigh. The height of the foot is the size of the nose. And its length is the same as that of the forearm. The height of the female head is equal to the distance between the prominent points of the chest, the male - half the width of the shoulders.

Differences between male and female parameters
The average height of a man is about 170 cm, women - 160. The arms of a strong half of humanity are long and muscular, when the hands of girls are a little shorter. But the legs of women are longer (in relation to the body). Men have a strong physique, broad shoulders and a short torso. female body longer, shoulders often shorter than hips. Men have a thick neck, girls - on the contrary, thin. As for the muscles, in men it is strongly marked. At the same time, the contours of the body are sharp. At the same time, in women, the outlines are soft, the shapes are round, the fat layer is larger. male foot- massive, large, female - much smaller in size.

We draw a man
The following master class shows how to draw a man's body:
- Start at the top. Draw a small circle, draw a curved line from below. You should get the shape of an egg, only turned upside down.
- Draw the neck by sketching two straight lines. As a guide, take the distance from ear to ear.
- Draw a long (2-3 head width) horizontal line so that it is perpendicular to the neck. It determines the location of the collarbones.
- At the end of the two lines, draw small circles of the same size - these are the shoulders. Sketch two ovals a little lower, slightly longer than the height of the head - these are the biceps.
- In the place where the biceps begin, outline the body of the body. Geometrically, it will look like this: an inverted trapezoid is the chest, vertical straight lines are the torso, an inverted triangle is the pelvis. Place above last geometric figure mark with a dot - there will be a navel.
- Draw two circles on both sides of the triangle ( most of should be outside), and immediately below them are long ovals. They will be hips.
- Below are two small ovals for the knees. Let it intertwine a little with the hips. And even lower - for the shins.
- For the legs, draw two triangles, at the very bottom.
- Try to draw show jumping of the body, add details, come up with clothes for your character.

We draw a woman
Now that you know the basics and have learned how to work with the male silhouette, you can learn how to draw the female body:
- Start with the most important thing - draw a vertical line. To represent the torso, place an inverted triangle at the top of the torso.
- Inside the resulting triangle, draw another one looking up. Draw two circles at the corners of the inner figure to represent the breasts. If you did everything right, the first one should be on the right and the other on the left of the line drawn earlier.
- Just below the main triangle, draw a circle of equal size. Its upper part should go slightly beyond the triangle. This will be the pelvis.
- To draw the hips and legs, draw two curved lines from the top of the circle. And below - two more, but shorter. Some should look like brackets.
- Add lines and details, dress up the girl.
Done, now you know how to draw a girl's body.

Summing up
Using the techniques presented above, you can draw almost any person - an adult man and woman, a teenager, a child. The main thing to do is follow the instructions, learn how to work according to the scheme. After a while, you yourself, without anyone's help, will draw beautiful and proportionately correct characters on paper. Don't get discouraged if something doesn't work out for you. You can try again at any time.
Remember one more thing important rule: the artist's work does not end when he understands how to draw the body. It is also necessary to think over the hairstyle of the character, his style, give him emotions, portray the character. In other words, with the help of a pencil, “breathe” life into it. Learn the art of drawing, improve your skills - and you will definitely succeed!


