The human body has many parts. As we have already discussed with you here on the site, it is not so easy to draw the body and its individual parts correctly. To do this, you need to learn and know the basics of anatomy and physiology. Very often, children draw parts of the body and the figures themselves in a very simplified way, one might say, in an amateurish way. We want to teach you how to draw elements here. human body correct, especially from an anatomical point of view. Arm yourself with a pencil and eraser, take an album and start the lesson. Following our tips, you will gradually learn the basics of this wisdom.
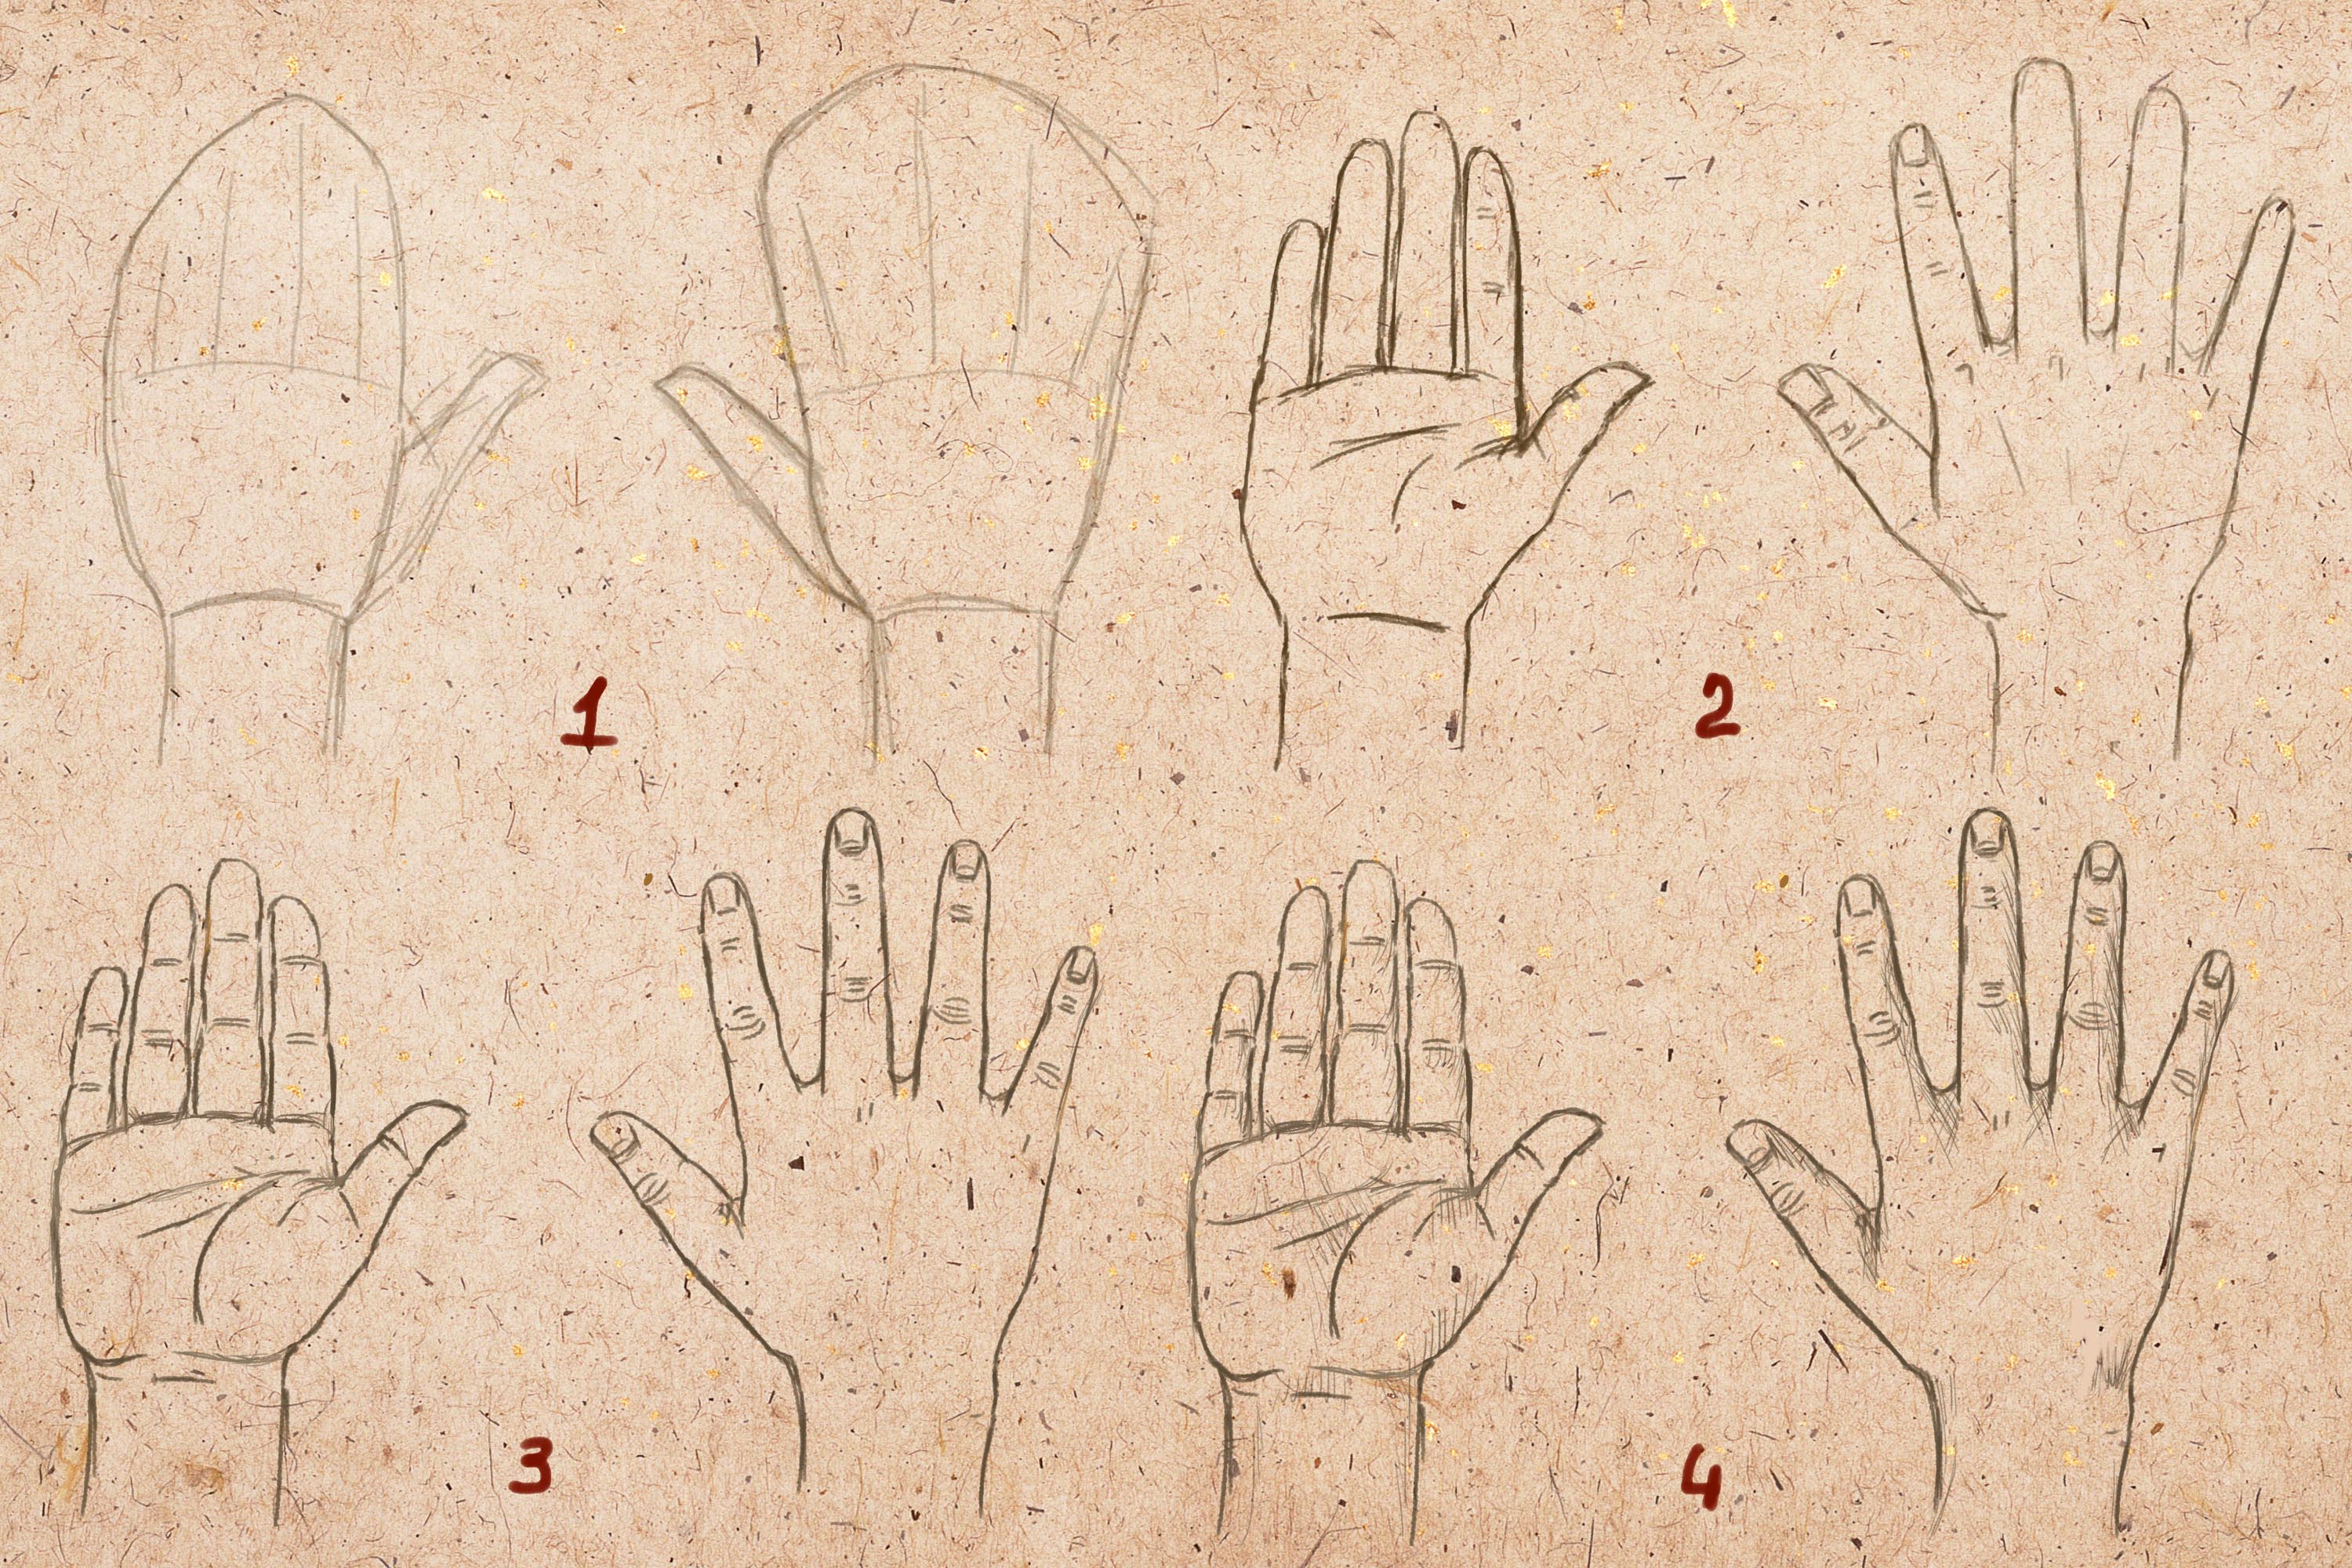
Stage 1. Draw the caracas lines of the human hand. First we will teach you how to draw a human hand from the elbow to the fingertips. We build a straight line .. On the upper part we mark a point from which we draw five segments, from which, in turn, we draw five more segments connected at an angle to the first ones. This is the basis of the future hand. Then, along the main straight line, we begin to outline the line of the elbow and the forearm of the arm (this is the part of the arm from the hand to the elbow). The forearm widens from the elbow bend, then becomes thinner and passes into the hand (expanded part). After that, we begin to draw the fingers. Little finger first, then ring finger. We draw them along those lines from point 1 of the same stage.

Stage 2. Now we draw the middle and index fingers of the brush. Along the auxiliary lines we give contours to the phalanges of the fingers. The hand is slightly bent, as if a person wants to take or hold something. Then we will finish the last, thumb. And further. On the fingers and palms, we will show bumps on the skin, depressions and tubercles, skin folds.


Stage 4. Now let's try to draw a separate human hand. We build additional initial wireframe lines like this. Select a point on a sheet of paper. We remove three features from it in different sides. At the end of the third line we put a point, and from it we draw segments connected to each other. It is like a skeleton of future fingers. Outlining the hand smooth lines around these straight lines to the digital zone. The brush is bent down. Then. Let's draw the thumb. First, we will show its thickened part, then the phalanges of the finger itself and the line of connection with the index finger. Then draw the index finger and middle finger hands outlining skeletal lines starting point this drawing.

Stage 5. Finishing ring finger and little finger. They are barely visible because of the front toes. We show the folds on the skin, tubercles, bulges and bumps on the brush. Then we delete all the sketch lines and leave only the necessary ones. We colorize the hand, shading some areas (the play of light and shadows). We hope you learned this lesson well and you managed to draw the hands of a person.

This is enough difficult lesson, so it may take a lot of effort for you to repeat it. If the first time you didn’t manage to draw hands, don’t despair and try again. Try your best to complete this lesson. If, however, it still doesn’t work out, you can try to complete the lesson “”. But I believe that you will succeed.
What you need
In order to draw hands, we may need:
- Paper. It is better to take medium-grained special paper: it will be much more pleasant for novice artists to draw on this particular paper.
- Sharpened pencils. I advise you to take several degrees of hardness, each must be used for different purposes.
- Eraser.
- Stick for rubbing hatching. You can use plain paper rolled into a cone. She will rub the shading, turning it into a monotonous color.
- A little patience.
- Good mood.
Step by step lesson
Different parts of the body and human organs should be drawn with a certain degree of realism. This is required academic drawing. Also, he strongly recommends drawing hands from nature or, in extreme cases, from a photograph. This is the only way to achieve high realism and elaboration.
By the way, in addition to this lesson, I advise you to turn your attention to the lesson "". It will help improve your mastery or just give you a little pleasure.
All complex drawings must be created with forward thinking and vision. The subject should not only be a form on a sheet. You must draw it in volume, that is, creating from simple geometric bodies as if they are on top of each other: here is a ball on a cube, and here are two balls side by side. Of these primitive forms and consists of everything living and non-living on earth.
Tip: sketch with as light strokes as possible. The thicker the strokes of the sketch, the more difficult it will be to erase them later.
The first step, or rather zero, is always to mark a sheet of paper. This will give you an idea of where exactly the drawing will be. If you place the drawing on half of the sheet, you can use the other half for another drawing. Here is an example of a sheet layout in the center:
Well-drawn hands always ennoble the whole illustration as a whole. Some artists specifically include hands in their subjects.

Anatomy
Most important fact- the fact that the hands are concave on the side of the palm and convex on the back. The bulges are so arranged around the circumference of the palm that you can even hold liquid in it. hand served primitive man cup, and by cupping his two palms together, he was able to eat food that he could not hold with his fingers alone. The large muscle of the thumb is one of the most important in the hand. This muscle, in interaction with the muscles of other fingers, provides a grip so strong that it allows you to keep your own weight in a suspended state. This powerful muscle can hold a club, a bow, a spear. We can say that the existence of animals depends on the muscles of their jaws, and the existence of man depends on his hands.

It is worth paying attention to the powerful tendon attached to the base of the hand and how the tendons of the fingers are grouped on the back of the hand. These tendons can control both all fingers together, and each individually. The muscles that pull these tendons are located on the forearm. Luckily for the artist, the tendons are mostly hidden from view. In children and young people, the tendons on the back of the hand are not visible, but become more visible with age.

The bones and tendons on the back of the hand are close to the surface, but those around the palm and inside the fingers are hidden from. There is a pad at the base of each finger. It protects the bones lying inside and creates a grip with the object being held.
Proportions of the hand
Next important thing- This is a curved arrangement of fingertips and knuckles. Two fingers lie on both sides of a line drawn through the middle of the palm. The tendon of the middle finger bisects the back of the hand. Also important is the fact that the thumb moves at right angles to the movement of the other fingers. The knuckles are located slightly in front of the folds below them on the inside of the palm. Pay attention to the curves along which the knuckles are located and that the curve gets steeper the closer the knuckles are to the fingertips.

The middle finger is the key finger that determines the length of the palm. The length of this finger to the joint is slightly more than half the length of the palm. The width of the palm is slightly more than half of its length on the inside. The index finger is almost on the same level with the base of the nail of the middle finger. The ring finger is almost the same length as the index finger. The tip of the little finger is almost on the same level with the last joint of the ring finger.

The figure shows how to correctly determine the position of the palm cavity. Also notice the curve of the back of the hand. Hands will not look natural, capable of grasping until the artist has mastered these details. The hands in the figure are depicted as if they were holding some kind of object. The loud sound of applause is produced by a sharp compression of air between the hollows of the two palms. Poorly drawn hands will look incapable of applauding.


Women's hands
Women's hands differ from men's mainly in that they have smaller bones, less pronounced muscles and a large roundness of the planes. If the middle finger is made at least half the length of the palm, the hand will be more graceful and feminine. Long fingers, oval in shape, add charm.


Man's hands


babies hands

Children's hands are on their own good exercise in drawing. The main difference from adult hands is that the palm is much thicker compared to small fingers. The muscles of the thumb and the base of the palm are very voluminous, even small children can support their own weight. The knuckles on the back of the hand are hidden by the flesh and visible through the dimples. The base of the palm is completely surrounded by folds; it is much thicker than the pads under the fingers.

Hands of children and teenagers
The proportions are basically the same. Aged elementary school the difference between the hand and the hand is small, but there are big changes in youth. The boy's arm is larger and stronger, showing the development of bones and muscles. Girls' bones remain smaller, so they never develop as big knuckles as boys. The base of the palms also develops more in boys, in girls it is much softer and smoother. In boys, the nails, as well as the fingers, are slightly wider.
If you do not take into account the face of a person, then most of all the emotions of a person are conveyed by the position of his hands. The hands and fingers are very plastic, and perfectly display emotional condition person. In this lesson we will draw a human hand with a pencil in stages, from simple to complex.
If you are learning how to draw a person, a portrait or a figure correctly, you definitely need to know how to draw a hand, correctly and naturally, and this requires some knowledge and a little practice.
Proportions
In order to learn how to draw hands, first of all, you need to learn proportions and be able to apply your anatomical knowledge in practice. This is not as difficult as it might seem at first glance. Remembering just a few simple rules you will increase your drawing skills several times, and your hand drawings, miraculously, will become plausible and natural.
General ratios
An interesting fact is that the hand is a bit like a shoulder blade, which consists of two parts of the metacarpus and fingers.
The length of the fingers is equal to the length of the pastern.
This ratio must be observed. The drawing of a hand can be started from a schematic designation of its shape, and a line to show the line separating the brush into two equal parts.
How to draw beautiful eyes
The length of the entire brush can be quite different. There are people with short and long fingers and, accordingly, with a square or elongated brush.
Fingers
Movable and flexible fingers are made up of joints. The bones of the metacarpus are the largest and longest, the joints of the fingers are attached to them. Each subsequent phalanx is smaller and thinner than the previous one. 
The hands of our hands are arranged according to the principle of the golden section, because women's hands so attract the views of surrounding men. The proportions of the phalanges are in the ratio of 2/3 of the length of the previous phalanx.
The picture below shows the first phalanx in red, the second in orange, and the third in yellow. 
All fingers except the thumb consist of four joints: three phalanges and one joint in the metacarpus. Thumb set aside, slightly turned in relation to the rest of the fingers and consists of three joints. Its length usually reaches the middle of the first phalanx index finger.
How to draw glass: how to make a glass vase

Length little finger almost reaches the bend of the last phalanx of the ring finger. This is shown in the illustration above.
Directions
If you carefully observe the hands different people, there will be another common feature, which must also be taken into account in your sketches. If we outline the brush on top with one line, we get small semicircle, the top of which is the middle finger.
Pay attention to the inside and outside of the palm. If we draw a conditional line at the base of the fingers, we will also see a small arc that goes from the index finger and goes down to the little finger.
In the illustration below, this is indicated by red arrows. You can draw a hand, starting from the mitten, which is shown in the corner brown, immediately outlining all directions.

The pads and folds on the inside of the palm also have one common direction, they seem to descend from index finger to little finger.
Fist
Some more information about the directions that will help you more quickly and correctly depict the brush. Let's say you need to depict a brush clenched into a fist. Evenly bent fingers again form a kind of arc, with general direction"down to pinky".
Draw a fish

Pay attention to the upper part of the illustration - a small hand drawn in brown. Here is a diagram showing how the the width of the fingers in each subsequent phalanx, keep this in mind and do not forget to show in your work. Compare the lengths of the red, orange and green segments.
A fold forms on the outer side of the hand clenched into a fist, under the little finger, it is underlined by a small green arc in the illustration above. By designating it, you will be able to create more realistic image hands holding something or gathered into a fist, etc.
Important Details
The picture below shows how the skeleton of the hand looks like. The joints at the junction are slightly wider and thicker. We need to understand this in order to know how to draw a hand realistically. This is especially true for the hands of the elderly and thin people. In place of the bends, the finger will be slightly thicker, along the length of the phalanx - a little thinner. 
Pay attention to how to draw a curved hand in profile. Look at the junction of the metacarpus joint and the first phalanx of the finger. In the picture above, the red line shows where the first phalanx is attached to the metacarpus joints. This is the beginning of the finger, it can be identified by the joint protruding upward - the knuckle. The green line indicates the place where there are membranes between, they are often mistaken for the beginning of the first phalanx.
Human balance in motion
If we look at the hand in profile, we can see that outer side quite flat, only the knuckles protrude. The inner one, on the contrary, is soft, there is a protruding pad under each phalanx. Under the first phalanx there are two “pads”, one under the joint is especially large and stands out well for everyone.
We draw a hand in stages
Before drawing the hand, decide on the position of the forearm and wrist. To start, let's take the simplest example, use your brush as a nature, and do not redraw the picture below.
How to draw a blooming iris
In general, drawing hands is a skill that needs to be constantly developed and improved. The hands are very plastic and can acquire hundreds of different positions and angles.
Difficult angles
Interesting angles in which the fingers are in different provisions more difficult to portray. There are several ways to help avoid mistakes.
One of the most effective and most commonly used ways of depicting a hand from a non-standard perspective is to indicate the position of each finger: 
Sometimes the line does not cope with the task and you have to use auxiliary shapes, cylinders or parallelepipeds to indicate the position of the phalanges:


How to draw hands with a pencil?
Hands are a personal and unique part of the body. Often they can tell about a person's life with their shape and size. Long years people study their lines and structure, try to read the future along the lines. Today we will learn draw hands with a simple pencil
by using step by step lesson. We will pay special attention to their construction and the imposition of shadows, so that the drawing comes out the most realistic.
Tools and materials:
- White sheet of paper;
- Eraser;
- Solid simple pencil;
- Two soft simple pencils.
Stages of work:
Photo 1. The figure will show two hands. One lies on top of the other. Let's start with the hand that will be on top. To build we use hard pencil. Let's denote the shape of the first hand with simple lines:

Photo 2. Place the second hand on the bottom left. It will be turned sideways. We are not in a hurry to draw fingers. Just outline the wrist and hand:

Photo 3. On the left hand, draw the fingers and folds on the bends. We do not stylishly press on the pencil, the pressure should be weak at the first stage. Otherwise, then the contours will not naturally stand out. The fingers are slightly unevenly spaced so that they peek out from behind each other. The little finger has the most folds, because it is the most bent:

Photo 4. Now let's move on to the right hand. She is on the top left. Add fingers and two parallel lines at the level of bones, at the level of bends. This will make it easier to navigate when building:


Photo 6. We continue to hatch gradually adding more volume. Let's draw a little contour and work it out right hand. The little finger and ring finger are on a bend, so we add more shadow on them than on the rest:

Photo 7. Let's add folds and a contour on the bends. Let's draw the details of the upper hand, in parallel we make the volume on the lower one:

Photo 8. Let's make more shadow, but try not to darken it. Strokes are applied gradually. This trick helps to make the hands realistic:

Photo 9. Let's add more contrast. We continue to add a shadow:

Photo 10. Let's refine the contour again, it will highlight the foreground. The rest of the places are left untouched.
People who try to draw human hands for the first time face a number of difficulties. How to understand the shape of the hands? How to learn patterns in their structure? Plastic anatomy for artists helps to understand these issues. In this article, I have made a series of anatomical drawings, sketches, and diagrams to help beginners understand the basics and pay attention to key aspects. I have tried to make this material as simple and to the point as possible. I do not exclude that somewhere I could make small inaccuracies, but the essence of this does not change.
1. Main titles
The arms are made up of three main parts:
- shoulder;
- forearm;
- brush.
The forearm is made up of two bones:
- ulna (thickening at the elbow);
- radius bone (thickening at the wrist).
Main muscles:
- deltoid muscle (raises the entire arm);
- biceps or biceps brachii (flexes the arm at the elbow);
- triceps or triceps muscle of the shoulder (extends the arm at the elbow);
- muscles responsible for the movement of the hand, fingers and rotation of the forearm with the hand (pronation-supination).

The two main muscle groups of the forearm are:
- on the side of the external epicondyle of the humerus is a group of muscles (a), which includes the extensors of the hand and fingers;
- from the side of the internal epicondyle of the humerus there is a group of muscles (b), which includes the flexors of the hand and fingers;
- these two muscle groups clearly visible and distinctly separated by the ulna.

2. Anatomical structure of the hand. Core muscles
The shape of the hand depends on the shape of the bones and muscles. Therefore, in the process of drawing a person, you need to pay attention to the anatomical structure of the hands. It is important to “see” which muscles are located where. For understanding plastic anatomy can help following pictures showing the skeleton and muscles. In each such drawing, I added a diagram in which I highlighted the key, clearly visible muscles with color. These muscles are pronounced, so they should be visible in the drawing of a person. Of course, the muscles of women's hands will be more refined and miniature than men's. In addition, there are full people, and there are thin and "wiry". This means that their muscles will also be different. But the main muscles indicated in the drawings will be visible to one degree or another in each person.


3. Pronation and supination
If you stop and pay attention to how the hand moves, you will notice that it is able to rotate. That is, we can turn our hands palms up, or we can turn our palms down. If up - then this position of the hand is called supination. And if from top to bottom - then pronation. In this case, the radius of the forearm moves around the ulna. For clarity, I made a schematic diagram showing how this happens.

In the process of drawing, you need to constantly compare sizes. This helps to correctly convey the proportions. Hand drawing is no exception. If we talk about the forearm, then in its widest part the abdomens of the muscles are concentrated, and in the narrowest part - the tendons (although there are also some muscles there). Knowing this feature, it will be easier to draw human hands.

5. Shoulder and forearm are angled relative to each other
When a person holds a straight arm, the arm will not be absolutely straight anyway. This is due to the fact that the shoulder and forearm are located at an angle to each other.

6. The connection of the shoulder and forearm is like the connection of chain links.
The chain example is very helpful in understanding the shape of the hands. How is the widest part of the shoulder rotated relative to the widest part of the forearm? This is clearly visible in schematic drawing. If you remember this feature the structure of the hand, then further drawing of the hands will be much easier.

The elbow joint provides a movable connection of the humerus, ulna and radius. The principle of its operation is clearly visible in the schematic drawing. The head of the ulna is like a wrench. The joint of the radius and humerus resembles a ball and a cup, because the radius rotates around the ulna, and also moves up and down, like the ulna, providing flexion of the arm at the elbow.

8. Three visible points in the elbow joint
Some novice artists may ask: “Why do you need to know the structure of the joint if you can’t see it anyway?” The answer is simple - the joint affects the shape of the hand, its movements, and three of its elements are also visible. Internal condyle, external condyle and head of the ulna. If the elbow and internal condyle are visible to a greater or lesser extent in any position of the arm, then the external condyle is noticeable with the arm bent. When the arm is straight, he hides in the hole. These details affect appearance hands, so it is important in the drawing.

9. Drawings of hands in pencil
After studying the anatomical features, you need to be able to apply knowledge in practice. Therefore, in the conclusion of this article, I give as an example pencil drawings in which human hands are depicted in various positions. Notice the shading. It seems to repeat the shape of the muscles of the hand, bending around the surface. This important point V technical side drawing. If we talk about chiaroscuro, then both on the whole arm and on individual muscles, you need to learn to see light, penumbra, shadow - just like in the figure of a jug or geometric shapes. However, in order for the drawing to become confident and professional, you need to practice a lot. It takes time to develop skills in drawing.


