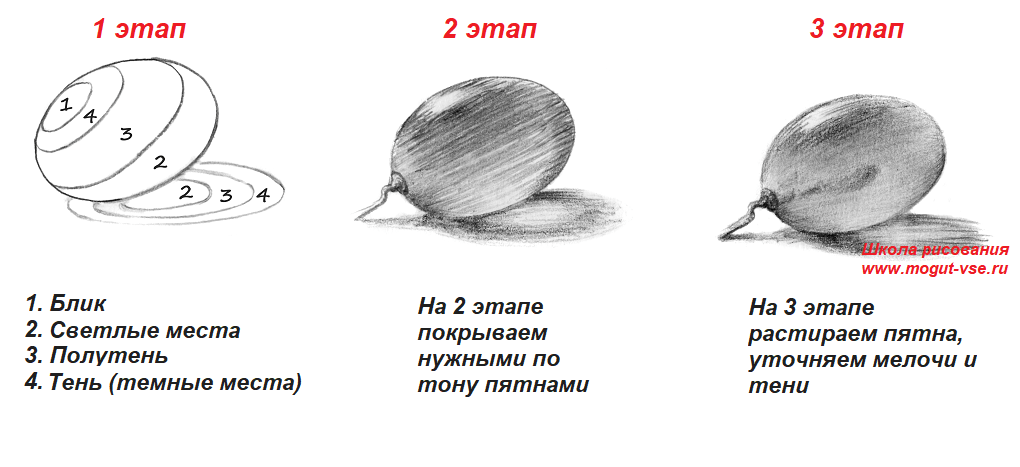
Each of us in childhood made our first sketches. At the drawing lessons, not everyone tried to do the work efficiently, did not think about acquiring skills. At an older age, many feel the need to create something beautiful, but how to learn to draw with a pencil? After all, any drawing techniques are based on the ability to properly hold the stylus, make elementary sketches, and create images. In this article you will find helpful tips for teaching drawing, both in art school and independently.
Pencil Drawing Basics
Experts say that anyone can learn how to learn how to draw correctly with a pencil, regardless of age. Learning to paint always begins with getting to know the materials that a novice artist needs:
- a sheet of white paper, any format;
- eraser, he is a rubber grater;
- simple pencils.
The first steps in drawing begin with pencil sketch. With the help of mean lines are transmitted general outline sketched object, various different poses, moments of motion. Sketch is the most fast way fix on paper your first thoughts and impressions of what you draw. During the execution of the sketch, you do not need to pay attention to unnecessary details, it is recommended to draw it for no more than 10 minutes.
How to learn to draw from scratch
Scientific psychologists have proved that during the process of creating a drawing, both hemispheres of the brain are actively working in a person, imagination is turned on. No wonder there is a technique for calming the nerves called art therapy - this is drawing for adults and children. Many want to be able, but do not know how to learn to draw with a pencil. Learning to draw from scratch is not at all difficult, because the technique of drawing with a pencil is available to children and adults.
Art school
How to teach a child to draw with a pencil? The best solution is to send him to art school. It is designed to teach children school age from 6 to 17 years old. Upon admission to this institution, the level of knowledge and skills in fine arts. Depending on the skills of the child, they are assigned to the appropriate group of students.

Education at the art school is free and is funded by the state. This institution is visited after the main lessons at school three times a week. The course of study is from two to seven years. After graduation, the graduate receives a diploma that opens the door to an artistic future: admission to a college or higher institution by specialty.
Courses
How can adults learn to draw with a pencil? Learn the art of drawing with the help of art courses. They are paid. The course of study ranges from several weeks to four years. During this time, the art studio will teach you the following skills:

- How to draw correctly in phased technique.
- Learn how to use a pencil and a brush. teachers in art studio they teach not only the ability to properly hold tools, but also to choose, to distinguish high-quality from low-grade ones.
- Learn how to draw children with a pencil.
- Learn many drawing techniques.
- Learn how to learn how to draw various objects.
- Learn to draw from life, landscapes, still lifes, people, animals, etc.
- Learn to color - choose and combine colors correctly.
- Learn how to draw a cat with a pencil and other animals.
- You will be told how to learn how to draw portraits.
Lessons online
If you do not have free time, and you do not know how to learn how to draw with a pencil, then use online courses. They are suitable for those who do not have the opportunity to visit a stationary studio. An approximate plan for completing classes of this format for beginner artists:

- The teacher gives basic knowledge in drawing in the form of examples of work, pictures.
- The chosen topic of the drawing lesson is analyzed in detail.
- The teacher at the end of the lesson gives homework, which you complete and mail to your teacher for review.
- At the next lesson, the student, together with the teacher, analyzes the homework in detail, together correcting the mistakes in the drawing, if any.
Online lessons, as an option, in order to learn how to draw professionally, are not the only way out. If you do not have financial and territorial opportunities, but there is a great and irresistible desire to learn how to draw cool, then this can be done independently with the help of:
- textbooks and manuals for drawing;
- tutorials;
- drawing instructions;
- instructional videos.
Step by step drawing technique
A beginner needs to practice drawing by creating sketches. In order for the drawing to be meaningful, the sketch must be created according to the rules that form the plan:
- First, choose an object to draw, such as a teapot or a vase.
- Examine it from all sides, determine the shape, its texture, how shadows fall on this object.
- Determine the composition of the drawing, i.e. how it will be placed on paper, in what format.
- After the contours are drawn, draw the details, apply shadows.
Human
In order to draw a person, you need to decide on the composition. This means that you need to analyze the boundaries of the location from head to toe. When you mentally imagine the figure, begin to compose the parts of the body. You need to draw a person from a sketch of the contours of the head, dropping lower. In the image of a person, it is very important to immediately find the image, you should determine the amount of detail needed for the finished drawing.
Face
In drawing a person, much attention is paid to the face. To draw it correctly, you need to follow the steps:

- Decide how the face will be located on paper. To do this, mentally draw an axis of symmetry, it should pass through the center of the sheet.
- Draw with a pencil on paper the outlines of the face in the form of an oval (shape chicken egg).
- Line up the shape of the face, starting from the chin line, moving to the most convex part - the zygomatic region, then to the narrowest - the temporal zone.
- Align the drawn lines with the help of an eraser, this will noticeably "lighten" the outlines of the oval.
- Divide the resulting oval into three equal parts with light, barely noticeable lines. The very first line, located closer to the chin, marks the tip of the nose.
- We draw the nose, starting from the tip. It always protrudes forward, therefore it has a round, square, or pointed shape. Then we draw the wings of the nose and the bridge of the nose.
- We draw a mouth, starting from the upper bend of the lip, which is located in the middle of the nostrils of the nose.
Eyes
In a portrait of a person, the eyes occupy the most important place, they attract attention to themselves, so they need to be given special attention. To draw them in a phased technique, you must adhere to this plan:

- Before drawing the eyes, it is necessary to designate the eyebrows, which are located at the level of the bridge of the nose. Their form depends on the character that the artist wants to convey in the portrait.
- Having outlined the approximate location of the eyes, we draw their shape in the form of an oval.
- Draw a pupil in the shape of a circle.
- We direct the eyelids and shape the eyelashes.
Anime and Manga
Many young artists start their art training with anime and manga, because portray people in style bright characters Japanese cartoons Much easier than the classic one. The greatest emphasis in such cartoon characters falls on the head, eyes and hair. Let's analyze step-by-step scheme drawing, with which an aspiring artist learns how to learn how to draw anime:

- We start drawing anime with an oval that will be the head.
- Divide the circle in half lengthwise with straight line.
- We divide the head across into three parts with light lines.
- Next, you need to note the location of the eyes, nose and mouth.
- Draw big eyes, starting from the arc upper eyelid. The distance between them should be equal to one eye. great attention in drawing pupils, it is given to applying highlights. Eyebrows for these characters are drawn classic style: two straight arcs.
- Anime and manga noses are drawn small, expressed with a tick.
- The lips are drawn with two small lines.
- Anime and manga hair should be drawn in falling triangles that slightly cover the eyes.
- Anime girls are drawn in bright clothes, mostly in dresses.
3d drawings

Volumetric drawings fascinate with their realism, thanks to the correct construction of the form, the application of shadows and highlights in right places. Learning to depict such pictures should be simple geometric shapes: cylinder, rhombus, square. To recreate the 3D illusion of an object, it is necessary to draw in isometry, when the angles between the coordinate axes are 45 degrees. Auxiliary lines add volume to the picture, which are drawn inside the figure with a light touch, and we draw the contour in bold, more dark color.
portraits

Portraits can be drawn from nature or from photographs. Before drawing up the image, carefully consider what message it will carry. future drawing. Learn to draw a portrait of a person correctly, not only in terms of proportionality and symmetry, but also to display vivid emotions. Another task of drawing an image of a person is the maximum transfer of the similarity of what is being drawn, for its implementation, before starting to draw, consider all the details, highlight those features, “highlights” that you will focus on.
Graffiti on paper

Now graffiti drawing is a fashionable movement that is gaining momentum. Many buildings are full of incomprehensible volumetric inscriptions, but often there are beautiful, professional drawings on the walls. So that your paintings do not disfigure city buildings, and expensive paints do not go to waste, you need to practice on paper for a long time. To get started, try drawing the letters of the alphabet with a simple pencil. To give them volume, use auxiliary lines.
House

The ability to draw buildings is useful not only for children, but also for people of any age. age groups to easily compose pictures, such as a house with a landscape. Buildings are very easy to draw with lines. You should start with a rectangle, adding a triangle, you will get the image of a house, as children draw it. With the help of simple tricks and additional lines, the house becomes voluminous.
Cars

To draw a car with a pencil, you must adhere to step by step plan:
- Mark the outer outlines of the machine by dividing it in half with a line.
- We draw the body with bolder lines.
- Then we draw wheels.
- We display the details of the front of the car: headlights, windshield, bumper.
- We draw windows, doors, mirrors.
Animals

It is much more difficult to draw animals than objects, especially from nature, because they constantly change their position and are in motion. To draw an animal, for example, a horse, you need to decide on its characteristic features: thick mane, elongated muzzle, slender muscular legs. See detailed instructions, . You may not be able to correctly portray your favorite cat or dog on the first try, but after a few trainings you will definitely succeed.
Video tutorials on drawing with a simple pencil for beginners
Video tutorials are a great way to learn how to draw on your own. Below is a selection of instructional videos experienced artists show how to create easy pencil drawings for beginners. After watching the video, you will learn how to draw Japanese cartoon characters - anime girls, learn how to draw flowers. If you like landscapes, then watch the third video to the end, in which the artist draws nature, focusing on trees.
Draw girls
How to draw flowers
Beautiful landscapes
How to draw a human body
there are answers to all these questions. Here are the basics, where to start painting. Follow these tips, do the exercises and you will no longer be afraid clean slate. You'll get necessary knowledge and basic skills. Painting will become closer, clearer and will deliver a lot of pleasure.
Part 1. Preparatory
1. Find an inspiring object to draw
It happens that you have already prepared everything, but you cannot find an object that would inspire you. This should be taken care of in advance. Something interesting must have been lying around in cupboards and drawers. Look for items at sales, consignment and grocery stores. Study the paintings of your favorite artists.
The collection should include objects that are pleasant to look at: this is important for creating a successful work.
Interest in color and form will motivate you in the process of working on the picture. There is a connection between feelings for an object and the ability to reveal one's abilities. You can do more than you think.
For the first picture, a simple one-color symmetrical vessel, such as an ordinary coffee cup, will do. Illustration from the book
2. Get familiar with brushes and paints
Take a soft round and bristle brush in your hands and compare their pile. Squeeze a little on the palette acrylic paint from a tube. Try applying undiluted paint with different brushes to canvas or watercolor paper. strokes should be bright and embossed. Feel the difference in strokes with different brushes. Add some water and apply the strokes again. The average consistency of the paint has the same color intensity as undiluted, but its texture is smoothed out. And do this exercise again with weak solution paints. Note how quickly the paints dry the first, second, and third times.


Illustration from the book
Try to apply paint with different brushes - oval soft, synthetic thin, bristly flat. Try each brush until you're sure you know which brush to use to complete your design.

Illustration from the book
3. Useful palette tricks
The colors in the paintings that we see are usually obtained by mixing: the pure color from the tube is usually too intense. These tricks will make it easier for you to get the right color.
- 1Squeeze out the paint from the tube to the edge of the palette, leaving a space between the colors. Use the center of the palette for blending. Keep batches far apart to prevent unwanted mixing.
- Pick up a pure color on the brush from the edge of the palette, and not from above and not from the middle of the extruded “sausage”.
- Intensive dark colors, such as black (although it is not considered a color scientifically), add with care: even a small amount of it can significantly change the color being mixed.
- You need to mix the colors with each other until the batch becomes completely homogeneous.
- Don't skimp on the paint. Squeeze out as much as you need - usually this is a circle the size of a ruble coin (for white - with a five-ruble coin). Paint consumption is an integral part of the painting process. If you save too much, you will never learn how to use paint.
4. Learn to get neutral colors
In any picture there are neutral colors - "visually gray". Due to their low intensity, they are invisible at first glance, but this is the most useful tool for creating a harmonious color composition. Let's see how to achieve this.
Mix blue and orange in any proportion. Now let's try to change the color temperature due to the proportional ratio of warm and cold colors in the mixture. If the result is more purple, try making it rusty by adding more orange paint and then white for a lighter peach color. If a rusty color is formed in the first step, add blue to make a cool color close to purple, and then white to make a light purple-gray.
Repeat previous steps for another pair additional colors- yellow and purple, red and green.

Pairs of complementary colors are connected by short vertical strokes. The colors of each pair are mixed together to produce two neutral colors, each dominated by one of the parent colors, located to the right of the respective parent. Illustration from the book
5. Primary, secondary and tertiary colors
Draw a circle, then break it into three identical sectors. Paint the upper sector with medium cadmium yellow, the lower right sector with ultramarine blue, and then mix the main red from raspberry naphthol and light cadmium red and paint over the lower left sector with it.
On the color wheel from the primary colors, draw semicircles centered at the intersection of the boundaries of the sector with the outer contour color wheel. Fill in these semicircles with secondary colors, positioned above the "parents": cadmium red light above the border between red and yellow, violet dioxazine above the border between red and blue. Add yellow to the green FC and paint a green semicircle over the border between yellow and blue.
The main color, when mixed with the adjacent secondary, gives the tertiary. Add one triangle on each side of the semicircle, for a total of six. Color each triangle based on the labels.

Primary, secondary and tertiary colors. Illustration from the book
Part 2. Drawing
6. Start with abstractions
Abstraction is a fun and easy way to prepare for a realistic piece. It is important to choose 3-4 colors that you like to feel emotional connection with a picture. Draw a continuous, angular or rounded line over the entire surface of the sheet with a simple pencil. It may overlap several times.
Paint over the shapes in the drawing with the colors and shades, paint consistency and brush that you like. Listen to your inner voice. the main task- do as you like, forgetting about everything else.

Illustration from the book
7. Smears scheme
Beginners are often unsure how to apply strokes. In the figure, the arrows show the direction that will help to achieve a good depth of the depicted space using the example of a mug.


The scheme of strokes and the result. Illustration from the book
8. How to apply shadow
Shadows play a key role in creating a three-dimensional image: they must first be learned to see and write. There are four types of shadows in total:
- Own shadows located on objects. These are areas of dark tone that contrast with the illuminated parts of the depicted form. They usually have a sharp border on the outer contour and a smooth transition on the border with areas of light tone of the object. They own the main role in creating volume.
- Halftone areas- narrow, with a soft contour, located on the border between its own shadow and the illuminated area of the object. These shadows are in the middle tone between contrasting dark and light colors object.
- Falling shadows- the silhouettes of the object, "fallen" or thrown by it on any surface, except for itself. They give the impression that the object is on some surface.
- T eni at the point of contact- the darkest area of the drop shadow lying next to the object. They are responsible for the "stability" and mass of the object. These shadows are also called accent - the darkest area among the dark tones. The accent is the dark counterpart of the highlight, the lightest area of the highlights.
To draw a shadow, put black paint or a paint that is darker than the main color. And in the second step, cover this darkened area with the main color. The black color in the halftone should show through under the new layer of paint, creating a colored shadow. If you want to make the shadow darker, apply more black from the sharp edge of the shadow and blend with the color at the midtone.

Shadow on the example of a cylinder. Illustration from the book
9. How to apply highlights
To create a realistic highlight, use a dry brush with white to mark the lightest area on the subject as many times as necessary for sufficient brightness. In the middle of the highlight, put a small smear of thick paint for more brightness.


Two examples of overlay highlights. Illustration from the book
10. Paint pictures in your mind
Pursuing daily affairs, paint pictures in your imagination. Mentally look for a match between the surfaces and textures you see around you and the way you work with the brush and apply paint.

To get started, ask yourself one simple question: why do I need to learn how to draw with a pencil and what do I want to portray? There are quite a few goals in the world, and everyone has their own. Eat cool idea for a comic - there is also a desire to create, because who, besides you, will draw your story? People who are fans of some game, movie or comic book learn to draw just to portray their favorite characters. And there are also those who want to draw art in order to earn money.
Basic knowledge of how to learn to draw with a pencil on your own
On the one hand, it seems a simple matter, but we assure you, this is absolutely not the case. Of course, you don't have to learn the basics of color rendering, as you would with paints, but instead you'll have to learn the basics of shadows and partial shadows, which is not easy, but it's almost half the battle. You should always start with the basics, which we will tell you a little about.
1. Tool selection
Any business must begin with preparation, and our case is no exception. Finding an answer to the question of how to learn to draw with a pencil without answering the question of how to choose the right pencil is quite difficult.
All simple pencils vary in softness, this should be known to you by school lessons drawing. The softness and hardness of pencils are denoted in different ways. Now it is quite difficult to find pencils in which the softness / hardness indicators are indicated as "TM", "T" and "M". Of course, they exist, for example, they are produced by the Konstruktor company, but most often pencils can be found with Western markings “HB”, “B” and “H”.

- "B" (from English blackness) is the most soft pencil, which also produces the darkest shade;
- "H" (from English hardness) - hard and "light" pencil;
- "HB" - a standard (hard-soft) pencil, in addition to the combinations of "TM" and "HB" is denoted by the letter F (from the English fine point).
In addition to the letters indicating softness, you can find numbers on the pencil marking, and so that you do not get confused, look at the graph, which shows what shade each of the pencils will draw
"HB" is a hard-soft pencil. A person who can draw enough good level, with its help it can depict anything: a dark area, a contour, a shadow, a stroke. Of course, it will not give a deep enough dark color, which is usually given by a pencil marked "HB", but the drawing will look quite decent. Dudes who think they can draw can say all they want that one pencil of any hardness can draw anything, but eminent artists always have a few on hand. different pencils. You should always have a pencil marked "HB" - this pencil is universal in its essence. It is great for them to outline the main lines, primarily because it erases perfectly. With pencils of increased hardness, it is much more difficult: after erasing, a “scratch” remains, which is difficult to remove. Of course, with experience you become convinced of the usefulness hard pencil(thin "basting" is very cool to do), but it's best to start with hard-soft, simply because it is easier to wash.
Done with pencils. So how to learn how to draw with a pencil at no extra cost? Don't interrupt, dude! Everything is gradual.
2. Strokes
First you need to deal with the shading and the position of the hands during the drawing. Each position gives a different pressure on the lead, and consequently, a different thickness and strength of the line. Pressure control comes with experience, so we recommend that you achieve optimal result exercise as often as possible. Get yourself a small notebook, either in a cage or completely without markup, and practice. The more often, the better. try different angle pressure, different position hands and different type hatching, remember that competent hatching can make up for the most unfortunate drawing. Therefore, one of the answers to the question “How to learn to draw” will be: “Learn how to hold your hand and stroke!” But we are not here to help you. You must choose the stroke that you need and is comfortable.

3. Sense of shape and shadow
At the first stage of drawing, it is very important to know what a sense of form is. If you have basic knowledge in the field of drawing, then it will be easier for you. The shape of an object can be conveyed by the correct transmission of the play of light with the help of strokes. different strength and directions. Remember man, the strokes don't have to be nearly invisible, the visual roughness of the drawing gives it character. If you could not learn how to convey the play of light and shadow with a simple pencil, try first to learn how to draw with two tones in a kind of noir style. In this way, you will learn to understand how the shadow generally falls and plays on different surfaces, and drawing in the style of Frank Miller's "Sin City" will help you master a couple original tricks. First, get a good black gel pen, poor pens will not cover the surface of the paper with uniform black. When you start to get better, or you like to draw like this, buy yourself a liquid liner or ink liner.
It is very difficult to teach someone to draw in small article. There are a lot of answers to the question “how to learn to draw”. So ask yourself the question: “What do I want to draw?” If you want to draw people, we strongly recommend that you learn the basics of anatomy. Of course, many people will tell you that anatomy is superfluous, that it is much easier to download a special program on your phone, tablet or computer, in which you can put a person in different poses and look at him from different angles to redraw later, but believe me, anatomy is a very important thing. If you are going to draw in a comic or anime style, then of course, anatomy will not be very useful to you (but it will not hurt either), but such programs will be very useful. But what you will need for sure is the knowledge of proportions. Google them! It is the proportions that will give any of your work a sense of completeness. Even if you are going to or in anime style, then you need to know the anatomy of human hands.

 The book is a good reference book. B. Hogarth “Drawing dynamic hands for artists. Tutorial»
. Let's say right away that drawing hands is the most dreary and difficult thing in drawing a person, believe me.
The book is a good reference book. B. Hogarth “Drawing dynamic hands for artists. Tutorial»
. Let's say right away that drawing hands is the most dreary and difficult thing in drawing a person, believe me.
How to learn to draw human figures with a pencil correctly? Read anatomy books for artists, for example, "Anatomy for Artists" by Jeno Barchai, many artists, however, do not like it, but these are purely professional holivars.

 There is literature for every purpose of drawing. Do you want to know how to learn how to draw comics with a pencil in american style? read books Christopher Hart. He has a great many reference materials for different occasions. His books will help you learn how to draw monsters, comics, learn the basics of building a page in a comic, learn the basics of fantasy drawing techniques or science fiction. Also very good book guru of the comics industry, Stan Lee How to draw comics. And also good advice- read more different comics and redraw. For drawing fantasy and science fiction, this book is a good fit. "Fantasy Drawing Technique" by Bruce Robertson, however, in some places it is morally outdated, because many tricks can be easily done on a PC.
 For the most novice artists, passion as we recommend a book Gina Franks "Pencil Drawing"- This is a book by an old artist, a master of graphics and drawing with simple pencils. She will teach you all the basics of pencil drawing.
Do you want to know how to learn how to draw manga with a pencil or japanese comics? There are a lot of books on this subject. Be sure to see that there are tips on drawing the types of the main characters, because it is the manner of drawing that betrays the character of the characters. The magician girl from "Slayer" Lina Inverse, for example, is one type, for drawing more realistic heroes, other tips are needed.
Landscapes are much more difficult. Here you will have to study the laws of perspective, composition, the concept of the golden mean and all that stuff. Here we can advise you to draw more from nature.
The most important thing in the question "How to learn to draw" is practice. Practicing is very important! The best, in our opinion, way of practice is redrawing pictures and drawing from nature. The more often you do this, the faster you will learn to draw.
Lessons of right hemisphere drawing with a pencil for adults
Mila Naumova
The author of the project
professional drawing teacher
painting and composition.
Author of books:
"About kalyaks-paintings, or How to Become an Artist?"
"Learning to draw with a pencil" (PITER publishing house)
"A drop of courage"
Do family and friends think you're doing bullshit?
B basic drawing course for adults X
who want to quickly learn how to draw
(result in 2-3 weeks)
Course №1 "LEARNING TO SEE AND DRAW AS AN ARTIST"
If you have a desire to quickly learn how to draw, so
so that your friends and acquaintances admire your drawings, then my course of 6 drawing lessons according to the method of one of the greatest draftsmen Albrecht Dürer, who worked at the turn of the 15th-16th centuries, will definitely help you.
Even if you can't draw at all!
And if you already draw well, then thanks to the course you will improve your technique and understand that you can draw anything from life - any still life, landscape, and even a portrait.
If you didn’t have a good artistic background, then you will discover a lot of new things, because I talk about the basic basics of drawing, which are necessary for both graphic artists and painters.The most important thing for an artist is to learn to see like an artist, and then capture what you see on canvas or paper.
.
First of all, we will deal with the disclosure of artistic vision in the course, as well as let's learn to draw not objects and forms, but lines and dots.
ARTISTIC VISION
To teach a person to draw without developing his artistic vision is a meaningless occupation. Because when a common person looks at the landscape, he sees the street, houses, trees, people. And when the Artist looks at this landscape, he sees lines and spots. If the Artist at this moment draws with a pencil, he sees dark and light spots, if he writes with paints, he sees colored dark and colored light spots.The artist sees lines and spots, transfers them to the canvas, and the viewer distinguishes on the canvas - streets, houses, trees, people. Here is such a magical transformation, and without it, nowhere.
If you wish learn to draw from nature anything, regardless of shape and material, try to see not objects and objects, but lines and spots.
.
.WHAT DOES IT MEAN TO SEE SPOT AND LINES?
In the right teaching of drawing, the general principles (formulas) are taught, thanks to which the beginning Artist can draw from life and from imagination all such objects.
For example?
For example, if you watched the site's lessons, you may have seen such a lesson: "SHADOWS ARE DIFFERENT, HOW TO TRANSFER VOLUME." In that lesson, I talked about how to make objects three-dimensional by placing light and dark spots correctly: highlight, light around the highlight, midtones (penumbra) around the light and shadow (the darkest places). This general formula to give volume to any shape, from a ball to a person's face.
And it doesn't even matter if you know how to hatch or not! The main thing is to correctly find the place of dark and light spots.
I will try to show with an example, as if I do not know how to hatch.
It looks something like this:
But if the object is at least a little transparent, then in our formula, light and shadow are reversed.
That is, there will always be a dark place around the highlight, and where opaque objects usually have the darkest shadow, transparent ones will have light.
Approximately like this:
Let's check this formula on grapes:
On the average bottle, everything is the same: there are dark places around the highlights, halftones around the dark places, and light spots in the shadow itself, only the shape of the spots changes:
And even the iris of the eye is drawn according to the principle (formula) of transparent objects:
So, just by swapping the shadow and light in places, drawing any object, you can create the illusion of transparency! I hope you noticed the principle of drawing and drawing steps different items were the same.
It is called general principles.
Knowing the general principles greatly facilitates the work of the Artist.
There is an even more general principle for drawing from life, and even more so from a photo, thanks to which you can learn to draw from life EVERYTHING, anything, in a couple of weeks! The main thing is that all this can pose for you for a while
About it general principle I tell on my already famous course
"LEARNING TO SEE AND DRAW AS AN ARTIST!"
basic course №1
BEFORE the training begins, I ask you to make test drawings so that after the training the person can see for himself what he has learned during the course.
On the course, we do not learn to draw one picture, hand or landscape, but learn to draw EVERYTHING, anything.Total 6 learning tasksand you can draw like this!


|
R
drawings and feedback from students Vladimir Pritchenko (Servo-s):
I hoped that maybe they would not criticize me much, maybe even praise me, but that I would be suspected of a disguised artist pretending to be a teapot - I did not even dream of that! |
|
| BEFORE the course | AFTER the course |
 |
 |
Tamara Sh: |
|
| BEFORE the course | AFTER the course |

|
 |
 |
 |
Julia: |
|
| BEFORE the course | AFTER the course |
 |
 |
Larisa: |
|
| BEFORE the course | AFTER the course |
 |
 |
More drawings :) |
|
|
AFTER the course |
|
 |
 |
|
AFTER the course |
|
 |
 |
|
AFTER the course |
|
 |
 |
| BEFORE the course |
And this kid was drawn in the third lesson |
 |
 |
| AFTER the course | |
 |
 |
| AFTER the course | |
 |
 |
| AFTER the course | |
 |
 |
| Sixth task | |
 |
 |
| BEFORE the course |
AFTER the course |
 |
 |
| BEFORE the course |
AFTER the course |
 |
 |
| BEFORE the course |
AFTER the course |
 |
 |
BEFORE the course |
AFTER the course |
 |

|
What do you need to practice?
Need paper size A4 (landscape sheet) and A3 (as two landscape sheets),simple pencils and a soft eraser (preferably a nag).
ATTENTION!
I'm updating the course and it's not working yet.
You can take as a gift my book from the publishing house "PITER"
"Learning to draw with a pencil"
The book contains all the lessons of the basic course + hatching options.
Many beginners do not know how to start learning to draw. The Internet is full of open materials that are confusing. Also, people, as a rule, have a fear of failure and doubts about their talent. Today, I am based on own experience I'll tell you how to learn to draw from scratch.
First of all, I must say that it is never too late to start drawing, there are many successful and talented artists, who first took the brush in their hands already in adulthood. Of course, it is easier to teach children anything, including drawing. But, if in your childhood acquaintance with painting was limited to art lessons in the third grade, then it does not matter! You can start in your 20s, 30s or 50s.
But where to start?
Drawing is a creative and rather time-consuming process, so do not expect masterpieces from yourself in the second lesson, but be patient.
First step- sketching from pictures, photos, video lessons. Yeah, that's not really what they do art schools and yes, the basics academic drawing you will not study, because you can do it yourself without help professional educators almost impossible, and not necessary. Your hand is completely unaccustomed to a pencil, you still do not know the proportions and shapes of objects. Drawing various objects from a photo will help you fill your hand and understand the construction of objects.
To successfully pass this stage, you need to forget what exactly you are drawing. If there is a chair in front of you in the picture, do not think that you are drawing a chair, but simply copy the lines, shadows. Thus, your right hemisphere, which you now need much more than the left one. And yet, do not try to finish the picture in "one sitting", take breaks in work. When your drawings have become more or less "edible", you can move on to drawing by, where you draw in parallel with the video.
Second phase- sketches from nature. You are not yet ready for large-scale work with nature, but start sketching, draw everything that you see around. Pay attention to the proportions of the object and its location in space. Yes, you are not doing very well yet, but look at your first works. You will definitely see progress! In parallel with the sketches, continue drawing from pictures, photos and video tutorials. In principle, here it is the beginning, nothing complicated, just work and patience.
Now let's analyze 6 major mistakes, which beginners often admit.
- Buying too expensive materials. This is how psychology works, that on paper for 3,000 rubles you are supposedly obliged to do something worthwhile and you have no right to make a mistake. Such a completely natural attitude gives rise to a fear of drawing, so we do not buy the entire assortment of an art store.
- Painful perception of criticism. Most likely, you will post your work on social media. network, where you will find a million angry critics, but do not take anyone's words to heart. Pay attention only to constructive criticism of the case, and ignore insults and unpleasant statements about your work.
- Desire to embrace the immensity. Yes, I understand that you already want to draw views native village or a portrait of a beloved brother, but take your time. Taking on things that are too difficult for you, you will only be upset and disappointed in your abilities. Everything has its time.
- Reading books on drawing. It seems that books can contain bad things? If you have just started learning to draw, then you do not yet have the knowledge base for all these books on color perception or anatomy to help you. These books are for students. art academies and not for beginners.
- Rare or irregular drawing. Here everything is the same as in sports, for 10 minutes a day you will not achieve anything, draw at least 1-2 hours a day. And if you give up drawing for a week or a month, you will lose shape and feel how naughty your fingers have become.
- Fear of new materials. On early stages drawing, your main material will be a simple pencil, but do not be afraid to draw with pens, paints, markers, etc. If the opportunity to work with some new material is given, do not miss it.
Create, work hard, and everything will work out.


