Learning to draw animals is useful knowledge for children and adults. It will be useful first in kindergarten, school, and the second - to create knitted patterns, appliqués from fabric, decorating cakes.
How to draw a penguin?
See how to create this flightless bird.
For this you will need:
- simple pencil;
- eraser;
- paper.
Such beautiful drawings with a simple pencil create. Since then it will be possible to erase unsuccessful and auxiliary features and draw new ones. Therefore, do not press hard on the pencil.
- Draw a small circle - this is the head of the penguin. It is crossed by the oval body of this animal, but at the bottom make this figure straight.
- At the next stage, draw 2 rounded features - the first is almost parallel to the back of the head, and the second is to the left side of the body. If you then want to do the drawing in color, these features will help keep the face and tummy white, and some elements black.
- Next - we draw the underdeveloped wings of a penguin bird, two small ovals at the bottom of the body, which will soon turn into the paws of this animal.
- You will make them more realistic in the next step. To do this, draw 3 fingers on each paw. A small circle on the face will become the eyes of this bird, it will also acquire a beak.
- It remains to show that his fur is quite fluffy. To do this, make a few small dashes on the tummy, back, and back of the head. Draw a crest. Add eyelid and pupil to the eye.

Here's how to draw a penguin simply and easily. You will also create other animals using the same technology without any problems.
How to draw a pig?

- Draw an oval shape. In its lower part, draw a circle that will become the head of the pig. His piglet is depicted on right side this circle.
- Depict 2 of his front legs, one back, lop-eared.
- Designate the hooves, cheeks of the animal, make the outlines of his eyes. At the next stage, draw pupils in them, as well as eyebrows, mouth, nostrils.
- The twisted tail completes the image of the mischievous pig.
How to draw a donkey?
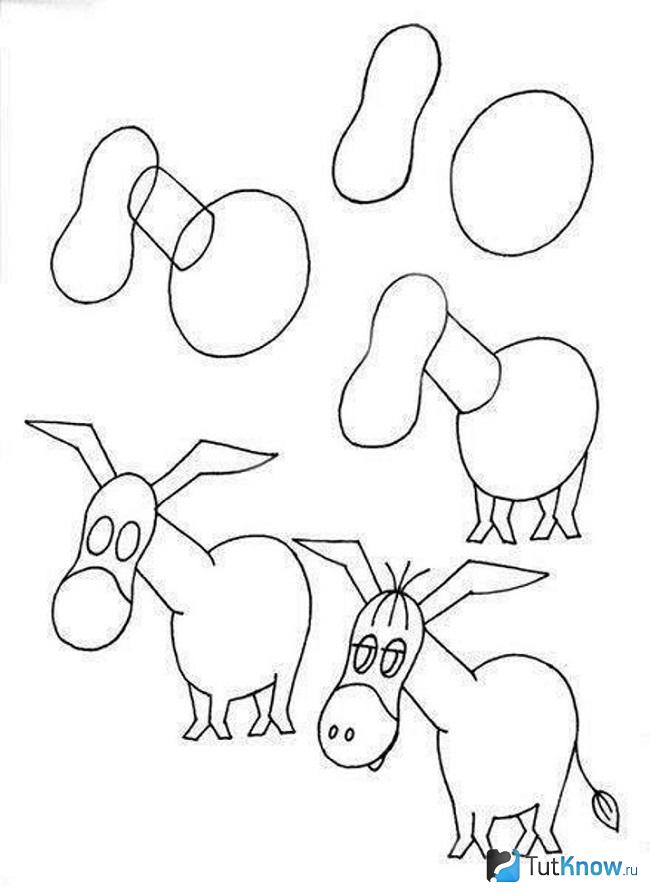
Having learned this, you and the children will be able to take up the illustration of the cartoon about Winnie the Pooh.
- First, draw a figure similar in outline to the number 8 - this is the head. The circle will soon become his body. These parts are connected by an elongated neck.
- Ears that look like small wings, draw next. The two oval eyes will get pupils and eyelids in the next step. Then draw the nose and nostrils.
- It remains to depict a bang, a tuft, the legs of a donkey and his tail.
How to draw a lamb?
The image of this animal can also be used for appliqué. But make a fur coat from fur or glue curls from segments of threads onto the base, twisting them.

How such simple drawings are created in stages, the photos show.
- First, draw a small egg-shaped shape that will become the lamb's head. And the body is a slightly larger oval.
- To make it easier to draw the horn, first draw a small circle on the side of the head. And then draw a spiral horn in it. The second is located on background and not fully visible.
- Four rectangular legs end in hooves. Curly bangs will add charm to the animal.
- Draw his dreamy eyes, curly hair, nostrils, tail.
Rybka

If you are wondering how to teach to draw small child, then show him how this sea creature is created.
- Draw a semicircular line at the top and bottom, connecting them on the right and left. Draw the lips on one side and the tail on the other. Separate the junction of the face with the body with a semicircular line, draw a round eye on the muzzle.
- On the next step step by step drawing add an eyelid to the eye, depict two fins.
- It remains to draw the pupil, scales with wavy lines. Using small dashes, make the fins and tail more realistic.
How to draw a cat?
You will learn it in 5 minutes.

Draw a circle - this is a blank for the head. It is crossed by the ovoid body. Erase the intersection of these two parts with an eraser.
Draw the front and hind legs. Also, with the help of an eraser, remove the places where they intersect with the body. Draw a tail.
At the third stage, add ears to the cat, make the muzzle more protruding by drawing an oval at the bottom of the circle.
You already practically know how to draw a cat. It remains to erase the auxiliary lines, draw a small triangle inside the right ear, depict the eyes, nose, mustache, toes and the tip of the tail.
Winnie the Pooh
The hero of the cartoon of the same name and the book is quite easy to draw.

- First draw 2 identical shapes - they are a cross between a square and a circle.
- In the next step, erase the place where they intersect and add the front and hind legs to the hero.
- It's time to draw winnie the pooh muzzle and ears. Draw eyes, nose, claws. The mouth, like that of the cartoon character, is slightly on its side. Which adds to its charm and originality.
How to decorate a cake with fondant in the form of a picture?
To do this, you can use the image of any character that you just learned to draw or depict another character, for example, an owl.

To assemble such a cake, take:
- biscuit cakes;
- oil, custard or whipped cream;
- white mastic for the cake;
- food coloring in three colors;
- blackcurrant or raisins;
- water;
- silicone rolling pin;
You can make your own food coloring using blackcurrant, spinach, and beetroot juice.

The same dyes will be needed to give desired shade mastic. But first you need to assemble the cake. Layering cakes with cream, put one on top of the other. Put the cake in the refrigerator for an hour, then roll out the white fondant, cover the cake with a sheet of this sweet flexible material.
Mastic will stick to it better if you first grease the cake with buttercream.
Trim off excess mastic, add more. It needs to be divided into 3 parts, mix a little food coloring into each. Roll out the mastic into a layer. Attach a template of an owl or any other character to it, cut it out according to this sample.
Dip a cooking brush in water, moisten some of the fondant on the cake, attach the owl blank here. Glue them all the same way.

Roll up round eyes from the remnants of white mastic. Place a blackcurrant or one raisin in the center of each to make the pupils. But pre-soak the raisins for 20 minutes in warm water to make it soft.

It is not necessary to make eyes on all blanks, perhaps some owls are turned back to the viewer.

Usually, a cake with mastic should be left in a cool place for a day so that it dries, after which it can be served.
This is how simple drawings will help decorate the cake. If you want to be the designer of your home, don't forget about accessories. And you don't have to buy expensive paintings. You can make them yourself, this will help the master class. Such canvases are created very simply, but they look spectacular.
DIY stone paintings for beginners

To create such a man-made masterpiece, use:
- smooth stones such as pebbles;
- shell "queen";
- artificial moss;
- transparent glue Titanium;
- thin branches of a tree;
- plywood;
- colored paper;
- paints.
If you are doing this for the first time, then it is better to first mark the locations of the elements with a simple pencil.
Designate where the lovers will be. Glue 3 almost identical flat pebbles to create a guy and his head with light pebbles.
For the body, head and legs of the girl, use one pebble each, make a skirt from the “queen” shell, after breaking off the “antennae” with pliers.
Such a picture is perfect for those who are relaxing on the sea or brought some shells and smooth pebbles from there from vacation. Such a panel will be a wonderful reminder of a holiday on the sea coast.
And you can take branches from a tree growing in the yard, but it is better to use dry ones. Treat them with pliers, removing excess.
Attach a relatively even trunk to a picture of stones with Titan glue. In the same way, glue small twigs that will become the branches of the tree. Cut out the leaves for it from green paper, and the birds from another colored paper.
Draw the elements of the tree, plants with paints. Glue the moss as grass, after which you can frame the work and start a new one.

This simple picture also created quickly. It will require:
- plywood or thick cardboard;
- frame;
- threads;
- flat stones;
- glue.
girl holding Balloons for the ropes, and they themselves are made of round pebbles.
If you are relaxing by the sea while walking along the beach, look for a heart-shaped stone, you will need it for your next romantic painting.

An oblong pebble will become the arms and legs of the characters, a round one will become their heads, and an oval one will become the torso. Glue a fancy dry branch down the panel - it will become the path on which the lovers stand.
Put a sprig of dried flowers in the guy’s hands or make them from colored paper. Such a picture of stones will be another pleasant reminder of the wonderful summer holiday on the south coast, like the other.

For each cat, you will need a pair of pebbles of the same color, but different in size, to make the body and tail. If you cannot find an identical color scheme, just paint the stones in desired color. When the coating dries, glue the blanks on a dense base, after painting it or gluing a sheet of light cardboard.
Draw ears, grass for cats. Glue branches that will become a tree and a couple of small pebbles that will turn into birds.

By the way, you can dwell on their creation in more detail. After all, creating simple drawings in stages, you will also depict birds.
How to draw birds in watercolor?
In just a few minutes you will be able to draw a jay. To do this, take:
- a sheet of thick paper;
- simple pencil;
- watercolor;
- brush.

This step by step drawing watercolor involves using blue and black shades in the second step. With paint of such colors, highlight the eye, breast, outlines of the back, tail, head of the jay.

Before that, you need to barely mark these fragments, at the next stage, select them more confidently. light gray draw the plumage of the jay.

On the next step, act even more confidently, because everything is working out for you! Create a background, let it be green bushes in the background, yellow flowers, the sky and a branch on which a bird sits.

The last stage is the final one. Make the bird more realistic by painting a few strokes of black and gray paint on its chest, side, and head. Highlight the background by adding a green, yellow watercolor. You can also draw a blue sky behind the jay.

Here's how to paint watercolor step by step. Now you can create simple canvases with a simple pencil, paint, and even using stones. Be creative, dare, and you will certainly succeed!
How to draw simple drawings for beginners, see here:
How to draw easily step by step and by cells?
Using simple technique step-by-step drawing, even novice artists will be able to draw beautiful animal figurines. Here's how to draw a funny puppy.
And so with the help geometric shapes you can draw a cow.

The chicken that sits on the eggs begins to draw from the circle. Gradually draw the beak, eyes, wings and tail.


And after the chicken has hatched the eggs, you can draw chickens.


At first glance, drawing a bat seems difficult, but if you use the step-by-step drawing technique, then this cute bat will appear in your album in 5 minutes. Also two circles, but a larger one at the bottom, and a smaller one at the top will help draw a cat.


Birds are hard to draw, and parrots are even harder to draw. But three circles of the same size will help to cope with this task.


And so you can draw a mouse.


A very cute cat lady is drawn in pencil, the auxiliary lines are carefully removed and the cat is painted watercolor paints.


The drawing of an elephant and a horse can be drawn by everyone who knows how to draw circles, ovals and rectangles.

The difficult task of drawing a camel only seems difficult. But in the technique of phased drawing, nothing is possible.

Domestic animals sheep and pig are drawn a little differently. In a pig, the muzzle is first drawn, and then the torso. In a sheep, on the contrary, first the body and at the end the muzzle.


A non-flying bird of the cold seas, a penguin and a forest bird, an owl, are drawn in stages and painted with watercolors.

Drawing a snail is easy to do if you draw a circle, then draw the body of the snail and finish the curl on the shell, eyes and antennae.


To draw a duckling, it is enough to draw an oval to the circle and finish the tail, beak and eyes and wings.


And so you can draw kids.


It happens that girls draw in albums, but do not know how to draw a face beautifully. A simple scheme will come to the rescue, where correct proportions faces.


You can not puzzle for a long time what hairstyle to draw for a girl in a diary, but simply choose the one you like and draw the same one.


Flowers in albums can also be drawn in stages. For a flower to have correct form it is enough to make a circle or an oval and draw the center and petals.

Beautiful and easy drawings by cells for sketching in a notebook and a personal diary for girls 5 - 12 years old
The easiest way to draw on the cells. Of course, if you have a lined drawing. These cute kittens can appear in the diary if you draw them in the cells.

For pages in a diary about love, a drawing with a boy and a girl who exchange hearts is suitable.


Another drawing on the theme of love is not difficult to redraw, but very interesting.

A bear holding a heart will decorate the pages of the girls' diary, and the cells will help to draw it.


A smiling dog in flowers is suitable for those who like to communicate with dogs and draw them.

Drawings of girls in anime style will decorate the pages of the diary. They are easy to redraw in the cells and paint with watercolors or felt-tip pens.


The drawing is more complicated with a girl, a butterfly and a strawberry. However, if you carefully count the cells and draw on them, success is guaranteed.


An anime-style portrait of a girl in profile is also suitable for girls' diaries. The drawing is transferred to the cells, the color of the hairstyle and eyes of the drawn girl depends on the wishes of the owner of the diary.


Bear-boy and bear-girl will remind you that friendship happens both between animals and between guys.


Beautiful and easy drawings by cells for sketching in a notebook and a personal diary for boys 5 - 12 years old
Both boys and girls love to draw cats. Such a funny cat will appear in an album or notebook if you draw it in the cells.


Boys love to draw motorcycles. Even though they don't have a motorcycle yet. real life, but it can always be drawn in cells.


space theme is also relevant for drawings of boys and the astronaut cat may be to their liking.

Cell drawings are beautiful and easy for girls and boys: ideas, photos
A lion with a red mane, drawn in the cells with its fiery mane, will decorate any diary.


The whole picture can be drawn by cells. A lion, a zebra, a giraffe, an elephant and a hippo sit on it in dense thickets.

These animals can be drawn separately. Blue elephant for sketching by cells
And so you can draw and color a butterfly. She can decorate girls' albums.


If you finish the pond and reeds, you get a picture with funny frogs in the center.


A checkered fox cub can be drawn on fabulous pictures, or you can add flowers and grass and decorate a diary with such a picture. Tree for sketching by cells
A cheerful dragonfly will surprise you with bright wings.


VIDEO: How to draw a bee in stages?
What can you draw with an ordinary simple pencil? Yes, exactly the one that everyone used at school. Children's drawing, sketch or diagram? Do you know that there is a whole art in which the main actor, or rather the subject, is an ordinary gray stylus. with a simple pencil - scope for human imagination.
unusual art
One of the most accessible, but at the same time incredibly complex types Graphics is a simple pencil drawing. It would seem, this usual subject for us? It turns out there are a lot. Some museums and exhibitions can boast of having an entire hall in which pencil drawings are presented. They display a wide variety of ideas for drawings that came at the time of inspiration to famous artists.
The unsurpassed play of shadows, the maximum resemblance to the original fascinate and captivate. Looking at some masterpieces, it is very difficult to imagine that this can be depicted with an ordinary gray slate pencil. It seems that this is certainly work done in well, you cannot draw such a miracle with a simple pencil! However, if you look closely, it is already impossible to contain the admiring sigh.
Necessary materials
If you think that a lot of materials are needed to create such a masterpiece, then you are greatly mistaken. To complete the drawing, you need to have landscape sheets, a set of pencils, an eraser and a sharpener. And, of course, drawing ideas. If you have no idea what you want to reproduce, the result will be deplorable. Or rather, this result will not be at all.
For more complex work Of course, a snow-white, slightly rough sheet of paper is selected, on which each stroke will be clear and noticeable. Specialized stores sell ready-made sets of simple pencils, but you can buy the most common ones. They should differ in the level of softness or hardness. The corresponding marking is necessarily indicated on them. Such gradation is needed to create shadows, without which even the most daring ideas for pencil drawings are doomed to failure.

You can not do without a sharp one, which will create the necessary sharpness of the rod. It is advisable to have several erasers that will erase failed or extra lines according to the type of pencil.
For work on professional level you will need an easel, as it is better to create a picture in an upright position. In this case, the tool will easily slide over the paper, accurately conveying the smoothness of the lines.
How to hold the instrument correctly?
To create a masterpiece, you need to master the correct grip of the pencil. It must be held in the palm of your hand, pressing. Such a grip should be developed, but after getting used to it, the results will be more obvious. In art schools, the first few lessons are devoted to the skill of holding a pencil.
Of course, the simplest pencil drawings do not require special skills. They can be created by holding the tool like a pen when writing. After all, there simply cannot be a risk of smearing simple drawings: the lines in them are clear and there is no play of shadows. But still, if you want to learn how to draw professionally, it is worth holding the tool masterfully from the first attempts.
The simplest pencil drawings
The most simple in technique are children's drawings. They are quite simple in execution, can be drawn in several stages. But it is with them that you can begin to develop the artistic talent of kids or try your hand at graphics.
Ideas for drawings for children are varied. These are birds, animals, cartoon characters. The most important thing is to carefully consider the object, take into account all its characteristics and try to reproduce what you see. This is how children draw, this is how an adult should try. Below are just some ideas for drawings with step-by-step execution of all operations.

Agree, anyone can draw this. But even more complex, it would seem, objects can be reproduced on paper if the whole is broken into parts. See how easy it is to create lovely swan. By the way, this drawing already uses some tricks of the play of light and shadow (pay attention to

Similarly, in just 13 steps, you can draw Kitty for a child - the heroine of the animated series.

The fact that the drawing at first glance is simple does not matter. If you have it turned out without problems, start working with the shadow, trying to give the figure volume. To do this, use pencils of different hardness, and experiment with pressure.
If reproducing children's drawings is too easy for you, create your own paintings. Start with simple things - a cup, a phone, a book, gradually complicating your work. Believe me, even the most seemingly ordinary item in a talented performance will sparkle very attractively. See: the figure below shows a conventional light bulb. But thanks to the play of light and shadow, recreated with a pencil, the drawing captivates with its realism.

Such images are often referred to as 3D. This technique is quite difficult to master, but still possible. In them, the realism of objects is built on the play of light and shadow, which makes everything drawn seem real.
But for starters, it’s still worthwhile to translate ideas for simpler pencil drawings into reality. It can be household items, wildlife that surrounds you. For more complex work, you can choose a color drawing and draw it in black and white. There are a lot of options: you just have to look around you, and your heart will tell you exactly what to display on paper.

Instead of an epilogue
To learn how to draw, it is not necessary to take lessons in art school. Active workouts at home can also pay off. The first steps can be simple pencil drawings. Based on them, you can complicate the technique, fantasize with forms - and then everything should work out. Believe in success and improve your skills.
In childhood, the child does not think why and what to draw. Drawing, he recycles his life experience, transferring it to paper, and, thereby, comprehends it and develops.
As you get older, it gets harder to come up with ideas... We are distracted by everyday affairs, we stop hearing ourselves, our inner world. It is especially difficult at the beginning, when you are just embarking on the path of knowing yourself as an artist.
To draw well, you need to draw daily. But where do you get inspiration for this?
Here are some ideas for you how and what to draw every day.
What to draw? 11 ideas for daily drawing.
1. Go through the archives of your drawings and sketches.
The simplest thing is to open the folder with your old drawings and look at them.
What is not finished in them? Where did the hitch occur? 
Look at the drawing with fresh eyes. Think how to modify or rewrite it.
In addition, immersion in past drawings will plunge you into those emotions that you experienced before. It can re-inspire your creative muse. Maybe based old idea a new… And then another picture will be born.

2. Draw something from nature.
Look around the house: walls, furniture, interior items, potted plants, souvenirs brought from trips that keep your memories. What caught the eye? 
Draw one object. You can add other objects to it, draw a background.
As a result, your drawing can turn out to be very atmospheric, keeping the warmth of the house, your thoughts and memories.

I propose to watch the recording of my speech on Periscope on the topic quick sketches from nature. I hope you find this video helpful.
Sketching a plant from nature
3. Draw an abstract combination of spots.
Unleash your imagination, imagine yourself as a creator and get the most out of the game of color, how the paint flows and mixes, what new shapes and shades you observe. Let go of doubts and fears. Create! This is a great color therapy.
Depict your day, your mood in this way, fix it in color.

4. Create a hand drawn cooking recipe.
The cooking process itself can be very creative. And if you also transfer it to paper ... Write down your culinary ideas, make them beautiful pictures, create your own unique recipe books. In the future, this will inspire you to continue to create in cooking and drawing.

Don't know how to draw recipes? Watch this video:
Recipe drawing: charlotte with apples!
![]() more interesting and useful information about drawing
more interesting and useful information about drawing
from the artist Marina Trushnikova
You will find in electronic journal"Life in Art".
Get journal issues to your e-mail!
5. Draw a cute little thing for friends or family members.
It can be a postcard for a holiday - for a birthday, for the New Year, for March 8 or Valentine's Day. Or just a cute impromptu for no reason ... 
Get a handmade postcard in the century emails- it's unusual. Such gestures are always very pleasant.
The emotions of gratitude received in return will surely give you inspiration to continue the creative process.

6. Practice quick sketches.
Draw people and animals using sketchy human and animal anatomy figures.
Complicating the task, use a timer, setting yourself the time in seconds for this work.

In the future, the ability to quickly draw a human figure will inspire you to make quick sketches.
Watching and noticing interesting stories, types and characters, you can draw, snatching scenes from life: on the street, in the theater, in a cafe, at work.
This will allow you to develop yourself, your attitude and inner flair of the artist.
Second timer:
7. Practice creating monotypes.
Learn to create monotypes. This will allow you to create without initially thinking about the plot. Monotype will do it for you.
Connect your imagination! Experiment! A monotype print will give you many opportunities for spontaneous decisions. Examine the image in the spots and streaks that have appeared. And paint some spots to help the viewer see this image.

 Start painting with watercolors today!
Learn the basics of watercolor painting with a popular course
“The Taming of Watercolor”
8. Draw a graphic drawing.
Do you like to draw with a simple pencil or in black and white?
Then try your hand at graphics! This can be drawing a spot with further drawing details with a pencil, helium pen, ink or marker.
Or maybe you first make some kind of drawing graphically, and then supplement it with a background, add volume to the details, make a fill, fill it with fancy patterns, lines and scatter spatter spots.

Practice making doodles!
9. Draw in a travel sketchbook.
Are you going on a trip? Take a small sketchbook with you! 
A notebook filled with impressions and drawings (as well as booklets, tickets, checks, napkins… and other “tourist trash”) will become no less valuable memory than an album with photographs.

 IF YOU WANT TO:
- learn to quickly capture your thoughts and impressions
- get rid of the fear of drawing in public
- bring back beautiful travel books
then my sketchbook workshop
will become your invaluable assistant in this!
10. Browse the websites of your favorite artists.
Look at their paintings, find something that catches, touches the soul. Compare different techniques, try to imagine how this or that picture was written, what the artist felt, what he wanted to say, how he saw the world while working. 
Look at your favorite painting by your favorite artist and try doing something like this. Or just copy a piece of the picture to study the technique, repeat it the way you understand.
Dreaming of learning to draw? And look for detailed step by step drawing lessons for emerging artists? I will try to help you in this difficult matter and tell you about the many nuances when writing beautiful drawings and portraits in pencil and watercolor! With the help of my step-by-step lessons, master the basics visual arts not only adults, but also children!
In this section, I publish all my step by step lessons drawing, and separately, under the heading Drawing lessons for children, I collect simple lessons drawing for beginners. Therefore, if you are just taking the first steps in drawing with a pencil and watercolor, I recommend starting with this section. Be sure to check out all the drawing lessons and tips for artists collected on my blog!
Before you start a full-fledged portrait writing, you need to learn how to draw the details of the face. In today's lesson, we will learn how to draw lips pencil, thanks step by step description. The lesson is not difficult and is designed for beginners, but do not rush. To achieve a result, namely beautiful draw human lips, you need to carefully follow the rules of construction and shadow.

Almost every person wants to have his own portrait at home, which is considered one of the most complex drawings what an artist can draw. Not surprisingly, there is a great demand for this particular type of pattern. Therefore it is the duty of the beginner and experienced artist is to improve step by step your skills in drawing human facial features, because through the face you can convey not only gender and age, but also the character and temperament of the person. According to their characteristics, portraits are divided into three types: children's, women's and men's. Today we will learn how to draw the last view - male portrait with a simple pencil. It has its own features and secrets, which we will discuss in this step-by-step lesson.


Many people dream of drawing a portrait of their relatives and friends. But before drawing the face as a whole, you need to learn how to draw the details of the face. This lesson for beginner artists is devoted to the question " how to draw a nose". This task is not difficult, you just need to use the information about the construction and overlay of shadows. The shape and size of the nose may vary, but the basic outline remains the same. Let's find out how easy it is draw a nose with a pencil.

Hands are a personal and unique part of the body. Often they can tell about a person's life with their shape and size. Long years people study their lines and structure, try to read the future along the lines. Today we will learn draw hands with a simple pencil by using step by step lesson. We will pay special attention to their construction and the imposition of shadows, so that the drawing comes out the most realistic.

Step by step lesson on how to draw a female portrait with a simple pencil. After going through just a few stages, you can understand the main features that are inherent in portrait of a woman
and absent in the rest. The face will be located in full face, the hair is pulled back. This is important to know before starting work. Now you can get started.


