The art of creating stained glass windows can be applied in your home. The room, in which fragments of stained glass decor will be present, will sparkle with new colors, such a design will not go unnoticed.
Useful information about stained glass windows
This type of design, like stained glass, refers to artistic painting. This decorative arts knows no boundaries either in time or in the variety of its application.
Some facts of history
This art form has ancient history. Archaeological excavations confirm that stained glass art existed in ancient Babylon, Rome, Greece, Egypt. Some finds made of multi-colored glass, according to archaeologists, are about five thousand years old.
The modern understanding of stained glass is inextricably linked with Christian traditions decoration of temples. Windows decorated with stained-glass windows were created by Byzantine masters of their craft in the Church of St. Sophia of Constantinople (VI century). Stained glass windows of that time were boards interspersed with glass. Those countries in which glass was not yet suspected used stones (in the form of plates) - selenite, alabaster.
This is how the images in the temple, made using the stained glass technique, look like
The first book describing all the subtleties of stained glass art was published in the 11th century. This work, written by the German monk Theophilus, contains all the classic basics of the use of glass for decoration.
Let's omit centuries of history development of stained glass decor and return to our days. Over this long period, both materials and tools have changed dramatically.
The combination of classics and innovation is typical for the works contemporary masters this kind of creativity. The technologies for creating stained-glass windows have become much simpler, and this makes it possible to use this technique to create a beautiful decor with your own hands.
Places of application
Modern use of stained glass is very diverse:
- window;
- doors and doorways;
- glass partitions;
- niches;
- pieces of furniture;
- mirrors;
- panel;
- ceilings.
Stained-glass windows are decorative elements that are appropriate both in in public places(cafes, restaurants, museums, offices), and at home. Furniture in the children's room and in the kitchen, slides in the bedroom, ceilings in the living room, facades of furniture sets - this is a very small fraction of what can be decorated with stained-glass windows in the home interior.
Benefits of using stained glass windows at home:
- Safety. Such elements cannot injure either adults or children, especially if the stained-glass windows are made using film technology.
- Variety of colors and styles. You yourself have the right to decide what tone and style to choose so that the stained glass decoration is in tune with the whole environment.
- Easy care. Stained glass windows do not need any special care products, a regular glass cleaner and a soft cloth will do the job perfectly.
- Profitability. Creating a stained glass window at home with your own hands is much cheaper than ordering such a pleasure from companies involved in their production.
Types of techniques
Stained glass windows can be created using various techniques and techniques developed by masters of their craft. Here a brief description of such techniques.
Technique | Stages of creation | Application |
Classic |
| Suitable for creating structures with large dimensions. All areas listed above. |
| This technology is similar to the process of creating artistic canvases from paints, stained glass details can be so small. The application is diverse, but the design of lamps in this technique is interesting. |
|
| The relief and layering of the resulting products allows them to be used as paintings, mirrors and other interior decorations. |
|
Sandblast |
| The decor turns out to be matte, so it is most often used in interiors to dim the light, as well as to decorate doors, etc. |
| A variety of applications - depending on the ideas of the decorator or designer. The screens covering the batteries look interesting under such “protection”. |
There are many other ways of applying patterns to glass surfaces, but most likely it will no longer be a stained-glass window, but its imitation: film technique, filler, scalloped stained-glass windows, photo printing, glass matting, collages, 3D design, etc. Great option the use of such stained-glass windows - wardrobe doors, mirrors, furniture elements, etc.
Creating stained glass windows with your own hands
First, think over, and then imagine on paper what you want to get in the end. Based on this idea, stock up on materials.
Choice of materials and tools
For stained glass painting (one of the most affordable techniques for a simple layman) you will need:
- acrylic paints, matched to the color of your sketch;
- a solvent suitable for such materials;
- brushes of different sizes;
- contours for stained glass works;
- cotton buds;
- barbecue sticks or toothpicks;
- ferrule.
Acrylic paints have long gained great popularity among needlewomen. different directions. And this is no coincidence, since they are easily washed off (when applying unnecessary strokes), lay down qualitatively and mix with each other, there is no chemical smell when working with them.
When choosing a paint, do not forget to look at the line about the purpose of these materials. They should be suitable for working with glass, ceramics.
It is very easy to embody a stained glass window on a glass surface using a film technique. To do this, you need to find a special film that differs from the usual self-adhesive and is a high-tech imitation of colored glass. Between the two transparent layers is a colored substance that is resistant to sunlight, temperature range (from -45 to +135 Celsius). Colors, presented by the manufacturers of such material, help to realize any idea.
The stained glass film is cut with ordinary scissors, you do not need any special devices. Fragments are glued together with a special lead tape. There is another option - the easiest - to use the film already with the printed pattern, ready. But in this case, your idea will have to say goodbye.
The choice of technique and appropriate materials is up to you.
Making a stencil
If, nevertheless, the embodiment of stained-glass windows in a painted version is closer to you, then you will need a stencil for work. This is especially necessary for people who do not have sufficient experience and certain skills as an artist.
Stencil selection
A sketch, previously drawn by you or downloaded from Internet sources, needs to be transferred from a thin paper sheet to a denser “carrier” - cardboard, drawing paper, etc.
If the stained glass pattern is supposed to be used several times, then there is a logical reason to make a stencil from plastic, then it can serve more than once.
There are templates that can be reproduced on a stencil, with special designations for each fragment of the future stained glass. These can be numeric or alphabetic abbreviations indicating the color of this area.
By securely attaching the template pattern to the glass surface, you can not worry that you will not accurately reproduce your idea. You will only have to draw, following the notation of the template.
We bring ideas to life
- We print (we draw ourselves) a suitable stencil and transfer it to a dense material.
- Then you need to degrease the surface that we will decorate.
Degreasing the glass surface
Stained glass windows are special kind decor that allows you to enrich and effectively highlight any interior. But this is not only the merit of stained glass art, but the entire process of reproduction. Making a stained glass window is a very painstaking work that will take a lot of time and effort. Without skill, it is unlikely that you will be able to create any kind of masterpiece, so masters of their craft are valued very dearly. But today's trend is that people are trying to create their own beautiful decoration of their premises, so they are interested in a completely reasonable question, is it possible to learn this art, and how to make a stained glass window with your own hands?
If a person is talented in something, then he is talented in everything. If you have a great desire to learn this skill and you have all the data for this, then nothing is impossible. First, let's figure out what types of stained glass windows are.
Several techniques fall under the definition of stained glass, the execution of which is very different from each other. We list the most popular options, many of which will enchant you with their beauty and originality.
So, what kind of stained-glass windows are very popular:
- Film stained glass . This is the most a budget option design, but also the most modern. Only in this technique it is possible to create pseudo-stained-glass windows, the principle of which rests on the tinting of the glass surface with special films. Among the advantages of this method is the use of solid glass in the work. In addition to convenience during work, it is also safe, so craftsmen often resort to this technology. The stained-glass window in this design weighs very little, and its surface is perfectly flat. Despite this, it is very difficult to attribute this technology to stained glass, since it is rather an application, only a special lavsan film is used instead of paper.
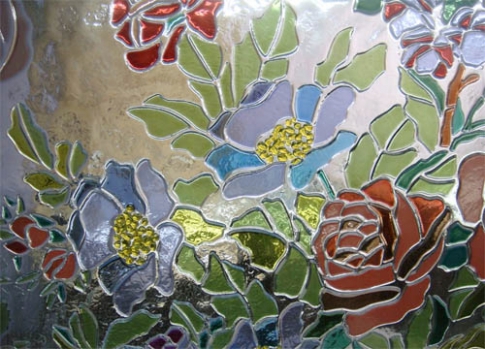
- glass mosaic
. Stained glass windows in this technique look very impressive, while the work itself is simple. First you need to prepare colored fragments of tempered glass, and lay them down, forming the intended pattern. This image is very voluminous, so it is customary to use it for decorating ceilings and windows.

- Stained glass windows in fusing style.
Making such a decor requires special conditions since you will have to use ovens. First you need to draw up a sketch of the picture, then lay out, according to it, colored fragments of glass, and send the entire composition to a special oven for baking.

- Tiffany stained glass windows
. This decor is called classic. To understand how this is done, you need to look at the master classes of craftswomen. First, they form small glass fragments of the desired shape and color, fastening all parts of the composition with copper foil.

- Etched stained glass.
The decor of this class can only be made by a specialist who has not only materials for this, but also the appropriate experience and knowledge. With the help of an aggressive acid, it is necessary to apply the contours of the pattern on the glass. This will draw the boundaries of future creation. And then it's a matter of technology.

- Pseudo-stained glass or painted decor.
It is considered the easiest to perform. All you need to work is to purchase special paints for glass painting, which can be found in every store. There you can also see stencils that will help create a masterpiece.

- Faceted stained glass windows
. These decorative elements are used by masters if it is extremely important to emphasize architectural features interior, playing on the refraction of artificial and natural light. This technology helps to create the illusion of glass design. precious stones, which emphasizes the style and wealth of the owner of the home.

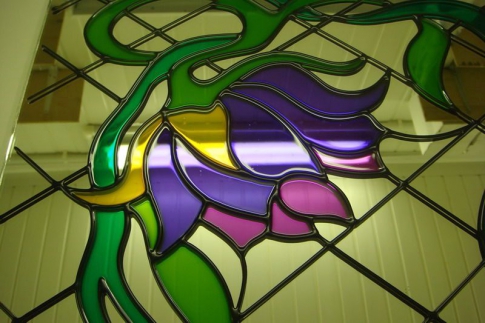
- flooded stained glass windows
. The technology of such decor is based on manual way playback. Of course, it is very difficult to do this without artistic talent, so many turn to specialists. Initially, you need to create a polymer circuit that will look like a metal broach. After it dries, the drawing can be filled with paint or stained glass varnish.

Advantages and disadvantages
Like other decorative elements, stained glass windows can have advantages and disadvantages.
The advantages of stained glass decor include:
- Perfect harmony with any style of interior, be it hi-tech or baroque.
- Refraction of light, which allows you to make them softer and more enveloping. Thanks to this quality, an atmosphere of comfort and warmth is achieved in the interior.
- Does not depend on the size of the room. What stained glass windows are good for is that they can be used for all rooms, regardless of their area.
- Stained glass decor is already an excellent interior decoration, so clutter up the room extra items not necessary.
Stained-glass windows do not have a negative side, well, at least designers never name these shortcomings. But from a financial point of view, a real work of art is very expensive, so not everyone can afford it. Therefore, this, of course, is a minus.
Practicality or expediency?
Most people who decide to decorate their interior with stained glass elements ask the same question of how practical this product is and whether it is advisable to install it at home. This question can be answered by listening to several designers whose advice concerns the use of stained glass in the home:
- firstly, you should not use stained glass art to decorate the floor, but this applies more to spacious rooms, because you can decorate the bath in this way;
- secondly, household interior items, such as lamps or countertops, will acquire additional functions and will not lose their relevance, so this is a big plus;
- thirdly, if stained-glass windows are used to decorate the ceiling or niches, then you will effectively transform your room, giving it a touch of sophistication and pretentiousness.
The sophistication of your room can suffer if you overload it with elements of this decor, so designers recommend using them as accents in the room.
Making stained glass windows with your own hands - the beginning of the beginning
For this work, it is not enough to have theoretical knowledge, at least you also need a great desire to learn a new business. If you are interested in this activity, the first thing you need to do is to develop a sketch of the future drawing. To do this, several requirements must be met:
- All drawings and sketches must be drawn in full height. To do this, take a sheet of paper and cardboard of the appropriate size;
- draw the contours of the future drawing on paper so that the division of the image into separate zones can be seen;
- on a sheet of cardboard, indicate the color and material that will be used in the work;
- if this is a stacked stained-glass window, then you will also have to indicate the direction of the glass fibers and number the details.
Theoretically, this may look very complicated. But with a little practice, you will gain enough experience and be able to create a truly bewitching pattern on your mirror or window.
Outwardly, the drawing on paper looks like a coloring book for kids, only in each zone there is a number indicating a certain color or texture of the material. In addition to numbers, there may be arrows or other symbols that should help to assemble the picture and make your workflow as easy as possible for you. Over time, your drawings will become more and more difficult, which will speak of your skill and acquired skills, only then you can say with confidence that this is your favorite pastime.
Modern technologies can significantly save time on the development of sketches and drawings. You can purchase a stencil or download it from the Internet. Your only concern will be transferring the pattern to the glass.
Manufacturing technology
In order to make a stained-glass window with your own hands, you need to decide on its technology. But first, find a place for its location where it will be used: on a window, ceiling, lamp or glass picture. Each specific case will have its own implementation nuances, so it is very important to decide on this at the initial stage.
Outside the workshops, at home, you can make three types of stained-glass windows that are undemanding to special conditions. This decor includes:
- stained glass Tiffany;
- film stained glass;
- flood stained glass.
Unlike fusing, you do not need sophisticated equipment and furnaces, and the workshop can be replaced with an ordinary apartment, because you will not dilute chemicals and abrasives there. But let's not get ahead of ourselves, first let's look at how to make a Tiffany stained glass window. Experts say that Tiffany has combined several design methods that are an imitation of all classical techniques.
We make stained glass Tiffany
For such a decor, it is necessary to create a sketch, according to which templates of the necessary parts from cardboard should be prepared. Their contours must be transferred to the glass and cut out with a glass cutter. This is followed by a grinding step so that the edges of the parts do not have jagged edges. Copper foil must be applied around the perimeter of each element, fixing it. After that, you can begin to connect the whole picture, closely matching each individual element, collecting a kind of mosaic. The extreme elements must be fixed with small nails, and the foil joints should be treated with flux, soldered on one and the other side of the product, and installed in a prepared frame made of a metal profile. Solder is used to fix the stained glass to the frame. 
Each stage of manufacturing such a stained glass window has its own nuances:
- when developing sketches, avoid acute-angled and S-shaped figures, it is better if they are smooth lines with beautiful gentle curves;
- as the main material, experienced experts recommend purchasing not solid glass, but broken glass, at least until you gain sufficient experience in making stained-glass windows and cutting glass;
- for cutting, take a diamond glass cutter, and practice on cheaper material to handle them, this will save you from large expenses;
- the production of stained glass elements and the formation of a pattern must be carried out simultaneously, performing the work step by step. Only in this way can you accurately select all the details and move them as close as possible to each other;
If you use a backlit surface to assemble the drawing, then it will be much easier for you to do this work.
- for soldering parts, you need to take a 100-watt soldering iron, the tip of which will be nickel-plated. And as a solder, fusible tin without rosin should be used;
- when soldering glass elements, avoid large gripping areas to prevent cracking of the glass, then you will have to make the same element again.
You can see this in more detail in the video below:
Film stained glass manufacturing
To make a film stained glass window, you will need less effort, since the technology itself is very simple: 
- First you need to clean the glass and place a pre-drawn sketch under it. Contours should be laid with lead tape, and its ends should be fixed with subsequent segments. When the entire pattern is applied, it must be rolled with a roller.
- Now you need to flip the glass. Wipe and prepare the film elements along the outlined contours by gluing them on reverse side. After that, you should take a special roller for the film, and roll the surface again.
- The joints of the film must be glued with lead tape, exactly repeating the contours on the other side and rolled again with a roller.
- Finished stained glass must be wiped with any detergent.
If it seems to you that such a stained-glass window has an unfinished look, you can decorate it with various glass elements by putting them on glue.
Making a jellied decor
For flooded stained glass, you need to prepare a polymer contour, acrylic varnish or a special paint for stained glass. 
The work consists of several stages:
- First you need to prepare a sketch, which should then be placed under the glass. Alternatively, you can transfer the drawing with a disappearing marker, there are no strict instructions on this matter.
- The working surface of the glass should be cleaned and degreased.
- According to the applied drawing, apply the boundaries of the sketch with a polymer contour, forming closed areas.
- When the contour dries, you can begin to fill in these areas by filling them with paint or varnish.
You can see this in more detail in the video:
The application of paint or varnish must be carried out very carefully so as not to touch the outline of the pattern. It is impossible to smear the paint on the glass, it must itself spread over its surface in order to create a stained glass window that plays with light.
In conclusion, we can say that stained-glass windows, undeservedly forgotten a few years ago, are becoming in demand in our time. They not only decorate and revive our interiors, but also make them more comfortable and spectacular. The great advantage of this decor can be considered the possibility of using several techniques at home without resorting to sophisticated equipment, which allows a person to enjoy a corner of luxury at home.
Stained glass is a special kind monumental art, which is original decoration interior. But pleasure is expensive, because such decorative painting requires from the master accuracy and accuracy of lines.
There are quite a few stained glass technologies, which allows you to choose the simplest of them and make a stained glass window with your own hands at home. You will only need perseverance, an accurate eye and accuracy when working.
Let's take a closer look at stained glass manufacturing technologies and master classes.
Each creative work, And making stained-glass windows with your own hands including, it begins with a sketch study of the idea.
- First, decide what size your product will be, and develop a sketch on thick paper or cardboard of the same size.
- Clearly draw the contours of each element of the picture, breaking it into shapes.
- Specify the color and material of each fragment.
- If necessary, number the fragments, write notes and the necessary designations to make making a stained glass window at home easier.
Stained glass drawings are a whole art. If you are not good at drawing or you simply have no ideas, print ready-made stencils for stained glass windows or seek help from an experienced artist.
Before you make a stained glass window with your own hands, decide on the stained glass object. It can be windows, doors, mirrors or just a picture that will organically fit into your interior. The choice of stained glass manufacturing technology also depends on the choice of object. There are three common techniques for making stained glass windows with your own hands..

The stained-glass window manufacturing technology is the easiest to master on your own. A beautiful stained glass window with your own hands can be created in two stages.
- Drawing a contour. The contour prevents paints of different colors from mixing and gives the stained glass texture.
- Filling elements between contour lines with paints.
Gallery: do-it-yourself stained-glass windows (25 photos)


Do-it-yourself stained-glass windows: a master class
- On the finished stencil or sketch, put the cleaned, degreased glass.
- Apply a polymer contour along the lines outlined in advance, forming closed areas.
- Wait for the contour to dry, and then fill the elements with stained glass paints using a brush or syringe.
- If the paint has leaked through the contour and mixed with another color, remove the drip with a knife or razor blade after the paint has completely dried.
Film stained glass: master class

Tiffany stained glass: master class
- Cut out each element of the pattern from cardboard.
- Cut the glasses into separate fragments according to the stencils.
- Sand sharp edges and uneven glass.
- Wrap each piece in copper foil and solder together.
- Cover the soldered seams with paint, imitating the outline.
As you can see making a stained glass window with your own hands is not difficult. With a desire, you can decorate windows, glass doors, mirrors and much more. And with the technique of English film stained glass, you can even decorate the ceiling.
Now let's take a closer look at how to do stained glass paints and imitation lead binding between drawing elements.
Stained glass paints can be purchased at special art stores, but if there are no such stores in your city or you do not want to spend a lot of money, then there are several ways to make paints at home:
- from PVA glue and food coloring;
- from PVA glue and rods from gel pens;
- from oil paints and solvent;
- from BF-2 glue and acetone;
- from gelatin and fabric dyes.
 If you are making paints in the first way, then take a regular plate and mix two teaspoons of PVA glue with a few drops of liquid food coloring in it. desired color. In a similar way, paints are made with the addition of paste from gel pen. Mix glue and paste to a uniform color.
A more complex option is the manufacture of paints using a solvent, nitro-lacquer and oil paints. Mix 1/3 nitro lacquer with a small amount of thinner. Add one tube oil paint and mix everything until smooth.
And you can also mix BF-2 glue and acetone in a ratio of 1: 1. Add any soluble paint to the mixture and mix everything again with glue. Now you can get to work.
Another inexpensive way is to mix gelatin and fabric dyes. Dissolve gelatin in warm water until swollen and add paint.
Stained glass paints themselves are liquid, homemade paints can be much thinner. Adding a little eyeshadow or loose glitter will correct this deficiency.
In a stained-glass window a special contour for stained glass paints is used, and in other types of stained glass this place is occupied by a special lead binding, an imitation of which can also be recreated with your own hands. For this, lead tape can be used, the principle of working with which is the same as with ordinary tape. Only lead tape is very thin, which makes it easy to lay it out along the contour, and has a protective film.
You can also use aluminum wire, which, due to its softness, can take any shape, including smooth contour lines. This wire is glued with PVA dish glue.
Using the same PVA dish glue, black ink and aluminum powder, you can prepare contour paste. First mix the glue with the mascara, and then add the powder. It should be remembered that such a paste is not stored and requires frequent stirring during use so it's better to make some pasta.
Having carefully studied all the technologies for making stained glass, stained glass paints, contours and bindings, you will be surprised how easy it is to transform the interior of a house and create a special atmosphere with only a little desire, patience and time. Your work will be appreciated by friends and relatives, because the real work of stained glass art costs big money.
Many people think that decorating a room with their own hands, stained glass paints is difficult. In fact, the lesson can become an exciting game for both adults and children. The main thing is not to be afraid to fantasize and not give up, making the first mistakes. If you are used to doing everything with your own hands, then stained glass will not cause you much trouble.
Types of stained glass
Before we start creating stained glass windows with our own hands, let's look at the main types of stained glass art and technology.
fusing
One of the most difficult techniques for creating stained glass windows is fusing. The stained-glass window is made of solid glass with colored elements applied to it. There is no fastening metal thread between the fragments, and the finished canvas is calcined in a red-hot oven for several hours.
The details of these stained-glass windows can have clear boundaries, can merge and overlap each other, or can take on textured outlines. It all depends on the idea of the master and on the temperature of the melting furnace. Stained-glass windows are created in production; it is difficult to repeat the technique at home.

Fish. Glass. Fusing. Master Elena Yaroshenko
Of course, it will be difficult to repeat the fusing technique with a small child, but with an older child, you can sign up for a stained glass master class. Impressions from a non-standard lesson will remain for many years.

Master Lilia Gorbach
Tiffany
In stained glass windows created using the Tiffany technology, working with glass involves bonding separate parts using a metal strip and soldering. Bizarre shapes, intricate plots and bright colors- the main component of any product in the "tiffany" technique. From the lamp, and the lampshade of the table lamp, to the dollhouse - all this can be decorated stained glass technique"Tiffany".
Creating stained glass windows using the Tiffany technique with your own hands can cause the following difficulties:
- glass must be cut small parts and sand the edges
- a metal thread does not always lend itself to soldering the first time;
- It is strongly not recommended to master this technique with a child.

Vera Yurieva, St. Petersburg

“Fairy”, Stained glass in Tiffany technique. Master Olga Lisitsyna, Voronezh region.


Lamp made of colored glass and glass drops in the Tiffany technique.
Master Nadya Bezrukova, Samara
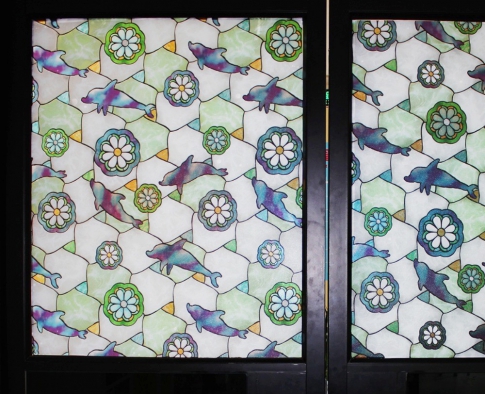
Film stained glass windows
Stained-glass windows made in the English technique, which involves assembling a picture on glass from parts of a self-adhesive film, are gaining particular popularity. For this stained glass window with your own hands you will need:
- self-adhesive stained glass film of different colors;
- self-adhesive lead tape;
- rubber roller;
- paint knife;
- glass.
This technique can be mastered with older children, having previously instructed how to work with materials.

The essence of the English method is to transfer the outline of the picture onto the glass. The blank can be printed from templates posted on the Internet, or you can create it yourself. First, we apply a contour to the glass with a black marker, then we glue it along the contour with a lead self-adhesive and turn the glass over. We paste a colored stained glass film and apply the second contour of the lead tape. It remains to fix the lead contour with a rubber roller.

Film stained glass on the cabinet door. Workshop “Miracle of glass”
Stained glass films are monophonic and multi-color, smooth and with embossed effects, interspersed with particles various forms and shades.

Painting on glass with stained glass paints
Most affordable way creating stained glass windows with your own hands - stained glass paints. This version of the stained glass will appeal to both adults and children. It is based on: drawing the outline and drawing of the future stained-glass window with special paints.
A picture created with stained glass paints must dry completely after being made, therefore, after applying a contour or picture, the product will have to be left alone for at least 24 hours.
But you can draw with stained glass paints with your child different ages. The younger ones can copy the contours through the film - the basis, the older ones transfer the drawing directly onto the glass.

Interior plate with stained glass painting in African style.
3dogsdesign workshop, St. Petersburg

Flashlight with stained glass painting.
Decorator Maria Nett, Chelyabinsk

Painting with stained glass paints.
Maria Kirillova, Nizhny Novgorod
Technique for creating stained-glass windows according to your sketch
If you are seriously thinking about creating a stained glass window with your own hands, using stained glass paints, do not rush to master windows and glazed doors. First, you should try to draw a stained-glass window on a small area. For example, decorate a night light or a vase, a glass plate or a mug.
stained glass paints
To create stained-glass windows with your own hands, you need to decide which paints you prefer to use. All paints for stained glass can be divided into fired and non-fired. Fired allow you to calcinate the finished product in the furnace, that is, to extend the life of the finished stained glass window.
But, despite the obvious plus of the fired materials, such stained glass paints have drawbacks. Firstly, after firing the product, the paint becomes matte, losing its former brightness. Secondly, some shades after annealing may change their color. Turbidity may appear.
Unfired paints do not have such features. Ready product has bright, juicy colors, smooth, glossy structure. The only “but” is that you will have to wash this product manually using mild detergents.

Paints and contours for glass without firing Idea
Contours for stained glass paints are sold in special tubes. Very often, beginners buy a black outline. It is not right. Working with a black outline is more difficult than it seems at first glance. Lines can be unreasonably wide, and contours can be conspicuous. Overshadowing the whole picture.
A beginner in stained glass decoration and decor is better to use the contours of silver or white colors. Do not be afraid, at first the line will be larger than you planned, but with experience you will understand how to extrude the contour paint of the desired width.
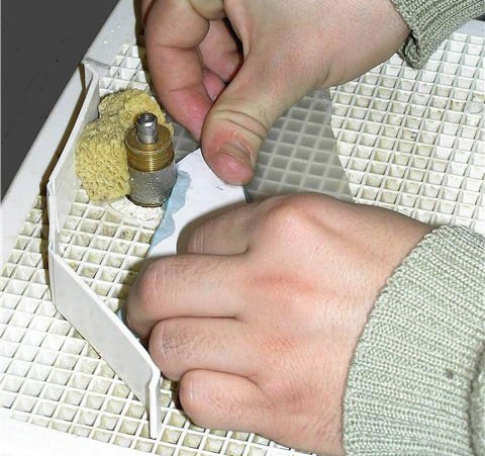
So that the tip of the nozzle does not dry out and does not become overgrown with paint residues, always place a damp sponge next to the product, on which you will wipe off all excess.
Stages of work
Before working with glass, it must be freed from dirt and excess fat. To do this, wash the base under running water with detergent.
Now for the sketch. If you do not want to repeat replicated pictures and dream of creating something unusual, then the drawing can be done using special programs or in simple Paint, which is on every computer.
Having created and printed a sketch, we proceed to transfer it to a glass product. If this is a night light for decor, then we carefully set the sheet with the pattern inside the glass lampshade, fix it with adhesive tape.

Now we take a black marker for working on glass (its outline is erased very easily), and we draw the outlines of the picture on our lampshade. The next step: apply the stained glass contour and leave the product to dry.

In creating stained glass windows with your own hands, it is important to work correctly with stained glass paints. Before use, each tube must be shaken, but not shaken, so as not to raise a bunch of bubbles.

Stained glass paints are applied in a thick layer on every detail of the picture. Allow each side to dry completely. The finished product can be opened with acrylic varnish to fix the parts, or it can be calcined in an oven. In the second case, pay attention to the heat resistance of the base glass.

Stained glass paints as fun for a kid
In order not to go broke on expensive stained glass paints, you can invent fun for the baby yourself. To do this, take a tube of PVA glue and several bags of food coloring. Mix the dye with glue until you get a homogeneous, thick mass.
Under the containers, you can use empty gouache tubes, or baby food jars. Such material is ideal for work even for a small child.

The next step is to apply the pattern to the film. Do-it-yourself stained glass paints are applied to a file sheet containing the desired picture. A child over three years of age will cope with tracing the contour and applying a pattern according to the template under the film. The kid needs to be given space for creativity.
After complete drying, the film with the painting is separated from the template and glued onto the glass.

My daughter loves to draw the sun and flowers, houses and little men. If earlier her art forced me to wash off the paint from the windows for hours, now the acrylic pictures are easily attached to the glass. They are also easy to remove, which is great!

This is how interesting, friendly and creative we create stained-glass windows with our own hands with stained-glass paints, which is what we wish you too!
The oldest example of stained glass art that has survived to this day dates back to the 7th century BC. As strange as it may sound, the process of making stained glass is so simple that even children can learn how to make stained glass windows on their own.
Stained Glass Styles
Behind for a long time existence of this type of creativity creation technology glass drawings has been greatly improved by hand. New types and technological features have appeared.
Having studied all the techniques, you will be able to choose the right one, each time planning new interesting stained-glass windows.
Classic way
The classic technology for creating stained-glass windows with their own hands has been preserved to this day. The master draws sketches on the main glass, cuts them out, and, according to these blanks, prepares the details of the future composition from colored glass. The particles are inserted into a pre-prepared forged frame.
After the installation of colored glass is completed, the iron partition is sealed for greater strength. The finished product is beautiful picture from large geometric elements with a well-defined metal outline.
In ancient times, wide openings of buildings were decorated in this way. Stained-glass windows were especially often used to decorate windows in Christian and Muslim churches - the ideas for drawings were taken from biblical and Koranic motifs.
charm classic way in that it allows you to connect the details large sizes with your own hands. Unfortunately, the design turns out to be quite voluminous and heavy, so it is not recommended to use it to decorate the ceiling. In addition, rough metal does not make it possible to draw a pattern from small curved parts.
Tiffany stained glass
The improved technology was developed by the founder of the Tiffany jewelry company, Louis Tiffany, at the turn of the 19th and 20th centuries.
He came up with a rather simple solution, thanks to which the stained-glass windows began to look different. Instead of lead rods, Louis began wrapping glass parts with thin copper strips with his own hands. As a rule, the strip protrudes slightly above the plane of the part.

After drawing up the drawing, the parts are treated with flux to prevent rust and soldered to each other. The protruding edge of the copper tape is leveled above the glass surface, creating additional protection against falling parts from the frame.
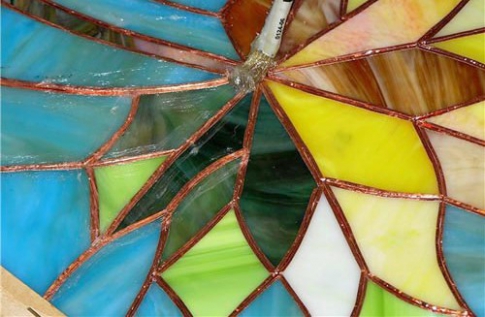
Thanks to the Tiffany technique, stained glass windows have turned into real works of art! Fine filigree patterns made up of small particles allow for smoother color transition and naturalness of the image.
Tiffany stained glass can be used to create almost any product due to their lightness and beauty.
fusing glass
The amazing fusing technique allows you to create a variety of products - from glass inserts in doors and furniture to painted dishes. But this method is too laborious to make stained-glass windows of large sizes with your own hands.
The peculiarity of the technique is that colored elements are laid out on top of the main transparent glass. The workpiece is sent to the furnace, where, under the action of high temperature, the parts are fused into each other. Thus you get colored glass without iron barrier.
Another disadvantage of fusing is that it is difficult to find a kiln in which large items can be placed.
Pseudo-stained glass
Modern technologies have given people the opportunity to create stained glass windows with their own hands without learning the laborious process of forging, metal processing and glass cutting.
All you need is a piece of transparent glass of a certain size and a special film with colored patterns that allows light to pass through. There are several types of film:
- self-adhesive - a sticky layer is applied on one of the sides of the material;
- a film that needs to be attached to the glass using a special colorless glue.
Film stained-glass windows help save on interior decoration, while maintaining an interesting appearance glasses.
In addition to the film method, the use of special stained glass paints is also widely used. Transparent gel-like mixtures are applied to the workpiece in the form of a specific pattern. After they harden, the glass takes on the appearance of a transparent stained glass product.
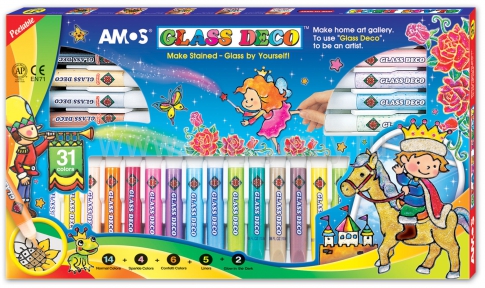
This technology is so simple that Lately children's kits for creativity began to appear, allowing you to create painted stained-glass windows with your own hands.
Tiffany stained glass: master class
Tiffany stained glass is very easy to create even at home. Prepare colored glass shards, glass cutter, thin copper foil - foil, soldering iron, grinder, flux, soldering tin.
- Create a blank sketch - the more T-shaped connecting lines in the drawing, the stronger the details of the stained-glass window will hold.

- Print out 2 life size copies of the sketch. Number the pieces on each sketch and cut one of them along the seam lines.
- The second whole sketch is pasted over with adhesive tape and inserted into a wooden working frame.

After working on the sketch, you can proceed to the preparation of parts.
- Attach the cut out parts of the first sketch to the fragments of a certain color.
- Take the glass cutter and start cutting out the colored element, holding the tool at a 45 degree angle to the surface. Try to cut the part in one continuous line, keeping a constant pressure, otherwise you may get chips and cracks.

- After the glass cutter, microcracks formed in the glass. Barely tapping on it, you can separate your part.
- Use a sander to smooth the edges of the glass and give them a rough texture before the next steps.
- Now wrap the piece with copper wire. Use foil - a special thin long copper material with one adhesive side.
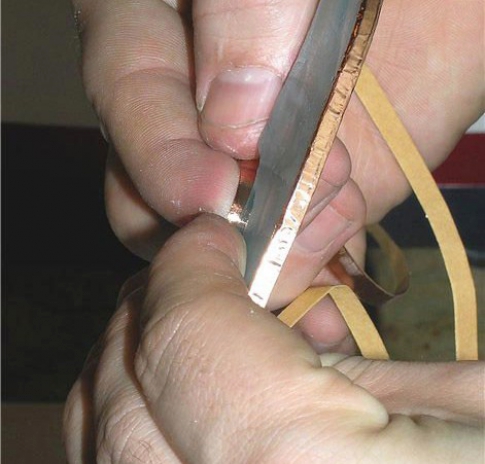
- Bend and smooth out the protruding edges of the foil on the product.

- Set the finished element to general drawing with nails driven around.

- When all the parts are in place, remove the nails and flux the gaps between them.
The preparatory stage is completed - you can start soldering!
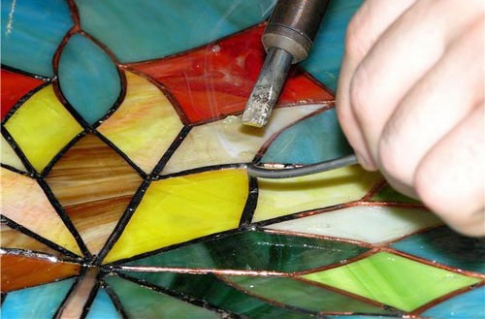
- Put the tip of the tin wire to the joint and heat it on top with a soldering iron. Thus, gradually process all the seams with your own hands. Do not keep the soldering iron in one place for a long time - you can overheat the foil and glass, and also melt too much tin.
- After completing the soldering of the pattern, remove the wooden frame and bring the iron blanks to the sides of the picture.
- Using tin, solder them with the image at the points of contact with the seams.
Leave the product to cool in a dry, ventilated area for an hour or two. When it reaches room temperature, wash the painting well with a sponge, water and degreasing detergents.

Now your creation can be hung on the wall or placed on a shelf.
Filled stained glass: master class
Try to make stained-glass windows with your child - the kid will surely enjoy the process custom drawing. The main thing is to follow the safety rules: after all, your main material - glass - can lead to injuries and cuts.
Prepare stained glass paints - they are easy to find in large stationery stores- and a small square piece of glass. Pre-insert it into the frame with rounded corners to protect the child from sharp edges.
With dark color paint, draw thin sketch lines on the glass with your own hands. The most commonly used color is black. You have defined hollow areas. Near the black color, but not on it, drip several times with a color tint - it should spread over the cell on its own.

You can create beautiful stained-glass windows with your own hands for decorating a candlestick by watching the following video.
With this technique, you can decorate a glass frame for a photo, a locker door or a window in a nursery.


