Paintings were once a luxury available only to wealthy gentlemen. Everyone can decorate the interior with paintings today. It is not necessary to buy them at all. With the help of available materials and rich imagination, you can make a dozen paintings, even if you are not Modigliani.
1. Geometry
- Geometry is an extremely popular pattern in interior decor today. And it's easy to draw. Having drawn the canvas into squares, and the squares into triangles (we paint the latter as the soul lies), we get a fashionable, stylish and bright picture.
2. Prints
- Playing on color contrasts and using natural “stamps” or stencils (for example, fresh flowers), you can “draw” unique canvases that will definitely be in a single copy. Try to print asters on a white canvas with rich colors - the result will pleasantly surprise even connoisseurs of high art.

3. Stencils
- Any branch can become a stencil for your future picture. Lay it beautifully on the canvas, fill the canvas with spray paint, remove the stencil. And do not tell anyone where such luxury is sold.

4. Fabrics
- However, who said that the picture needs to be painted? A piece of beautiful fabric will not hit the wallet and will become a cozy addition to the interior of a nursery or kitchen, where simplicity is always appreciated. To decorate the living room, choose more expensive fabrics - for example, silk or velvet.

5. Buttons
- Where there are fabrics, there are buttons. In general, buttons are a grateful material. And they are inexpensive, and the decorative possibilities are wide - they can decorate both a dull rag bag and a boring interior. A picture with a button heart will melt this very heart of absolutely everyone.

6. Wallpaper
- Similar to fabrics, wallpapers can act as paintings. It is good if there are several such pictures in a row. A lone piece of wallpaper in a frame looks at least strange. Ornaments and floral prints look great against the background of plain walls.

7. Threads and nails
- Threads stretched over nails look extremely impressive, although it is difficult to imagine more incongruous things. Nevertheless, the paintings from them are masterpieces. The direction even has a name - string art.

8. Modules
- Any "doodles" and abstractions, divided into modules, will look fashionable. Cover several picture frames with fabric, put them together to form a single canvas, make a few careless strokes of the brush, disconnect and hang on the wall.

9. Beans
- Creativity can be used natural materials including food items such as beans. Before gluing the beans, paint the sketch of the future picture with paints. Choose a simple plot, use beans in contrasting colors.

10. Branches
- Nature is rich in materials that are widely used in creativity. Dry branches more than once became the heroes of crafts. We suggest attaching pre-painted dry branches to the back of the frame. And then what? All! The picture is ready. Looks no stranger than most paintings world size.

To give a hateful interior design a new character and color, as well as to bring a fresh stream into the design of the kitchen, bedroom, nursery, paintings created by yourself will help. You can make unique paintings with your own hands from any available materials; this absolutely does not require professional art education. Stylish works of art that rightfully occupy a dominant role in the house - this is bright accent, which will be able to revive the interior, filling it with individual features.
In fact, you can make a picture with your own hands from almost anything. Yes, yes, this is not a joke. Applying imagination, all creativity and creativity, it is really possible to use any materials at hand: coins, shells, buttons, threads, fabric cuts, leaves, dried berries, small branches, cutlery, sewing accessories, personal photographs and even miniature children's toys.
An excellent solution not only for the kitchen, but also for the bedroom, living room, nursery. Such modular compositions look holistic due to a single trunk and branches extending from it. The background of each individual element corresponds to a certain season (autumn - orange, summer - emerald, spring - light green, winter - blue). The button foliage is also made in a tonality corresponding to the presented seasons.
Button painting

Composition of buttons "Seasons"
A few more buttons
Buttons are the perfect material for self-creation interior paintings. Using the structure, dimensions, shape and materials wisely, you can create real masterpieces without having an art education.

fluttering butterfly

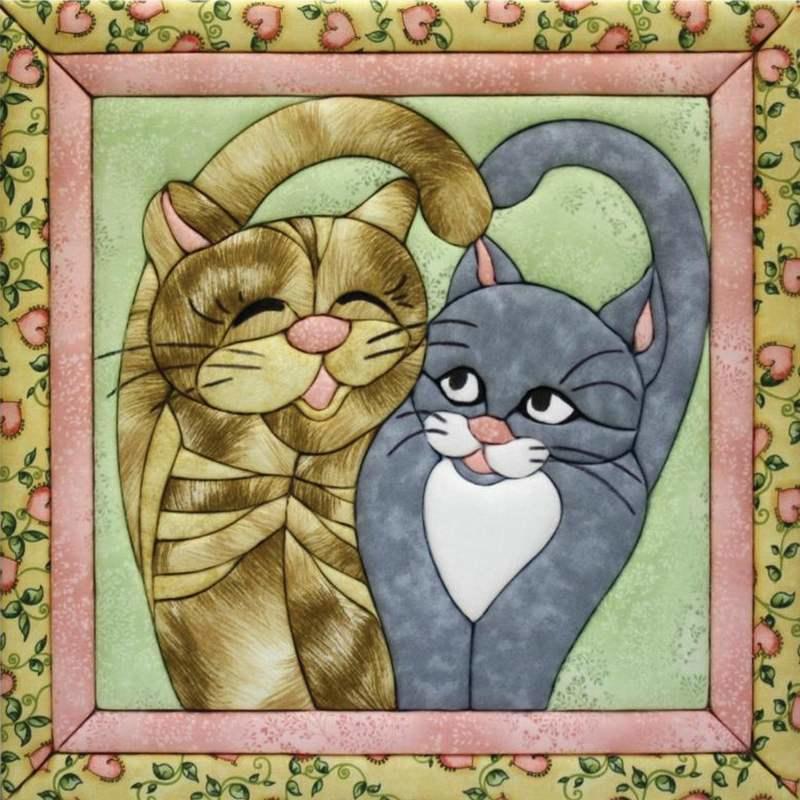
Cat for cat lovers

Seascape from buttons

Color spectrum-rainbow
Leather goods
Despite the fact that the skin is quite easy to process, the picture is not so easy to handle. Here you need an understanding of working with the material, knowledge of the basic properties of the skin, considerable patience and perseverance. Therefore, it is recommended that you first try to make small trial compositions, and then move on to voluminous, fundamental works.
The most commonly used color palette in paintings made of genuine leather - brown-beige. But some daredevils are happy to use green, red, orange, yellow patches.
The main advantages of leather images:
- Exclusivity - due to the originality of the material, it is impossible to repeat the picture one to one;
- Relief - depth, elevation, highlights and shadows create an unsurpassed 3D effect, thanks to which the picture "comes to life";
- Availability - small pieces of leather can be found both at home and purchased at the "flea" market or from shoemakers literally for next to nothing.

Still life of multicolored leather

Game of contrasts (applied red, black and white patches)

Convex leather flowers
Video master class: do-it-yourself leather painting
Panel of products
One of the most relevant techniques for creating paintings for the kitchen is subject application. Moreover, in this case, cereals, coffee beans, small dry vegetables and fruits, citrus peels, spices and the like are most in demand.
Food panels look harmoniously in the interior of the kitchen, as they look not only stylish, but also appetizing.


Monochrome composition of black and white beans

Landscape from various cereals and seeds

Round panel of legumes
Framed wallpaper
Paintings from wallpaper are a very budgetary addition to the interior. Moreover, you can create in several techniques at once: appliqué, 3D format, stretching on a wooden base, etc. Wallpaper is good because it fits perfectly into any room in style - after all, the remnants of rolls purchased in excess are used.

Ornament elements

creative collage

Panel from the remnants of wallpaper

Wallpaper frames
Application of dried flowers and leaves
Unusually look on the wall and paintings made from pre-dried vegetation. Buds, flower buds, petals, small twigs, leaves, blades of grass - everything is used. Having drawn pencil sketch on paper, just glued on top necessary elements according to your preferred color and shape.

Vase with Flowers

Volumetric picture of dry vegetation

Unusual application of flower petals
Photography in the interior of the kitchen
For those who prefer to follow the path least resistance, a wonderful way to add color to the room - photo paintings. In this case, it is enough to pick up a photo on the Internet or from a personal archive, and print it on a large-format color printer.

Do-it-yourself photo-triptych for the kitchen

Thematic composition of several photos

Photo collage on canvas
Fabric drawings
Fabric paintings are also widely applicable in the design of kitchens. They always look original, colorful and stylish. To prevent dust and grease from penetrating inside, upon completion of the creation of a work of art, textiles are usually treated with varnish. For fabric products, synthetic material, burlap and silk are best suited.

Textile application in 3D format

Flat patchwork appliqué

Fabric painting made with a sewing machine
- When creating a picture for the interior with your own hands, it is best not to dazzle with colors, but to use a tone that matches the design of the kitchen. You also always need to adhere to the style of the overall concept of interior design. For example, in a classic room, leather goods and canvases painted in oils are acceptable. The following materials are suitable for high-tech style: glass, metal, mirror. Provence can be filled floral ornaments and paintings from cereals. Volumetric works harmoniously look in modern kitchens and combined styles.
- The color palette should include three primary colors and several (at the request of the owner) close shades. Cold tonality is allowed to be diluted with warm accents, but you need to take colors from the opposite spectrum.

Color spectrum: the right principles for combining shades
- For convex shapes, you should always use alternating light and dark tones. Moreover, oversized dark volumes look best on a light plane. Approximately the same principle of a tandem of glossy with matte materials: matte should protrude above glossy. Thus, great depth pictures and maximum 3D effect.
- When making paintings on your own, whether it is an applique or a drawing, it is important to observe the basic compositional principles, dynamics and balance.


- easy way make the picture original - bring the inner picture outside basic contour. For example, to extend the image to the frame or, with relief forms, beyond the border of the frame.
Four simple master classes

Photo end result
You will need:
- empty candy box or any deep frame
- bilateral colored paper
- simple pencil, eraser
- cardboard scraps
- sharp scissors
- PVA or transparent stationery glue.
Step-by-step instruction:
- At the bottom of the candy box you need to draw a big heart. It is desirable that the distance to the frame is at least 20 ... 50 mm (depending on the size of the box).
- Make several templates of different sizes from cardboard in the shape of hearts.
- cut by cardboard templates multi-colored paper hearts. Fold each heart in half vertically.
- Glue two hearts of the same color and size. Gluing is done along the edge of the upper figure.
- Lay out a composition of double miniature hearts inside the frame. Important - you can not go beyond the contours of the drawn big heart.
- Glue all the elements according to the laid out scheme. Glue should be applied only to the edges of the hearts.
- Volumetric 3D picture is ready! Then you can decorate it by painting a plain frame or using a hanging decor (candy on ribbons, paper butterflies on a fishing line, and the like).
DIY drawing

Photo of the final result
You will need:
- colored cardboard
- simple pencil, eraser
- ruler
- black marker or marker
- PVA glue
- scissors
Even a child can make such a picture on their own. After all, the exact shapes and proportions are not important here. The main thing is to skillfully wield a ruler and a pencil, and also to have at least a little creativity.
How to draw a picture yourself: step by step

Tip: The drawing can be left in monochrome or painted with colored pencils, watercolor, wax crayons to match the interior.
How to make modular composition yourself

Photo of the final result
You will need:
- piece of fabric (the size should be with a margin - for each detail you need a margin of at least 10 cm in width and 10 cm in height)
- pieces of plywood and wood slats for the frame
- foam or chipboard for the base
- furniture stapler
- scissors
- tape measure or long ruler
- a simple pencil or chalk (chalk is useful if the fabric is dark in color)
Step by step instructions:
- Two options for creating a base for a do-it-yourself painting:
- Making a stretcher with your own hands. Saw the ends of the rails at 45 degrees and connect them with glue or a stapler. For reliability, it is recommended to fix isosceles triangles small size at the corners of the frame. Triangles can be made from plywood or fiberboard. Also, for structural rigidity, you can stretch the fabric around the perimeter by attaching it with a stapler.

Making a stretcher with your own hands
- Cut the finished base strictly in size from chipboard (16 ... 25 mm) or prepared foam.

Chipboard base
- Fixation of textile fabric. Cut the fabric to a size larger than the stretcher, taking into account all the folds. Next, you should slightly moisten the material and only after that proceed to pulling on the base. Corners require special care and attention.
Tip: first you need to stretch the long sides of the future picture, and then the short ones.
Before fixing one of the sides, you need to make sure that the material is not crumpled and not crushed.


- That's all - modular picture ready. By the same principle, you can make a photo decoration for the interior.
Decor for the kitchen from threads with your own hands

Photo finished work
You will need:
- base - you can use wood, laminated chipboard, corkboard and the like
- miniature carnations with wide caps (so that the thread does not slip off)
- ball of yarn of medium thickness
- scissors
- hammer
Step by step master class

This technique of self-creation of paintings is only the first step towards the manufacture of masterpiece works of art from threads. Having learned the basics, it will be possible to make pictures of the most complex configurations from multi-colored threads.
Pictures from threads: video master class
Fountain with ideas, create and get up - let the interior paintings made with your own hands please not only you, but also amaze, surprise, delight guests! Stylish interior the kitchen and the whole house are the merit of enterprising owners who are not afraid to experiment.
Creation three-dimensional paintings on the walls - this is a great solution for those who are looking for fresh and extraordinary ideas for interior decoration. Volumetric decoupage is considered a sign of good taste, it has an exquisite look and impresses others with its originality. Graceful plaster bas-reliefs over the fireplace, textured putty paintings, flower arrangements, images and patterns are far from full list creative solutions, thanks to which you can realize your creative ideas. A lot of photos, videos, master classes on decorating rooms using three-dimensional drawings can be found on the Internet, so everyone can create such a masterpiece with their own hands.
You can create a relief on the wall with the most different ways, in this case, it all depends on imagination and skills. Decoupage is one of the most simple techniques, which allows you to decorate any surface with your own hands. The main advantage of this method lies in the ability to give flat image volume and depth, while using available improvised means.
The presented master class on creating volumetric panels using decoupage technique will allow you to study the workflow and apply the knowledge gained in decorating your own walls. First of all, you need to prepare materials and tools:
- decoupage paper;
- glue;
- polymer clay that hardens in air;
- paper napkins and towels;
- varnish based on polyurethane;
- paint brushes and scissors.
From decoupage paper or napkins with a pattern, you need to cut out the desired image. If the resulting workpiece is too large in size, you can cut it into several parts so that there are no problems with gluing. Next, you need to wet the parts of the composition in warm water and get them wet paper towel. On reverse side The drawing is applied with universal glue for decoupage, after which the workpiece is glued to the wall and pressed with a paper towel. The remaining elements of the image must be glued in such a way that all joints at the cut points are neatly connected, while maintaining the integrity of the picture.

Important! In the process of gluing the picture, the master must ensure that there is no excess glue and bubbles between the paper and the wall surface.
To create three-dimensional drawing, it is necessary to work with an already glued base. If you created a picture of flowers, then in the next step you need to cut out the same flower as at the beginning, and then also cut it into pieces.

The first petal is smeared with glue, then a small piece of modelin is glued to the corresponding element of the flower on the wall, which is also covered with a layer of glue. The petal is lowered into the water, dried with a towel, smeared with glue and pressed against the model.

Each part must be pressed and carefully leveled, and at the end of the work, leave the resulting picture for several hours until the modelin has completely hardened. The final stage of decoupage is applying varnish with a thin brush, resulting in an original relief on the wall in the form of a floral ornament.
Paintings from putty
Putty drawing is a rather laborious process that requires increased accuracy, certain skills and creativity. But original design DIY walls are worth the time and effort spent. The choice of tools used in the work depends on the specific pattern, the volume of the drawing and the technique of execution. The master class below will help you understand the features of such decoration.
As a rule, any master class is based on a standard work technology, which includes the following activities:
- The surface must be plastered, cleaned and treated with a primer.
- Prepare a putty solution - it should have a pasty consistency.
- Using a wide spatula, apply the mixture to the wall with a layer no thicker than 1.5-2 mm.
- After the material has dried, draw a sketch of the future image with a pencil; for this, you can also use stencils or transfer the finished drawing through carbon paper.

Volumetric drawing on the wall can be created in several ways - using spatulas or a syringe. The first technique can be seen on the example of drawing a flower stem:
- Put the spatula next to the traced line of the stem and smoothly draw it along this line - this way all the contours of the image are drawn. In this case, the tool must be held at an angle away from you so that the mixture slides towards the sketch line and forms in the form of a three-dimensional roller.
- Remove excess putty with a dry spatula, then leave the drawing to dry completely.

Advice! Before decorating a room with your own hands, it is recommended that a novice master practice on separate sheets of drywall or on walls in small rooms, such as a pantry.
Creation of a bas-relief
Bas-reliefs are another popular option for volumetric wall decoration, which you can create with your own hands based on gypsum, clay, plaster, alabaster and other materials.

Artistic modeling involves the following stages of work:
- cleaning the surface of the old finish, leveling, priming and base coat with plaster;
- creating a background texture using fleecy rollers, foam rubber, felt or other materials (this procedure is not required for decorative plaster);
- drawing a sketch of the created ornament;
- creating a three-dimensional image by applying several layers (a new layer of plaster must be applied after the previous one has completely dried);
- adding individual elements of gypsum to the composition;
- covering the bas-relief with a layer of selected acrylic paint;
- applying styrene-butadiene latex to a completely dried surface of the bas-relief (this material restores the shades of dried gypsum stucco).
Video: art modeling master class
In an age when all design solutions already seem boring and a little fed up, making a picture on the wall with your own hands means finding an opportunity to stun your guests and make them admiringly look at the creation of a talented owner. However, experts insist that even talent is not strictly required, because the main thing is desire. Everyone has the right to a zest in the interior, and the fact that you can make it yourself allows you to save a lot - it’s even strange that this technique has not yet become universally popular.
The idea of putting pictures on the walls is attractive enough to play a bad joke on the interested person. The owner of the premises, having heard about the unique opportunity to quickly, inexpensively and creatively decorate his home, can take rash steps - for example, make pictures inaccurately or use the first idea that comes across instead of the one that would turn out to be ideal.
You can't do that. Failure in this matter can greatly disappoint an unlucky designer, and it is possible that he is really a talent, he just does not suspect it himself. idea creative work without fail, it is necessary to bear for a long time - until all the details of its implementation seem obvious, and the idea itself becomes a familiar and integral part of the future implementer.

Remember that masterpieces are created only when the creator has a clear idea of both the work process and the final result.
Methods for making paintings
Once upon a time, paintings meant mainly painting, but if we are talking about a design element for a wall, then there will be much more options. There will be no usual paints applied to paper here - everyone can guess to draw a picture and insert it into a frame. We will try to analyze only those solutions that look fresh, and at the same time they can be made by hand.

Finished fabric paintings
This method does not involve any visual arts, except, perhaps, the correct compilation. The picture does not have to contain a clear plot and meaning - you can make a chic abstraction by simply hanging three pieces of fabric of the same shape and size stretched on the base next to each other, which would properly harmonize with each other.

If the fabric already contains some images, then this can be used additionally to create some kind of meaningful composition. It’s not difficult to make these with your own hands, here it will be harder to choose a good combination in such a way that it leaves a stable pleasant impression. You can deviate from the triptych proposed above - separate fragments fabrics may be irregular, intertwined, or combined in any other way.
 main feature in creating paintings from fabric is the ability to choose the right combination, in accordance with the rules for combining colors
 Embroidery
This method is fully consistent with the wisdom that everything new is just a well-forgotten old. In the old days, women decorated their homes in this way, but today this tradition has been largely abandoned - and in vain: with proper execution, embroidery looks very attractive. Of course, only a real needlewoman can do such work with her own hands, but literally any plot can be depicted. If the author also dreams of getting married, then her work, hanging on the wall in a frame, will tell a lot about potential candidates for husbands invited to visit.
Paintings in 3D
And who came up with the idea that the wall should be flat? We propose to make a real out of it with our own hands. volumetric image, whose features are conveyed not only by colors, but also by bulges and depressions!

Such work will be more difficult, more time and effort will be spent on its implementation, but the result will definitely be unusual! And you will need to do the following:
- On the wall that you plan to decorate in an original way, draw the outlines of the intended pattern with thin pencil lines. It is advisable to evaluate the sketch immediately under different angles view and from different distances, show to several people for an objective assessment and immediately correct if there is constructive criticism.
- In an oilcloth bag, collect a sufficient amount of putty and tie a container by making a small hole in it. With an impromptu putty gun, circle the outlines of the drawing so that the drawn lines become convex, thanks to the added layer.
- Wait for the material to dry and harden, and then use a small knife to carefully trim the volume contour. If the drawing is complex enough, you can highlight both the contours and the internal details with irregularities.
- Since the resulting surface will not only be convex, but also very rough, use sandpaper to achieve smoothness. Do not choose the coarse-grained option - it will only damage the results. creative work. It is best to give preference to the smallest grains used for final grinding.
- Mix gouache with liquid PVA glue - so it will be much more resistant and durable. Use a brush to color the image as you intended at the planning stage.
- To complete the picture, its borders can be marked with special baguettes, which in this case will play the role of a frame.
colored paper
Such a solution threatens to be short-lived, but it is easy to do it yourself and then periodically renew it, introducing additional elements. The idea is extremely simple - silhouettes are cut out of colored paper according to the template, for example, butterflies, which are freely glued to the wall using ordinary PVA, or simply pinned. Cut out figures can be additionally decorated with intricate patterns. Ideally, the figures should differ in shape and size, and maybe in color. It is best to combine opposite shades, for example, black with white or red with blue.

For the wall near the stairs, figurines imitating a kitten captured in various playful poses on different steps are perfect.
Twine as a tool in the hands of the artist
Striking but do beautiful jewelry for the interior, you can even use an ordinary rope! Only a gifted person can make such a picture with his own hands - here it is necessary artistic vision and great patience to secure the rope in a vertical position in the required form. You can set the shape in any way - both with hot glue and with hidden thread fasteners. The resulting product is attached to the wall either with the same glue or with hidden studs.
 Twine paintings look unusual and stylish, so this wall decor option definitely deserves attention.
 Three-dimensional paintings with appliqué elements
You can make a picture with your own hands, which will combine both painting and applicative creativity. For this you need:

Value this product it will turn out to be all the higher because, despite the availability and prevalence of all the materials used, not so many people can create such a masterpiece, simple in its genius, with their own hands.
Option for the laziest
After all, there is a way to create wall painting, which does not require any talent, or any skills, or even effort. All you need is to find the desired image on the Internet in good resolution and print it out on a printer. Next, the resulting printout is inserted into a frame purchased in advance in the store and voila - cheap and cheerful!
Not every person decides to hang beautiful pictures in their own kitchen. And this despite the fact that designers highly recommend decorating the kitchen with their own hands. After all, they will be able to bring something new and unusual to this room. Do-it-yourself paintings for the kitchen are considered a new direction in the transformation of premises.
If you want to decorate the kitchen with paintings, then, first of all, you need inspiration. But how to find it?
The search for new ideas for inspiration should be drawn from everywhere. Do not discard even those that initially seem too simple and banal. They may end up being exactly what you need.
Also accumulate vivid impressions. Find some nice box and put in it all those curious things with which you hope to decorate your kitchen later.
Realize your abilities in new genres for you. To create something interesting, you need to try new ideas.
Coffee and condiments for paintings for the kitchen
Make a canvas with my own hands pretty simple. To do this, you only need certain tools and materials:
- various cereals;
- cardboard;
- glue;
- beans;
- Bay leaf;
- coffee beans;
- dense fabric;
- cinnamon bark.


Making a canvas for a painting
First you need to prepare the cardboard. From it you will need to cut a rectangle or square. It depends on how you want to see the picture.
After that, the resulting blank is circled over the fabric, an allowance of five centimeters is made and cut out.
Next, you need to attach cardboard to the fabric, cut off the corners of the fabric and glue it to the cardboard. To prevent the fabric from spreading, its corners will need to be glued with special care. Do-it-yourself burlap is pulled onto cardboard very tightly.

Drawing a picture for a picture
If you did everything written above with your own hands, then you should have got a canvas. Now you need to make a drawing by spreading coffee grains and cereals on the canvas. What will be the picture for the kitchen depends solely on personal imagination. The material can be laid out both freely and tightly.
After you have designed the pattern, you need to glue all the elements of the picture. You can use ordinary glue, but it is best to find a silicone gun with your own hands, since with its help gluing is much faster.
On this, the process of making this picture can be considered complete.
Paintings from cereals and seeds (video)
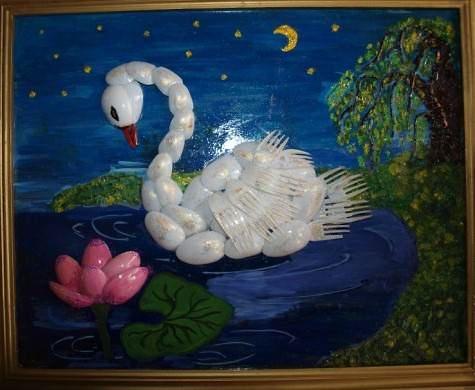
Cutlery crafts for the kitchen
In this case, we will not talk about standard pictures for cuisine, and more about panels.
Pictures from buttons and plates
The more buttons, the better. They will be the basis for the paintings. They will need to be sewn onto a dense fabric. After that, they are inserted into the frame and glued with glue. Interesting plates are hung in the center and on the sides, painted acrylic paints. The masterpiece is ready!
Pictures from spoons and forks
Forks with metal spoons can also be sewn to a dense fabric. They will need to be painted with enamel, after which you will get a beautiful still life.
Their plastic materials can make more interesting pictures to the kitchen. Plastic forks and spoons are easy to paint and can be glued to any surface.


Cross-stitch
With the help of cross-stitch, you can achieve incredible beautiful pictures for kitchen. Such paintings are considered simply stunning decor for this room. All drawings and pictures can be made from:
- various products;
- colors;
- utensils.
There are many things that you might not have paid attention to before. Now, thanks to the paintings, it will be possible to feel all their beauty and charm. In order to make such a picture with your own hands, The following materials and tools are needed:
- fabric (canva is best);
- scissors in the amount of two pieces (large and small);
- threads (preferably floss);
- marker for marking;
- special warmed needle;
- hoop (suitable various forms, sizes and from any materials).
All these materials are most often included in a common set for embroidery.
improvised materials
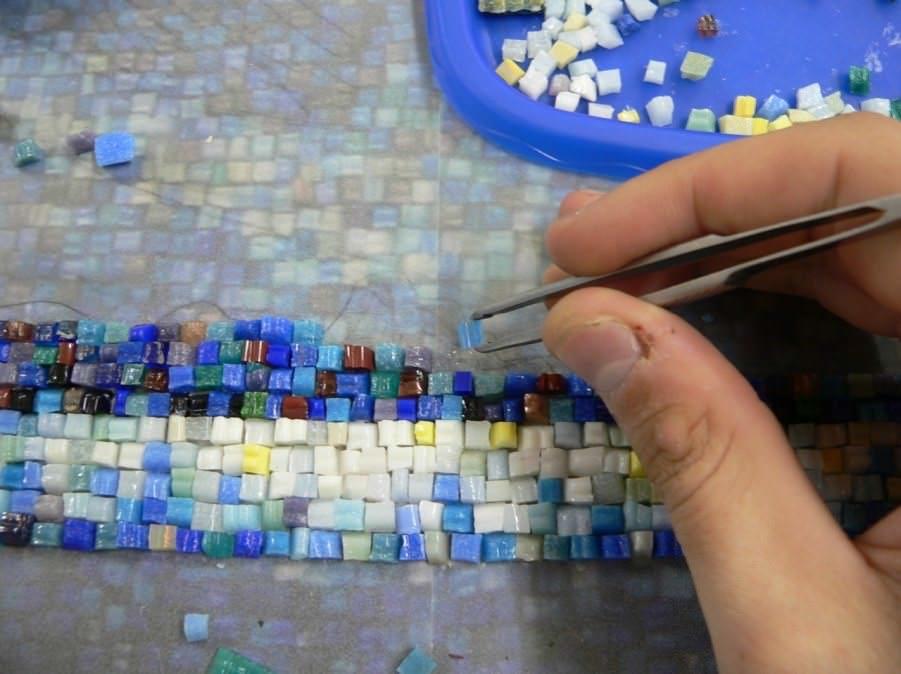
Mosaic
Mosaic opens up great scope for implementation creative ideas for kitchen. You can make pictures in the form of a mosaic from the following materials:
- glass;
- eggshell;
- broken tiles;
- rhinestone
Using the instructions below, you can easily mosaic picture:
- cardboard of the required size is taken as the basis;
- glue is applied to it;
- put all the necessary elements on it;
- to fix small parts, the product is varnished.
installations
In the manufacture of do-it-yourself paintings in the kitchen, you can use completely non-standard ways. With the help of ordinary household items, the most incredible pictures. For example, thanks to ordinary knives and other items, you can create an incredible composition. Therefore, for this materials such as:
- A4 photo frame;
- glue;
- ruler;
- pencil;
- scissors;
- cutlery in the form of a knife and other cutlery;
- pieces of fabric.
DIY flower painting
The essence of this picture is the collection of dried flowers. Making it is completely easy. Such flowers can be bought at any specialized store.
We take the basis, the flowers are glued to the glue. With the help of pencils and felt-tip pens, leaves and petals are drawn. If desired, you can even glue dried grass.

Leather painting for the kitchen
In this case, both suede and real leather are suitable. Its pieces are combined with paints, fabric and other materials. Most importantly, with any such combination, the picture will look amazing.
paper painting
Unfortunately, this picture will not last long. But very beautiful. You can do both origami and quilling. Basically, such masterpieces are made by children, to whom the manufacturing process brings a lot of pleasure.
Paper painting (video)
Decorating with posters
Posters are considered large images, which can convey someone's image or some idea. Black-and-white posters are considered the progenitor of posters.
Exists several types of posters:
- depicted on canvas;
- printed on canvas imitating paper;
- printed on photo paper
Making them for the kitchen is quite easy. It is enough to find the desired image.

Styrofoam painting for the kitchen
A lot of foam blocks remain after buying various household appliances. Many people throw it away, and do it completely in vain. After all, if you approach the matter creatively, then from it you can make a peculiar picture for kitchen.
Initially, you need to prepare an image. It will need to be glued to the surface of the foam. The sides of the block are also pasted over with paper. desired color. To hang the resulting picture in the kitchen, it will be enough to attach a small loop to the back of it.
Master class on making a frame for a picture (video)
Conclusion
You read in this article about the main types of paintings that you can make yourself. As you can see, there is nothing complicated in their creation. So feel free to start experimenting!
Paintings for the kitchen (photo)