This is a rather difficult lesson, so it may take you quite a lot of effort to repeat it. If the first time you didn’t manage to draw hands, don’t despair and try again. Try your best to complete this lesson. If, however, it still doesn’t work out, you can try to complete the lesson “”. But I believe that you will succeed.
What you need
In order to draw hands, we may need:
- Paper. It is better to take medium-grained special paper: it will be much more pleasant for novice artists to draw on this particular paper.
- Sharpened pencils. I advise you to take several degrees of hardness, each must be used for different purposes.
- Eraser.
- Stick for rubbing hatching. You can use plain paper rolled into a cone. She will rub the shading, turning it into a monotonous color.
- A little patience.
- Good mood.
Step by step lesson
Different parts of the body and human organs should be drawn with a certain degree of realism. This is required academic drawing. Also, he strongly recommends drawing hands from nature or, in extreme cases, from a photograph. This is the only way to achieve high realism and elaboration.
By the way, in addition to this lesson, I advise you to turn your attention to the lesson "". It will help improve your mastery or just give you a little pleasure.
All complex drawings must be created with forward thinking and vision. The subject should not only be a form on a sheet. You must draw it in volume, that is, creating from simple geometric bodies as if they are on top of each other: here is a ball on a cube, and here are two balls side by side. Of these primitive forms and consists of everything living and non-living on earth.
Tip: sketch with as light strokes as possible. The thicker the strokes of the sketch, the more difficult it will be to erase them later.
The first step, or rather zero, is always to mark a sheet of paper. This will give you an idea of where exactly the drawing will be. If you place the drawing on half of the sheet, you can use the other half for another drawing. Here is an example of a sheet layout in the center:
Well-drawn hands always ennoble the whole illustration as a whole. Some artists specifically include hands in their subjects.

Anatomy
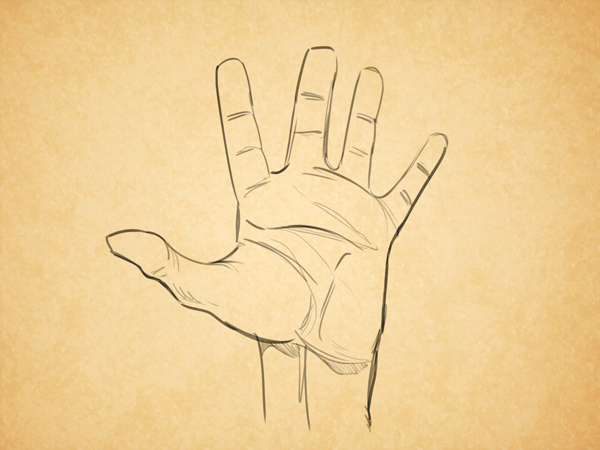
Most important fact- the fact that the hands are concave on the side of the palm and convex on the back. The bulges are so arranged around the circumference of the palm that you can even hold liquid in it. hand served primitive man cup, and by cupping his two palms together, he was able to eat food that he could not hold with his fingers alone. large muscle thumb- one of the most important in the brush. This muscle, in interaction with the muscles of other fingers, provides a grip so strong that it allows you to keep your own weight in a suspended state. This powerful muscle can hold a club, a bow, a spear. We can say that the existence of animals depends on the muscles of their jaws, and the existence of man depends on his hands.

It is worth paying attention to the powerful tendon attached to the base of the hand and how the tendons of the fingers are grouped on the back of the hand. These tendons can control both all fingers together, and each individually. The muscles that pull these tendons are located on the forearm. Luckily for the artist, the tendons are mostly hidden from view. In children and young people, the tendons on the back of the hand are not visible, but become more visible with age.

The bones and tendons on the back of the hand are close to the surface, but those around the palm and inside the fingers are hidden from. There is a pad at the base of each finger. It protects the bones lying inside and creates a grip with the object being held.
Proportions of the hand
Next important thing- This is a curved arrangement of fingertips and knuckles. Two fingers lie on both sides of a line drawn through the middle of the palm. The tendon of the middle finger bisects the back of the hand. Also important is the fact that the thumb moves at right angles to the movement of the other fingers. The knuckles are located slightly in front of the folds below them on the inside of the palm. Pay attention to the curves along which the knuckles are located and that the curve gets steeper the closer the knuckles are to the fingertips.

The middle finger is the key finger that determines the length of the palm. The length of this finger to the joint is slightly more than half the length of the palm. The width of the palm is slightly more than half of its length on the inside. Forefinger almost level with the base of the nail of the middle finger. The ring finger is almost the same length as the index finger. The tip of the little finger is almost on the same level with the last joint of the ring finger.

The figure shows how to correctly determine the position of the palm cavity. Also notice the curve of the back of the hand. Hands will not look natural, capable of grasping until the artist has mastered these details. The hands in the figure are depicted as if they were holding some kind of object. The loud sound of applause is produced by a sharp compression of air between the hollows of the two palms. Poorly drawn hands will look incapable of applauding.


Women's hands
Women's hands differ from men's mainly in that they have smaller bones, less pronounced muscles and a large roundness of the planes. If middle finger make the size at least half the length of the palm, the hand will be more graceful and feminine. Long fingers, oval in shape, add charm.


Man's hands


babies hands

Children's hands are on their own good exercise in drawing. The main difference from adult hands is that the palm is much thicker compared to small fingers. The muscles of the thumb and the base of the palm are very voluminous, even small children can support their own weight. The knuckles on the back of the hand are hidden by the flesh and visible through the dimples. The base of the palm is completely surrounded by folds; it is much thicker than the pads under the fingers.

Hands of children and teenagers
The proportions are basically the same. Aged elementary school the difference between the hand and the hand is small, but there are big changes in youth. The boy's arm is larger and stronger, showing the development of bones and muscles. Girls' bones remain smaller, so they never develop as big knuckles as boys. The base of the palms also develops more in boys, in girls it is much softer and smoother. In boys, the nails, as well as the fingers, are slightly wider.
For many artists, drawing hands is a rather difficult task. In this lesson, we will deal with the anatomy of the hands in order to simplify and understand all the details as much as possible.
Let's start by examining the bone structure of the hands (picture on the left). 8 carpal bones are drawn in blue, 5 metacarpal bones in purple, 14 phalanges in pink. Since many of these bones don't have the ability to move at all, let's simplify the basic structure of the hand: the picture on the right is all you need to remember when drawing.

Note that the actual base of the fingers - the joint that connects to the knuckles - is much lower than it appears visually. Knowing this is very important, especially when drawing bending fingers, which we will talk about a little later.
So, with all that said, an easy way to sketch a hand is to start with a basic brush shape, a flat outline (much like a steak in shape, but round, square, or trapezoidal) with rounded corners; and then complete the drawing with your fingers. Like this:

As for the fingers, when drawing, you can use the "three cylinders" scheme. Cylinders are quite easy to draw from different viewing angles, which makes it much easier for us to draw fingers in different perspectives. See how this scheme can be applied in practice:

Important: the joints of the fingers are not located in a straight line, but form a kind of "arch":

In addition, the fingers themselves are not straight, but slightly curved. Such a small detail gives significant realism to the drawing:

Let's not forget about the nails. It is not necessary to draw them every time, but let's still deal with the main aspects:

1. The nail starts from the middle of the upper joint of the finger.
2. The point where the nail separates from the flesh is located differently for all people: for someone it is along the very edge of the finger, for someone it is much lower (dotted line in the picture).
3. Nails are not perfectly flat. Rather, they resemble tiles in shape, with a slight bend. Examine your hands and compare the nails on different fingers: you will see that each nail has its own curve - but, fortunately, such fine details can not be drawn on each of your drawings :)
Proportions
So, let's denote the main proportions, using the length of the index finger as the main unit of measurement:

1. The maximum length of the distance between the thumb and forefinger is 1.5.
2. The maximum length of the distance between the index and nameless is 1.
3. The maximum length of the distance between the ring finger and the little finger is 1.
4. The maximum angle that the thumb and little finger form is 90 degrees.
Range of motion
When drawing hands, it is extremely important to know exactly how our hands move.
Let's start with the thumb. Its base, as well as its center of movement, are quite low on the hand.

1. In the usual relaxed state, a space is formed between the thumb and the rest of the fingers.
2. The thumb can be bent so that it touches the base of the little finger, but this will quickly become painful.
3. The thumb can be stretched to the full width of the palm, but it can also be painful.
As for the rest of the fingers, they have a smaller range of motion to the sides, and basically they bend to the front side, parallel to each other. Each finger can be bent individually, but it will still affect the other fingers. For example, try bending just one little finger and see what happens to the rest of your fingers.
When the hand is clenched into a fist, then all the fingers are intertwined together, and the whole hand forms a rounded shape, as if squeezing a large ball.

When the arm is fully extended (in the picture on the right), then the fingers are either straight or slightly bent outward - depending on the plasticity of our hands.
The fully clenched palm deserves special attention:

1. The first and third folds form a cross.
2. The second fold is a continuation of the line of the finger.
3. The part of the finger covered by the skin and the thumb serves as a reminder that the whole structure of the thumb is the furthest from the center.
4. The knuckle of the middle finger protrudes more than the others.
5. The first and third folds again form a cross.
6. The thumb is bent so that its extreme part is shortened.
7. The skin fold in this place sticks out.
8. When the hand is clenched into a fist, the knuckles protrude and become more clearly visible.
Hand as a whole
When the hand is in the normal relaxed state, the fingers are slightly bent - especially if the hand is pointing upwards, then gravity will bend the fingers. In both cases, the index fingers remain the most straight compared to the rest, and the little fingers, on the contrary, the most bent.

Often the little finger "runs away" from the rest of the fingers and is separate from them - this is another way to depict hands in the most realistic way. As for the index and middle, or middle and ring fingers, these are usually paired and "stick" to each other, while the other 2 remain free. This also helps to depict the hand more realistically.

Since all fingers are of different lengths, they always represent a certain gradation. When we take something with our hand, for example, a glass (as in the picture), then the middle finger (1) is most visible, and the little finger (2) is barely shown.
When we hold the pen, the middle finger, ring finger and little finger are bent under the pen.

As you can see, the hand and wrist are perfectly articulated with each other, and each finger, one might say, has its own life. That is why it is very difficult for every novice artist to draw hands. On the other hand, sometimes some go to the other extreme - they try to draw hands too carefully: they carefully draw each finger in its place, observe proportions and clear parallels of all lines, and so on. And the result, as a rule, is quite hard and not at all expressive. Yes. this can work for certain types of characters - for example, your character naturally has these qualities. But more often than not, you would still like to portray lively, realistic hands, right? The picture shows some positions of the hands in comparison - too unnatural, strained positions are drawn on top, and more natural, natural ones are drawn below, in a word - those that can be seen in ordinary life around us.

Varieties of hands
As you know, each person's hands have many differences and distinguishing features- just like faces. Men's hands are different from women's, the hands of young people are different from the hands of old people, and so on. Below are several classifications.
hand shape
Let's see what different shapes and proportions there are between the fingers and the hand:

Finger shape

Even nails are not the same for everyone! They can be flat or round, and so on.

More practice!
- Pay more attention to people's hands. First, on the anatomy itself: how the fingers look in different positions, how lines and folds appear and disappear, how individual details are strained, and so on. Second, pay attention to the types of hands: how do men's hands differ from women's hands? How do they change with age? How does it depend on the person's weight? Could you recognize someone by just one hand?
- Make quick, dynamic sketches of hands, which can come from any source - your own hands, or the hands of people around you, or just photos. Don't worry about correct proportions and generally speaking appearance and the similarity of your sketches; the main thing in sketches is to catch the very expression and express it on paper.

- Draw your own hands in various positions and, using a mirror, from various viewing angles. You can also start with small dynamic sketches.

Hands: the basics
Search for joints

Essentially, there is an invisible line that runs through the middle finger and through the center of the wrist. It should be perpendicular to a horizontal line across the wrist.
At the intersection of the lines, a circle is drawn, around which the hand rotates freely.

Depending on the person's hand, the position of the joints on the fingers also varies. However, to imagine where the joints should be, you can draw two curved lines emerging from the nail of the thumb. If you add wrinkles in these places, the hands will look very natural.
moving parts
Now we will look at how the hand moves. Once you understand these basics, you will be able to draw realistic hands.
Each area of the hand will be marked with a color, which will correspond to text of the same color.
Inner side

This area moves towards itself, along with four fingers.
Outer side

This area is not moving - this is very important to remember.
This area moves with the thumb towards the inside of the palm.
This area moves with the little finger, however, the movement is small.
hand drawing

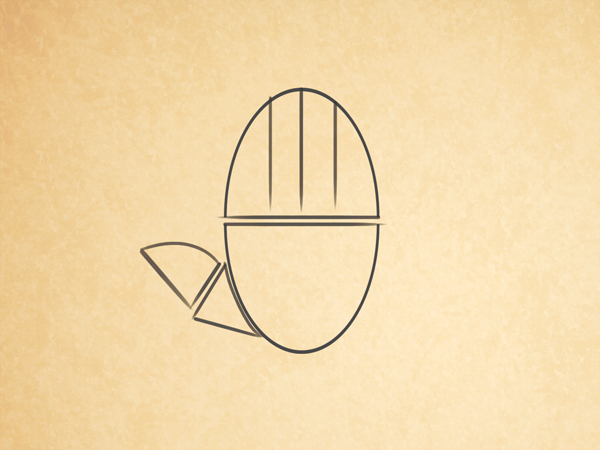
Let's draw the outline of the hand in the shape of an egg. The top of the egg will be the end of the middle finger. Next, draw the continuation of the hand, wrist and circle inside.

Now we outline where the thumb, palm and four fingers will be. For convenience, you can draw vertical line passing through the center of the palm.
Notice how the fingers are connected and how they move.
Make the outline smooth and erase the auxiliary lines.
The size and shape of the hand differs from person to person: wide palm, narrow palm, long fingers, short fingers. This list can be continued - therefore, there are rules in proportions when drawing a hand.
Basically, the length of the hands is approximately equal to the length of the middle finger doubled.
The middle finger is usually the longest. The index and ring fingers are approximately equal, but sometimes the ring finger is longer. The little finger reaches the top joint of the ring finger.


In order to understand how the muscles and skin move, consider the diagram of the bones of the hand.
Note that the bones of the index, middle, ring, and little fingers are mostly connected, which means they cannot move far apart. The thumb has much more wide circle movement.

Between the male and female hand exists a big difference. The human hand looks more masculine if it is given a more angular shape, and more feminine if it is given a soft roundness.

On average, the nail is about half the length from the tip of the finger to the first joint.
Female nails are drawn more elongated and rounded, while male nails are more square and angular.

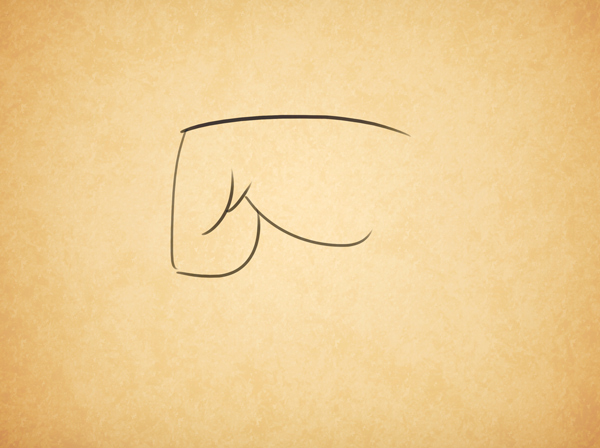
Let's draw a circle that will match the basic shape of the fist. Then add the lines of the thumb and wrist.
If you find it difficult to imagine where the thumb will be, just make a fist with your hand and take a closer look at the position.

The back and top of the hand does not move, so you just need to pay attention to how the fingers are connected. We mark the upper part of the hand and four fingers, as a rule, the same width.

As for the shadow, you can add it to create more realistic depth.

However, how detailed you will draw the hand is up to you. Find your style that works best for you!
Various drawing options fist

This drawing shows a hand clenched into a fist from the outside. The index finger is much higher than all the others.
In this drawing, three fingers are pressed to the palm, the thumb is pushed back, and the index finger points to a point.
Please note that with the help of shadows and wrinkles, the index finger looks voluminous. The same applies to the fist, despite the fact that only some phalanges are drawn for three fingers, a volume effect is created.

This picture shows a hand clenched into a fist from the inside. The index finger is also higher than all the others.
Exist various ways placement of wrinkles and shadows in order to create the effect of fist volume.

Movement from an open hand to clenching it into a fist.

If you still find it difficult to draw fingers, imagine them as cylindrical elements that connect with each other to form fingers.

However, sometimes it is necessary to slightly distort the fingers to give more depth.
For example, in the image, you see the index finger curved in an unnatural way, but it looks much more realistic than a direct appeal.
How to draw a hand with a pencil step by step
Step one.

Step two.

Step three.

Step four.

Step five.

1. Marking the contour of the hand

Indeed, if you need to draw a hand on the entire sheet of paper, then it is easier to outline the outline of your hand, and then, using some of the tips from this lesson, just add details.
If you need to draw a hand on a reduced scale, then first put two points for the wrist and five points for the fingers.
Please note that not the index, but the middle finger on the hand is the longest.
2. Straight contour lines of the fingers

The length of the fingers is different. They say musicians have very long fingers. Among the nobles, long and delicate fingers emphasized aristocratic background. Maybe but we will draw normal hand, so divide the segment where the little finger will be in half, and draw a line from it, parallel to the points outlined earlier.
For the thumb, draw a rectangular outline.
3. Draw real contours fingers

At this stage, you only need to circle the straight contours of the fingers with a pencil and give them real shapes. Perhaps these preliminary contours turn out to be inaccurate, then the shape of each finger can be specified separately.
4. General contour line hands

At this step, you can correct the contours of the fingers. Make a deeper "angle" for the thumb, but you can leave the original outline, at your discretion.
Make a markup of the phalanxes and remove extra contour lines from the drawing.
5. The hand drawing is almost finished

First of all, draw the fingernails on the hand. Highlight the joints of the fingers with a few strokes and you can say that the drawing of the hand is finished. It remains only to draw a few details in the next step.
6. How to draw a hand. Shadows

In humans, the knuckles of the hands have "wrinkles" or folds that stretch when the fingers are squeezed, make these areas darker. There is an area between the fingers that also needs to be highlighted. To make the hand look voluminous in the figure, you can make some of the contour lines darker and thicker. In this case, choose from which side you will have a light source.
It may seem that drawing a hand is not difficult at all. Try to draw, and then compare your hand with the resulting drawing.
Anatomy
The most important fact is that the hands are concave on the side of the palm and convex on the back. The bulges are so arranged around the circumference of the palm that you can even hold liquid in it. The hand served the primitive man as a cup, and by placing two palms together in the shape of a cup, he was able to eat food that he could not hold with his fingers alone. The large muscle of the thumb is one of the most important in the hand. This muscle, in interaction with the muscles of other fingers, provides a grip so strong that it allows you to keep your own weight in a suspended state. This powerful muscle can hold a club, a bow, a spear. We can say that the existence of animals depends on their jaw muscles, and the existence of man depends on his hands. 
It is worth paying attention to the powerful tendon attached to the base of the hand and how the tendons of the fingers are grouped on the back of the hand. These tendons can control both all fingers together, and each individually. The muscles that pull these tendons are located on the forearm. Luckily for the artist, the tendons are mostly hidden from view. In children and young people, the tendons on the back of the hand are not visible, but become more visible with age. 
The bones and tendons on the back of the hand are close to the surface, but those around the palm and fingers inside are hidden from view. There is a pad at the base of each finger. It protects the bones lying inside and creates a grip with the object being held.
Proportions of the hand
The next important thing is the crooked placement of the fingertips and knuckles. Two fingers lie on either side of a line drawn through the middle of the palm. The tendon of the middle finger bisects the back of the hand. Also important is the fact that the thumb moves at right angles to the movement of the other fingers. The knuckles are located slightly in front of the folds below them on the inside of the palm. Pay attention to the curves along which the knuckles are located and that the curve gets steeper the closer the knuckles are to the fingertips. 
The middle finger is the key finger that determines the length of the palm. The length of this finger to the joint is slightly more than half the length of the palm. The width of the palm is slightly more than half of its length on the inside. The index finger is almost on the same level with the base of the nail of the middle finger. The ring finger is almost the same length as the index finger. The tip of the little finger is almost on the same level with the last joint of the ring finger. 
The figure shows how to correctly determine the position of the palm cavity. Also notice the curve of the back of the hand. Hands will not look natural, capable of grasping until the artist has mastered these details. The hands in the figure are depicted as if they were holding some kind of object. The loud sound of applause is produced by a sharp compression of air between the hollows of the two palms. Poorly drawn hands will look incapable of applauding. 


Women's hands
Women's hands differ from men's mainly in that they have smaller bones, less pronounced muscles and a large roundness of the planes. If the middle finger is made at least half the length of the palm, the hand will be more graceful and feminine. Long fingers, oval in shape, add charm. 


Man's hands


babies hands

Children's hands are in themselves a good drawing exercise. The main difference from adult hands is that the palm is much thicker compared to small fingers. The muscles of the thumb and the base of the palm are very voluminous, even small children can support their own weight. The knuckles on the back of the hand are hidden by the flesh and visible through the dimples. The base of the palm is completely surrounded by folds; it is much thicker than the pads under the fingers. 
Hands of children and teenagers
The proportions are basically the same. At the age of elementary school, the difference between the hand of a boy and a girl is small, but in adolescence there are big changes. The boy's arm is larger and stronger, showing the development of bones and muscles. Girls' bones remain smaller, so they never develop as big knuckles as boys. The base of the palms also develops more in boys, in girls it is much softer and smoother. In boys, the nails, as well as the fingers, are slightly wider. 
Children's hands are a cross between the hands of a baby and the hands of a teenager. This means that the muscles of the thumb and the base of the palm are proportionately thicker than in an adult, but thinner in comparison to the fingers than in an infant. Fingers in relation to the palm are the same as in adults. The arm as a whole is smaller, slightly fuller, dimpled, and the knuckles are certainly more rounded.
Old people's hands
Having mastered the design of hands, you will enjoy drawing the hands of older people. In fact, they are easier to draw than the hands of young people, because the anatomy and construction of the hand is more noticeable. The basics are still the same, but the fingers are getting thicker, the joints are bigger, the knuckles are protruding more strongly. The skin becomes wrinkled, but this wrinkling needs to be emphasized only in a close-up view. 
Let's start ! Start drawing basic shapes and lines. This is useful so that you can keep the shape of the hand and the proportions of the joints.

First, let's draw on the base line of the upper and visible ending of the forearm at the level of the wrist!

Now draw the basic shape of the index finger!

And now, along the base of the thumb, the lines and shapes of it itself. The hand took shape pretty quickly.

And now draw the shape of the middle finger!

The next step is nameless. Fingers become less and less visible. But the joints line up and the proportion and beauty of the lines are noticeable.

And now your last finger in the basic form - a drawing for a small finger - the little finger! And you did everything quickly on the basic shape of the hand from the first step!

Now draw the nails on the fingers, as you can see them on your own or in the photographs.

Draw small details of the folds in the joints and skin folds. They are on both sides. The hand in a relaxed state tends to shrink.

Here are some small parts, which you also need to draw to make the drawing realistic /

You did it! Now you have to apply shadows and light yourself.

First, start drawing the hand with anatomical tips! We will try to refresh or replenish our knowledge about the structure of the human body. This is very useful, because most beginner artists can find their hands difficult. Well, let's start with anatomy and you will better understand the drawing of a human hand!

Here is a slightly enlarged anatomy of your fingers so you can get a better look at the bones and remember their main parts. We will always use them for the base of the hand drawing.

Maybe it doesn't seem important, but when you draw larger hands you will need help choosing the type of nails. You can choose the best ones for your character in the picture!

And here's some extra help in the picture so you can see and compare the difference for your character's age and gender!

Here are some sketches of hands that give an idea for the drawing style. realistic hands! You should start with any style based on their actual appearance.

And now the hand options from the comics or fairy tale characters. These are just a few examples. You won't notice too big difference between realistic and comic or fantasy style.

In cartoon style, there are more noticeable differences from realism. It's always helpful if you look closely at that particular detail in the cartoons you watch, and then you can pick a style you like and start creating your own for that part of the drawing.

If you have animal characters, then these examples will come in handy! Basically, when your animal character walks on two legs, his/her front arms or paws are more like real arms and hands, so you should draw them like human arms, only with some animal specificity and style.

And now, the last part of the preparation for drawing the hand. This possible options, angles and positions of the hands and fingers. First, let's look at simpler options and catch the basic principle for the joints and proportions of the fingers and palms. For a female hand, you can increase flexibility, and for a male, increase angularity.

Step 10
Now there are several harder drawings, from a different perspective and angle! This is an expression of emotions, gestures accompanying words and actions.

This part of the preparation will already be really difficult, but not impossible! When you start drawing hands harder than these, you will remember with a smile. We're just looking at the tip of the iceberg in terms of bases and shapes, and will start moving towards hatching, shading and color grading and editing. And now we are just warming up!

1. You can fit several options for turning your hand at once. Mark them with a base oval and a guide line.
2. How to draw hands. Start drawing individual fingers.
3. The next step is to draw in more detail the contours.
4. Erase unnecessary lines, mark small skin folds and nails.
5. How to draw hands. With a TM pencil, shade the shadow on the brush, just try not to darken it right away.
6. The next brush is deployed a little differently. This angle can be used quite often in drawings. Outline the general shape.
7. Refine the drawing of the fingertips. How to draw a cat.
8. Draw nails with a sharpened pencil.
9. Use a soft eraser to remove all unnecessary construction lines. How to draw a dragon.
10. Feel free to proceed with the black-and-white study.
11. Now you can try to draw horizontal arms. Just like in the previous sketches, start by laying out the general shape.
12. Work out the contours of the hands in detail.
13. Using a soft pencil, you can accentuate the drawing so that it looks natural.
14. With a hard pencil draw a shadow on the lower arm.
15. Do the same with the top.
STEP 3. anime hands
Here is a typical anime/manga hand, as it looks painted with fingers spread. When painted, you should end up with something like this.
STEP 4. anime hands
Let's start this first drawing step by drawing an inverted bell shape for the middle part of the arm. Once this is drawn, add five lines for the fingers. I've added some arrows to show you how far apart each finger should look.
STEP 5.
Now that you've drawn the skeleton of the hand, you can add three circles on each finger. These circles will help you draw the anime/manga finger shapes. Before moving on to the next step, draw a line for the wrist.
STEP 6.
In this sixth step we will start drawing the shape of the fingers and hand. Once that's done, let's add the form right side wrist.
STEP 7. how to draw hands
In this step, we will simply add the lines of the joint and bones of the wrist. Once that's done, start erasing all the instructions and shapes that you've drawn in the previous steps.
STEP 8.
this is what your hand should look like
STEP 10. draw anime hands
Start clenched fist from the center of the square, this will help you draw individual fingers
STEP 12. how to draw anime hands
In this next step, you will start adding lines for the fingers and knuckles. Once this is done, add the shaping line for the left side of the wrist.
STEP 14. learn to draw hands
Once you're done it should look like the one in my picture. I hope you enjoyed this lesson.
For starters, pay attention to our hands. They consist of three parts: shoulder, forearm and hand. Each of them can be depicted in the form of ovals, well, or you just need to learn how to draw a hand right away. If you depict a lowered hand, then the tips of the fingers will reach the middle of the thigh, and the elbows will be at the level of the waist.

Here we have considered a method with a simplified form of the hand, now we will improve it so that it looks more natural. When you draw the hands, don't draw them too evenly. We start from the shoulder, it has a smooth bend, near the elbow the arm narrows a little and expands again at the place where the biceps are located.
The elbow will be a little hard to draw, because it's not just a bend, it's a connection, a hinge.

Next is the brush. Imagine each of the segments as a cylinder, and now turn your hand upside down and you will see three almost identical segments on each finger. Well, because all the fingers are different in length, the pads and the folds that are between them do not line up.
Let's start drawing the hand with the knuckles of the fingers from the bones. Joint 1 is the largest of the three. The second joint is located between the two (in the middle), it is smaller and shorter than the first, but longer than the third joint - the tip of the finger. It is not possible to draw all fingers in this way, since each finger has a different length.

On top of the phalanx of the fingers, you need to draw straight lines, and from the side of the palm, rounded.

But let's not forget that the male hand is slightly different from the female. male hand more massive and more sinewy. There are three options for drawing a hand: Muscular, toned, and a weakling's hand. 
Perhaps For sketching or to see some parts, I don’t know .:
No aspect of drawing is as difficult as . There is very little material on the subject. The biggest difficulty arises precisely with the search suitable material. Your hands are the most excellent material available for study. Perhaps you have never seen them under the light. In most cases, people learn how to draw hands on their own. Any teacher can only point out the facts that are connected with your hands.
The study of the hands, not including the study of anatomy, mainly consists of comparative analysis measurements. The fingers have a certain length in relation to the palm; the space between the knuckles of the fingers is specifically proportional to the entire finger. The palm is fairly wide compared to the length. The distance between the knuckles on the back of the finger is greater than the similar distance between the folds on the back. The length of the long finger from its tip to the third knuckle is equal to half the length of the hand from the fingertip to the wrist. The thumb in its length almost reaches the second joint of the first finger. The length of the palm is approximately equal to the length of the face from the chin to the hairline. You, like anyone else, can make such comparative measurements.
The most mobile part of the body, it can accommodate objects of considerable shape and weight. Such mobility complicates the work of the artist, because the hand can take a wide variety of positions. Thanks to certain technical parameters, the hands work constantly. The palm can form a kind of hollow, contracting and unclenching. When squeezing the palm, the fingers are directed inward, towards the middle of the palm. The fingers have rather hard nails, which sometimes help a lot if you need to grab something. You take the pin with your fingertips, you take the hammer using your fingers and palm. It is impossible to fully bend back the fingers due to the rigidity of the back of the hand.
This mechanism was invented by nature for pushing movements. As we know, the hand is the most perfect mechanism for performing an almost unlimited number of actions. Added to this perfect tool is the fact that, perhaps more than any other part of the body, this tool depends on the brain to work. Most hand movements occur at the subconscious level. For example, typing on a computer or typewriter, as well as playing the piano.
IN cultural sense man began to train his hands long before he began to train his brain. A newborn begins to use his hands effectively long before he learns to think. He can grab a burning match, not yet knowing that he can get burned. The history of human progress since prehistory can be closely associated with the development of the hands.
The fact is that hand movements do not require great skill. This may be the reason why there is very little knowledge of hand drawing. Now look at your hands, you will see them differently. Notice that before picking up any object, the hands automatically take on the appropriate shape. To draw a hand, first you need to take it, study its silhouette, look at its changes so that the hand fits under the silhouette. Try picking up a ball, a peach, or an apple, see what shape your fingers will take before you pick up the object. The mechanical principles of how the hands work is a very important part of drawing.
Only by knowing how the hands work can one learn how to draw hands.
The back of the hand is usually drawn in three plans: one is drawn for the thumb and for the lower knuckle of the index finger. The remaining two are for the back of the hand, grabbing the wrist. In most cases, the back of the hand is wavy, and this phenomenon is reduced to these three planes. The palm is usually presented in three blocks that surround the inner space of the palm - the vault, the thin base of the thumb, and small tubercles that are just below the fingers.
When the fingers are bent, the knuckles should be flush with the thumb, when the fingers are extended, the knuckles should not stand out. Care must be taken in aligning the nails because they are on their midline, which intersects with the midline of the finger. In other words, the nail can somehow change its position, we won't even notice it.
Keep Examining Your Hands for Acquisition general knowledge. Muscles are so deeply located that they are no less important than external forms.
Of the bones accessible to the eye, we are presented on the back of the hand with knuckles and carpal bones. If you involve your hand in different kinds her activities, then the fingers are fairly easy to join. Study the relative length of the fingers and remember that the thumb almost always runs at right angles to the rest of the fingers. Get rid of the idea that hands are hard to draw. It's just hard when you don't know how they work. Once understood, hands become charming.
Remember a very important fact that the palm is sunken, and back side palms - convex. The tubercles on the palm are lined up so perfectly that they can even retain liquid. For ancient man the palm happened to be a cup. He put his two palms together so that he could eat food that he could not grasp with his fingers. The thumb muscle is undoubtedly the most important muscle palms. This muscle, along with the muscles of the other fingers, gives a person the ability to grip very strongly. Thanks to this, a person can even support his own weight. This muscle gives a person the ability to hold a bat, club, bow, spear, etc. The life of an animal directly depends on the strength of the muscles of the jaws. Man depends on his own hands.
When you perfectly master the features of the structure and proportions of the hand, you can easily use this knowledge to display specific traits, characteristic of female, infant, children's hands, as well as the hands of the elderly.

1. The line that bounds the palm of the hand resembles a "flattened iron" in its shape. This perfect shape to start brush painting. The outlines of a human brush literally amaze the imagination of beauties and the ideality of forms.

2. Drawing a line from the wrist along the BRUSH, we separate the area of the fingers. The auxiliary organ of the hand, the thumb, is bent in relation to the rest of the fingers; without it, the hand of man would be helpless.

3. Horizontal line, drawn in the middle between the base of the hand and the end of the longest finger, helps to determine the position of the fingers relative to the thumb and the rest of the palm.

4. A curved line drawn above the middle line of the hand shows the base of the fingers. The little finger is the only finger whose base is below the middle line. The rest of the fingers start above this line. Distances 1 - 5 can be considered equal. The middle finger is the longest. Each finger is limited by the oval drawn at the beginning.

5. The length of the middle finger is already known to us. Fingers 1 and 3 can be the same length, but quite often finger 3 is slightly longer. The little finger (4) is shorter than the above fingers, and the thumb (5) ends slightly above the curved line of the base of the other four fingers.

6. The length of the middle finger is already known to us. Fingers 1 and 3 can be the same length, but quite often finger 3 is slightly longer. The little finger (4) is shorter than the above fingers, and the thumb (5) ends slightly above the curved line of the base of the other four fingers.

7. At the base of the fingers there is one feature: small wrinkles are bent away from the line of the fingers and go along the line of the arc depicting the base of the fingers.

8. When the hand is straightened and the thumb is placed together with the rest, the palmar wrinkle, shown in the figure above, passes into the line of the upper joint of the thumb. A fold is clearly visible at the base of the thumb, which turns into a line representing the collected skin, similar to an inverted "T".

9. Having determined the location of the joints of the fingers (Figure b), you can depict them in two lines in the first row of joints, if the hand is massive enough. The upper joints are depicted, as a rule, by single lines. If the hand is small, then the first row of joints is depicted by single lines. And on very small hands, the joints may not be visible at all.

10. If you look at the palm from behind, then the fingers will appear longer. The lines of the borders of the fingers will reach the dashes shown in the figure.

11. If you turn the straightened brush the other way around, then part of the thumb will become invisible. Areas of free skin on all joints of the fingers will become visible. They will be in the form of small ROUND areas. On the upper joints, these areas are not as clearly visible as on the rest. The protrusions of the lower joints take the form of ellipses, so the same shape and y areas of free skin over these joints. The bones and tendons of the hand are also visible in these places.
Perhaps no aspect of the drawing is accompanied by more disorder and is less adequate material for study than the drawing of hands. Much of this trouble is caused by the fact that you rush to look for material anywhere, instead of looking at your own hands. You have the best source of information available at all times. Perhaps you have never thought of them in this sense. The drawing of the hands should be based largely on yourself. After all, any teacher cannot explain to you more than you learn by carefully examining your own hands.
The study of the hands, besides the study of their anatomical construction, consists mainly of considering the sizes of the various parts in comparison. The fingers have a certain length relative to the palm; the joints of the fingers are in a certain proportion in relation to the whole finger. The palm has a width and a length. Distances between joints outside more fingers than they are between the folds on the inside. The length of the longest finger from its base to the third knuckle at the back is actually half the length of the back of the hand from the tip of the finger to the wrist. The tip of the thumb reaches almost to the second joint of the index finger. The length of the palm is equal to the length of the face from the chin to the hairline. You can take these comparative measurements on yourself or on someone else.
The hand is the most flexible and adaptable part of the anatomy of the body, it can embrace an object of any shape and size comparable to it. This flexibility is also a difficulty for the artist, because the whole hand can take different positions. But still the mechanical principle of the hands remains constant. The palm opens and closes, and the fingers curl inward towards the middle of the palm. Nails are a very convenient exercise for learning how the fingers work, since they need to be grasped accurately and firmly; you pick up the pin with your fingertips; take the hammer with your fingers and palm. The back of the hand is more or less resistant to the back pressure of the fingers, and is used in pushing (it is quite difficult to bend the fingers back). The hand is the most perfect mechanism that we know to achieve a variety of goals. In addition to its perfection, the hand is most closely and precisely coordinated with the brain than any other part of the body. Many of her movements are controlled by subconscious reflexes; for example, typing and playing the piano.
Man began to operate with his hands before his brain and cultural level. The baby can use his hands effectively before he can think. The history of human advancement since ancient times is closely related to the adaptability of the human hand.
The fact that the hands and their movements require so little conscious impulse that it is surprising to be aware from the outside. Look now at your own hands; you will see in the illustration how the hand automatically takes a shape that is convenient for grasping the object.
To draw a hand while building an object, you must first examine the outline of the object, then observe how the automatic adjustment of the arm fits that outline. Watch your fingers before grasping and squeezing a peach or apple. The principle of the grasping mechanism is very important in the drawing of the hand. Only by knowing this, how it actually works, can the hand be drawn convincingly. To draw a hand as you sketch a person, you must first examine the contour of the object, then note how the position of the hand matches this contour. First, before taking and squeezing a peach or an apple in a fist, one must observe the fingers in order to notice how they behave before grasping. The reflex principle is very important in hand drawing. Only by knowing how the hand actually works can one draw it convincingly. The back of the hand can be drawn in three planes - the first for the section of the thumb up to the joint of the base of the index finger, and the other two along the palm, tapering towards the wrist. In most actions, the back of the hand is bent. As a rule, the palm is three blocks surrounding the inside of the palm - the base of the palm, the thick base of the thumb, the base of the remaining fingers. The joint between the fingers and the thumb is connecting, adapted to move the thumb to the palm inward or pull it at an angle of 900 to the palm. We must also carefully align the nails so that they lie on the same plane as the outer surface of the fingers and are a continuation of the midline of each finger. Otherwise, the nail will be crooked and you won't understand why.
Keep studying your own hands to learn about hands in general. The internal muscles are so deep that they are not as important as the external forms. The only bones we see are the knuckles on the outside of the joints and wrists. If you're drawing the palm in action, the fingers can be fairly easily attached to the knuckles and aligned properly. Study the comparative length of the fingers; remember that the thumb works mainly at right angles to the rest of the fingers. Get rid of the idea that hands are difficult to draw. It's just very easy to get confused if you don't know how they work. Everything becomes much easier once you get the hang of it.
The most important thing to remember about the hand is that it is concave on the inside and convex on the outside. The fingers grow so tightly that even liquid can be held in the palm of your hand. The hand served the primitive man as a cup and spoon, he picked up in a handful what he could not take with his fingers alone.
The thumb muscle is perhaps the most important muscle in the hand. This muscle, supporting or opposing the rest of the fingers, gave a person the opportunity to make a very strong grip, capable of holding even human body. This muscle helped a person to hold a spear, a club. As animals often depend on the strength of their jaws, so man depended on the strength of his hands.
When you become familiar with the structure and proportions of the hand (Fig. 77 - 85), it will be easier and more convenient for you to display the features of women's hands, the hands of babies, children, and the elderly.
Figure 77. Anatomy of the hand. 
Pay attention to the tendons located on the back
side of the palm that reach for the fingers. They perform
huge function: with their help you can compress and decompress
palm, and also move each finger individually.
The muscles that control these tendons are located
in the forearm. Fortunately for artists, most
tendons are hidden under the skin and muscles, and imperceptibly.
In children and adolescents, the tendons of the hands are not visible, they
emerge in old age.
Figure 78. Blocks that form the hand 
On the back of the hand, bones and tendons are located close under the skin; those on the sides and on the inside of the palm are additional. I have outlined these surfaces in such a way that it is easier for you to get to know them. Note the thick, fleshy "pads" in
base of the thumb and base of the palm. A pad is present at the base of each finger, together they encircle the upper part of the palm. The muscles of the fingers protect the bones. Due to their elasticity, they
provide good coordination of movements, just like good tires provide traction on the road. There are no muscle pads on the outside of the palm,
but on the other hand, the outer surface of the little finger is well protected by the muscle, so much so that it can withstand a fairly strong blow, especially when the fist is clenched.
Figure 79. The proportions of the hand 
The next important thing is the curved lines that can be drawn through the fingertips and knuckles. If you divide your palm along an imaginary line in half, then on each side of it there will be two fingers. The tendon of the middle finger roughly bisects the outside of the palm. Note also that the thumb grows almost at right angles to the rest of the fingers. They can be moved perpendicularly from the palm and towards it, while the remaining fingers are compressed and unclenched parallel to the palm. The joints of the fingers are located slightly above the folds on the inside of the fingers. Draw imaginary curved lines: the curve crossing the base of the fingers will be gentle, those crossing the knuckles will be steeper, and the steepest one will be the line crossing the fingertips.
The middle finger is the key finger by which we determine the length of the hand. The ratio of the length of this finger to its knuckle at the back is slightly more than half the length of the hand.
The width of the palm is slightly more than half the length of the inner side of the palm. The index finger is approximately as long as the nail of the middle finger, the ring finger is approximately equal to the index finger. The little finger only reaches the top joint of the ring finger.
Figure 80. Building a hand 
Figure 81. The inside of the palm (fossa) 
In the picture above, note how carefully the turnout is indicated in the middle of the palm. Also note the curve encircling the inside of the palm. Hands never look natural and capable of grasping until artists understand this feature. All of these hands look like they are holding or grabbing something. The loud clapping sound is produced by the sudden compression of air between these two pits in the palms. A hand that does not look capable of grasping and clapping is poorly drawn. Examine your own hands to be sure.
Figure 82. Building hands in perspective 
Figure 83. Hand in action 
Figure 84 Joints 
Figure 85. Drawing your own hand 
Figure 86. Woman's hand 
Women's hands, like their faces, differ from men's mainly in smaller bones and more delicate muscles, and generally more rounded surfaces. For greater elegance of the hand, the middle finger should be about half the length of the palm, and oval nails also add grace. Even though women's hands are thin, they can be very clenched and prehensile.
Figure 87. Fingers, tapering towards the ends, in motion. 
Figure 88. Explore many different hand poses. 
There is only one the right way learning how to draw hands is doing many, many sketches. When drawing hands, more than anywhere else, their position is essential. Spread your fingers along the palm of your hand before examining them in detail. Hands are almost never completely straight and flat. Carefully study the space between the knuckles of the fingers. Most time we see them not in direct projection, but in perspective, as shown in ch.82-85.
Figure 89. Baby's hand 
Babies' hands are studied separately. Their main difference from the hands of adults is that the palm is thicker in relation to the smaller fingers. The muscles at the base of the thumb and at the base of the hand are relatively very powerful in young children. Babies can pinch and grab something equal to their weight. The joints on the outside of the arm are completely hidden by the muscles and marked with dimples. The base of the palm is often surrounded by a thick fold. The base of the palm is much wider than its width at the level of the base of the fingers.
Figure 90. Studying the hands of an infant 
Figure 91. Children's hands 
The hands of a child are intermediate between the hands of an infant and a teenager. This means that the muscle of the thumb and the base of the palm are thicker than in an adult hand, but not as thick as in a child's hand. The fingers grow relative to the palm in the same way as in adults. The whole arm is smaller, a little thicker, and more dimpled, and the joints are certainly not as prominent as they are in adults.
Figure 92. The proportions remain more or less constant. 
In junior school age the difference between the hand of a boy and a girl is small, but great changes appear in adolescence. The boy's hand is much larger, stronger, more developed bones and muscles. The base of the palm, the joints of the fingers are more developed in the boy, while in the girl the hand is thinner and more delicate, the bones in it are smaller. On the boy's hand, the nails, as well as the fingers, are slightly wider.
Figure 93. The hand of an elderly person 
If you have mastered the construction of the hand, drawing the hands of old people is a pleasure for you. In fact, they are easier to draw than the hands of young people, since the structure and anatomy are more clearly visible there. Main features: thicker fingers, protruding knuckles. The skin becomes wrinkled, but this needs to be drawn only in close-up.
Looks like learning to draw human hand the most difficult, as it can take many forms and express different emotions. Animation is no exception. You will have to learn how to draw hands in different angles so as to show them in dynamics and draw the attention of the viewer to them. Don't underestimate the power of a well-drawn hand in animation - it will save your work from monotony!
What you need to know
In the comments to my courses, I was asked several times how I draw characters in different poses and with different expressions. The bottom line is that with experience you will begin to develop own style drawing. Unbeknownst to other people, you will have your own little tricks. These tricks are the poses and expressions that you will use much more often than others, as well as certain hairstyles and clothes that you will be able to draw best. It is quite widespread and professional artists resort to this secret all the time!
However, this is very difficult to achieve in hand drawings! Let's take the head as an example. The only moving part there is the lower jaw. We can change facial expressions, but the eyes, nose and mouth remain in their places (at least in real life!) With the hand, everything is different. With any new movement of the brush, everything changes radically. In fact, in a scene with dialogue, facial expressions may barely change, but the hands will move very actively and under different angles.
The goal of this activity is to turn a human hand into a cartoon hand, so let's not waste time learning the names of the bones and muscles of the hand. (On the Tuts+ platform, by the way, you will have extensive opportunities to learn this too). We, in turn, will try to find a simplified way to draw a hand in a way that is practical and efficient.
1. Hand in its most simplified form
 "Mom, hi! I'm on the Internet!"
 The hand is made up of a variety of bones, especially in the fingers. This means that all fingers are of different sizes and can bend in different directions. For this reason, it is important that you learn how to draw the hand in the most simplistic way possible and be able to look at it like a small puzzle with several key pieces. Let's try to divide it into blocks:
Step 1
Let's start with the back of the hand. Let's draw a simple semicircle:

Step 2
Now let's draw a triangle that is attached to one of its sides. Like this:
 Peace of mind: we don't draw a cup of tea!
 Step 3
Above the triangle, draw something resembling the tip of a knife.

Step 4
It's time to draw the fingers. IN mirror image draw the first shape at the top. "Puzzle out of hand" is ready:
Step 5
Great! It remains to fill in the missing details with soft contours:
 The contour of the thumb is the trickiest - it must be gently combined with the center of the palm.
 Note that the fingers have a different format due to the difference in their sizes.
2. At a glance
You need to know a few more details of the palm. Let's take a look at them:
Step 1
Again we repeat the process above, following the basic pattern:

Step 2
Something new appears - the palm now looks a little more complex, and in its shape there is characteristic differences that need to be taken into account. Fortunately, a few simplified forms are enough to display it.

Step 3
Now we can add outlines to complete the drawing with the necessary details.
 Note that we end the sketch with soft, rounded lines. Think of the palm of your hand as a delicate sculpture.
 Profile view
When the hand is turned in profile, we can see the protrusion of the muscle at the base of the thumb.

The more "childish" your drawing style is, the simpler and smoother your lines will be. Here are my little secrets that helped me understand that hands can be drawn based on simplified shapes. The most important thing is to strive for a style that will reflect the personality and dynamics in the drawings in the final stage.
3. More shapes and 3D hand
Now you can draw a flat hand for the rest of your life, right? If you want to draw hands with convincing depth, use the same technique above, just change the camera angle! Play with this technique until you feel confident.

To form the fingers, imagine them as cylinders stacked one on top of the other. This technique will help us to draw the fingers from different angles, as it makes it easier to "see" the hand in space.
 Hand or robot?
 The forms into which a human hand can form are innumerable. When the palm is open, the same rules apply; when closed - others! The same thing happens when a hand holds an object, and it must adjust to its shape.
Let's learn how to draw a fist. A slightly different process, but at the end you will see that it all comes down to a simplified drawing of basic geometric shapes.

Step 1
To begin with, we simplify the fold of the little finger, draw something similar to the letter "y".

Step 2
We kind of "wrap" the little finger around the letter "u". Don't forget to highlight the curve that goes from the little finger to the wrist.
Step 3
We continue to draw fingers in space. This time we draw only three fingers. I'll explain why later.

Step 4
IN last turn draw the thumb and the protruding muscle at the base of the thumb.

Step 5
Fine! In a few steps we have finished the simplified drawing of the fist on one side. See how roughly the shape of a fist can be depicted using "boxes" of various sizes.
 Notice how you can fit the contour of the fist into three-dimensional rectangular shapes in space.
 Obviously, if we try to simplify each hand position with various techniques, we will quickly get tired. So remember that the real secret to simplifying hand drawing is real life observations.
 View from the opposite side: simplified drawing.
 4. Fab Four
It is widely accepted in animation to draw characters' hands with only four fingers. This allows, in addition to enhancing the dynamics of the character, to make life easier for the artist. That way he doesn't have to worry about too many details.
 Hands with four fingers of different styles and sizes.
 Note: When using this technique, you need to adapt your knowledge of the five-finger hand to the four-finger hand. Concepts need to be adapted to achieve a suitable and interesting result.
It is worth paying attention to the fingertips. In animation, the more rounded and mobile the fingertips are, the more interesting and dynamic they are. When you create characters, think of their hands as if they were separate characters!
 See how this hand has its own character?
 Another good reason to draw hands with four fingers: in this case, you have the opportunity to increase the size of the fingers, which means making them more expressive! A number of famous cartoon characters were able to stand out thanks to this technique: The Simpsons, Bugs Bunny, Flintstones and Mickey Mouse.
Mystery of the little finger
One of the biggest secrets to this brush design is to make the most of your little finger! If you place it at a different angle in relation to the other fingers, you will break the monotony in the perception of the hand.

 Select the position of the little finger in the frame. See how the character of the action changes with this technique. The viewer's attention is now focused on the main subject in the frame, and the personality of the character is given a special twist.
 5. Talk with your hand
When we need to express emotions in an animated drawing, the role of hands is indispensable! Look at the images below: the hands visually support and mimic the facial expressions and body language of the characters.

- "I have an amazing idea!"
- "How do I look, dear?"
- "I can't believe... I'm getting an Oscar!"
- "I don't understand... he was just here!"
- "Ahhh! My head is splitting!"
As strange as it may seem, hands have their own character! Not only do they support facial expressions and body language, they can express own emotions!
 Do you see the greatness in these gestures above?
 However, often you will find yourself in a situation where the hands should not be a distraction. In this case, they must be minor character. Characters in action scenes tend to be exaggerated more than characters in quiet scenes.
 Note that there is little movement in the dramatic scene. There is no room for exaggeration here. Hands should emphasize the feelings of the characters - this is one of the most difficult processes in design.
 6. Knowledge check
I have prepared a little quiz to test your powers of observation. Analyze the pictures below and try to determine what feeling the best way describes each. Can you guess everything correctly?
 Can you guess what the hand is expressing in each of the drawings?
 Raise a hand!
Now you know all the secrets of the art of drawing cartoon hands, Congratulations!

Although hands are a part of the body that is very interesting to draw, the ability to create hand designs in different styles not so easy, and only with the help of hard training you can achieve a natural result. Even if your goal is to draw for animation, it doesn't hurt to buy a good anatomical atlas to understand how the muscles and bones in the hands work. In this case, there is no need to memorize each thoroughly. It is enough to understand how the hand works in motion. Remember that a character's expressions are much more important than what's under the skin.
Last tip: When you need to draw hands, place your own brushes in front of a mirror, or just watch your hands. One of them will remain stationary while drawing (unless you have learned to draw with both hands at the same time!)


