Program tasks:
To consolidate knowledge about Dymkovo toys;
Strengthen the skills of drawing elements Dymkovo painting(circles, dots, stripes, mesh, ring, wavy arcs);
Strengthen children's ability to create decorative composition in the genre of Dymkovo painting;
Fix drawing techniques smooth lines when working with a brush and the ability to draw with the tip of a brush.
Cultivate respect for work folk craftsmen admiration for their work.
Equipment:
Several drawings of Dymkovo toys, pictures with elements of the Dymkovo pattern; watercolor paints, brushes, water, napkins, ready-made template drawings.
Preliminary work:
The teacher's story, looking at albums, paintings about Dymkovo toys; conversations; clay modeling of Dymkovo toys; coloring of coloring books, conversations about the Dymkovo toy.
Lesson progress:
Educator:
What do I see! What a marvel!
How much joy around!
Really, children, it's beautiful here?
It's breathtaking!
Today, I invite you to the gallery of drawings of toys. Look how beautiful it is here. Let's take a look at them. (Children independently examine toys painted in the style of Dymka). They are all bright, beautiful and very different. But they have something in common!
Masters for all children
Stuffed foals
riders, chickens,
They put them in a tub.
Planted, dried, whitewashed
Dressed up with bright paint
Put everything in a tray
In an embellished scarf
And rather sell
Entertain everyone with a toy
Lush, elegant,
Before that, pleasant.
Guys, what are these toys called?
Children - Dymkovo
- Do you know why they are called that?
- Far, far away, behind the dense forests, behind the green fields, on the banks of the blue river, there was a large village. Every morning people got up, lit the stoves, and blue smoke curled from the chimneys of the houses. There were many houses in the village. So they called that village Dymkovo. Lived in that village cheerful and mischievous people. They loved to sculpt cheerful, bright, colorful toys, whistles. Many of them will be made over the long winter. And when the golden sky rises spring sunshine, the snow will run away from the fields, funny people they took out their funny toys and, well, whistle - drive away the winter, praise the spring.
Funny toys sold in different cities and villages. And by the name of this village, toys began to be called Dymkovo.
- What color are Dymkovo toys?
(Always white)
- What are the patterns on Dymkovo toys?
(Straight line, wavy line, dot, circle, ring, cell, lattice)
- What color is more? What colors are used?
- How are patterns made?
(By dipping, with the end of the brush, brush flat on the pile)
- Sit back, let's get started.
During independent work, the teacher keeps all children in sight, helps those who find it difficult to create a composition, monitors the fit, and the technique of performing work.
After 10 minutes of independent work - physical education break.
We drew today
Our fingers are tired.
Shake our fingers
Let's start drawing again.
Feet together, feet apart
We hammer in a nail.
sun bunnies
Sunbeams play on the wall
I beckon them with my finger
Let them run to me.
Well, catch it, catch it soon!
Here, here, here - left, left!
Ran to the ceiling.
Now finish your work, finish drawing the patterns, and then look at the drawings.
Summing up, the teacher hangs out all the drawings.
1. What job did you like the most? Why?
2. What did you like the most here?
3. What is special about this job?
4. How is this work different from others?
The teacher reads the verse:
All toys are not simple,
And magically painted
Snow-white, like birches,
Circles, cells, stripes -
Seemingly simple pattern
But you can't look away.
Well done, everyone tried to create new beautiful Dymkovo patterns. The lesson is over.
Municipal budgetary preschool educational institution
kindergarten №9
Summary of GCD in the educational field
"artistically aesthetic development» (decorative painting) in middle group
on the topic: "Decorate the skirt of the Dymkovo young lady"
Prepared by:
caregiver
Belyakova A.P.
g.o.g. Vyksa
2016
Target: Consolidation of children's knowledge about the Dymkovo toy, expanding ideas about folk crafts, painting features.
Tasks
- To teach children how to make a pattern on paper using the elements of painting Dymkovo toys.
- Teach confidently (without separation) to draw straight and wavy lines.
- Develop Creative skills, aesthetic perception, artistic taste the desire to help others.
- To consolidate the ability to use a bright pattern; place the pattern throughout the sheet; use elements of Dymkovo painting in the pattern (circles, lines, rings).
Facilities: 3 houses made of cardboard, smoke comes out of the pipes, silhouettes of Dymkovo young ladies (up to 20 cm high), cut out of paper by the teacher; gouache paints, brushes, a jar of water, a napkin (for each child), cotton buds, Dymkovo toys for viewing,illustrations depicting a Dymkovo toy, toy samples, aprons and armrests (for each child).
Preliminary work:Viewing a presentation « Acquaintance with the Dymkovo toy ”, looking at illustrations of Dymkovo products, getting to know the elements of painting, drawing elements of painting, learning physical education, finger gymnastics, breathing exercises.
Methods and techniques: Use of ICT, motivation, problem situation, questions, d Ymkovo toys for viewing, conversation, art word, physical education, finger gymnastics, musical accompaniment, praise, reflection.
Integration of educational areas:
- "Physical development"
- "Speech development"
- "Artistic and aesthetic development (music)"
- "Cognitive Development"
GCD progress
Educator: Guys, today we will fly by plane to the village of Dymkovo, where they make fun, bright, colorful toys. Get on the plane.
Let's start the engine "rrr", spread the wings of the plane and fly high into the sky "ooo".
(Children run like a snake after the teacher. At the teacher’s signal “airplanes for landing”, the children run to the “airfield”)
Educator: So you guys and I flew to the village of Dymkovo, where clay toys are made.(There are 3 houses in front of the children, smoke comes out of the pipes.)
Educator: Guys, do you know why the clay toys that are molded here are called "Dymkovo"?
Educator: I invite you to listen to the story(Listen to a story.)
Educator: Guys, come closer, see what's here.
(Illustrations depicting a Dymkovo toy are presented on the board, samples of the toy are on the table).
Educator: Say it again. What are these toys called?
Educator: Look at the cute toys. Who do you recognize here?(water carrier, cockerel, etc.?(The teacher specifies the names of the figures.)
Artistic word about a water carrier:
Along the pavement street
The girl went for water
The girl went for water
Behind the cold key.
About cockerel: Cockerel, cockerel
golden scallop
Through the dark forest
Through the forest, across the river
Shout "Ku-ka-re-ku"!
Educator: Look how colorful, bright, different colors they are, so what do we call them? Multi-colored, but each of them has its own pattern, color. Guys, what colors do the masters paint their toys with?
Educator: And what patterns do the toy masters decorate?
Educator: Guys, let's draw them in the air.
Do you see flowers, leaves, berries among the patterns?
Educator: That's right, there are no such patterns on Dymkovo toys. What do you think Dymkovo toy was the most famous?
Educator: I have one lady friend(showing the Dymkovo Young Lady, she is very beautiful, but unfortunately she is very sad now. Do you know why?
Educator: Look at her friends, and now you guessed why the young lady is sad?
Educator: Let's help them, now we will become real masters! Today we will come up with a pattern on a dress for young ladies. I suggest thinking a little about what the pattern will be.
(I give the children the opportunity to think about the upcoming work).
Educator: We thought, let's repeat once again what colors the masters use in Dymkovo painting
Physical education minute
One two three four five
To become masters
Everyone sat down, everyone bent down
Smiled at each other
Two springs, three jumps
And patted lightly
A couple of circles around you
And turned into masters
Sit down, children, work has come quietly into the clearing.
In an amazing outfit in multi-colored, painted.
Magic came to us not to frighten us away ...
(Children sit down at the tables.)
Educator: Remember: we draw stripes and circles with the tip of a brush, we make dots with cotton swabs. Try to keep your work neat, do not use too much paint, excess water blot with a brush on a napkin. Remember to rinse the brush well after each paint.
Educator: Where do we start? First we will draw large elements, and then - small ones.
Before we get started, let's stretch our fingers:
Finger gymnastics:
Painters paint the house
For beloved children.
If only I can
I will help them too.
Educator: Now start drawing.
(Creative work of children(the music sounds “The moon shines”) children decorate ladies' skirts.)
Educator: Sit up straight, head up!
Let's straighten our shoulders and hear everything.
Reflection:
Educator: That's how many bright, funny toys turned out. Now our young ladies will join a magical round dance, start talking and showing off their outfits to each other. Educator: Let's hear what they have to say. “What a beautiful, red blouse with long sleeves, blue checks with yellow polka dots on the skirt. My master did a very good job beautiful pattern picked up!»
(Children, following the example of the teacher, tell on behalf of toys.)
Educator: This is how the toys showed off brightly to each other
patterns, admiring their outfits.
(I definitely draw attention to the fact that all the children helped the Lady-guest. She became cheerful and joyful.)
Children return to kindergarten by plane.
Drawing is one of my favorite activities visual activity in children preschool age. At first, the child enjoys drawing colored lines, curls, spots. By the age of 4-5, he has a desire to depict on a piece of paper what he was especially impressed with. AT artistic activity the child, there is a transition to associative drawing: in spots and scribbles, he finds the outlines of familiar objects. Development begins subject drawing: the child draws according to his plan. It is important for the teacher to teach children to see simple shapes in the basis of objects, to select and mix colors, to make sure that the pencil and brush are held correctly. In the middle group, learning begins a new type of drawing - decorative, when preschoolers use the acquired skills in creating patterns to decorate an object, for example, a sweater.
Preparation for a lesson in decorative drawing in the middle group.
AT junior groups kindergarten children completed tasks for drawing on paper blanks in the form of clothing items (dress, handkerchief). Drawing had a decorative character, but was aimed at honing the skill of working with a brush and paints: drawing straight horizontal and vertical lines along the edge of the workpiece, drawing dots within the marked contours. Learning directly decorative drawing starts in the middle group. The teacher introduces the children to folk crafts, highlights the features of Dymkovo, Filimonov, Gorodets murals. Through the study of objects created and painted by craftsmen from the people, children learn to respect manual labor, to see beauty in interior items, clay and wooden toys. There is a desire for independent creation patterns.
The tasks of teaching decorative drawing in the middle group:
- Sharpening technical skills. Children 4-5 years old create patterns from dots, lines, simple geometric shapes with a brush and paint or pencil.
- Development of compositional skills. The children master the concepts of "symmetry" and "rhythm", learn to place patterns on the surfaces of objects of different shapes.
- Development of a sense of color. The teacher teaches the children to mix colors, use contrasting color combinations in the pattern.
- Learning to Discriminate different kinds folk painting and perform individual elements in their own works.

Decorative drawing lesson in the middle group
Materials for the lesson
For decorative drawing in the middle group, it is recommended to use figured blanks made of thick paper (for watercolor or gouache) or cardboard. Blanks in the form of dishes (cups, spoons, plates), clothes (apron, dress, sweater, mittens) or toys can be pre-cut and stored in a cabinet with materials for visual activities. Another option for the basis for decorative drawing is the use of a template. The children are given cardboard templates sweaters, they should trace it with a pencil on a piece of paper. In the middle group, you can not give the task to cut along the contour to save time, but those of the guys who quickly cope with drawing a pattern should be offered to cut out a decorated object.
Also used as a base colored paper or cardboard. Bright material attracts children's attention and develops the ability to match the colors of the pattern and background.
Curly blanks for thematic classes on decorative drawing, you can instruct pupils to do it at home with their parents and bring it to the next lesson to decorate with a pattern. For example, on the weekend, the task is to prepare a blank cut out of thick paper for the lesson. "Sweater Decoration". creative process for the guys it will start already from the moment of choosing the style of the sweater (wide or narrow, sleeves with or without elastic bands, a collar with a collar or under the throat, or it is missing and then you need to decide on the shape of the neck) and the color of the paper from which the blank will be cut. As an idea, the teacher may suggest that parents find embossed paper. It is sold in specialized stores for creativity, has a relief surface and will serve as material for various crafts, including making a sweater.

Base material option
This theme can be used to conduct a short-term project - "Decorate a sweater for your favorite toy". The child chooses for which toy he wants to decorate the sweater as a gift, and the parents help to draw the contours of the appropriate size sweater. At home, children can try to cut the workpiece on their own.
Template options for the "Sweater" blank.
In the classroom for decorative drawing in the middle group, the guys draw with colored pencils, wax crayons, watercolor and gouache. Pupils are given freedom of choice (paints or pencils) during classes aimed at consolidating decorative drawing techniques.
Techniques and techniques of drawing in the middle group.
Children 4-5 years old learn how to hold a pencil correctly. They trace patterns along the contour, draw patterns from straight lines and curved lines, simple geometric shapes. In the middle group, learning to pencil hatching begins: painting circles and ovals with lines in one direction, without going beyond the contours.
Much attention is paid to the development of painting skills. Children reinforce the skills of working with a brush: wetting, picking up paint, mixing paints, drawing with the whole pile or the tip of the brush. Middle-aged preschoolers create a pattern using the following drawing techniques:
- smears. Simple decorative element, which does not require the utmost precision of execution. The guys create a pattern by lightly applying the bristles of the brush to the paper. The tasks for consolidating this technique include mastering the technique of alternation: in a certain order, strokes are applied with paints of different colors.
- points. A more complex element, children must learn to paint with the brush tip in a vertical position. The dots are placed in a certain rhythm within the contours of the workpiece to be decorated. In contrast to the tasks in the younger group (“With the help of dots, depict snow, raindrops, berries, grains for birds”), children are invited to draw a pattern with dots in accordance with the plan: parallel rows, a checkerboard pattern or a dotted contour of a figure, for example, a circle. The skill of alternation is first fixed in the task of drawing dots of different colors, then it develops when drawing dots and strokes in a given order.
- Rings and circles. Children learned to draw these elements in younger groups. In the classroom for decorative drawing, their implementation becomes more complicated: the children must draw circles and rings of the same size.
Initially, children learn the simplest compositional technique in creating an ornament - repetition, after - alternation. The skill of creating a linear pattern on strips of paper or along the edge of blanks (the hem of a dress, the rim of a cup) is fixed. On blanks that have the shape of a square or circle, the guys learn to determine the center of the figure, draw a pattern in a circle or with a turn of 90 degrees.
The use of other types of visual activity and non-traditional techniques.
In the classroom for decorative drawing, the techniques of others can be used. pictorial views activities - applications and modeling. The image with an ornament is complemented according to the plan with elements made of paper or plasticine. For example, paper strips can be glued to blanks in the form of mittens - these will be knitted elastic bands; the blank of a sundress can be decorated with an applique in the upper part - to decorate the bodice of a sundress; plasticine balls can be added to gloves, a hat or a sweater to imitate woolen pompoms; decoration of the finished work with small plasticine balls - beads, beads or buttons on garments and hats.
In the lessons on creating patterns, the following can be applied unconventional techniques drawing:
- Finger painting. Children 4–5 years old still have an interest in drawing with their fingertips and palms.
- Printing - creating a pattern by dipping in paint and applying pieces of foam rubber, leaves, buttons, etc. to paper.
- Pointillism - drawing with dots, usually with cotton swabs.
- Monotype is the technique of a single print. The ripples draw on one half of the symmetrical workpiece, without letting the pattern dry, fold the sheet of paper in half and get a mirror print.
- Drawing with wax crayons with watercolor filling. The guys draw a pattern with a wax candle or chalk, then completely paint over the blank with watercolors (on top of the wax pattern). When the paint dries, the wax contours show through beautifully.
- Grattage - scratching a drawing on dried gouache, under which there is a colored wax background.
Examples of works performed in non-traditional techniques.
Finger painting Finger painting Button printing Cotton bud drawing Monotype Cotton bud painting Finger painting Scratching Scratching Cotton bud drawing Printing
Individual tasks in the classroom for decorative drawing.
Educational activities in kindergarten are implemented within the framework of a personality-oriented approach. This means that when conducting classes (including visual activities), the educator must take into account the developmental characteristics of each child, the level of possession of certain skills, emotional condition at a particular moment. Since the practical activity of decorative drawing is aimed at fulfilling the goal of creating a pattern on a given surface, the main task should be available for all pupils to complete. If the child experiences difficulties, the teacher uses the technique of individual demonstration of actions. In the middle group, it is permissible for the child to repeat the actions of the teacher.
For those children who successfully cope with the practical task, the teacher must provide individual tasks.
Consider options individual assignments on the topic "Decorate a sweater":
- Use appliqué or sculpting elements to decorate the workpiece.
- toned watercolor paint paper blank.
- Trace the penciled shapes with a felt-tip pen.
- Draw on a separate sheet of clothing similar in style to your sweater (hat, scarf, mittens).
Lesson "Decorate a sweater" in the card index of drawing topics.
When drawing up the educational and thematic plan for visual activities for the year, it should be taken into account that drawing classes in the middle group are held once a week. At the same time, out of 35 lessons per year, 5–6 should be devoted to teaching decorative drawing:
- "Apron Decoration"
- "Decorating a Sweater"
- "Decorate a handkerchief."
- "Decorate the strip with flags."
- "Gloves for kittens."
- "Dress for a Doll".
The lesson "Decorate a Sweater" is recommended to consolidate the skills of drawing points and lines, simple geometric shapes. The task of this lesson should be to decorate the workpiece according to the presentation. The children themselves choose which pattern they will draw on the sweater: geometric (alternating lines and shapes in various color combinations) or thematic (they will try to create a floral or natural pattern - flowers, leaves, snowflakes).
A motivating start to the lesson on the topic “Decorating a Sweater”.
Ornamental drawing by itself may not be interesting for middle-aged preschoolers. To increase attention and encourage creative activity, first of all, it is recommended to involve the children's personal perception of visual images and use the elements of the game in the lesson.
Motivating material at the initial stage of the lesson.
| Material option | Application in a motivating beginning of a lesson |
| visual material | The guys are studying pictures with sweaters. The teacher conducts conversation: What elements are patterns made of? What techniques can be used to make similar patterns on paper (rhythmic repetition, alternation). What color combinations are presented in these models of sweaters? A variant of visual material can be sweaters on the pupils themselves. |
| game situation | The teacher draws the attention of the children to the fact that winter is approaching, the frosty season is beginning, and the toys / dolls in their group do not have warm clothes. The children are invited to choose a toy and prepare beautiful sweaters for them as a gift. In front of each pupil on the table lies a drawing of a girl or a boy and a paper blank of a sweater. Children are invited to draw a pattern on the workpiece and “put on” the sweater on the child from the picture so that he does not freeze on a walk. If there are paper dolls with a paper “wardrobe” in the group, then for the lesson you can make blanks with “ears” so that the guys can use the decorated sweaters in the next game. |
| surprise moments | Chanterelle enters the group ( junior educator or another employee in a fox costume), greets the guys and complains about the cold. Chanterelle asks the guys to tell her what to do so that the cubs do not freeze on a walk. When the children say that you can put warm clothes on the foxes, Chanterelle cries that she can neither sew nor knit. The teacher leads the children by leading questions or hints that they can draw and decorate sweaters for fox cubs. There is a box on the teacher's desk. The teacher reports that the postman delivered her to the group in the morning, reads the address aloud (the real address of the kindergarten: city, street, house, group number). When asked what to do with the box, the guys, of course, offer to open it, which the teacher does. The box contains paper blanks of sweaters of the same color and a letter from the Gnome. The teacher reads the letter: The gnome says that in the fall, his grandmother knitted sweaters for him and his many brothers, but they are all the same size and color - the gnomes confuse which sweater belongs to which of them, and ask the guys for help. The teacher offers to disassemble the blanks and decorate according to own will so that each gnome has his own unique sweater. |
| Didactic games | With children 4–5 years old, collective didactic games: tasks are not given on cards, but are presented on large pictures / posters or projected onto a screen. Game options: "Find differences". On two identical pictures of sweaters, you need to find differences, the teacher immediately calls their number. "Find a sweater by silhouette." The picture shows sweaters and one shadow silhouette. "Find pairs of the same." Among the sweaters shown in the picture you need to find the same ones. "Which sweater suits who." On the left side of the picture are sweaters with various patterns, on the right - characters. For example, a sweater with bows is suitable for a girl, a sweater with cars for a boy, and a bunny will be happy with a sweater with carrots. |
Drawing up a summary on the topic "Decorate a sweater."
The purpose of the lesson: decorating a paper blank with a decorative pattern.
Tasks: strengthening the ability to draw with a brush and / or pencil lines, strokes / hatching, dots, circles and rings, checkmarks; development of the ability to decorate the finished work with elements of other types of visual activity (paper strips or figures, plasticine details); development of a sense of color; development of the ability to see beauty in objects surrounding reality; activation of fantasy; education of independence and manifestation of initiative.
In accordance with hygiene standards, the duration of a drawing lesson in the middle group is no more than 20 minutes and consists of the following steps:
- Organizational moment 1 minute.
- Motivating start of the session 4-5 minutes.
- Practical work 10 minutes.
- Demonstration and discussion finished works 2–3 minutes.
- Summing up the lesson 1 minute.
The teacher needs to make detailed plan each lesson followed by obligatory analysis: whether the set goals and objectives were achieved, whether the methods and methods of teaching were effective, how the children behaved at various stages of the lesson, difficulties and delays at any stages of the lesson and their causes, analysis of the work of pupils, approximate ways to improve the conduct of the lesson .
Methodical development on drawing (middle group) on the topic "Decorative drawing "Decoration of a sweater"".
Strengthening the ability to decorate a piece of clothing using familiar elements: lines, strokes, dots, rings and circles.
Making paper strips.
Development of aesthetic perception and independence.
materials
Sweater blanks made of thick paper in different colors, paper strips for decorating the neck, cuffs and elastic bands.
Connection with other aspects of educational work
The study of decorative patterns on garments.
Lesson progress
Creation of a problem situation. The teacher brings a plush hare to the group and reads A. Barto's poem "The hostess threw the hare." The children are told that the hare himself got wet in the rain, and, of course, his sweater got wet - it became colorless and the pattern was washed off. How can you help a bunny? The guys offer to re-draw the pattern on the bunny sweater.
The message of the purpose of the lesson, the designation of the task for practical work.
Conducting a physical education session “Be careful” under the lines of a poem about flowers.
Before the guys begin to complete the task, the teacher draws attention to the fact that there is not enough orange paint on their tables, the guys remember which colors need to be mixed to get orange.
Pedagogical display. The teacher invites the children to remember the elements for decorative drawing and demonstrates their implementation on the board / easel.
During the practical work, the teacher monitors the process of mixing paints by the guys on the palette, the correctness of drawing with a brush, filling the entire area of the workpiece, and the posture of the pupils.
The guys attach the decorated sweaters to the magnetic board.
Discussion of works.
Summing up the lesson. Zaika says that the guys made bright and beautiful sweaters with interesting patterns, thanks them for their diligence and imagination.
The order of execution of work on the topic "Decorate a sweater."
Making paper strips.
Development of aesthetic perception and independence.
The message of the purpose of the lesson, the designation of the task for practical work.
Conducting a physical education session “Be careful” under the lines of a poem about flowers.
Before the guys begin to complete the task, the teacher draws attention to the fact that there is not enough orange paint on their tables, the guys remember which colors need to be mixed to get orange.
Pedagogical display. The teacher invites the children to remember the elements for decorative drawing and demonstrates their implementation on the board / easel.
During the practical work, the teacher monitors the process of mixing paints by the guys on the palette, the correctness of drawing with a brush, filling the entire area of the workpiece, and the posture of the pupils.
The guys attach the decorated sweaters to the magnetic board.
Discussion of works.
Summing up the lesson. Zaika says that the guys made bright and beautiful sweaters with interesting patterns, thanks them for their diligence and imagination.
During the performance of the pedagogical demonstration, the teacher is recommended to show on the board or easel the drawing of the techniques named by the children, and then show an example step by step drawing sweater pattern. You can consider examples of finished works on a given topic and invite the children to determine what methods these drawings were created with and in what sequence.
Decoration with paper stripes and pencil drawing.
 To decorate the sweater, paper strips are selected according to the size of the neck, cuffs, elastic bands
  Sticking paper strips
  Draw vertical lines with a pencil
  alternating pencil lines on a sweater
  We draw rings in the shoulder area, placing a semicircle
  Hatching elements
  We draw rings along the lower edge of the sweater and cuffs, fill in with shading
  We draw similar elements along the central transverse line of the product
Drawing patterns with a pencil and decorating with plasticine elements.
 Neckline, cuffs and elastic bands with pencil lines
  Drawing zigzag lines pink pencil
 Drawing zigzag lines green pencil
 Rolling plasticine elements
  Attaching plasticine balls by flattening
 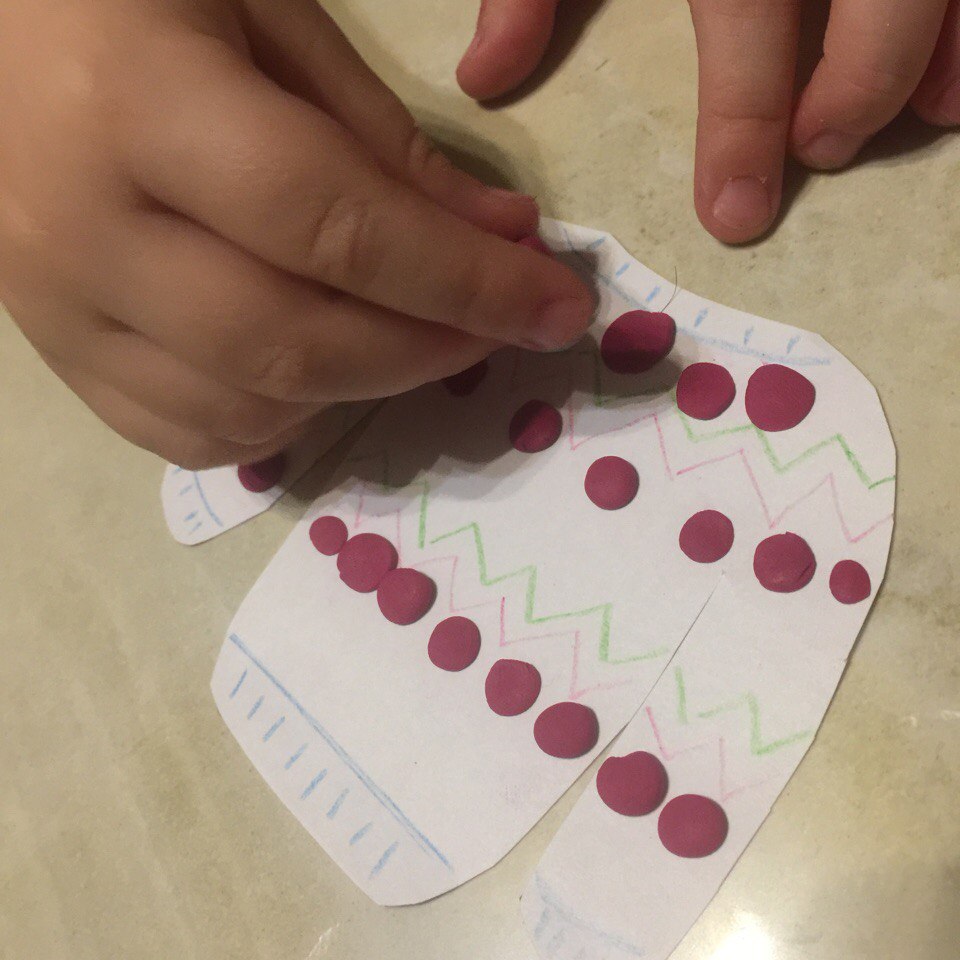 Sweater decorating process
  Finished work
Creating a pattern with a stroke.
 Drawing smears of the same color diagonally
  Applying strokes of a different color diagonally mirroring previously applied strokes
  Decoration with strokes of the neck, cuffs, elastic bands
Drawing a pattern with lines and dots.
 Line designation of the neckline and cuffs
  Cuff and neck trim
  Line drawing: alternating lines of different colors
  Dot Drawing: Rhythmic Repeat
Watercolor painting: toning, lines and rings.
 Separation horizontal line blanks
  Toning the top of the sweater
  Toning the bottom of the sweater and sleeves with a different color
  Drawing zigzag lines (interlacing)
  Sweater neck shaping
  Drawing rings (alternating in a checkerboard pattern)
Gouache drawing: circles and dots.
 Line designation of the neckline, cuffs, elastic bands
  Dot drawing: alternating dots of two colors
  Drawing circles in a checkerboard pattern
  Drawing circles of a different color
  Drawing dots along the bottom edge of the lighter and sleeves
  Drawing dots of the second color
  Drawing dots in the center of circles
 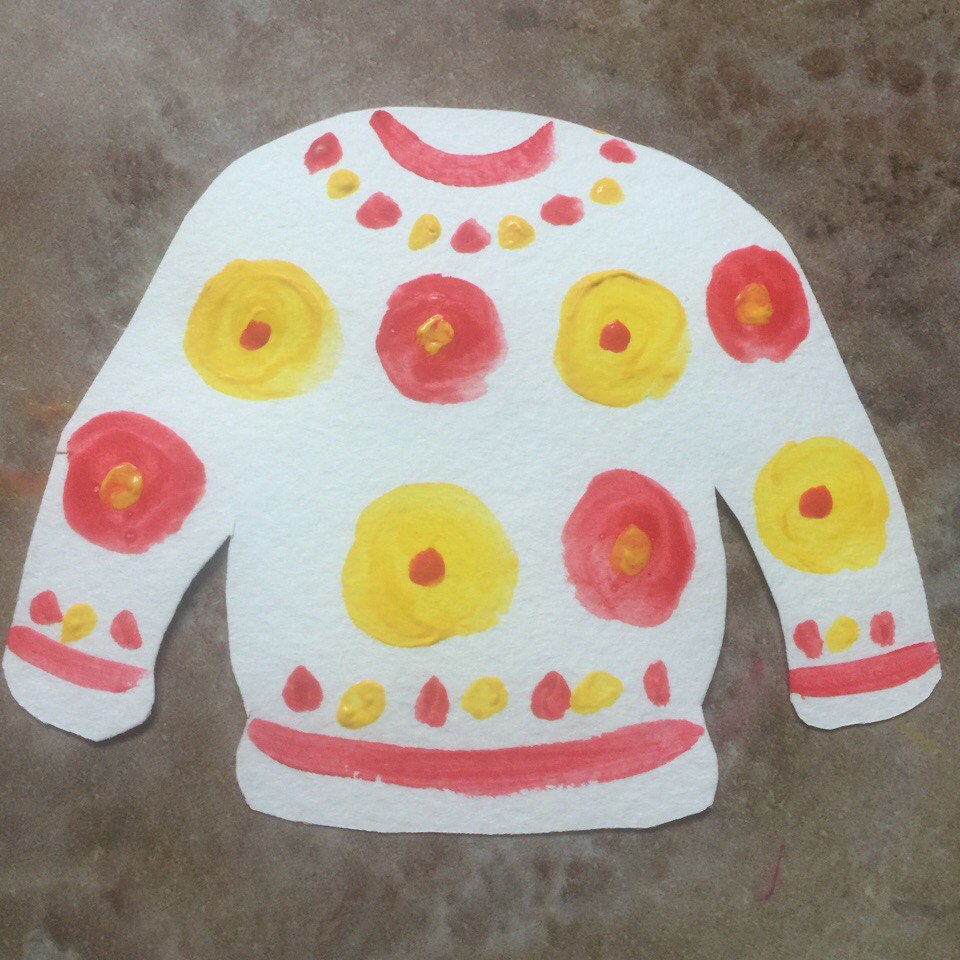 Finished work
"Winter patterns": gouache drawing of lines and dots on a color basis.
 Starting to draw Christmas trees at the bottom of the sweater: repeating diagonal lines
  Repetition of diagonal lines in a mirror position
  In the middle we denote the trunks of Christmas trees vertical lines
 Draw dots in a checkerboard pattern
  We make out the cuffs, neck and elastic band
  Finished work
Abstract of a lesson in visual activity (decorative drawing) in the middle group "Fairytale Bird"
Purpose of the lesson:
1. Teaching children to draw a fabulous bird in an unconventional way print - with a palm, place the image in the center of a sheet of paper.
2. Exercise children in drawing with a “poke” cotton swab.
3. Develop creative abilities: a sense of color, the ability to invent a decorative pattern.
4. Cultivate independence, confidence and desire to engage in creative activities. To give children the joy of the work done.
Material for the lesson: A-4 paper, watercolors for toning paper, gouache, brushes, cotton swabs.
Preliminary work: Examining illustrations, reading fairy tales, paper toning.
Lesson progress:
Organizational moment: the children stand in a circle.
- Show me your palms, stroke them, clap your hands, close your eyes with your palms, rub your cheeks with your palms. That's how many things your palms can do. You can also play with your hands. Let's turn our palms into birds.
Finger game:
Birds sit in nests
And they look out into the street.
Everyone wanted to fly.
The wind blew - they flew.
- The birds have flown away. And you would like them to stay with us. I will help you with this. Let's draw birds with you, but not simple, but fabulous. And our favorite hands will help us in this.
Children sit at tables.
- Look at my palm, it seems to me that it is very similar to a bird. And what do you think? Where is the bird's beak? Where is the neck? Show the body of the bird. And what a wonderful fluffy tail. (The teacher shows on his palm, the children on his).
- Only our bird is not bright at all. Let's color it. Look at your sheets of paper and choose a paint color for your bird. The color should be different from the color of your background so that the bird is not lost. (Children apply paint on their palms with a brush).
- Now plant your bird in the very center of the sheet. To do this, you must open your fingers wide and put your palm on a piece of paper. Pressed firmly, firmly and sharply lifted up. That's where the birds came in.
- Do you like your birds? And if you decorate them with patterns, they will become fabulous. Let our birds rest and dry, and we will play with you.
Speech with movement:
Girls and boys clap their hands.
patties, patties, patties, patties.
The porridge was boiled, stirred with a spoon.
Palms, palms, palms.
The crumbs were crumbled to the pied hen.
patties - patties, patties - palms.
They danced themselves, invited the legs.
They stomp, stomp their feet along the path.
We're building, we're building a house. House for nesting dolls.
Children circled, children, like nesting dolls.
We return to the tables.
- Your birds waited for us, they did not fly away. Do you know why? They want to be fabulous. Now you decorate your birds the way you want and turn them into fabulous ones. Remember, you can decorate not only with a brush, but also with a cotton swab - then the dots will turn out beautiful and even.
Children decorate their birds. Sounds of music "Sounds of nature. Songs of birds.
The teacher answers the questions that have arisen in the children, prompts, advises.
- So beautiful fabulous birds you got it. You are all just great! And now, let's put your birds in a fabulous clearing and admire them.
Synopsis of GCD in the middle group on decorative drawing "Mittens for a bunny"
Lyabusheva Lyudmila Vasilievna, educator MBDOU Kindergarten No. 1 of the city of Spassk, Penza regionMaterial Description: This abstract of GCD in drawing is aimed at developing children's creativity, to consolidate the previously studied methods of drawing with a brush and paints, as well as to form a culture of speech behavior (to educate children in kindness, responsiveness, sensitivity to the world around them, decisiveness in helping, the ability to use in speech polite words). This summary will be useful to both teachers and parents.
Synopsis of GCD in the middle group on decorative drawing "Mittens for a bunny"
Integration of educational areas:"Reading fiction", "Artistic creativity", "Communication", "Socialization", "Cognition".
Target: to teach children to independently determine the content of the picture and depict what was conceived.
Tasks:
Educational: Continue to teach children to use paints of different colors, to consolidate drawing techniques, to consolidate the skills of accurate work.
Educational: To develop aesthetic feelings, fantasy, a positive emotional response to a self-created image, children's creativity.
Educational: To cultivate initiative, independence, kindness.
preliminary work: Consideration of samples of "mittens" and discussion of techniques for working with paints, making silhouettes-mittens.
Materials and equipment: plot picture"Bunny and the Moon", samples of "mittens" for examining patterns and decorative elements, watercolor paints, brushes, jars of water, napkins, "mittens - blanks" for coloring.
Methodological techniques: game motivation, conversation - dialogue, reading a fairy tale by V.A. Sukhomlinsky "How the bunny warmed up under the moon", a conversation on what was read, finger gymnastics "Friendly family", independent work, analysis of work, encouragement. caregiver: Hello my guys! A new day has begun, which means that a lot of new and interesting things await us ahead. Come on, I will smile at you, you will smile at me and each other, and then the whole world will smile at all of us!
caregiver: Children, do you think the rays of the moon can warm us?
Children: No, only the sun can warm.
caregiver: And I know one hero for whom the rays of the moon were warm, warm. Do you want to know why? Then we sit back and listen to the fairy tale “How the Bunny Basked in the Moonlight” (V. A. Sukhomlinsky “The Book of Conscience”)
How the Bunny basked in the moon
It's cold in winter for Bunny, especially at night. He ran out to the edge. Frost is crackling, the snow is shining under the moon, a cold wind is blowing from the ravine. Bunny sat down under a bush, stretched out his paws to the moon and asks:
- Moon, dear, warm me with your rays, otherwise it will be a long time to wait for the Sun.
It was a pity for the Moon of the Bunny, she says:
- Go through the field, through the field, I'll light the way for you. Go straight to the big stack of straw.
Bunny went to a stack of straw, buried himself in the straw, looks out and smiles at the moon.
- Thank you, dear Moon, now your rays are warm, warm.
Conversation on questions
caregiver: Why, guys, was the bunny cold? How do you think?
Children: It was winter, and in winter there are severe frosts.
caregiver: What did the bunny ask the moon for?
Children: For the moon to warm him.
caregiver: Why does the bunny call the rays of the moon warm?
Children: Because the moon helped him.
caregiver: Are they really warm?
Children: No.
caregiver: From what then did the bunny become warm?
Children: From kindness, care.
caregiver: Thanks to what he was able to get to the haystack?
Children: Thanks to the light that was emitted from the moon?
caregiver: How did the bunny ask the moon for help? What words did he use for this?
Children: Moon, dear, warm me with your rays. Kind, gentle, polite.
caregiver: How can you call a bunny, what is it?
Children: Polite, kind, well-mannered.
caregiver: Let's help the bunny too. Let's make a gift "mittens" for him. But first, let's stretch our fingers.
Finger gymnastics "Friendly family"
This finger is a grandfather
This finger is a grandmother
This finger is a daddy
This finger is mommy
And the last one is me
Here is such a family!
(We massage each finger alternately on the left hand, then on the right).
Independent work of children.


Job Analysis.
caregiver: All the guys are great, they did it. Children, whose mittens did you like? Why?
Children: I liked the mittens of Marina, Kira, Uliana, because they are decorated neatly and beautifully.
promotion.
caregiver: Well done everyone! And I, children, liked your gifts to the bunny and you yourself! Do you know why? Because they helped a bunny in trouble. In life, you should always come to the rescue and do only good deeds.


