From time immemorial, people have tried to decorate their homes, painted animals and their way of life on the stone walls, and made various handicrafts. Modern people not far from their ancestors, and now we want to decorate our house, and certainly something special, not like everyone else. Our article will talk about one of the interior decoration ideas. It will be about how to create your own hands.
Pictures - decoration of any interior
How long have the paintings existed? As much as there is a person himself. Only their purpose was not always the same. Previously, many thousands of years ago, paintings were a kind of means of transmitting information to future generations. And only after many centuries people began to draw them for pleasure and beauty. Painting has become art.
It is pointless to argue with the fact that the picture is the decoration of any interior. Even the oldest wall will be transformed if you hang a picture on it, and the room will certainly become much more comfortable and nicer. Do you want to know how on their own change your home? Painting for the interior with your own hands - that's the answer! You do not need much time, effort and financial costs. If earlier picture considered a luxury item, now anyone can make it on their own. How? Read on and be sure to find out! All you need is a little diligence and minimal creativity.
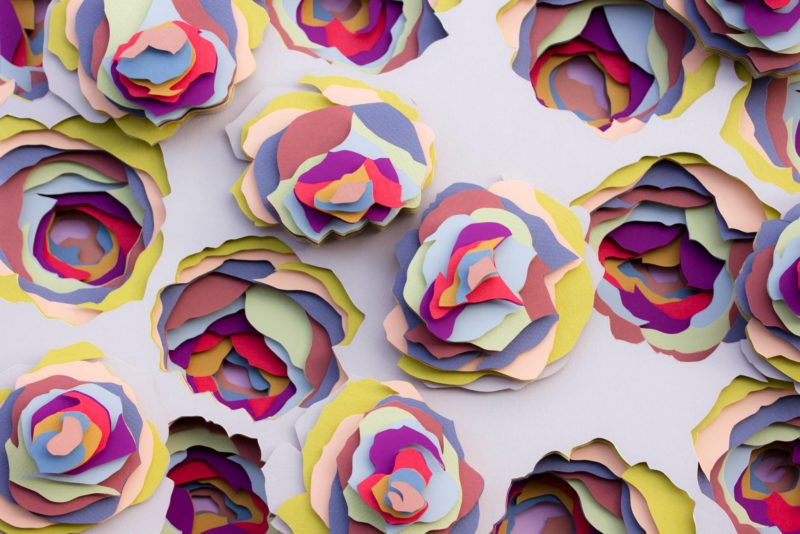
There are many ways to do it yourself. Most of them are related to the creation of three-dimensional colors. They are very easy to create using the embroidery method and a few bright satin ribbons. It turns out beautiful, bright and individual!
Such a picture can then be placed in an ordinary frame or come up with other ideas for using a three-dimensional pattern with flowers. You just need to apply a little imagination and creativity. For example, if the image is small, then it can even be placed in a photo frame, and then you will have an exotic desktop decor.
Necessary materials
What you need to purchase in order to learn how to create such voluminous

- Needle with a very wide, large eye.
- Chalk or pencil for sketching.
- Material as a canvas on which you will embroider flowers. It can be anything - thick cardboard, velvet paper pasted on the same cardboard. The main thing is that the base of the picture should not be too thick and hard, it should allow the needle with the tape to "pass" through itself. You can use the fabric and hoop, and then glue or stretch the fabric on another suitable base.
- Scissors.
Preparation: sketch
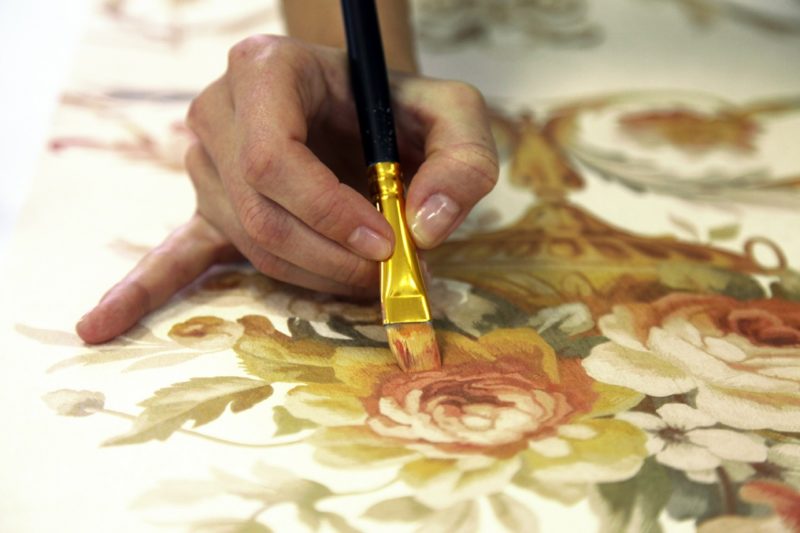
A painting for the interior, made with your own hands, can become not only a decoration for your own apartment or house, but also a wonderful gift. Where does the creation of the future masterpiece begin? That's right, from the sketch! First of all, you need to understand what nominal bouquet you want to see. In our master class, we will consider the manufacture of tulips. On the prepared canvas, barely noticeably draw the outlines of your bouquet with chalk or pencil. The most important point will be the location of the buds.

Bud embroidery
The sketch is ready. Let's start embroidering buds!


Stem and leaf embroidery
Agree, a picture for the interior, created with your own hands, would be incomplete without stems and leaves. It is them that we will now do, giving the picture a finished look!


Some more interesting ideas
A little higher it was said about how you can create three-dimensional paintings (flowers) with your own hands, namely from satin ribbons. You have learned all the secrets and made sure that there is absolutely nothing complicated about it. This example is just one of the few, it is the tip of the iceberg called "creativity"!
We bring to your attention a few more ideas for creating three-dimensional paintings.

- bottle caps
Why throw them away? After all, you can make a picture that is completely different from anything else! And you will be 100% sure that no one else has one like it.


DIY grain paintings - a new fashion trend
Grain paintings are gaining more and more popularity. It's eco-friendly, inexpensive and very interesting! Such a picture will perfectly decorate the interior in a rustic style. All you need is glue, a frame and grains of various varieties.
A great idea would be to create a picture of coffee beans. Making a composition is very easy, even a child can handle it. The grains are attached to the canvas with ordinary glue. Ordinary burlap will be an excellent material for the canvas. Besides, true connoisseurs of this drink will be delighted with the aroma of the created masterpiece! Art and aromatization of the room in one bottle? Easily!

Create, dear readers! Whether it is a painting made of material, satin ribbons, dried flowers or grains, the most important thing will always be that you made it with your own hands! You will always know that this masterpiece is available only in a single copy and your apartment is decorated with an exclusive little thing. Or maybe you come up with something completely new? Who knows! Surprise yourself and your friends, diversify your child's leisure time. Creating three-dimensional paintings is very interesting activity that can entertain the whole family!
Do you have an empty wall in your house with nothing to hang on? Scarlet cushions on the sofa look lonely and require another bright accent? Just take a canvas and draw a suitable picture!
We live in the era of the victorious abstract art when one wants to say about every second gallery work that even a child can draw it. So why not put aside your fears and forget about realistic art for a while to create your own little masterpiece? Drawing is fun, besides, it is simply impossible to draw an abstract picture badly or incorrectly! All you need is a canvas, paints, courage, a few hours of free time and perhaps a nice group of collaborators to create a unique work of art that is perfect for your interior. This is much more interesting than just buying a poster at IKEA! If you agree with us, we offer you a selection the best technicians and master classes to create your own painting.
gold and concrete
The most-most favorite color of everyone who undertakes to do stylish picture with their own hands - gold. You just need to add a little leaf foil or just paint to any, even plain, background. Gold looks good and not too defiant with an uneven gray concrete color.
Photo: Jennifer Flanniganart / etsy.com
sound waves
Horizontal jagged lines always resemble some kind of graphics or visualization of sound waves, in general, something important, and therefore it is interesting to look at them. To dilute the dull monochrome of the image, you can, as the author of this master class, add a little (or a lot!) Gold.

Geology
Have you noticed how beautiful cuts of stones are? This is a drawing with a history, a story about changes in climate, relief, and wildlife. You can create your own beautiful rock pattern: just take a vertical canvas and apply horizontal stripes of different widths and different colors on it. Invite the children to draw with you - let them come up with a story fictional world, in which such a beautiful cut could appear.

Photo: BrennaGiessen / etsy.com
Peas
Peas - magic pattern: you can draw it on everything, and it will turn out beautifully. You don't even have to have a brush handy - just make a stamp out of a wine cork or the bottom of a glass. If you take a thicker paint (as in this case), the pattern of the prints will resemble the pattern of corals!

colored peas
If you want something more complicated, then make a print with a colored ornament. In this master class, in order for the peas to be even, they are cut out with a special hole punch, and then glued onto the canvas.

Blot
One way to create an abstract drawing is to step back as much as possible and let the paint do the work for you. For example, pour a large blot and then tilt the canvas so that the paint runs picturesquely over it. Such a picture can be made together with the child, you do not even need a brush for this.

Photo: CelineZiangArt / etsy.com
Stencil
Checked: any abstract spots look cooler if their edges are very even. Such a contrast effect can be obtained by painting through a stencil, or by pre-reserving part of the canvas with masking tape, or by applying white borders with a stencil later, as in this master class.

Scribble
Make squiggles of any color on canvas of any color for inspiration famous works, or relying only on your own inspiration - there are no borders and laws, doodle art is a very democratic direction! You can, like blogger Michel, create many layers, achieving complex textures, or you can paint with pure color on white. The main thing is to relax your hand and not forget that this is pampering, and you can always paint over an unsuccessful option.

Color swatches
Paintings with careless horizontal lines look like they are a sample of colors from the table of a Pantone employee or a fashion makeup artist's palette. The secret to success here, as blogger Julia demonstrates, is to leave enough white space and apply the paint in one stroke. Colors can be anything.

ombre
Gradient, or ombre - very simple and very beautiful effect. You don't even need a master class to repeat it. Two paints - basic and white, brush or roller, five minutes of your time, and the picture is ready. A great solution if your bright apartment has a bright accessory that needs color support.

Vanguard
There is nothing easier than to make a print in avant-garde style. Draw straight lines with tape like in this tutorial and use bright paint straight from the bank. The only advice - do not be too lazy to make a few sketches in advance.

Stamps
Most budget pictures do not even require the purchase of brushes: just take the first object that comes to hand and use it as a stamp. You will be surprised what a stylish thing you can draw with an ordinary glass!

Impressionism
And the last idea of the painting for today is an impressionistic canvas painted in large strokes. Artist Ashley Sturgill shows how to paint bright picture with a golden accent.

Get inspired and experiment, and we will help you with this!
Probably, paintings are one of the oldest accessories for decorating your own home. The question of how to make paintings with your own hands can cause logical bewilderment - of course, draw, but what else? But let's say you can't draw. Or you know how - but are not yet ready to present your work to the public, even at home.
But even in this case you have full right call yourself an artist! After all, there are many ways to make a picture yourself - turn to arts and crafts, sculpt a masterpiece in graphics editor, cut into collages the annual subscription of your favorite magazine. Or indulge in spontaneous painting and throw paint at the canvas from a distance of several meters. Or maybe frame dried flowers or bags of sugar taken from a cafe?
There are more possibilities than you might think! We will please you - in the article we will talk about how to push your creative limits, and not about how to drive yourself deeper into them. Our goal is not to get an "A" in drawing, but to express our character through interior decoration.
- Look for ideas
- Accumulate impressions
- try new things
- Embroidery
- Application picture
- Silhouettes on canvas
- Patterned silhouettes
- Scenery
- Abstraction
- geometric patterns
"Where to begin?"
Are you planning to make a picture with your own hands? We will try to suggest you some simple and original options. Maybe you will realize some idea that you like the most.
"Search for Ideas"
- Are you ready to give the room a charismatic face? If yes, then start looking for sources of inspiration everywhere. Creativity is a constant search, observation and irrepressible curiosity. To make a breakthrough in interior design, you first need to make a breakthrough inside your head. Do not discard even the craziest ideas, because the original vision is what we need.
"To accumulate impressions"
- If you have already joined the ranks of supporters of the do-it-yourself philosophy, you will soon begin to notice how you scan the apartment with your eyes in search of unnecessary gizmos that can be turned into a work of art. Throwing out garbage will also turn into torture for you - a true hand-maker must fight to the last for every beautiful piece of paper. Jokes aside, but you will have to bring a separate box or basket for treasures. Who knows what feats she will inspire you to do sooner or later.
"Try new things"
- Even if you draw beautifully, no one has canceled the creative stupor. Besides, suddenly it's time to try yourself in a new genre? The interior design options that we have proposed belong specifically to the “try” category. That is, they will not take a lot of time and effort from you. If you understand that the topic resonates with you the most, you can always dive deeper into it. In the meantime, let's taste the life-giving nectar of the artist, a concentrate of inspiration and creative power!
"Fabric Paintings"
If you are into creating and sewing is your hobby, forget about throwing away the leftover fabric or putting it on rags! Textile paintings for interior decoration are the latest fashion now. And apparently they are not going to lose their status.
"Embroidery"
- Without much difficulty, such an element of decor will be created by lovers of minimalist jewelry and catchy accessories. The former can simply stretch the fabric on a wooden stretcher, the latter can find openwork frames in vintage style.


- Some do not know how to approach embroidery, complex multi-color schemes are intimidating, and therefore, they are put off for later. But to do pleasant masterpieces for interior decoration, no need to bully yourself high bar and embroider the scene of the Battle of Borodino. See how delicate flower stalks can look, embroidered on rough canvas and placed on the wall right in the hoop!

"Picture-application"
- Look, any embroidery is very easy to combine with applique, and work in a more flexible genre that allows you to create images that will decorate not only country-style interiors. DIY interior paintings, consisting of several parts, always look interesting - try your hand at this, what if it works out?

"Silhouettes on Canvas"
- The following photo confirms what unexpected discoveries a simple silhouette work can make! We use simple form- so we complicate the textures, common sense tells us. To repeat this picture at home, you will need:
In order to imitate the texture of wood, cover the canvas with an even layer of dark brown paint, and then gradually add strokes of ocher and red to it. Do not be zealous with the density of the coating, it is the "striping" of the picture that will give it a resemblance to the original. The image of a branch and birds can be found on the Internet, print and cut out a stencil from paper, according to which a textile version is cut out. Wait for the paint to dry completely (several hours) and carefully stick the fabric onto the canvas.

"Patterned Silhouettes"
- The possibilities of such a silhouette application are endless. You can create paintings for the interior with your own hands on any topic: elegant for the living room, delicious fruits for kitchen, cute animals or for kids room. For example, look at the photo below - making this wonderful giraffe is not difficult. The main thing is to find a suitable bright fabric.

"Taking on the colors"
Want to draw? Ever dreamed of having your own wall art at home? Do not be shy and do not put off inspiration for later. Get paints with brushes, and let's go create ...
"Scenery"
- If you are not one of the timid and are prone to expressive gestures, or if you understand that it won’t get any worse, splash out your emotions on the wall in literally words. Yes, very brave, but you have a chance to get not only a unique experience, but also an amazing wall. Brighter colors - and go!

"Abstraction"
- Each of us has a favorite color that we can look at endlessly. Or the interior greedily asks to complement it with a shade of sea wave or piercing purple. If you carefully look at the photos of designer interiors, you might notice that it is abstract canvases that often play the role of color support. Shall we do the same? We take:
We mentally break the host into several parts and begin to make a color stretch from dark to light. Don't try to get perfect transitions! You can always do right places darker or lighter by adding paint or water. Acrylic is easy to work with. But it requires speed, as it dries quickly. In a word, to make a picture for the interior with your own hands, as in the next photo, it will take you no more than an hour. All that remains is to choose a frame for the newly-made masterpiece, or leave it in a slightly unfinished form.

"Geometric Patterns"
- Remember, in the article about we talked about a bedside table, an unusual pattern on which was obtained thanks to masking tape? This picture was created in the same way. Places that should remain white are sketched in with a pencil, and then covered with tape. This technique provides perfectly smooth edges. To get paint streaks in some places, blot the still wet work with a cloth or foam sponge.

"Making a Collage"
Collage is a godsend for those who want to create something absolutely fashionable, bright and eye-catching. Moreover, the creative process itself may not be monotonous, but very impulsive. You can think over the composition and paste the collage on a piece of drawing paper. Or you can buy a large cork board and start collecting your wish card. Such a pattern can always be quickly replayed, so beginners can stop at the second option without fear.

"Photo printing"
If you are thinking of making a picture with your own hands in a more difficult genre- It is better to turn to the services of printing workshops. Only in this way you can get high-quality prints on any surface. For example, on book pages as in the illustration below. At first glance, it seems that the drawing is applied with black ink, but in reality, it is good photo. This is especially true if you are interested in a genre of miniature that you cannot depict yourself.

"Paintings from natural materials"
Of course, natural materials, minimal processing, and all kinds of handicrafts from them bring a very special comfort to our home. Making paintings out of them with your own hands is not only fast, but also very pleasant. In addition, in this way you can bring your interior closer to an eco-friendly style.
They brought shells, pebbles and stars from the sea - and don't know what to do with them? Do not rush to pour into a vase, better stock up:
- a set of deep photo frames - determine the depth depending on the size of the shells,
- colored blue or blue cardboard,
- scissors,
- superglue.
The next task is clear without words. As you may have guessed, we cut out squares from cardboard according to the size of the frame. Then we glue the shells on them and insert them inside. Voila - do-it-yourself sea painting is born! If the shades of blue in this room do not suit anything, then you can replace them with any other color.

"Frame without a picture"
Well, if nothing comes to your mind at all - decorate the interior with a picture that does not exist! Yes, yes, oddly enough, frames without pictures have come into fashion again. Decorate it prettier - and go! You can find dozens of frames of different sizes and shapes, and then cover them with paint of the same color, or create one massive and noticeable. To design a frame like in the next photo, you will have to learn how to create - so read our article on this insanely relevant topic.

A beautiful, refined interior of an apartment is not only beautiful fashionable furniture, lamps and expensive finishing materials. Since ancient times, paintings have been one of the ways to decorate your own home. Paintings painted by professional artists are modern, stylish, but do-it-yourself paintings for the interior are exactly the highlight that will give your design a soul and make it more lively and interesting. How to make a picture with your own hands on the wall with the least amount of time, effort, money and without the artist's special talent, we will tell in this article.
Where to begin?
If you decide to decorate the interior of your house with your own painting, then start by looking for a source of inspiration. Any ideas, even the most artsy, abstract or completely banal, will be useful to you in the creative process. Prepare a separate box or container in which you will put things to create a picture.
Dig into your hidden creative reserves and try your hand at different genres. For example, if sewing has always been your favorite pastime, then try making a picture out of fabric. Such products have always been at the height of fashion. If you like to embroider, then make a picture for the interior using embroidery. This will be the most in a simple way to make a picture on the wall. Start with something simple, and later on you can create a small piece of art.
Easy wall decor idea
 Making a picture of the wallpaper with your own hands is the simplest and most affordable solution for everyone, without exception, because after pasting the walls in your apartment with wallpaper, there are still unrealized surpluses of finishing material. Using fantasy and cutting wallpaper, you can glue the image of a fairy-tale castle, a hut on chicken legs, a sailboat on the wall of a children's room. The more types of wallpaper you use, the more interesting and colorful the picture will be.
You can also make an abstract picture of the wallpaper. To do this, you will need a sheet of hard cardboard of a suitable format and trimming wallpaper with the most spectacular patterns and textures. Insert the resulting masterpiece into a frame and hang it on the wall.
Important! The color scheme of the picture should be in harmony not only with the color of the wall, but also with other elements of the interior. Usually, an abstract wallpaper picture is hung in the center of a plain wall, as it can get lost against a colorful background.
Alternatively, you can frame pieces of wallpaper or use small candy boxes with borders for frames. original decoration suitable for the kitchen.
- To fix the cut out elements on the wall, use PVA glue or the like.
- If you plan to use several paintings from wallpaper in one room, then make them based on the same type of material so that similar elements are present in the decor.
- Place the manufactured product in a conspicuous place - opposite the entrance to the room. Then it will immediately catch the eye and become the main element of the interior.
How to create your own wallpaper?
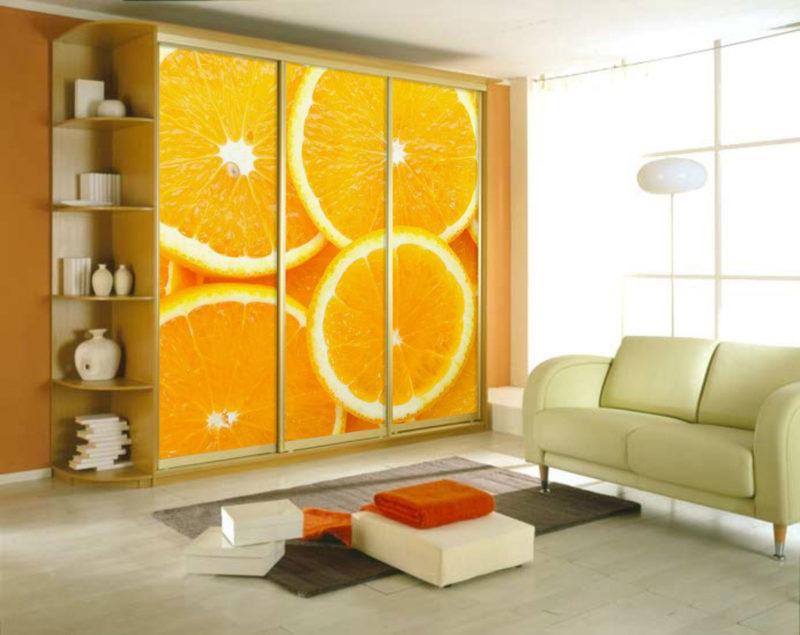
Bright and eye-catching photo wallpapers are still at the peak of popularity. If you do not like any of the images offered for sale, then you can order the printing of the selected photo, drawings, and paste over one wall with the material made or decorate the interior of the room around the entire perimeter.
To make a picture on the wall with your own hands using photo wallpaper, follow these steps.
Preparatory stage
Decide on the image that you want to see on the wall and prepare the necessary for creative process materials.
To make a masterpiece you will need:
- A printer.
- Colored ink for printing drawings.
- Photo wallpaper paper (thick).
- High-quality glue with which you firmly stick the drawings to the wall.
Important! If you decide to make photo wallpapers from photographs, then they must have a high resolution. To adjust the resolution, use the programs BlowUP, Genuine fractals, Magnifier, etc. Poor quality paintings will be blurry and look unaesthetic, which means that the idea of making a picture on the wall with your own hands will not be appreciated.
Print the wallpaper on a regular color printer using A4 paper. If you want to print pictures large sizes, then contact specialized companies that provide printing services on large-format sheets.
Painting creation
You can use the standard way to print pictures and decorate the wall in the room with them, or you can use the following options:
- Create photo wallpaper from improvised means. Perhaps you have original pictures, and a large number of photos you want to put on the wall. Using pictures and photographs, create a non-standard composition by sticking them on a wall or a separate part of it.
- If the image for the photo wallpaper has a high resolution and the main shades of the wallpaper are combined with the style of colors rooms, then print a large format photo wallpaper and stick it on the entire wall. Such a composition can be decorated with additional elements: lamps, neon lighting of the appropriate shade or framed with decorative strips, moldings.
- Above the bed or sofa, you can stick an image from the photo wallpaper and choose a suitable frame. Get the real picture.
- To make a three-dimensional picture, photo wallpaper can be glued to a wooden or other base.
- To create a modular picture from photo wallpaper, visually divide the overall picture into several parts. This painting would look great indoors. modern style or high-tech.
Important! For modular paintings, use landscapes or still lifes as images. Do not use portraits, as dividing a character into several parts is unacceptable.
- With the help of photo wallpaper, you can make a poster on the wall. The brighter and richer the image, the more interesting the picture will look.
- Before you start printing images, decide what sizes of canvases are suitable for the interior of the wall. This is especially important if you plan to hang a picture on a limited surface.
- If you have a free wall in the room, then a huge modular picture, consisting of a huge number of constituent parts. To make the composition look original, use canvases of different sizes, as well as the principle of asymmetry.
- To make a picture on the wall with your own hands, take wood, thick cardboard, foam, plastic and other sheet panels as the basis for modular images. various materials. Apply images to the base itself with glue. After complete drying, hang the composition on the wall.
- To make the original photo wallpaper serve you as long as possible, use a special protective film or transparent varnish. This will protect the surface of the drawing from dust and damage.
We decorate the wall with finishing materials
 A wall lined with wild stone, mosaic or decorative brick looks very impressive. You can complement the interior of the room with a false fireplace made of gypsum.
An interesting way to decorate a wall is to use decorative plaster. This design has many advantages:
- Helps to hide small wall defects.
- Lasts a long time.
- Simply applied.
- As a result, you can get a variety of relief.
With the help of decorative plaster on the wall, you can create geometric shapes, various patterns. An interesting effect is obtained as a result of the use of plaster with a pearly sheen, as well as when using multi-colored plaster. Here, full scope for creativity opens up, thanks to which you can show your talent as an artist and make a very unusual picture on the wall with your own hands.
Using interior paint
One of beautiful ways wall decoration is painting. Even in ancient times, such decor was practiced in palaces and temples, and real masters decorated the walls with beautiful frescoes. The wall must be prepared for painting: puttied, primed. To create a contrasting wall, use water-based paints, and for artistic painting- acrylic.
We offer you some ideas:
- If a plain surface does not inspire you, then with the help of masking tape make it striped or plaid.
- By painting part of the wall with special multi-colored slate paints, you will turn it into a large notepad for writing.
- With the help of artistic painting, you can decorate the interior of a nursery, living room, bedroom. If artistic skills are completely absent, then in order to make a picture on the wall with your own hands, use stencils or vinyl stickers. Stickers, if necessary, are easily peeled off the wall, and their range is diverse.
- With the help of paints, you can make a panel. You will only need: a basis for drawing, paint and adhesive tape to distinguish between sectors on the basis. Using the tools, divide the picture into sectors and paint them with different colors.
Wall decoration with photographs, paintings and framed mirrors
Paintings and photographs fit into any style of interior - you just need to choose the right plot and baguette.
Important! There should not be too many pictures and photos, since each of them is a bright accent. Photos can be constantly changed, for example, after joyful event in the family or after another trip. You can create as black and white compositions, as well as colored ones. It looks original, a large tree painted on the wall, and family photos on the branches. Apartment with family photos the interior has a special charm and looks very cozy and hospitable.
Use the following tips when designing:
- Do not hang pictures of the same size exactly in a row, as this looks ugly and rather boring. It is better to place a large photo in the center, and create a composition of small shots along the edges.
- When choosing a photo for the interior, consider the atmosphere of the room in which they will be located, for example, they will fit into the bedroom romantic pictures, in the living room - common family, and in the nursery - cheerful, cheerful pictures.
- If you want to decorate the wall with a mirror, then select interesting frame for him, but remember that a large mirror can be placed in the living room, bedroom or hallway, and in the nursery it is desirable to have a small mirror or no mirror at all.
Wall decoration with fabric and embroidery paintings
 We will offer you some interior design ideas if you are fond of embroidery and textile crafts:
- A composition of several paintings with different fabrics, but with a common shade of color in each of them, will look good. You can make such paintings on the wall with your own hands both from one piece of fabric, and from separate shreds.
- From fabric with a large pattern, you can make several paintings and place them in the form of one composition. In this case, the paintings must be made the same size and hung at a distance from each other. Such remoteness will give the composition a special charm.
- You can make a do-it-yourself picture on the wall of fabric, which repeats the element of the interior with its pattern.
- Pictures from scarves look interesting. Such decor would be appropriate in a children's room or if you decide to give preference to country styles, Provence.
- Fabric paintings look originally stretched on hard cardboard. There is another convenience for you personally in this - over time, the composition will not lose its shape and will look as attractive as when it was created.
Master class on creating paintings on the walls
If you can’t exactly determine for yourself what exactly you would like to do or it’s hard to combine materials, we offer a few ideas with step by step instructions. Surely this will help you make an original painting on the wall with your own hands.
Idea 1 - Abstract painting from blue turquoise tulle
To make a picture, you will need: canvas, scissors, glue and trimmings of colored tulle (chiffon or nylon ribbon).
Manufacturing scheme:
- Choose a fabric for a painting in related hues, such as turquoise or blue.
- Cut the tulle into strips of different widths.
- Apply the prepared strips to the canvas in random order, and then glue.
- Blot the remaining glue with a piece of cloth.
- Hide the ends of the strips reverse side canvas.
- Fasten them.
Idea 2 - Painting from natural material and gold paint
This do-it-yourself wall art is unique in that it does not require complex materials to create.
For creativity you will need:
- thick cardboard or a piece of plywood;
- cut of any plain fabric;
- a tin of paint;
- brush;
- glue stick;
- a branch of rowan or other tree;
- gold paint in an aerosol.
 Registration instructions:
- Cover thick cardboard with fabric.
- Paint it, for example, blue with a brush or sponge.
- While the paint dries, put the twig under a press for a couple of days so that it dries.
- Glue the prepared branch to the fabric (there should be little glue).
- Aerosol gold paint apply to the entire surface of the canvas.
- Once the paint is dry, remove the twig.
Important! Using this method, you can make far from one picture on the wall with your own hands. Use paint of different colors and branches various trees to make a whole plot composition from several elements.
Idea 3 - Fabric butterflies
Fabric butterflies will be a wonderful decoration for walls with drapery, other soft finishes, as well as walls with monotonous liquid wallpaper. For the manufacture of butterflies, both plain and colorful fabric are suitable. It is better to fix soft butterflies with PVA glue.
Important! It is better to make butterflies of different sizes, colors and configurations. Then the interior will definitely not look boring. And if you frame them in one or more places in a frame, the composition will look like a full-fledged painting on the wall, made by yourself.
Paintings for the interior from crafts
On the wall you can attach various crafts from buttons, coffee beans, old newspapers. Let's take a look at some easy-to-follow ideas:
- Old newspapers look original in frames. They can decorate one wall completely or, cutting it into small strips, sticking it on a sheet of paper, cut out any figure you like and decorate the wall with it. This solution would be especially appropriate if you are decorating a living room in a retro style.
- You can use buttons to decorate the walls in your home. Take a fabric or a piece of wallpaper as a basis. Glue buttons of various colors and sizes. For the base, pick up a frame, and hang the made picture from buttons on the wall. Of such small parts you can make a certain pattern or even lay out a whole thematic picture with multiple characters.
- The kitchen can be decorated with a mosaic or a picture made from coffee beans. For the base, you can take a fabric or a piece of wallpaper, or you can immediately glue the grains on the wall, in a previously prepared glued frame.
- You can decorate the wall with a panel in the form of scales. For manufacturing, you will need paper circles of the same size, spray paint, glue or a stapler, and for the base - chipboard or any other base. Cover the chipboard with circles and secure them with glue or a stapler. Then - using spray paint, paint all the circles in a golden color.
It has become popular to decorate the interior with paintings made by one's own hands. Placing them on the walls in the apartment will give comfort, individuality and breathe a piece of your soul into the room.
Where to start drawing
First, you should decide what you want to see as a result. Do not imitate other people's ideas, it is better to find your own. Think about what is missing in your home, feel the mood of the room in which it will hang. Any, at first glance, not even real fantasies, take place. Abstract images will add irresistibility to the interior, and posters in black and white will perfectly fit into modern design.
Having determined the style of work, you can begin to create a masterpiece.

Fabric making
Before drawing a picture, it is necessary to prepare the canvas. To do this, you will need cardboard and directly the fabric on which the image will be. A square or rectangle is cut out of cardboard, the size of the intended work. A fabric with 5 cm allowances is cut out from this blank. Then, the fabric is glued to the cardboard, while it should be well stretched. The corners are cut and carefully glued so that the fabric does not spread.
You can use a simpler version of the base - cardboard painted using a roller with white acrylic paint. It must dry well before applying the pattern on it. This will be the background of the painting.

drawing
Before applying the drawing to the canvas, you should make a sketch on plain paper. It is cut out, applied to the canvas and outlined with a simple pencil. The outline of the drawing must be circled with black paint.
Now you can begin to design the intended picture. Methods can be different:
- paint - the most common, the picture is painted multi-colored paints;
- cereals, coffee, cloth - the elements are located in the picture and fixed with glue.
Paint selection
Any paint can be used: acrylic, watercolor, oil. The main thing is to correctly combine the color shades of paints, then the picture will look impressive.

stencils
A stencil is the ideal tool for creating an image with paint or spray paint. You can also apply a drawing using a stencil using the graffiti technique, which is at the peak of popularity today. The best foundation for this picture there will be cardboard or plywood, which is painted in a contrasting color. Such ornaments look original on a gold or silver background.
The use of herbarium elements instead of a stencil or openwork napkins looks spectacular.

Photo printing
Modern and stylish interior can be created if you use the paintings ordered in the printing workshop. Such workshops produce high-quality prints on any surface.
Family photos in covers or frames fit perfectly into any interior, they can be color or black and white, placed in chaotic order or in the same plane. It is possible to arrange photos as modular elements, which creates the impression of a single image.
Textile
Patchwork style masterpieces are easy to obtain using scraps of fabric, braid, ribbon. Such paintings are made on the principle of application. The basis is textiles, dense in quality and not catchy ornament (polka dots, stripes). The elements of the picture, on the contrary, are cut out of bright fabric. Using different colors of shreds, you can get an original picture. And if it is placed under glass, it will look stylish and spectacular.
The combination of fabrics of different textures in one picture looks great. And from the material that holds the shape (felt, velveteen, flannel), you can cut out the elements of the picture: a house, an animal, fruits.
These products are ideal for the kitchen or children's room. And for the hall, a silk picture will be a decoration.

Modular pictures
Modular - these are several paintings with a similar plot or one drawing divided into separate elements, which can be of different sizes. Currently, they are popular, as they fit perfectly into the interior of any room. You can make them yourself and place them at your discretion.
You should start by choosing a picture: a landscape, an abstract image or a photo. Blanks can be printed on paper or canvas in a photo salon, and then cut into separate parts. The paper version is glued to plywood or chipboard, and the fabric version is fixed on the back of the frame using a stapler. On a fabric basis, it is good to work with the batik technique.

If you create a drawing yourself, then it is better to do it immediately on separate elements. To make such a picture you will need:
- colored acrylic paint or waterproof marker - when drawing an image on paper;
- hacksaw;
- ruler;
- simple pencil;
- foam sponge;
- sandpaper;
- brushes;
- expanded polystyrene sheet (1 cm thick).
You should start work by dividing the expanded polystyrene sheet into the intended number of parts. To do this, you need to measure with a ruler and cut it with a hacksaw into modules of the desired size. Then, sand the edges with sandpaper.
Now, all parts are folded into a single canvas and you can begin the process of applying the image itself. First, the background of the picture is made, the sponge is wetted in the paint of the intended shade. When the paint dries, you can proceed to the drawing itself using brushes with paint, a marker, an application.

Creating a three-dimensional picture for the living room
Look spectacular in the living room three-dimensional paintings, they can be made for any design of the room. Options are possible: from leather, paper, and even from coffee and pasta. For the manufacture of such paintings, the technique is perfect:
- decoupage - decorating objects;
- quilling - creating a pattern from twisted paper.
A picture made of textiles or foam rubber will look creative in the living room; it is easy to make an original multi-layered image from this material. The frame for the picture should be taken simple and decorated according to the interior of the hall.

The most simple way is where plain paper is taken as the basis, on which elements (butterflies, animals, flowers) made of various materials are glued.
If the hall is large, then a plaster image - a bas-relief - will fit perfectly. It is done immediately on the wall and goes well with the overall interior. However, it is rather difficult to draw such a picture. Skill in drawing and working with plaster is required. general recommendation there is no bas-relief for making, some craftsmen create it immediately on the wall, others separately make elements of plaster, which are then inscribed in general image. In the absence of experience, it is better to use a stencil.

Master class: Paintings for the interior
An unusual and modern solution is to decorate the interior with a 3d painting. They are fun to make and look spectacular. Eat different ways make similar products.
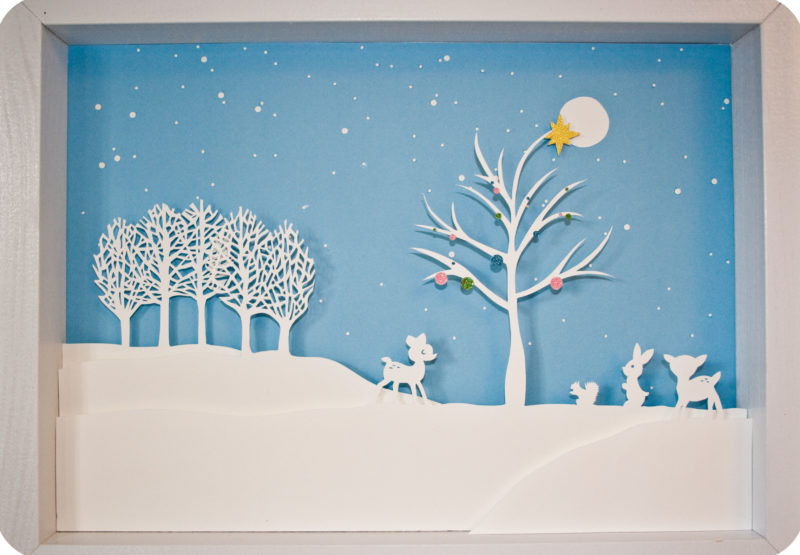
3d paper paintings
One of the easiest ways is paper application. For work you need:
- knife, scissors;
- pencils;
- not thick cardboard or paper white color;
- PVA glue;
- a frame with large sides, a candy box is suitable.
Step-by-step actions, using the example of an image - butterflies:
- A rectangle is cut out of paper, the size of a frame.
- A butterfly is drawn or printed on a printer, and cut out.
- The resulting butterfly layout is placed on prepared white paper and outlined in pencil.
- The most difficult thing is to cut the wings of a butterfly without affecting the body.
- The wings are bent to the top and to the middle, thereby giving volume.
- The blank with a butterfly is glued onto colored cardboard, which will be visible through the bent wings of the butterfly.
- At the end - the picture is placed in a frame and fixed with glue, or with a stapler.
In this way, you can add volume to any drawing.

3d leather paintings
To create a 3d picture, you don’t need expensive leather, pieces from old boots, bags, gloves, raincoats will do, but it is important that it be natural. To get the desired color, you can use acrylic paint.
The technology of creating paintings from leather is similar to the technology from paper. Leather is a material that is easily influenced and you can create whole bouquets of ornaments from it. Improvised tools are the same as when working with paper. Operating principle:
- a sketch is made on paper;
- transferred to the skin and cut out;
- in order for the leather elements to become rounded and voluminous, they must be held over a candle;
- the basis of the picture is made of fabric;
- on it there are elements of a pattern made of leather and are fixed with glue.
As additional decoration you can use buttons, dried plants, beads.

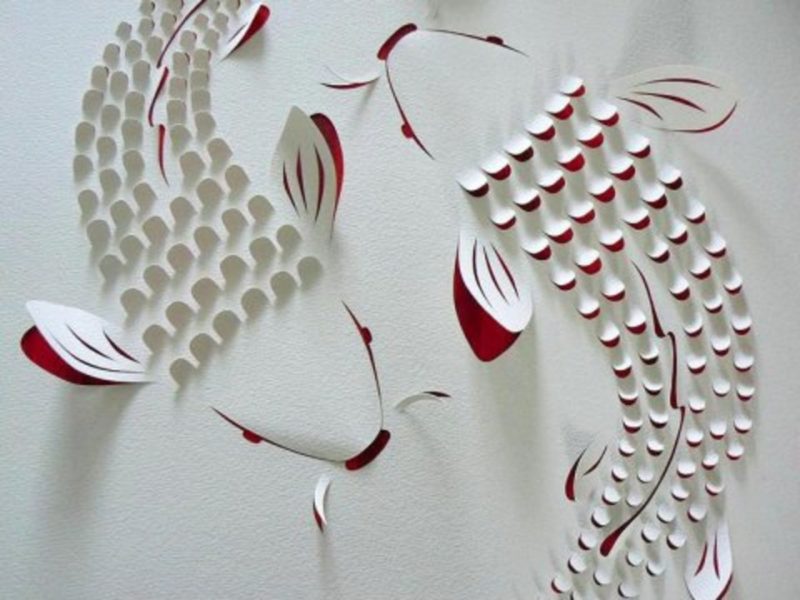
Multilayer 3d paper painting
Multi-layered 3d paper paintings look beautiful, it is not difficult to make them. You should prepare:
- deep frame;
- cardboard box;
- album sheets - for copies;
- Printer;
- glue;
- acrylic paint;
- scissors,
- acrylic lacquer;
- laminate underlay.
After choosing a picture, let's get to work. It is good if the picture is made up of several elements that can be cut out. Make at least 10 copies on landscape sheets. If an inkjet printer is used, then varnish must be applied to the pictures, otherwise the image will flow, when using a laser printer, you can do without varnish.
The next stage - the base is cut out of cardboard, the size corresponding to the frame, one drawing is glued to it. The remaining images are cut out, but in different ways. Several copies (let's say a flower) are cut out completely: flower, leaves, stem. Others are just a flower and leaves, and only a flower.
Now the base is cut out for the parts from the laminate, and the elements are glued to it. Then, already these blanks are glued on common ground. The sides of the substrates should be painted with the color of the image so that they do not stand out.
The final stage is the coating of the painting with several layers of varnish.
DIY paintings for the kitchen from improvised materials
In the kitchen, homemade paintings look like nowhere else. They give even more atmosphere of warmth and comfort. There are different options for their manufacture, and any items that can be found at home are suitable here: buttons, seeds, cereals, coffee.

Paintings from cereals and seeds
This type of interior decoration is increasingly popular, it is environmentally friendly and inexpensive. These pictures look especially good in a rustic-style kitchen. Making a picture of cereals is not difficult. You will need several varieties of cereals, glue, cardboard and thick material.
First prepare the base. For this, a shape is cut out of cardboard future picture, and there is already fabric along it, with an allowance of a few centimeters for bending. The fabric is glued to the cardboard.
The intended drawing is applied to the resulting canvas. Now you need to decompose the grain or cereal, if necessary, it can be painted in the desired color. After drawing up the drawing, you should glue all the elements to the canvas. This can be done with ordinary glue, but it is more convenient with a silicone gun.

Cutlery crafts for the kitchen
Spoons and forks made of enameled metal are sewn onto the prepared base. Such a still life will perfectly fit into the interior of any kitchen.
If you take plastic forks and spoons, you can create a more original picture. Plastic objects are easily glued to any surface and are well painted.
Decoration with cupronickel appliances will fit perfectly into a French-style kitchen.
A canvas with pasted porcelain dishes will look aristocratic.
You can arrange objects arbitrarily or following a certain idea.

Pictures from buttons and plates
Buttons can be used not only for their intended purpose, but also to create original paintings. They can be glued or sewn on. It is easy to make different patterns, animal figures, flowers from buttons. And you can use them as a background for the image, they are sewn onto the fabric and all kinds of plates and saucers are hung on top. If necessary, paint with acrylic paint.

Paintings for the nursery with their own hands
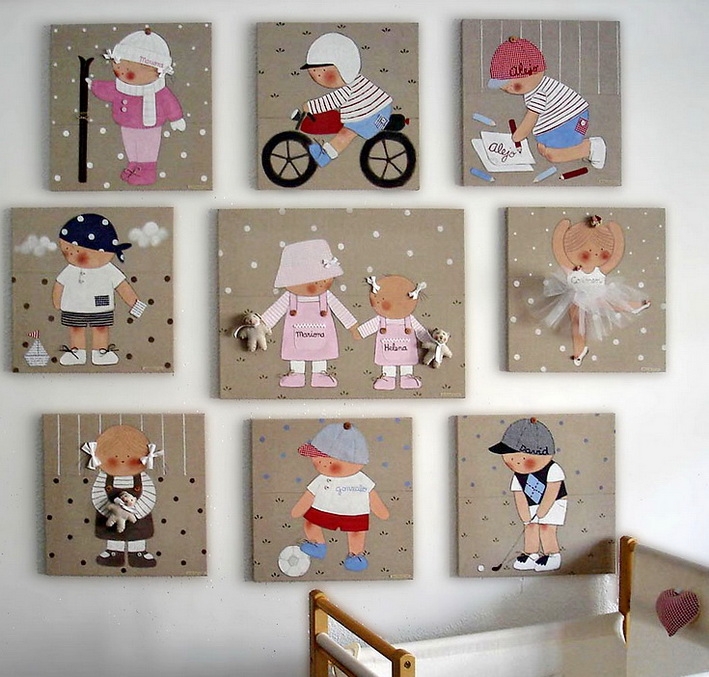
Works created by one's own hands will wonderfully decorate the children's room and it is not necessary to make them very complicated. When choosing a version of the picture, one should take into account the design of the room, its color, gender and age of the child, and his hobbies. Everything will do: a hand-drawn picture, appliqué, panel, photo, maybe big picture or modular option, the main thing is that it fits into the overall interior. Children's work decorated with a frame will look original.
An excellent solution is a fabric version based on foam. To do this, you will need: a piece of foam, shreds, a pencil, glue, carbon paper, a sharp object to push through the pattern.
The foam of the desired size is cut out, with the help of a carbon paper the drawing is transferred to it. With a sharp tool, the picture is pressed through. The part on which the fabric will be is smeared with glue, and matter is applied to it. It is pressed into the previously pressed contour, the excess fabric is cut off with scissors, and the threads of the patch are hidden inside with the help of a ripper. Using this technique, it is easy to create different fabulous paintings.
DIY paintings - photo
There are many ways to create paintings, you can use any materials and objects for this. It all depends on your imagination and creativity. The photo shows possible ideas.


